Blueberry Streusel Coffee Cake

Blueberry Streusel Coffee Cake.

What is a girl to do when a bestie friend comes home after a long time away?!

Well…. run over and visit and hug as soon as possible!  Right?!

But you can’t go empty handed!

So – what to bake to take?  I needed something quick, but yummy, that my sweet friend Janet and her Mom and Dad would enjoy…

I had some amazing fresh blueberries in the fridge I had recently bought at a local farm market, so I decided to make a blueberry cake.

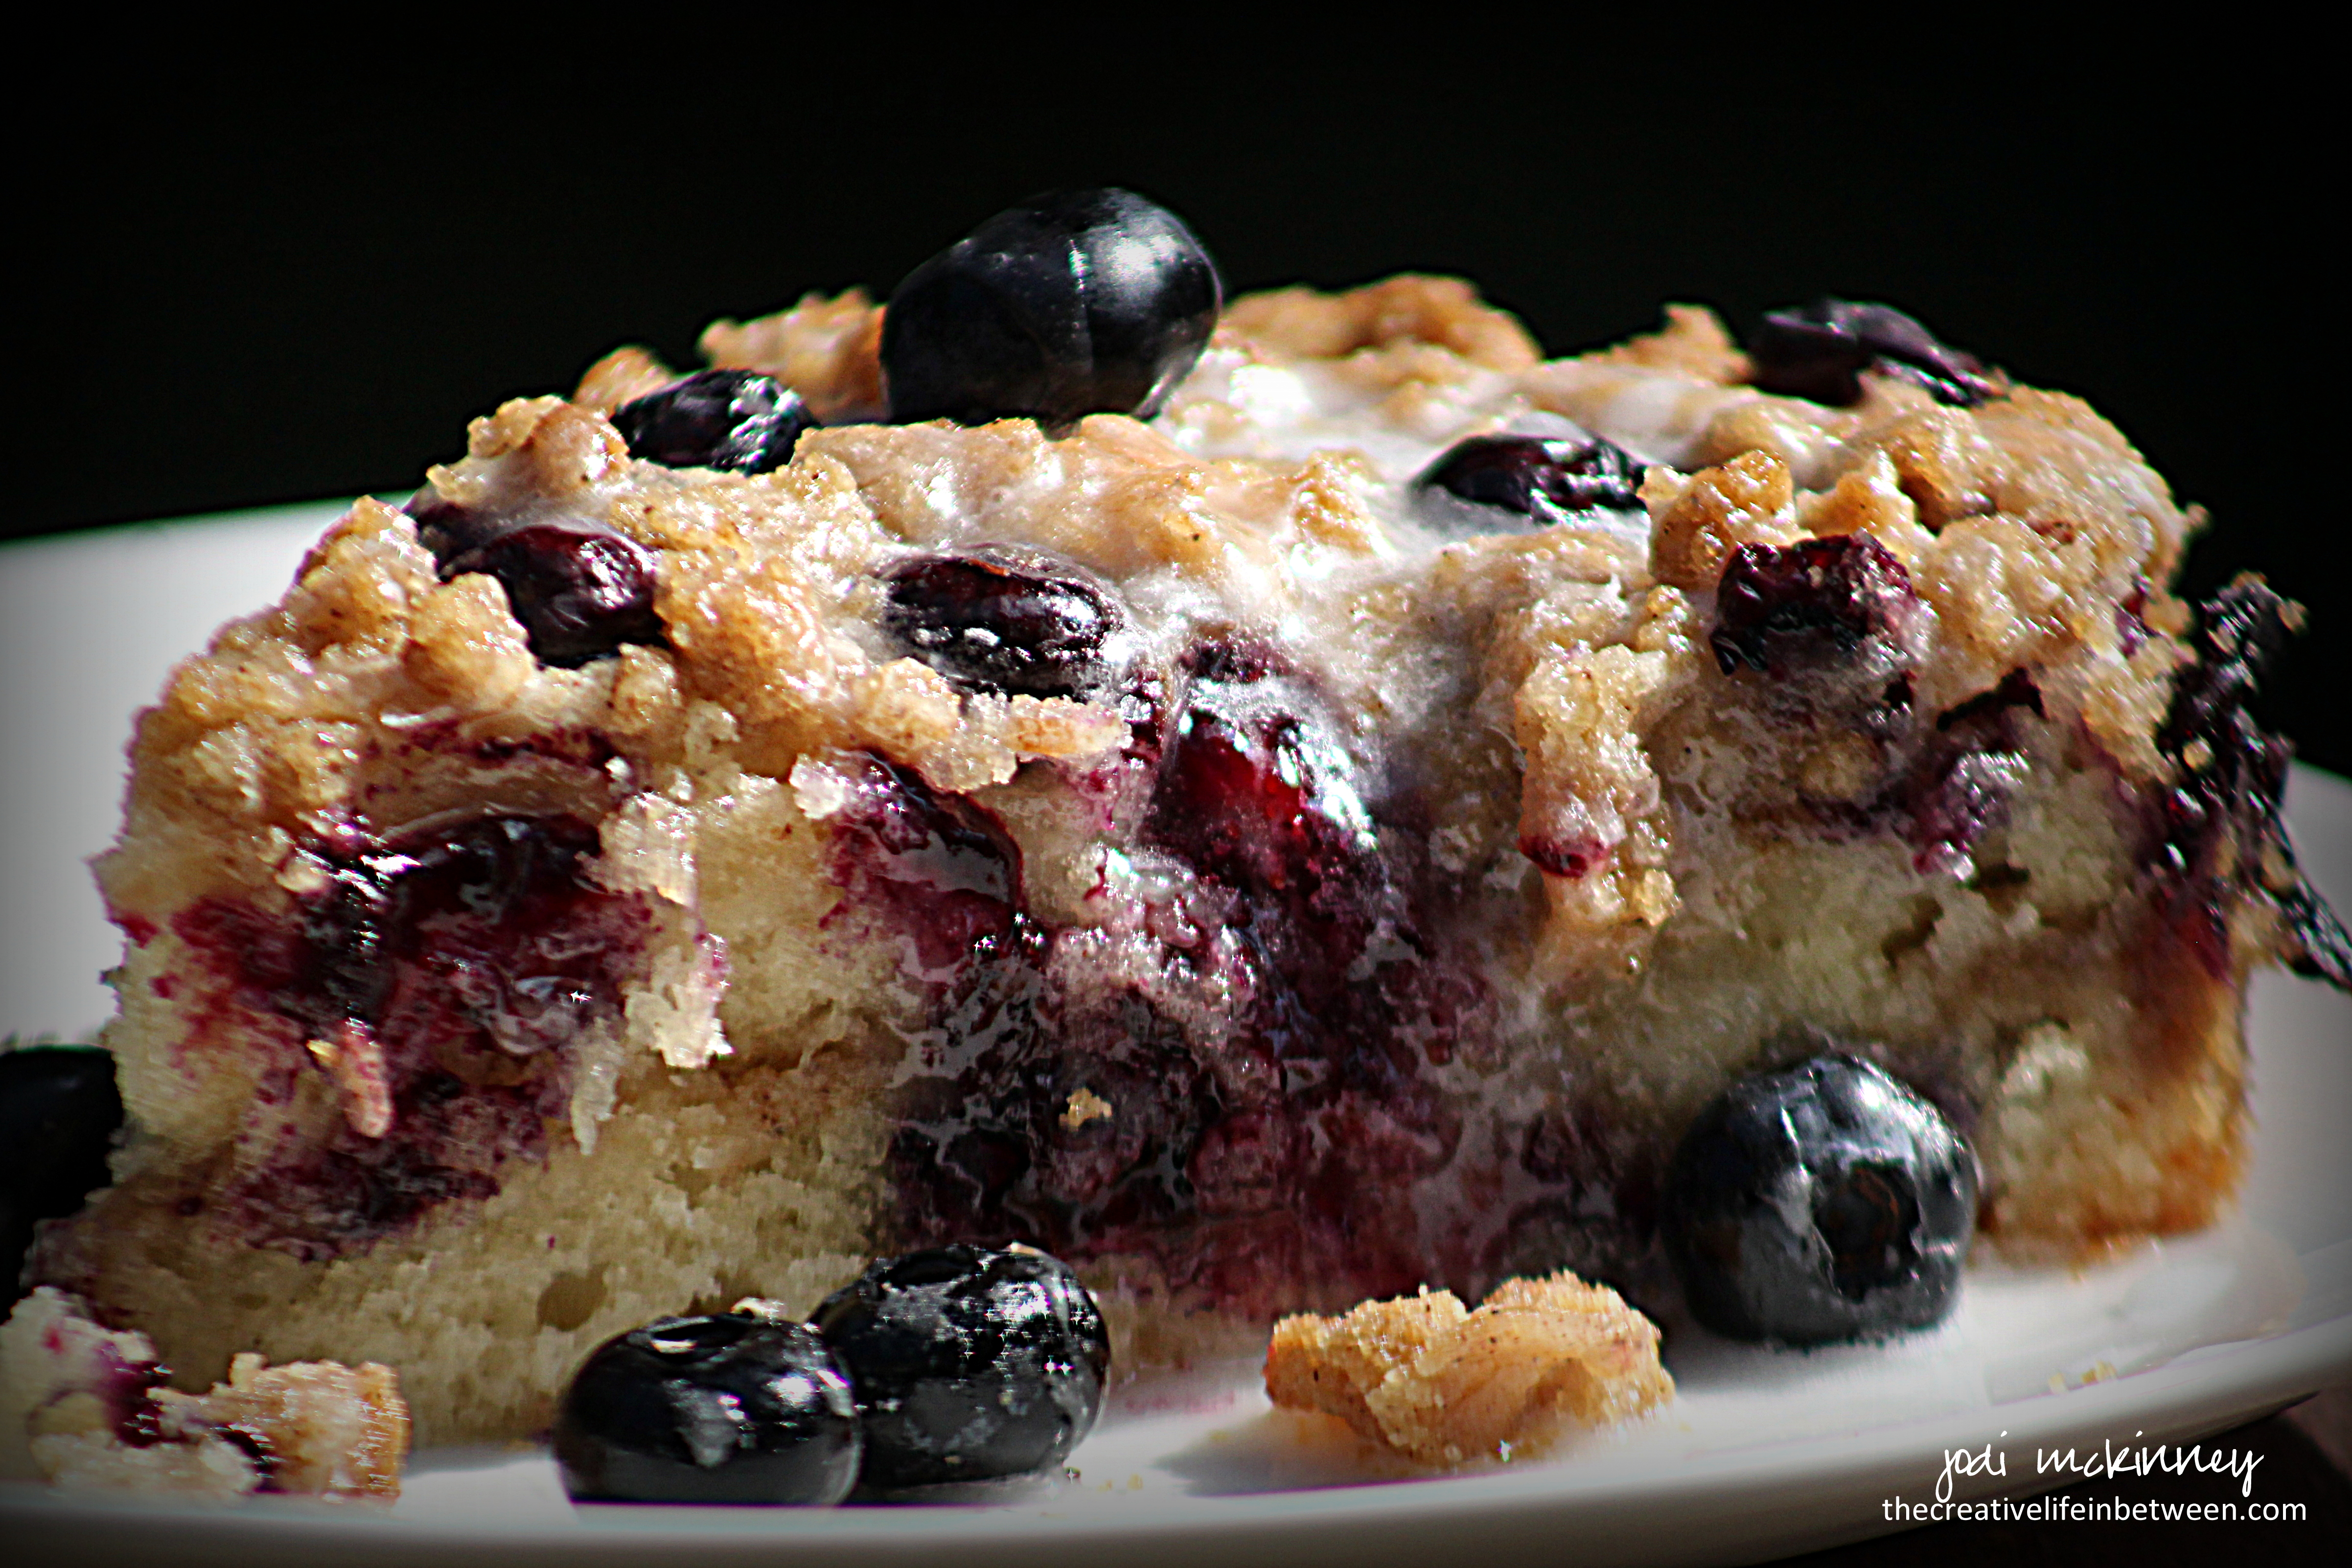
And OH was it yummy!  (I know because I kept half for hubby and me and took half to them.  She is that kind of friend!  The best kind – that you can take half a cake to – LOL!)

I arrived just in time to serve it to them for dessert!

Oh the joy of friendship!  Oh the joy of baking and sharing!

Make this for yourself!  Make this to give away!  But make this amazing Blueberry Streusel Coffee Cake today!  (oh dear – am I still rhyming?! )

Welcome home sweet Janet!  Looking forward to our time together.

Here is the recipe I made as I adapted from LifeLoveandSugar:

Blueberry Streusel Coffee Cake

Ingredients:

Streusel:

  • 3/4 cup flour
  • 3/4 cup packed brown sugar
  • 1 tsp. cinnamon
  • 6 Tbsp. salted butter, melted

Cake:

  • 1/2 cup white sugar
  • 6 Tbsp. salted butter, room temperature
  • 1/4 cup sour cream (light sour cream works fine)
  • 1/4 cup milk (I used Skim)
  • 1 large egg
  • 1 1/2 tsp. vanilla
  • 1 1/2 tsp. baking powder
  • 1 cup all-purpose flour
  • 2 cups fresh blueberries

Glaze:

  • 1/2 cup powdered sugar
  • 1 Tbsp. milk

Directions:

Preheat oven to 350 degrees F.

Prepare an 8-9 inch cake pan by greasing bottom and sides with shortening and then placing a circle of parchment paper in the bottom.

Prepare streusel by combining ingredients in a medium bowl with a fork.  Set aside.

Prepare cake batter by beating sugar and butter in electric mixer for 3-4 minutes until light and fluffy.  Add sour cream and milk  until well incorporated.  Add egg and vanilla.  Finally, add baking powder, then flour just until thoroughly combined.

Spread half of the batter in prepared pan.  Top with half of the streusel mixture, then  3/4 cup blueberries.  Repeat batter, streusel, then 1 cup blueberries.

Bake for approximately 35 minutes or until toothpick inserted comes out clean.

Cool in pan for 20 minutes, then remove from pan.

Prepare glaze by  by combining powdered sugar and milk until a glaze consistency is achieved.  Add more powdered sugar or milk as needed.

Drizzle cooled cake with glaze, and top with remaining 1/4 cup fresh blueberries.

Serve warm or cold – plain or with a scoop of ice cream or whipped cream!

Enjoy!

Cheers & Hugs,
Jodi


Easy Grilled Sweet Corn on the Cob

Easy Grilled Sweet Corn on the Cob.

It is Fresh Sweet Corn on the Cob Season in our part of the world!

Corn is a vegetable we rarely eat – except in the heat of summer when it is fresh and sweet and bought the same day it was picked from a local farm stand.

After being in Arizona for a week recently, where it seemed everything we ordered had grilled or roasted corn in it (even a delicious deconstructed Caesar Salad), I had corn on the brain.

We had always boiled our sweet corn on the cob, but I fell in love with the magically charred kernels we experienced on our Southwest trip, so we decided to grill it this time.

O.M.G!  We LOVED it!  Oh how easy!  Keep the heat outside by using the grill.  And save clean up time with no pots of boiling hot water.

When I buy corn on the cob, even though is only the two of us now, I buy a full dozen.  We usually only eat about half of it, so we cut the rest off the cob and either freeze it in Ziploc bags for a fresh corn treat in the winter or save it for using in other recipes or reheating another day that week.

Here is how we did it.  Quick, easy, and oh so delicious!

By the way – I think the mistake many people make with corn on the cob is OVERcooking it.  Sweet corn on the cob truly tastes its best when you just cook it long enough to heat, but retain its wonderful sweetness, crunch and flavor.  Also, don’t look for the biggest ears of corn.  They could likely be tough.  Look for smaller, young, tender ears, and buy them from the farm or farm market – not the grocery store, where it could be several days old.  There is nothing like eating corn the day it is picked!

Roll it in some butter and sprinkle with salt and pepper for even more yumminess, but when you get fresh, sweet, seasonal corn, it barely needs anything else!

Here is how we made it.

Easy Grilled Sweet Corn on the Cob

Ingredients:

  • 1 dozen fresh ears of corn on the cob

Directions:

Heat grill to approximately 450 degrees F.

Husk corn, and clean of the silks as best you can.  Rinse under cold water.

Place cleaned ears of corn directly on grill for 5 minutes.  Turn and grill for another 5 minutes.

Serve immediately with sweet butter, salt, and pepper.

Enjoy!

Cheers & Hugs,
Jodi


Roasted Vegetables

Roasted Vegetables.

You know those times when you get to the end of what you bought for the week and before you get to the grocery store and only have a handful of this and a chunk of that and a sliver of this in the fridge?

One day last week, I wanted to make a vegetable, but only had a bit of this and that.  I had a quarter of a small head of purple cabbage, a bulb of fennel, a half a bag of carrots, a small bag of golden fingerling potatoes.

So I tossed these together with a sliced onion and a few bulbs of garlic, drizzled it with some wonderful olive oil our son and daughter-in-law brought us back from their honeymoon in Greece.  I sprinkled it with salt and pepper and some chopped fresh rosemary.  I roasted it in a 400 degree F oven for about a half hour, and it turned out amazing!

You could throw in any vegetables you have left in your vegetable crisper at the end of the week.  Roasting vegetables makes them taste so amazingly delicious!  They become caramelized and tender and mellow.

I tried fennel raw chopped up on a salad, and have to say it was a bit too strong for my taste.  Maybe I added too much.  But when I roast it, I seriously cannot get enough of it!  It transforms and mellows the flavor into something absolutely divine!

What combination of vegetables do you like best to roast?

Cheers & Hugs,
Jodi

Red Quinoa Salad with Avocado, Black Beans & Corn

Red Quinoa Salad with Avocado, Black Beans, and Corn.

I love legumes, and I am really growing to love quinoa.  I recently tried this new salad for dinner that was so so delicious, filling, and healthy.

A one-cup serving of quinoa is packed with 9g proteins, 5g fiber, and 20g carbohydrate. Red quinoa is also rich in magnesium, manganese, copper, iron and phosphorous. It contains high quantities of lysine, an essential amino acid.

Legumes like black beans and edamame are also high in protein and fiber, and avocado is extremely nutrient dense.

To eat something that is so easy, so healthy, so pretty, and so delicious is a win-win in my book!

Are you a legume lover?  Quinoa connoisseur?  I’d love to hear your favorite ways to enjoy!

Red Quinoa Salad with Avocado, Black Beans & Corn

Ingredients:

  • 1 cup Red Quinoa, cooked in broth and cooled
  • 1 avocado, sliced
  • 1 15-oz can black beans, rinsed and drained
  • 1 cup corn, frozen, roasted, or fresh off cob
  • 1/4 cup Sweet Vidalia or Green Onion, chopped
  • 1/2 cup edamame (optional)
  • 1 lime, juiced
  • Cilantro, fresh chopped, to taste
  • 1 tsp. Red Wine Vinegar
  • 1 Tbsp. Olive Oil
  • Salt & Pepper
  • Cherry tomato (optional) for garnish

Directions

Cook quinoa, and set aside to cool.

Toss vegetables together gently.  Drizzle with lime juice, vinegar and oil.  Season with salt, pepper and cilantro.  Gently toss.

Spoon quinoa onto plate.  Top with a generous scoop of vegetable salad.  Garnish, as desired, with quartered cherry tomato.

Enjoy!

Cheers & Hugs,
Jodi


Roasted Brussels Sprouts & Chicken Salad

Roasted Brussels Sprouts & Chicken Salad.

On warm Summer days, salads are so great for dinner!

And there are so many fresh ingredients available to mix and match.

I had some fresh Brussels Sprouts and thought they might work great in a dinner salad.

They are so delicious roasted simply with olive oil, garlic powder, salt and pepper.

Then all you have to do is add your favorite greens to a bowl and top with some yummy, healthy additions of fruit and nuts and cheese and protein and more veggies.

The grand finale topping is the roasted Brussels sprouts and a drizzle of balsamic vinaigrette.  It is a full meal deal covering all the  bases!

Here’s the recipe for the way I made it, but feel free to mix and match and tweak it up to how you like.   Roasted Brussels sprouts are a great addition to any salad!

Roasted Brussels Sprouts & Chicken Salad

Ingredients:

  • 1 lb. Brussels sprouts
  • 2 Tbsp. olive oil
  • 1 tsp garlic powder
  • Salt & Pepper to taste
  • Chopped Romaine lettuce or your favorite mixed greens
  • 1/4 cup chopped carrots
  • 1/4 cup chopped walnuts (or almonds or pecans)
  • 1/4 cup golden raisins (or dried cranberries or cherries)
  • 1/4 cup shredded Parmesan cheese (or your favorite)
  • 1 grilled chicken breast, sliced
  • Balsamic Vinaigrette Dressing (or your favorite)

Directions:

Preheat oven to 400 degrees F.

Cut stems off Brussels sprouts, then cut into quarters.  In mixing bowl, combine Brussels sprouts, olive oil, garlic powder, salt, and pepper.  Pour into baking pan and roast approximately 25 minutes, stirring occasionally.

In a bowl, add lettuce.  On top of lettuce, add carrots, nuts, raisins, cheese, and chicken.  Top with a half cup of Roasted Brussels sprouts (or as many as you like – leftovers are always delish too!)

Pour dressing on top, then mix.

Enjoy!

Cheers & Hugs,
Jodi2

A DIY Rainbow Clock

A DIY Rainbow Clock.

My BFF Jill is an “all the colors of the rainbow” kinda gal.

She loves color – bright, bold colors.

So when I came across this idea on Pinterest for a colorful clock made out of a wooden plant stand, I knew this was the gift for her birthday this year.

I found this approximately 12″ diameter circular plant stand on line at Ikea for under $10!  It came with wheels that could be attached so that you can use outdoors and move your plants around I suppose, but I just tucked the wheels away to save for some other use some day.

I simply divided the circle into 10 pie shapes from the center with a pencil and ruler and painted them with bright beautiful colors of indoor/outdoor grade acrylic paint I found at Walmart (Waverly Super-Premium Plaid).

I hit the whole thing with a spray of Krylon UV Resistant Clear Spray after the several layers of paint dried.

Then hubby came to the rescue to cut out a piece in the back and drill a hole in the center to add the battery-operated clock works.

And Voila!  A fun rainbow bright colorful indoor-outdoor clock!  It’s TIME to celebrate YOU Jill!  Where has the TIME gone?  I love our TIME together!

Cheers & Hugs,
Jodi


Creamy Avocado Pasta

Creamy Avocado Pasta.

One day this week, I was in the mood for a creamy pasta with grilled chicken and broccoli.

At first I grabbed a jar of Alfredo sauce from the pantry – thinking hubby would enjoy that – and then I thought…. “Wait!  Isn’t there a healthier way to make a creamy pasta sauce?”

I had a few avocados on hand and wondered how they might work to make a creamy sauce.  After doing a little research on the web, I found this is kind of a “thing,” and I couldn’t wait to try.

I created this recipe by researching and combining ideas from several versions of recipes I found, and I have to admit- it was seriously flippin’ amazing!

Pasta covered in a creamy, dreamy, full flavored but HEALTHY sauce!!  What could be better?!

Goodbye Alfredo sauce.

Goodbye Mac’n Cheese.

Hello amazingly divine Creamy Avocado Pasta Sauce!

I steamed some fresh broccoli, and we grilled some marinated chicken breasts.  Putting these on top of a cup of Creamy Avocado Pasta made for a full and satisfying dinner.

You’ve got to try this!  Here’s my recipe.

Creamy Avocado Pasta

Ingredients:

  • 1 lb pasta of your choice
  • 2 ripe avocados
  • 2 cloves garlic, minced
  • 1/4 cup chopped fresh basil
  • 1/4 cup chopped fresh cilantro
  • 1 large or 2 small limes, juiced
  • 1/4 cup olive oil
  • 1/2 cup Greek yogurt or light sour cream
  • 1/2 tsp salt
  • 1 tsp freshly ground pepper

Directions:

Cook pasta in boiling salted water to al dente.  Reserve 1 cup pasta water, then drain and set pasta aside.

Cut avocados in half, remove the pit, and scoop out out the green flesh from the skin with a spoon.  Discard skin.  Put avocado in blender or food processor.  Add minced garlic, chopped fresh basil and cilantro, lime juice, olive oil, Greek yogurt or light sour cream, olive oil, salt and pepper, and 1/2 cup pasta water.  Blend/puree into a creamy sauce.  Add more pasta water as needed for desired consistency.

Toss with warm pasta, and serve immediately.

You can top with vegetables of your choice like cherry tomatoes and sweet corn, peas, asparagus, broccoli, green onions, pine nuts, or whatever you like.  You can also add a protein if you like – chicken, shrimp, crab meat, lobster, pork.  Sprinkle with a bit of freshly grated Parmesan for a bit of salty, nutty zip.  Or – you can just enjoy as is.  

Can’t wait to hear from those who try and what you think of it!  I’m a total fan!

Cheers & Hugs,
Jodi


A 30th Birthday Money Flower Card

A 30th Birthday Money Flower Card.

If you are looking for a creative card and/or gift for a special 30 year old in your life, how about making them a money flower card?

I needed a special card for a very special young lady (my daughter-in-law, Colleen) who turned 30 this past weekend.  I was trying to think of something creative like the Happy Birthday Money Cake I made for my son (her hubby!) a few years ago.

For the card, I started with a piece of black (any color will do) poster board cut to approximately 20 inches wide by 10 inches high that I folded in half to form a large card.  I also used two pieces of white 8.5 x 11″ card stock, 30 $1 bills and 1 $20 bill, approximately 33 dimensional adhesive dots, Tombow Mono Multi Liquid glue, a small piece of ribbon, and some colorful Sharpie markers.

I rolled all of the dollar bills tightly and adhered the loose end of each with a dimensional adhesive dot to the first piece of white card stock in the shape of a flower.  I used the $20 as the flower stem rolling it the long way.  I then drew around the flower with colored Sharpie markers, added two leaves with “Happy” written in one and “Birthday” in the other.  I drew a big bold “30” in the center of the flower, tied a bow on the stem, and then glued it to the front of the folded poster board using the Tombow glue.

On the inside, I listed 30 things we love about Colleen.  (That was the really easy part!)

You could use this for other milestone birthdays too and create different shapes.  It might make a fun wedding, anniversary, or graduation card too.

It was really fun and super easy to make, and even more fun to give to her.

Make giving the gift of money fun and creative!

Cheers & Hugs,
Jodi


Easy Skinny Zucchini Pasta Caprese

Easy Skinny Zucchini Pasta Caprese.

I bought a few zucchini recently itching to use my Spiralizer again, and I created this super easy, wicked fast, uber healthy, gloriously delicious lunch that came together in 10 minutes.   Seriously!

I spiralized two small/medium zucchini to create the “pasta” and tossed them in a skilled with some minced garlic and a dash of red pepper flakes sizzling in olive oil.  After just a few minutes. I tossed in some chopped fresh basil, chopped campari tomatoes, and some grated Parmesan cheese.

After I poured it from the skillet to my bowl, I sprinkled it with some fresh black pepper and flaked sea salt.    That’s it!

And it was absolutely amazing!  You will seriously question if you are eating fresh pasta!   I can’t wait to make it again and again this summer when I am able to pick the fresh produce right from my yard.

Here’s the simple recipe I came up with:

Easy Skinny Zucchini Pasta Caprese

  • Servings: 1 as main course, 2 as side dish
  • Print

Ingredients:

  • 2 small/medium zucchini, spriral sliced
  • 1 Tbsp. olive oil
  • 2 cloves garlic, minced
  • Dash red pepper flakes
  • 3-4 Campari tomatoes, chopped
  • 1/3 cup chopped fresh basil
  • 1/3 cup freshly grated Parmesan cheese
  • Salt & Pepper to taste

Directions:

Spiralize zucchini.

Heat olive oil in stir fry skillet.  Add minced garlic and red pepper flakes.  After about a minute when oil begins to sizzle around garlic, add zucchini.  Cook for 3-4 minutes, tossing every minute or so.  Add chopped tomatoes, basil, and Parmesan.  Cook and toss for about 2 more minutes.

Pour into bowl or on plate.  Sprinkle with salt and pepper to taste.  Serve immediately.

Enjoy!

Cheers & Hugs,
Jodi


Lemon Butter Scallops

Sizzling Lemon Butter Scallops in Skillet

Sizzling Lemon Butter Scallops in Skillet

Lemon Butter Scallops.

If you are looking for a super quick and easy and even more super delicious scallop recipe, I’ve got a winner for you!

I picked up a 12oz bag of “Specially Selected Premium Jumbo Scallops” at Aldi the other day to make something a little different for dinner for hubby and me.

As a quick side note – I am such a super fan of Aldi.  I am a bit late to the game and was really not sure about it at first, but now…. every time I go, I love it more!  I swear it costs half of what I pay at our other local supermarkets. I am always astonished when I walk out with a cart full of food for $100 or so.  And not only is it so greatly priced, but the quality is amazing.  The produce is fresh, the selection is nice, and I feel like I am being environmentally conscientious when I pack my own bags instead of coming home with 20 more plastic bags.

These scallops were absolutely delicious, and if I recall correctly, they were less than $10.  I didn’t realize what a great source of protein they are.  A 4-ounce serving has 19 grams of protein, 100 calories and 1 gram of fat (0 saturated fat).

So here is the way I made them.  (Enough rambling – right??!!) Simple yet delectable.  We had them with some butternut squash risotto (which I also picked up at Aldi) and a fresh green salad.  (And no I am not being paid by Aldi – though I should inquire! wink!)

Lemon Butter Scallops

Ingredients:

  • 12 oz. Jumbo Scallops
  • 2 Tbsp. olive oil
  • 3 garlic cloves, finely minced
  • Salt & pepper
  • 3 Tbsp. butter
  • 1 lemon, juiced
  • 1 Tbsp. freshly minced rosemary

Directions:

Heat 2 Tbsp. olive oil in a 12-inch skillet, add garlic and cook 1 minute.  Add scallops in a single layer to hot oil in skillet.  Sprinkle generously with salt and pepper.  Brown 1-2 minutes and then turn.  Sprinkle with additional salt and pepper.  Add butter and allow to melt.  Add lemon juice, and flip scallops again to coat with lemon, butter, and garlic.  Sprinkle with freshly minced rosemary, and serve immediately.

Enjoy!

Cheers & Hugs,
Jodi