Baked Parmesan Zucchini Marinara

Baked Parmesan Zucchini Marinara.

It’s Zucchini time of year!

Though this is one vegetable folks usually get an abundance of when they plant it, we have had a little “challenge” in our garden this year…

His name starts with a “C” and ends with an “E.”   He has stubby eyebrows, floppy ears, and a white-tipped brown tail….

Have you guessed yet?

None other than the infamous Charlie, who has figured out a way to wiggle through the locked gate of our fenced-in garden during the day while we are at work!

We have barely been able to harvest a handful of cucumbers and tomatoes from our tiny little garden this year.  As soon as I see a blossom, then the fruit/vegetable begins to ripen, and I anticipate a few more days until it is ready to pick, it is gone!

Charlie sure has been enjoying some healthy treats this summer!

I did manage to grab two zucchini so far, so was very excited to be able to enjoy one the other evening for dinner.

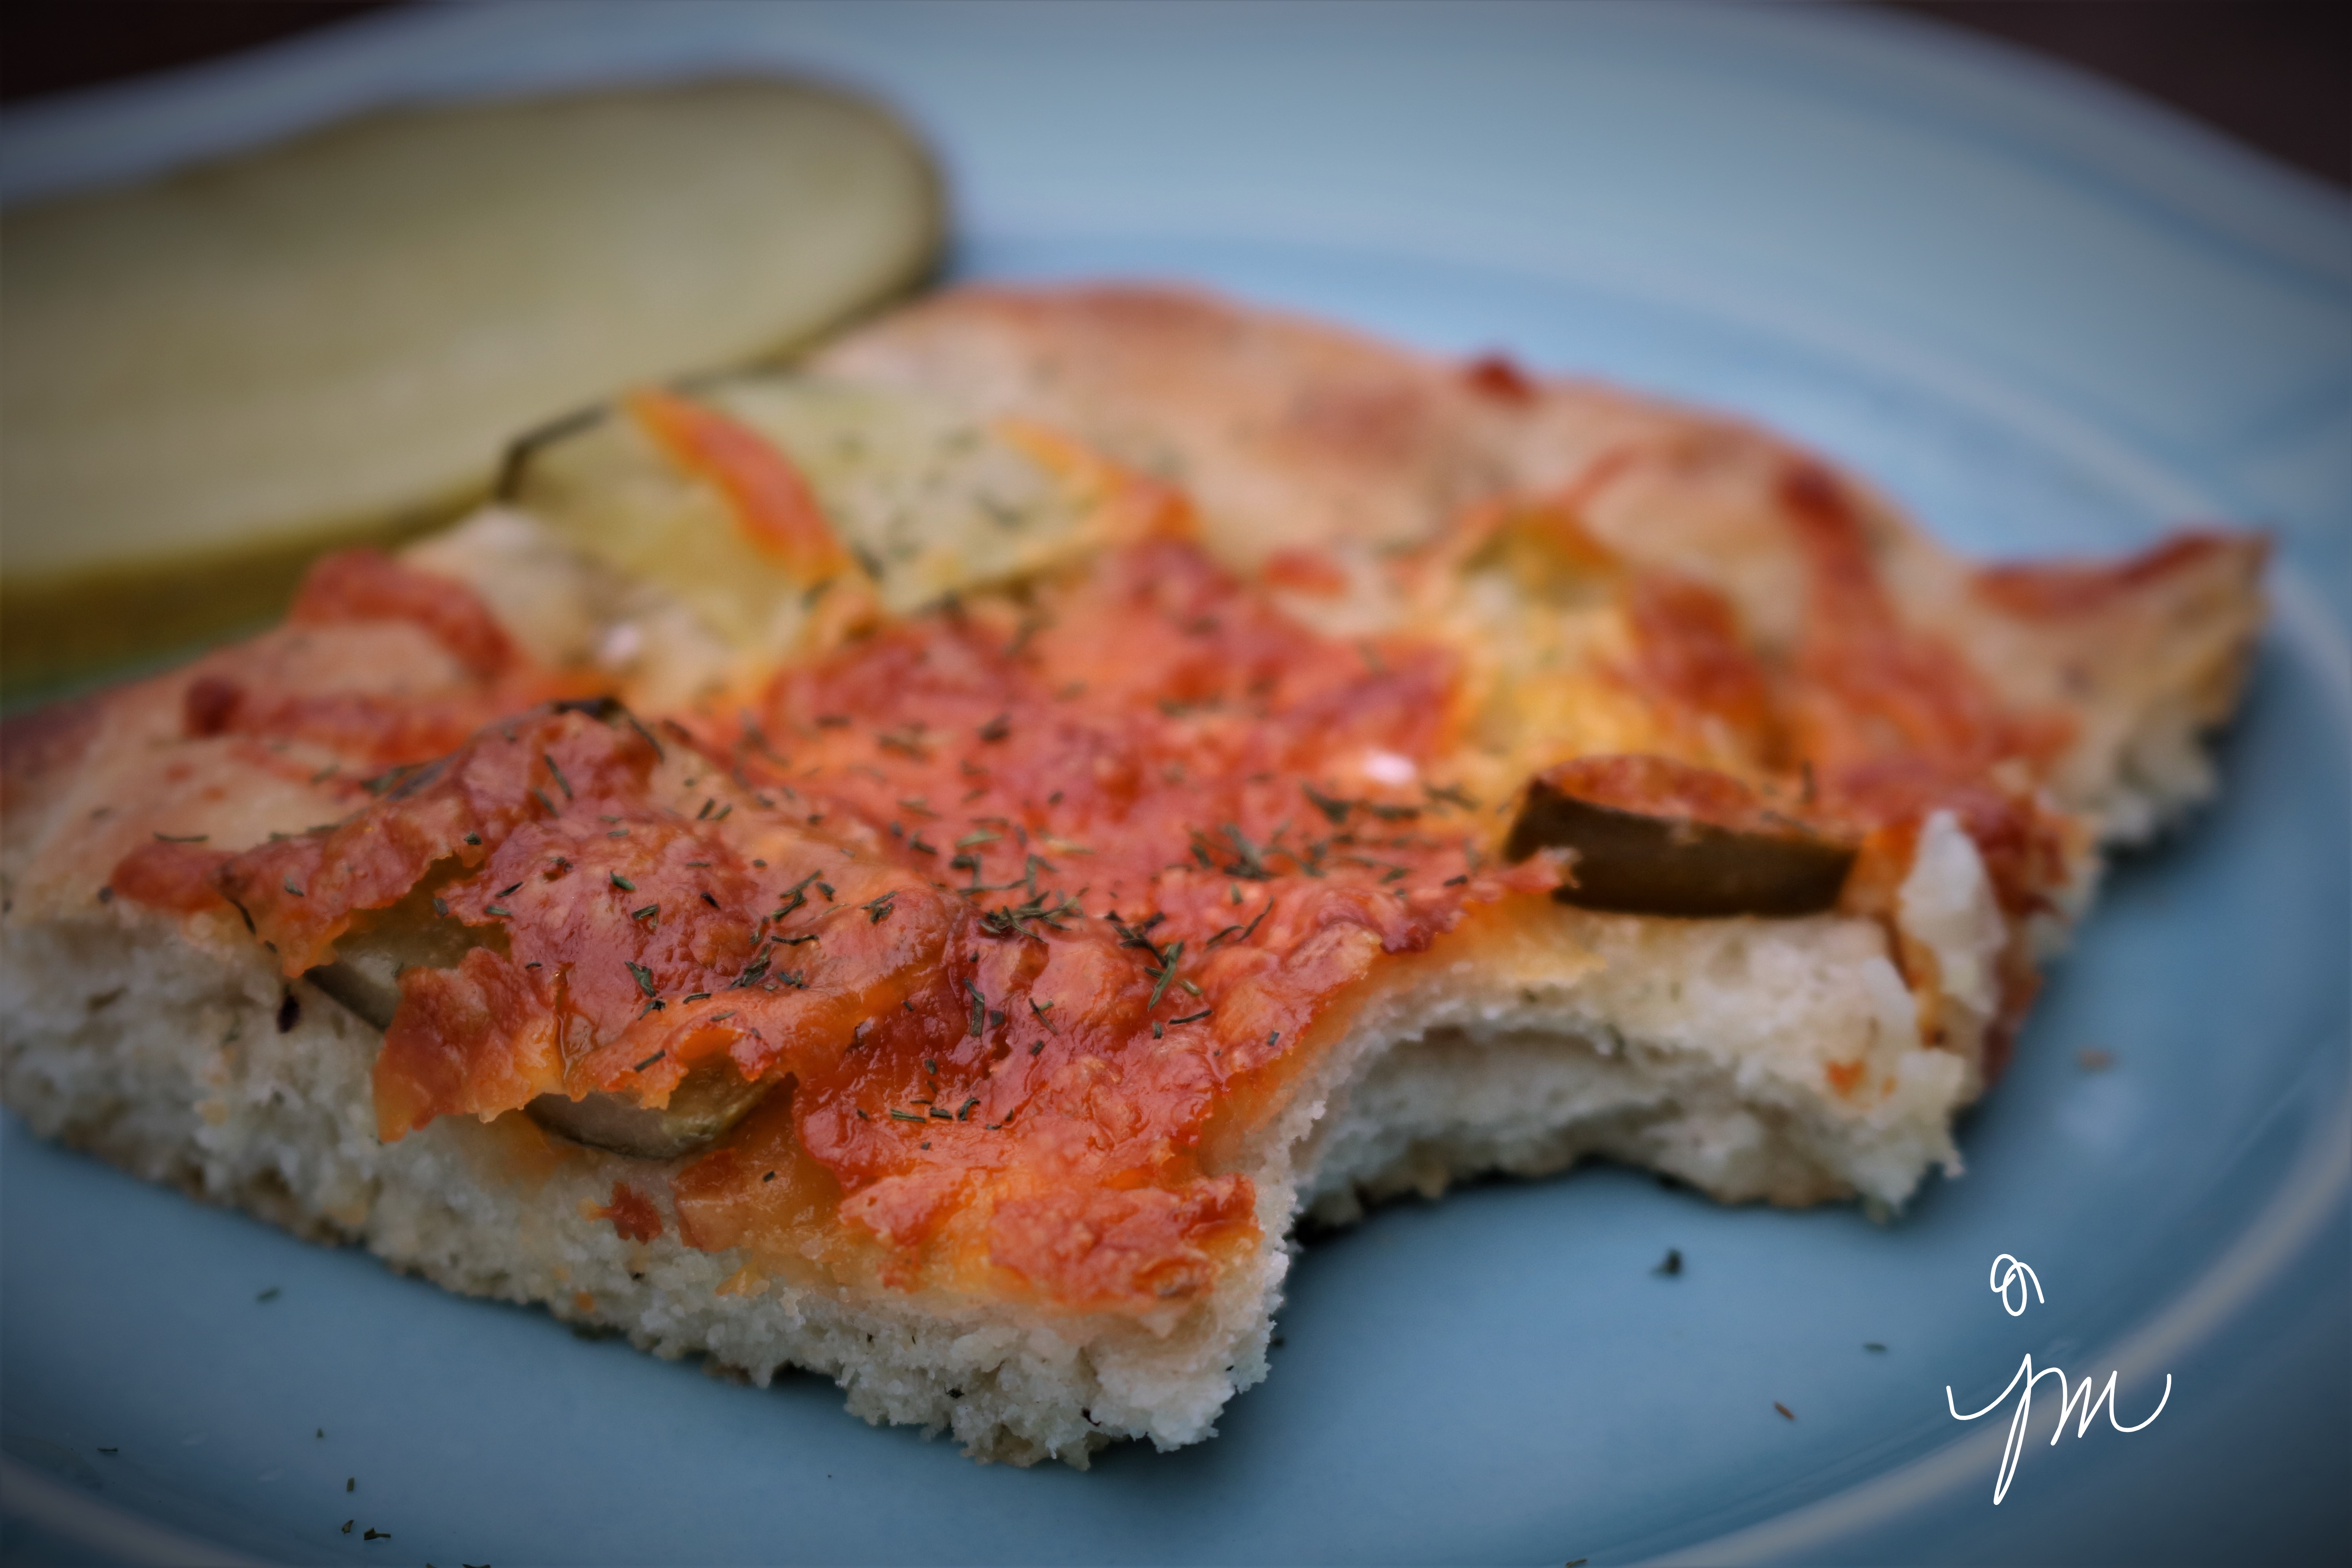
I simply cut it into spears, drizzled with some olive oil, sprinkled with some Parmesan cheese, seasonings, and my new go-to secret ingredient – Trader Joe’s Everything but the Bagel Seasoning.  I baked them until tender-crisp, then dunked/smothered them in marinara sauce.

Not the prettiest dish to photograph, but it was a super simple, delicious, healthy, light, filling vegetarian dinner for a hot, summer evening.  I loved it!

Here is how I made it.

How do you like to prepare your zucchini?

Baked Parmesan Zucchini Marinara

  • Servings: 1 as main course, 2-4 as side
  • Print

Ingredients:

Directions:

Preheat oven to 350 degrees F.

Combine Parmesan and seasonings in a small bowl.

Cut zucchini in half, then each half into 6-8 wedges, depending on size of zucchini.  Place on stoneware baking sheet or cookie sheet.  (I always using baking stones!)  Drizzle with olive oil.  Sprinkle with Parmesan and seasoning blend.

Bake for approximately 15 minutes until tender.

Raise heat in oven to 450 and bake for 5-10 more minutes until crisp and brown.

Dunk or smother in marinara sauce.

Enjoy!

Cheers & Hugs,
Jodi

Marinated Cauliflower Salad

Marinated Cauliflower Salad.

Looking for a unique healthy, yummy, fresh, light summer salad?

Especially after all those cookies recipes last week! 

This one was a crowd pleaser with my family at the function I recently made it for.  It’s a great different way to serve cauliflower, which we eat at least once a week in our house.

Hope you will give it a try and let me know.  Here is how I made it.

Marinated Cauliflower Salad*

Ingredients:

Marinade

  • 6 Tbsp. freshly squeezed lemon juice
  • 2 Tbsp. Dijon mustard
  • 3 cloves garlic, minced
  • 2 tsp. olive oil

Salad

  • 4-5 cups bite-sized cauliflower florets (approx. 2 small heads cauliflower)
  • 2 cups diced red bell pepper
  • 4 Tbsp. chopped fresh parsley
  • Salt and Pepper to taste
  • 1/2 cup shaved Parmesan cheese

Directions:

Whisk marinade ingredients together in a small bowl.  Add to cauliflower in a large glass or plastic bowl and marinade in refrigerator for 4-8 hours or overnight.

Stir bell pepper and parsley into marinated cauliflower when ready to serve.  Season with salt and pepper and sprinkle with shaved Parmesan.  

Enjoy!

Cheers & Hugs,
Jodi

*Original recipe from Vegetarian Times powered by Clean Eating

Cauliflower Crust Spinach & Feta White Pizza

Cauliflower Crust Spinach & Feta White Pizza.

I love pizza!

But I’ve been trying to avoid it in an attempt to lose some weight.

I also adore cauliflower, so I finally jumped on the cauliflower crust bandwagon, and O M Geee!  It is awesome!

Have you tried yet?

I did some reading on it before trying and found an important tip that causes many people to be unsuccessful and create a soggy crust…   It is super important to squeeze the water out of the cauliflower rice.  I got almost a whole cup of water out of my large head of cauliflower rice, and the crust turned out so nice and so delish!

I made this last weekend when the family came over for Father’s Day brunch.  It is quite healthy and low fat/calorie.  I used fat-free mozzarella cheese, fresh sauteed spinach and crumbled feta for my toppings.  YUM!

Here is how I made it.  Would love to hear your thoughts if you try it and/or your tips if you’ve made it other ways.

I loved it hot and also loved it cold the next day for lunch at work.  (Though I am one of those crazy peeps who loves everything cold as well!)

Cauliflower Crust Spinach & Feta White Pizza

Ingredients:

Crust:

  • 1 large head cauliflower
  • 2 eggs
  • 1 cup shredded fat-free mozzarella cheese
  • 1/2 tsp dried oregano
  • salt and pepper to taste

Topping:

  • 1 lb fresh baby spinach
  • 2 cloves garlic
  • 1 cup shredded fat-free mozzarella cheese
  • 6 oz. feta cheese
  • olive oil
  • salt and pepper to taste

Directions:

Preheat oven to 450 degrees F.

Cut cauliflower into florets and “rice” in food processor in batches.  Place in microwave-safe glass bowl with lid and cook for 8 minutes on high.  Allow to cool slightly and place cooked riced cauliflower in 3-4 even batches at a time in a dry tea-towel.  Roll up and squeeze water out of the riced cauliflower.  Squeeze hard and get as much out as you can.  This is an important step in creating a crust that will not be soggy.  You may get up to a total of a cup of liquid out.

Add eggs, cheese and seasonings to cauliflower and blend well using your hands.  Place on a parchment-lined baking stone, and pat into a crust.  Bake for about 15 minutes until golden brown.

While crust is baking, saute minced garlic in about a tablespoon of olive oil until soft and fragrant.  Add fresh baby spinach and cook until just wilted.  It only takes a minute or two.  Remove from heat and set aside..

When crust comes out of the oven, top it with the shredded mozzarella followed by sauteed spinach and then topped evenly with crumbled feta and seasoned with salt and pepper.

Place back in oven for about 10 more minutes.  Tastes wonderful hot (and cold!)

You can also add other favorite toppings like sun-dried tomatoes, roasted red peppers, grilled chicken – the possibilities are as endless as your personal palate!  

Enjoy!

Cheers & Hugs,
Jodi


Black Bean & Corn Salsa

Black Bean & Corn Salsa.

One of my favorite new healthy snacks is black bean and corn salsa.

It makes a wonderful “scoop” with tortilla chips.

It is also great all by itself as a salad or piled on top of a grilled chicken breast or fish.

It is light, healthy, crunchy, tangy, low-calorie, high-fiber, and absolutely DELISH too!

Here is how I make it, but you can surely tweak to your liking.  It would be great with a bit of fresh cilantro, which I didn’t have on hand when I made this batch on Sunday.  You could also switch it up with any other kind of bean you like or other veggies like cherry tomatoes or cucumbers.

Black Bean & Corn Salsa

  • Servings: approx. 3 cups
  • Print

Ingredients:

  • 1 15 oz. can black beans, drained and rinsed
  • 1 1/2 cups frozen or canned corn*
  • 1/2 red bell pepper, diced
  • 3 stalks celery, diced
  • 1/3 cup diced onion
  • salt and pepper to taste
  • Balsamic vinegar to taste (approx. 2 Tbsp)

Directions:

Combine all  vegetables in a bowl.  Stir to combine.  Sprinkle with salt and pepper to taste.  Drizzle with Balsamic vinegar to taste.

Serve as a salsa for tortilla chips, as a salad, or as a topping for grilled chicken or fish.

Store well in airtight refrigerator container for several days.

*TIP:  When we buy fresh corn on the cob in the summer, we always buy a full dozen, though we never eat all of that for the two of us.  We cut the leftover off the cob, throw it in a Ziploc freezer bag, and toss it in the freezer for the winter months or times when fresh corn is not available.  It is so much better than canned corn.

Enjoy!

Cheers & Hugs,
Jodi

Brussels Slaw

Brussels Slaw.

Who is a Brussels Sprouts fan?

Yes?  No?  Not sure?  Maybe not?

I was chatting with a friend at work last week that said she doesn’t like Brussels Sprouts, but said she wondered how they would be raw in a coleslaw like salad.  She commented that she likes cabbage in coleslaw, but not cooked cabbage.

It got me thinking…..  I am a Brussels sprout fan…. adore them roasted….  but I, too, wondered how they would be shredded and served raw in a slaw-type salad.

Then the universe poked me with a nudge, when I saw bags of  Shaved Brussels at my local Whole Foods Market!  

I bought a bag for me and a bag for my friend.

Trying to eat healthier these days, I decided on a vinaigrette slaw.  My friend made a creamy version using Marzetti slaw dressing, and she and her family loved it.


Here is the recipe for how I made mine.  Hope you will give it a try!

Brussels Slaw

Ingredients:

  • 1 12oz bag Shaved Brussels Sprouts (or you can slice/shave your own)
  • 1/4 cup finely minced onion
  • 1/4 – 1/3 cup dried cranberries
  • 1/4 – 1/3 cup sunflower seeds
  • 3 Tbsp. Apple Cider Vinegar
  • 3 Tbsp. Olive Oil
  • 1 tsp. Sugar (or sweetener)
  • Salt and Pepper to taste

Mix all together and let marinade in refrigerator for at least a half hour before serving.

You can change it up by adding sliced almonds or chopped apples or anything else you like.

Enjoy!

Cheers & Hugs,
Jodi


Fresh Beet and Goat Cheese Salad

Fresh Beet and Goat Cheese Salad.

I found another gem at our new Fresh Thyme Farmers Market this week – beautiful fresh golden beets!

I love beets – red or gold – but since these are a little harder to find where I live, I was excited to get them.  Golden beets are slightly sweeter and a little less earthy than red beets.  I actually love the earthiness of red beets, but those that don’t might enjoy these.

I love beets hot or cold, plain or fancy, so I decided to make a bit of a fancier salad for our Sunday supper this past week.  Here is my recipe.  Hope you will give it a try.

Fresh Beet and Goat Cheese Salad

Ingredients:

  • 1 large or 2 small gold or red fresh beets (or a combination of both), cooked* and cut into bite-sized pieces.
  • Small bunch of arugula or mixed greens of your choice
  • ¼ cup pecans or walnuts
  • 1 Tbsp pure maple syrup
  • 2 small clementines or oranges
  • 1/8 cup balsamic vinegar
  • ¼ extra virgin olive oil
  • 2 oz. goat cheese
  • Salt and pepper to taste

Directions:

In a small skillet, heat pecans or walnuts until warm and beginning to toast.  Add maple syrup and cook and stir to coat.  Remove from heat.  Spread out on cutting board or parchment or waxed paper to cool.

Prepare dressing by squeezing juice of clementine or orange into a small bowl.  Drizzle and whisk in vinegar and olive oil.  Season with salt and pepper.  Set aside.

Place a small bunch of arugula or mixed greens on each of two salad plates.  Top each plate with equal portions of the cut-up beets, followed by clementine or orange slices, toasted candied pecans or walnuts, and crumbled goat cheese.  Drizzle with dressing and sprinkle with additional coarse black pepper and salt to taste.

*To cook fresh beets, cut greens off top to about an inch from beet.  Place unpeeled fresh beets in a saucepan of water to cover and bring to a boil.  Boil for 20-40 minutes, depending on size, until beets are fork-tender.  (When you stab with a fork, the beet should slide right back off when done.) Drain under cold water and remove skin with paper towel.  Cool completely for salad.  Cut up after beets have cooled.

Enjoy!

Nothing beats a fresh beet!

Cheers & Hugs,
Jodi

Homemade Sweet Potato Chips

Homemade Sweet Potato Chips.

I’ve been trying to eat a bit healthier and make better food choices.

It’s hard.

While some people crave chocolate and sweets, I am a salty, savory girl.  I will take a crunchy pretzel or chip any day over a Hershey’s Kiss or cookie.

So when I heard about making homemade sweet potato chips, I had to try.

And HOORAY!  They totally satisfied my salty, crunchy chip-loving craving.

These are so easy to make, so delicious to eat, and healthy enough to not feel guilty!

The only tricky part is baking them long enough to get crispy without burning them.

This recipe is what works in my oven in my area.  I have an electric convection oven.  Your baking time may vary.  Just keep watching – and tasting – until you achieve your best results.

The batch pictured here is ONE sweet potato!

Here is how I made them:

Homemade Sweet Potato Chips

Ingredients

  • 1 large sweet potato
  • 1-2 Tbsp. Olive Oil
  • 1 tsp. coarse sea salt
  • 1 tsp. chili powder or dry rub or your favorite seasoning (optional)

Directions:

Preheat oven to 400 degrees F.

Thinly slice sweet potato with a mandoline slicer and layer on a baking stone or cookie sheet.  Drizzle with olive oil and combine to coat well.  Sprinkle with salt and seasoning.  Re-spread evenly on the baking sheet.

Bake 20 minutes.  Toss and flip slices.  Continue baking for 10 minutes.  Toss and flip slices.  Bake 10 more minutes or until edges are browned and chips become crisp.  Remove to paper towels to dry and drain off any excess oil.   Serve immediately and enjoy!

TIP:  Some type of mandoline slicer is really a must as well to get super thin, even slices.

Hope you enjoy!

Cheers & Hugs,
Jodi

P.S.  Do you see a familiar furry, four-legged friend in the first photo who also loves these sweet potato chips?  (Charlie says “Hi” and wants you to know how good these are!)

Homemade Apple Fritters

Homemade Apple Fritters.

Last Sunday, Hubby had to get up very early – really the middle of the night – to work during a winter weather event in our area.

Missing Sunday breakfast, I wanted to make him a special treat for when he returned home.

With some wonderful Misfits Market apples in the crisper, I thought I’d try my hand at homemade apple fritters.

Who can resist a fresh apple fritter??!!

A couple tips from a first-time apple fritter maker:

  • Don’t heat the oil too hot.  Be patient and use a medium heat.  Better to fry them a little longer and get a golden brown than to overcook the outside and undercook the inside with high heat.  (Which, by the way, is what I did with the first batch of three, resulting in us only having three total!)
  • Spread them a little flatter than I did so you get more icing in each bite as the dough itself only contains a small amount of sugar. (This was hubby’s suggestion!)
  • Use a sweeter, less firm apple for best results.  I would not recommend Granny Smith.  The recipe calls for 3 medium apples, but you could really add another apple, which I will do next time.

Let me know if you try and/or if you have made and have any of your own tips.  We sure enjoyed these on a cold, snowy, comfort food, stay-in kind of day.

Here is the recipe I very slightly adapted from I am Baker‘s blog.

Homemade Apple Fritters

Ingredients:

  • 3 medium apples, peeled, cored, and diced
  • Juice of half a lemon
  • 2 Tbsp. sugar
  • 2 eggs
  • 1 cup all-purpose flour
  • 2 tsp. baking soda
  • 1 tsp. cinnamon
  • 1/2 tsp. salt
  • 1/4 cup milk
  • Canola or Vegetable Oil  for frying
  • Glaze
    • 1 1/2 cups powdered sugar
    • 1/2 tsp. vanilla
    • 4 tsp. water (or enough for best consistency)

Directions:

In a small bowl, drizzle lemon juice over diced apples.  Stir to coat.  Set aside.

In electric mixer, beat sugar and eggs on medium-high speed until combined.  Reduce speed to low, and add flour, baking powder, cinnamon, and salt.  Mix until combined.  Add milk, and mix until incorporated.  Fold in apples with spatula.

Fill a frying pan halfway full with oil.  Heat over medium heat to 375 degrees F.

Drop three 1/4-1/3 cup portions of batter into the oil.  Let fry for a few minutes until golden brown.  Flip and fry until other side is golden brown.  Test for doneness by inserting a small knife in center.  If uncooked batter remains, fry longer.

Remove fritters from oil with slotted spoon to wire rack layered with paper towels or napkins to drain.  Allow to cool.

Repeat with remaining three portions of batter.

Prepare glaze by combining powdered sugar, vanilla, and water.  Drizzle over cooled fritters on cooling rack.  When glaze has set, turn to coat other side with glaze that dripped through, if desired.

Enjoy!

Cheers & Hugs,
Jodi

Easy Dill Pickle Focaccia Bread

Easy Dill Pickle Focaccia Bread.

Calling all bread lovers!

Calling all dill pickle lovers!

Calling all lovers of easy recipes that rock!

My cousin, who I affectionately refer to as “Oh Rob,” recently shared this recipe he made for his pickle-loving grandson.  Oh Rob loves to bake bread, and he loves his grandson even more!  This recipe was a match made in heaven for these two.

The idea really intrigued me and sounded so good. I knew I had to try it.

We are a dill pickle lovin’ family too.

And who doesn’t love bread?!

So I ever so slightly adapted the recipe and made it this past Sunday for dinner to serve along with spaghetti.  We loved it!

Give it a try, and let me know what you think.  Here is how I made it.

Easy Dill Pickle Focaccia Bread

Ingredients:

  • 3/4 cup warm water (105-110°F)
  • 1/4 cup pickle juice, warmed (105-110°F)
  • 2 tsp. granulated sugar
  • 1 (1/4-oz.) envelope active dry yeast
  • 2 3/4 cups all-purpose flour
  • 1 tsp. dried dill weed or 1 Tbsp. chopped fresh dill
  • 1 tsp. salt
  • 1 tsp. coarsely ground black pepper
  • 3 Tbsp. olive oil, divided
  • 1/2 cup Cheddar cheese, grated
  • 2 large dill pickles, sliced or chopped
  • Optional: 1 Tbsp. Maldon Sea Salt Flakes
Directions:

Combine warm water, warm pickle juice, sugar, and yeast in a medium bowl or measuring cup. Let stand 10 minutes.

Whisk together flour, dill, salt, and pepper in a medium bowl. Add pickle juice mixture and 2 tablespoons of the oil; stir until combined and dough begins to pull away from sides of bowl. Turn dough out onto a lightly floured surface, and knead until smooth and stretchy.

Drizzle 1 teaspoon of the oil in the bowl to coat; add dough, and turn to coat. Cover with towel, and let stand in a warm place until dough has doubled in size.

Preheat oven to 425°F.  Punch down dough. Place on a lightly oiled 18- x 13-inch rimmed baking stone sheet. Press and stretch dough to edges of baking sheet. Cover with towel, and let stand in a warm place 15 minutes.

Using the end of a wooden spoon, make indentions evenly over dough. Top evenly with cheese and pickles.  Bake until lightly golden and cooked through,  approximately 20 minutes.

Sprinkle top with sea salt flakes, if desired. 

Enjoy!

Cheers & Hugs,
Jodi

PS  I will be taking a holiday blogging break until after Christmas and the New Year.  Wishing you all the joy of this festive season!

Old-Fashioned Beef Stew

Old-Fashioned Beef Stew.

The weather has turned blustery here, and we are “turkeyed” out from Thanksgiving, so the other day, I made a comforting pot of bubbling, thick, hearty, old-fashioned beef stew.

I finally made a trip to a local pantry I’ve been longing to visit in the quaint town of Zelienople, PA (not far from Mars) – Penn Pantry, where I purchased some local, organic grass-fed beef (amongst many other wonderful treasures) that seemed to be made just for stewing.

I also had an abundance of fresh vegetables from my latest Misfit Market shipment that I knew would work perfectly in a stew – potatoes in sweet, red and white, carrots, parsnips, and onions.

So a stewing I did, and oh how we enjoyed!

Here is how I made ours.  Shake it up with your favorite ingredients, but feel the warmth and comfort in this great classic recipe.

Old-Fashioned Beef Stew

Ingredients:

  • 1 lb. beef, trimmed and cut into one-inch cubes
  • 1/4 cup flour
  • 1 tsp. Lawry’s Seasoned Salt (or your favorite)
  • 1 tsp. coarsly ground black pepper
  • 3 Tbsp. olive oil
  • 3 Tbsp. red wine vinegar
  • 1 cup dry red wine
  • 3 1/2 cups beef broth
  • 2 Tbsp. tomato paste
  • 2 bay leaves
  • 1 tsp. fresh thyme leaves
  • 1 tsp. fresh rosemary, finely chopped
  • 1 tsp. fresh sage, finely minced
  • 1 large sweet onion, cut into chunks
  • 4 cups chopped potatoes, sweet potatoes, and/or parsnips
  • 1 cup chopped carrots
  • 1 cup chopped celery

Directions:

Combine flour, seasoned salt, and black pepper in a small bowl.  Add beef cubes, and toss to coat.

Heat oil in a large pot.  Add coated beef cubes and brown on all sides.

Remove beef from pot, and add vinegar and wine to oil and beef drippings in pot.  Stir and scrape browned bits from bottom of pan until all combined and boiling.  Add beef back in, followed by beef broth, tomato paste, bay leaves, thyme, rosemary, and sage.  Bring back to a boil, then reduce to simmer for about a half hour to an hour – until beef is tender.  (Timing will depend on the cut and quality of beef.)

Add onions, potatoes, carrots, and celery, and continue simmering until vegetables are tender and broth thickens – approximately one hour.

Ladle into bowls and serve with fresh, crusty bread to soak up every bit of gravy goodness to comfort your appetite and warm you from the inside out.

Enjoy!

Cheers & Hugs,
Jodi