Cinnamon Chip Scones

sc

Another one of my “almost famous” recipes is this super easy, yet super yummy recipe for homemade Cinnamon Chip Scones.

I made some this week to take to a morning meeting at work, so I thought I would share with  you.

The first time I had these was at a friend’s house for a holiday party.  Brenda is quite the chef, baker, and entertainer.  We all raved about these scones, but I had never attempted making them before.  I assumed they were difficult.  And truthfully – every scone I ever had before this was less than exciting…..  Many I’ve had were quite dry and lacking in anything that really made me want to do cartwheels.

But these – oh my – I wish I could express to you have awesome they are.  They are tender and moist and full of sweet and cinammony chips.  sc8

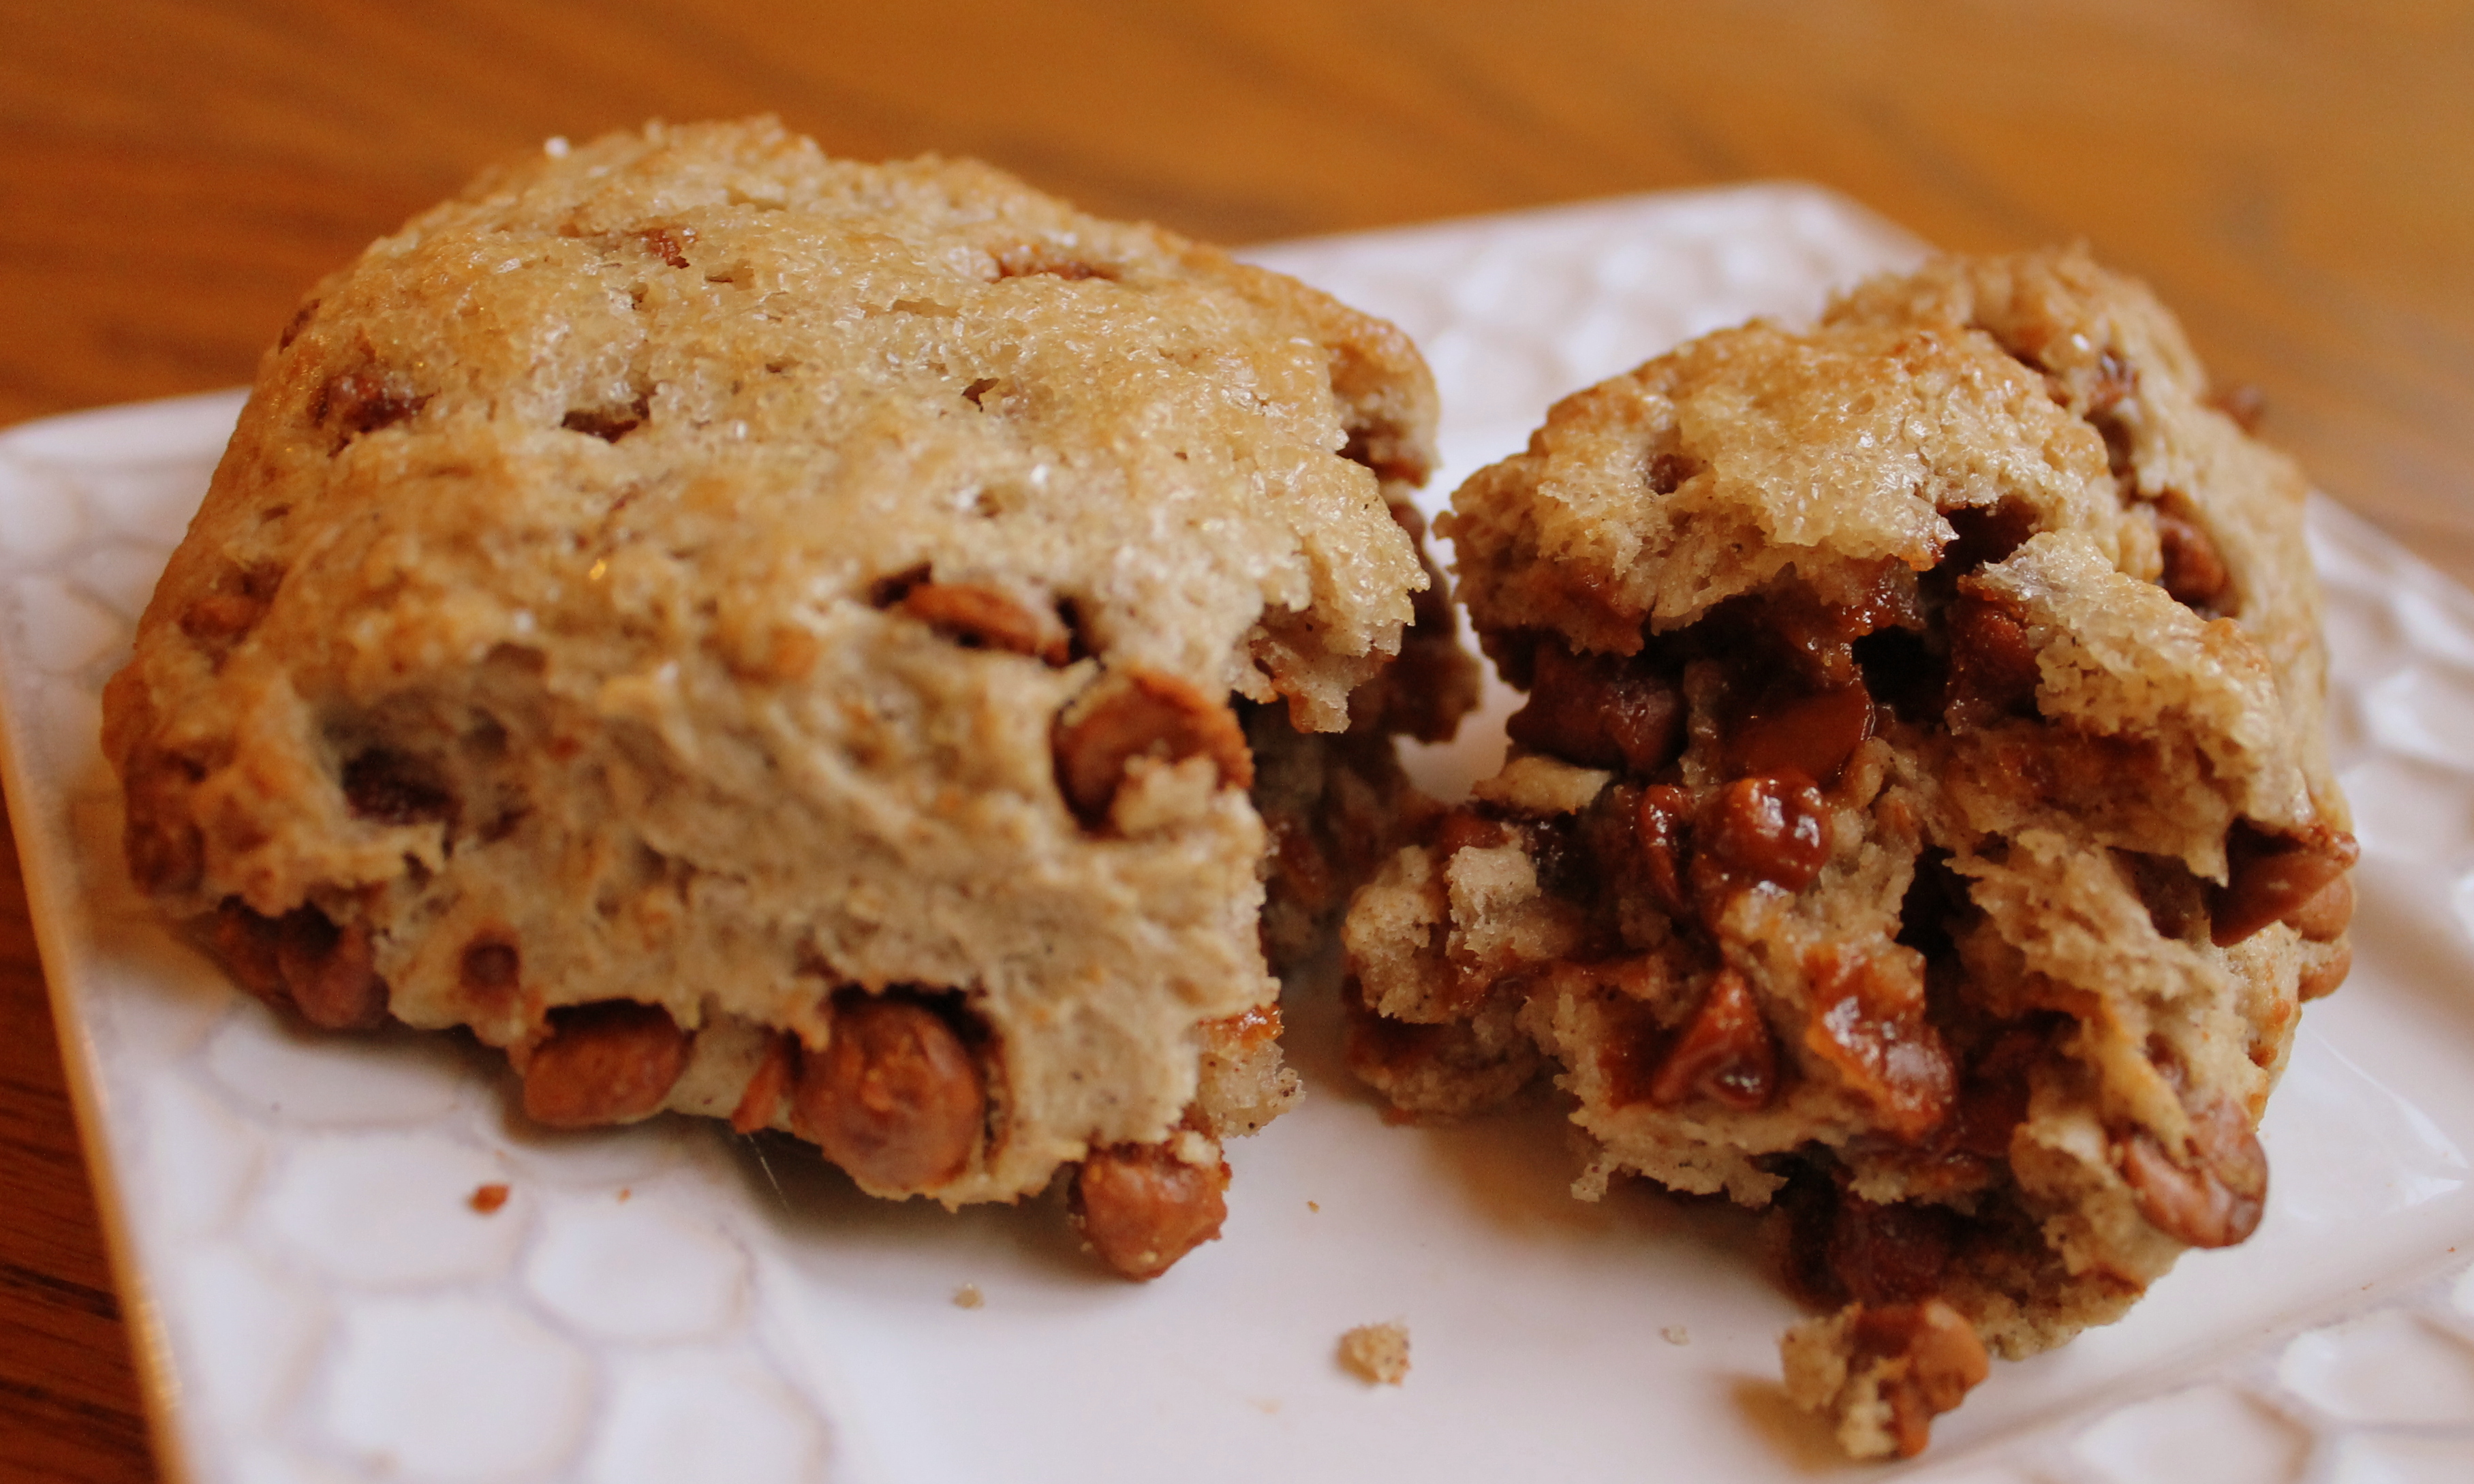
And though they end up looking like they would be something difficult or time consuming to make, they are really easy.

sc6

So here we go.

Start by mixing the dry ingredients together (I often do this the night before and put in a bowl with a lid, so I can make fresh in the morning by simply adding the wet ingredients and baking):

2-3/4 cup Flour
1 TBSP Baking Powder
1 tsp Baking Soda
1/4 cup + 2 TBSP Sugar
Pinch of Salt
2 tsp Cinnamon

Then add 1-1/2 sticks of cold butter, sliced and cut in with a pastry blender (Sorry, Kurt – I told you there was no butter in them – just keep believin’ that – Wink! Wink!)

It starts out looking like this…
sc1

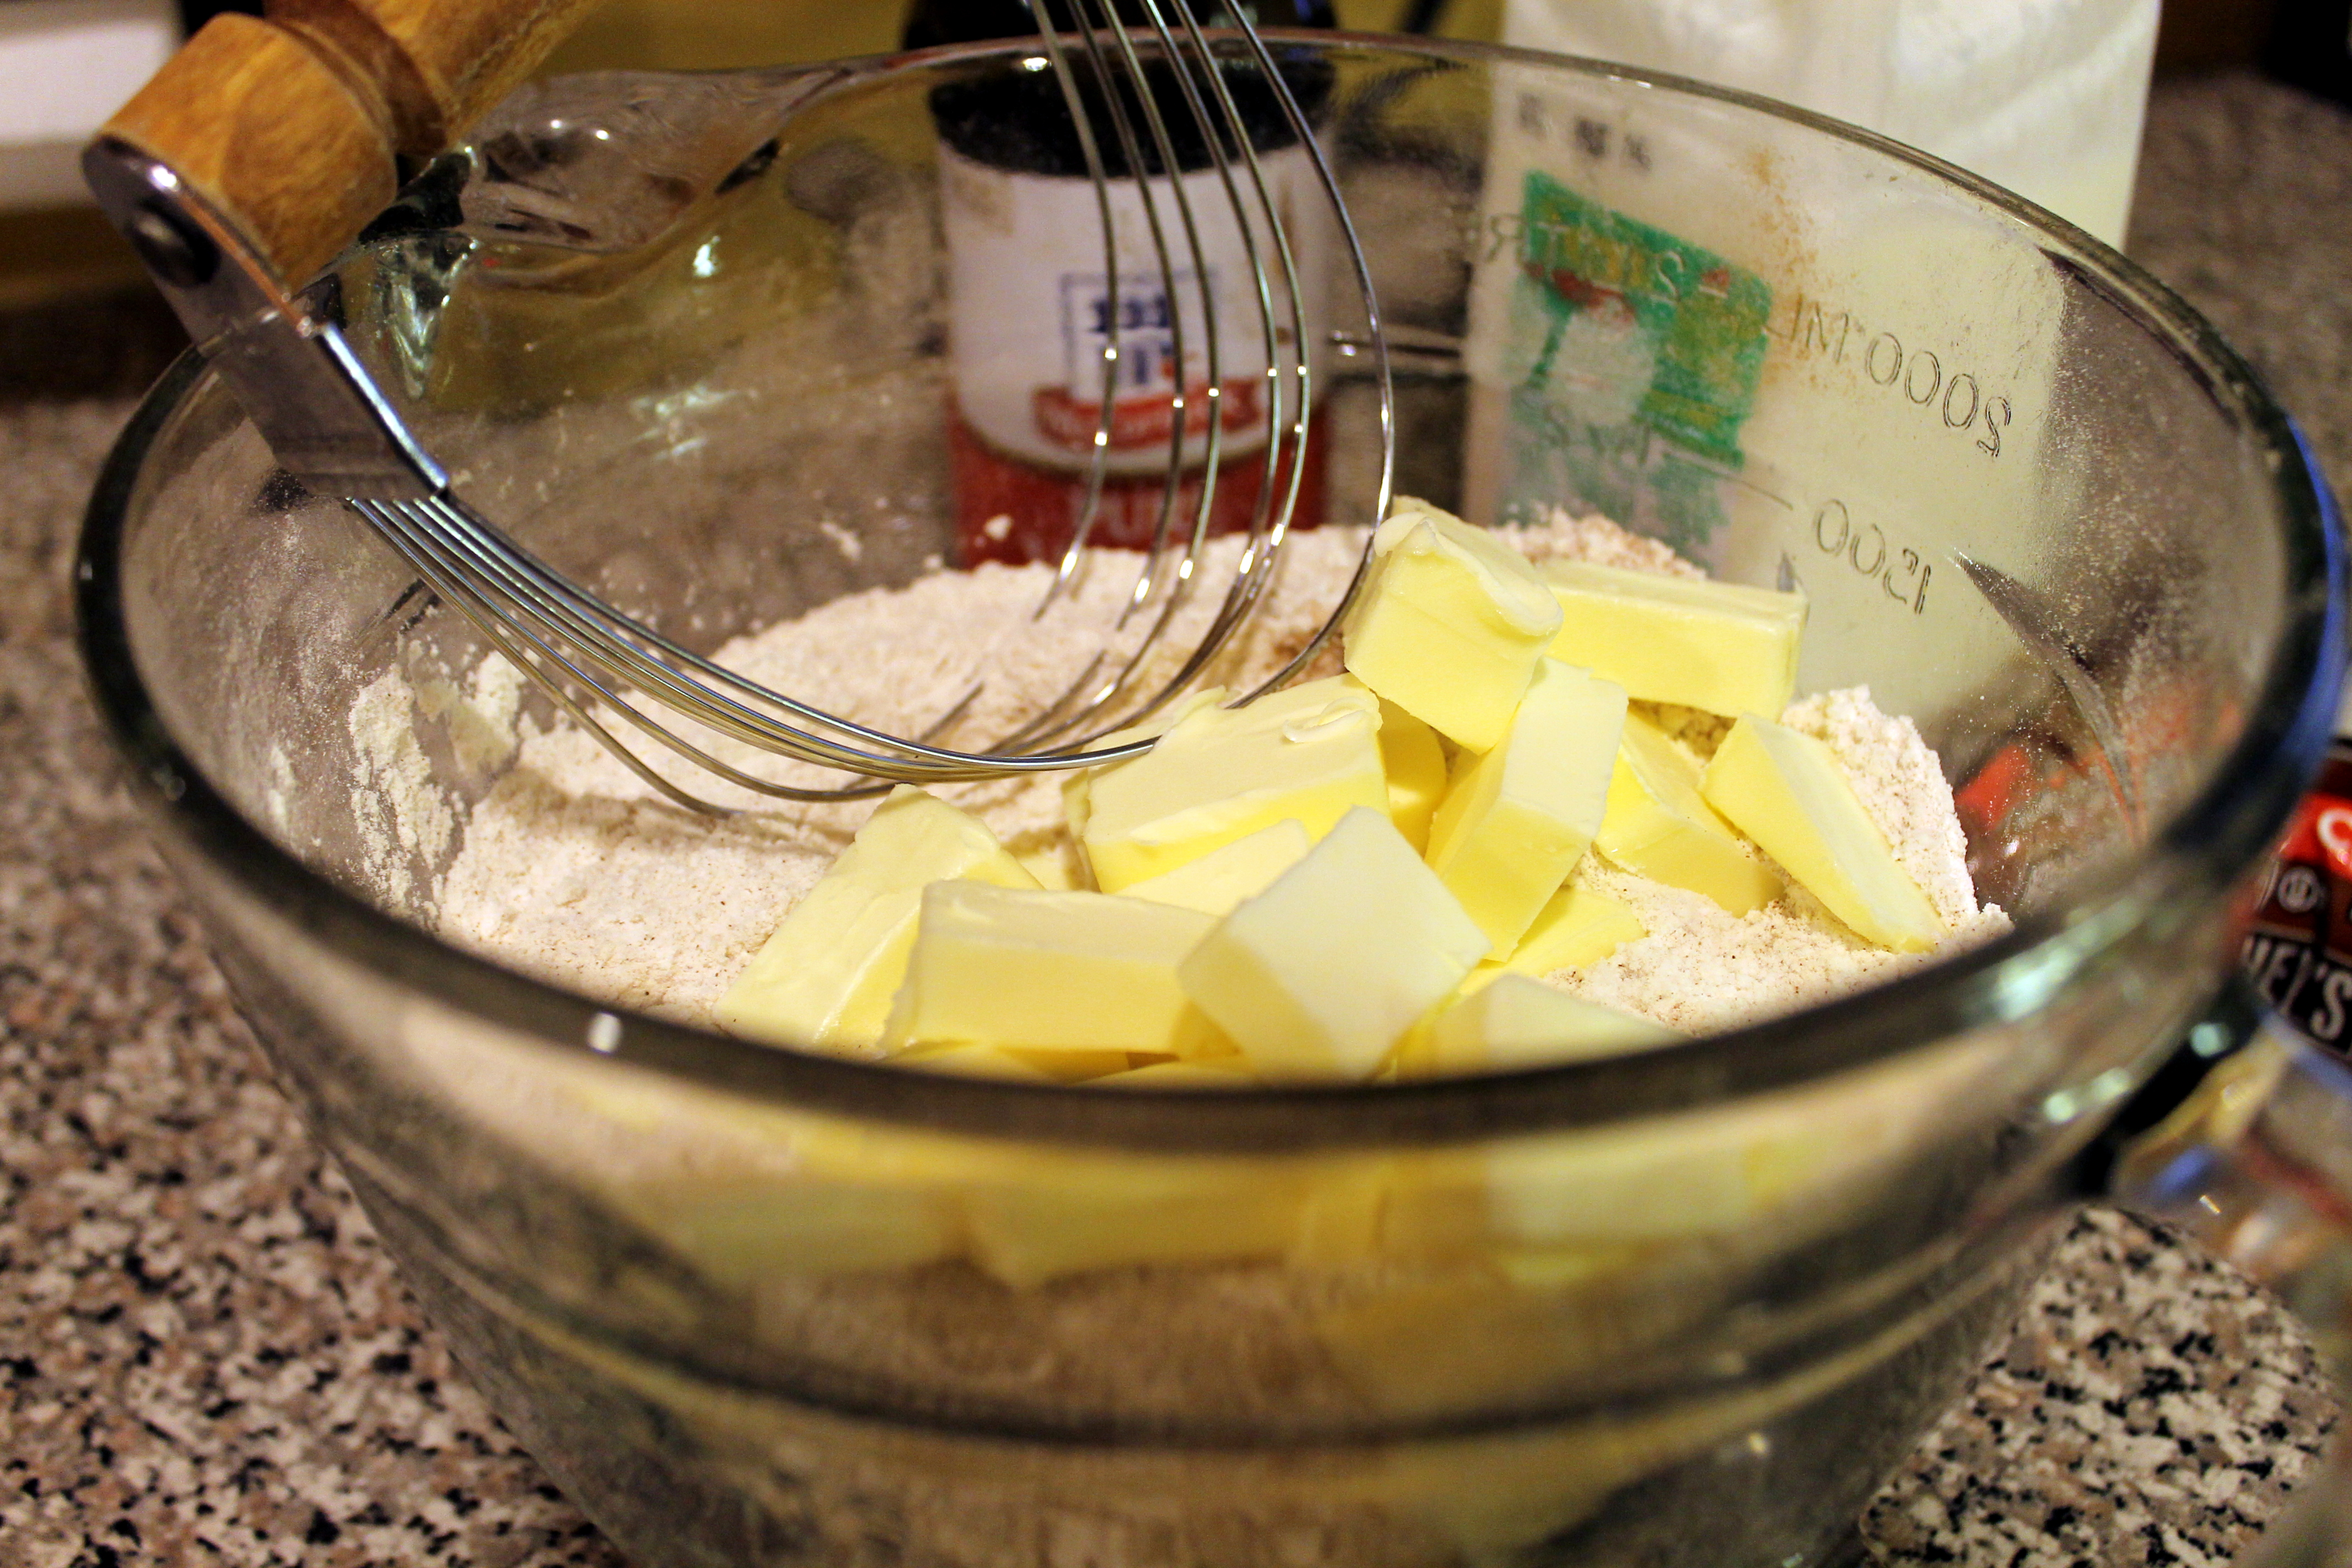
and with the magic of the pastry blender (who needs a food processor?! – have had two – gave away – over-rated), in a matter of about 2 minutes, it becomes a crumbly mixture like this:

sc2Easy Peasy.

Then you add 3/4 cup (or a little more if it is too dry) Buttermilk and 1 TBSP Vanilla with a wooden spoon just until dough forms a ball.

Then you transfer it to a floured surface, blend in a bag of Cinnamon Chips, and shape into a 15 x 3″ rectangle.

Cut it in half, then each half in thirds, then each third on a diagonal into triangles – like this:

sc3

I then brush with a little bit more buttermilk or water, sprinkle some coarse raw sugar on top, place on baking stone (I use 2 with 6 on each) – allowing room for them to GROW.  They go in the oven looking like this:

sc4

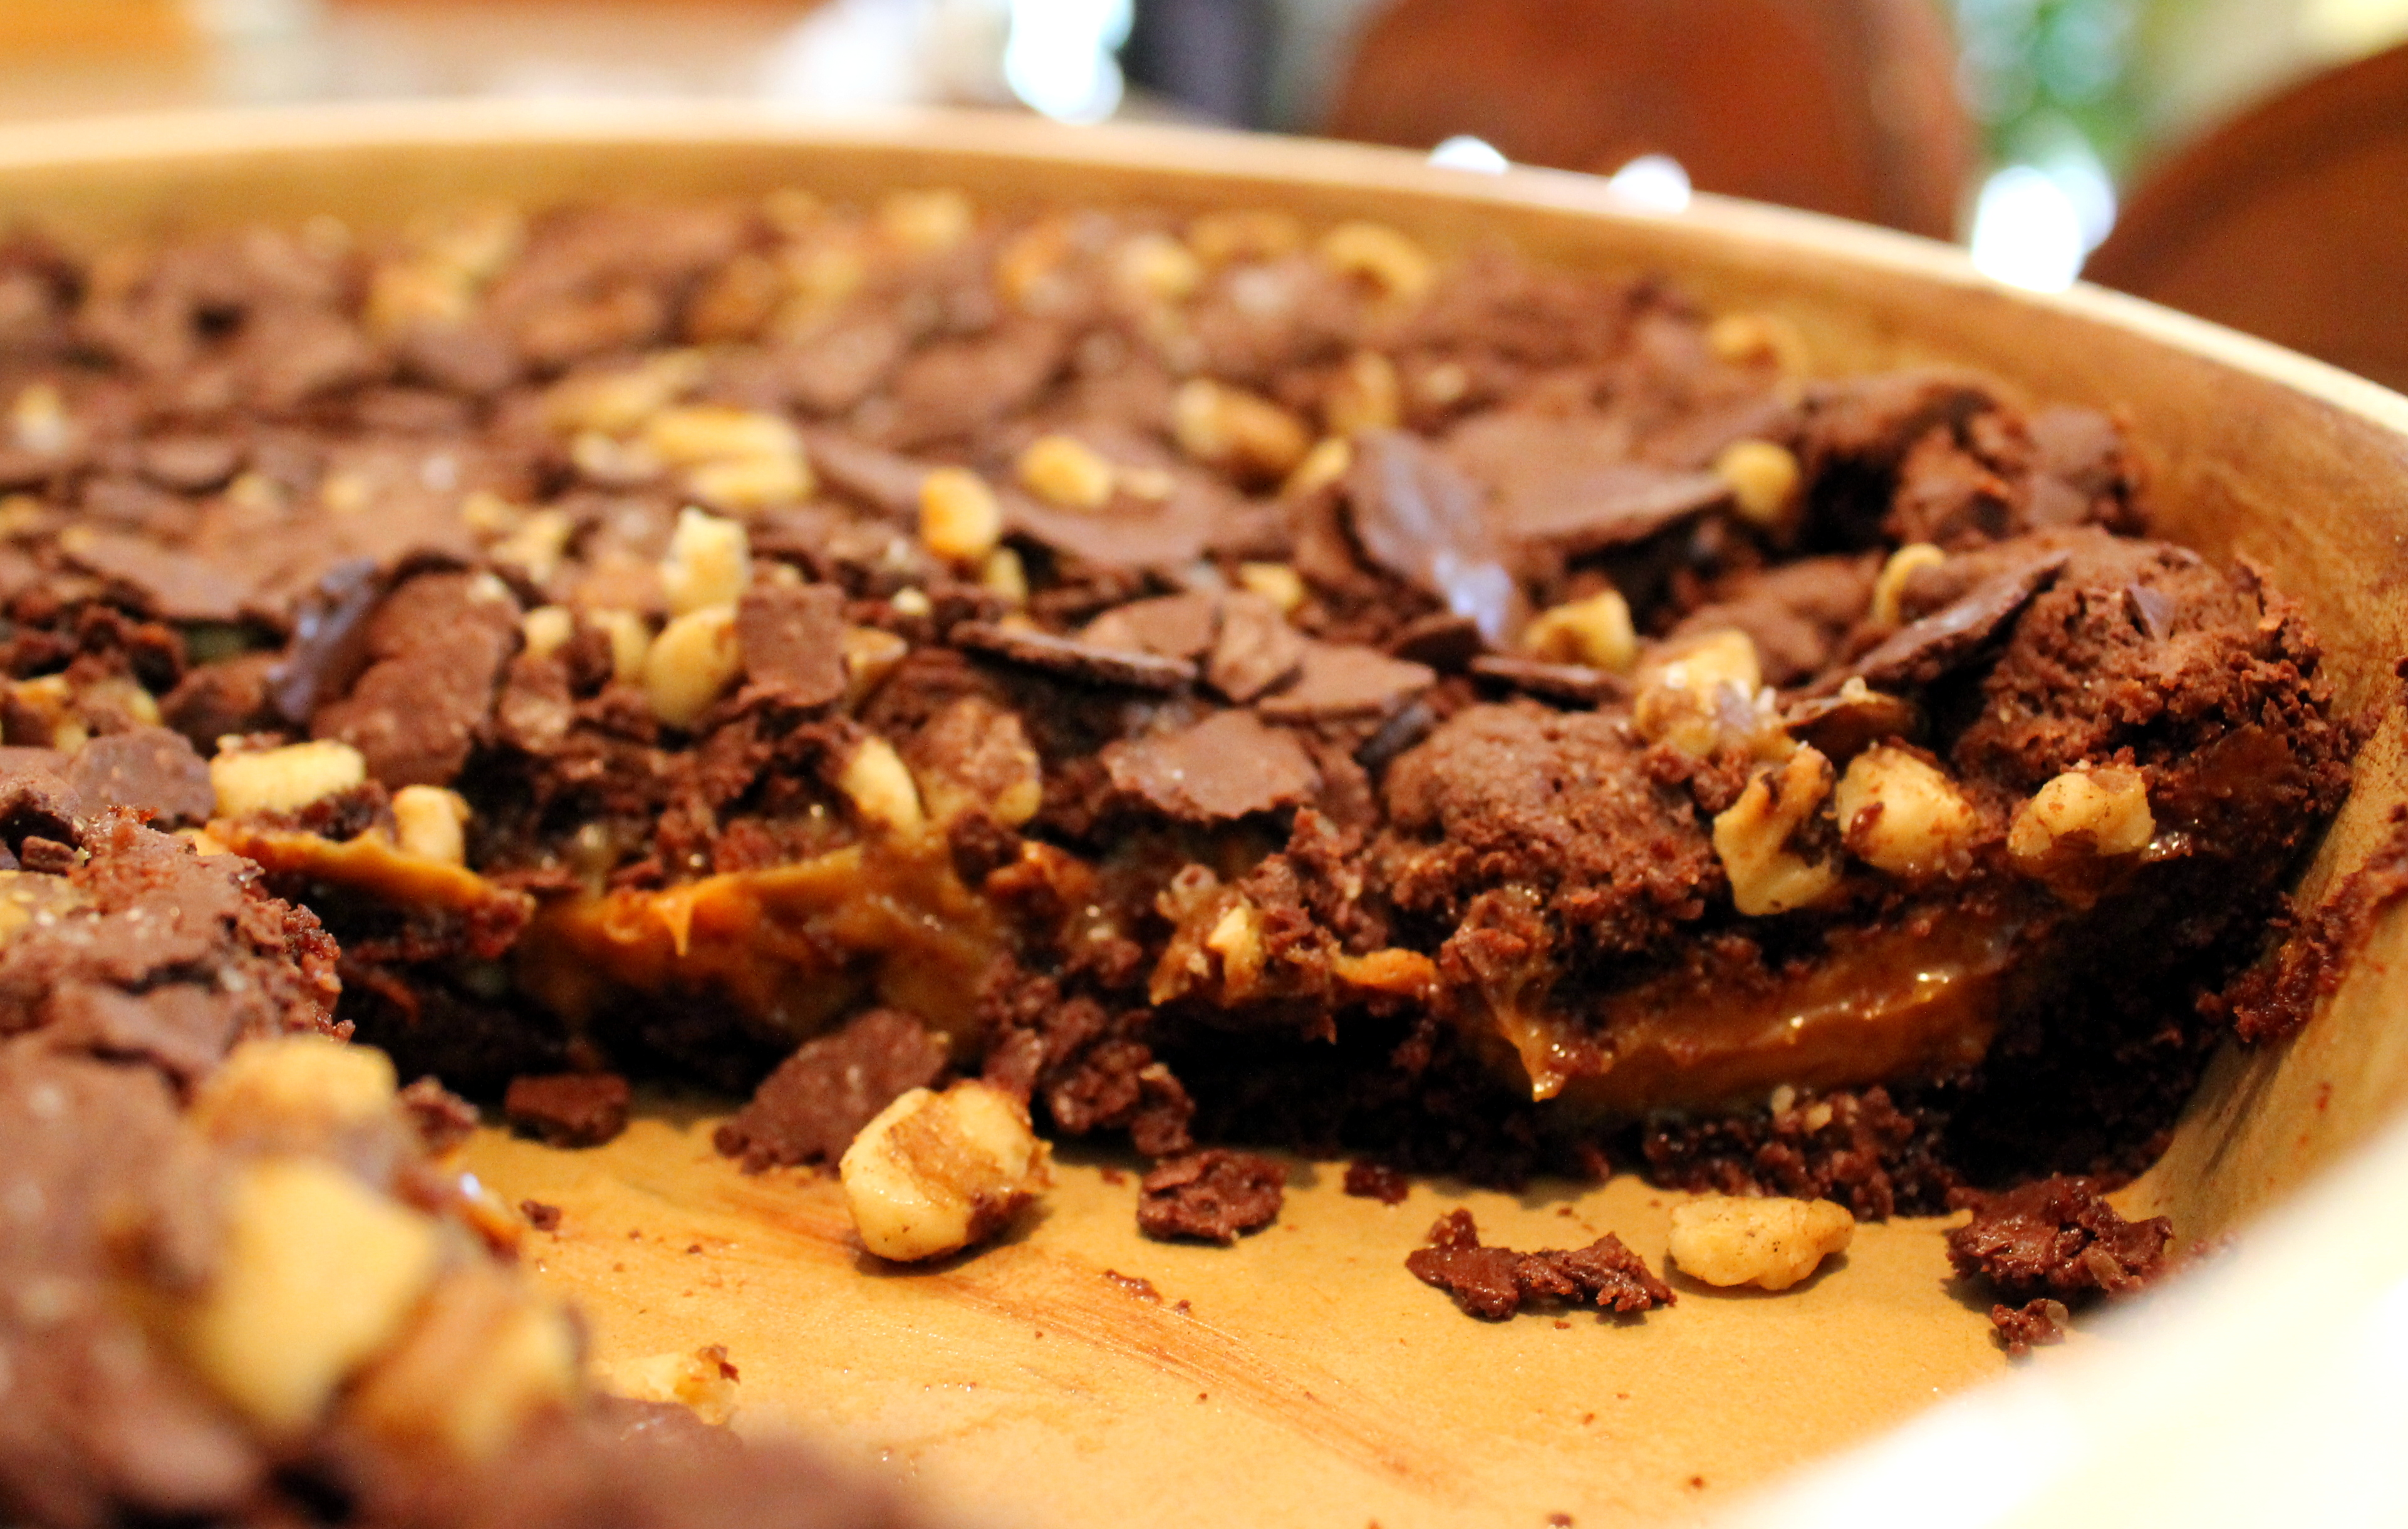
Bake at 400 degrees F for 10-15 minutes, and they come out looking like this:

sc5

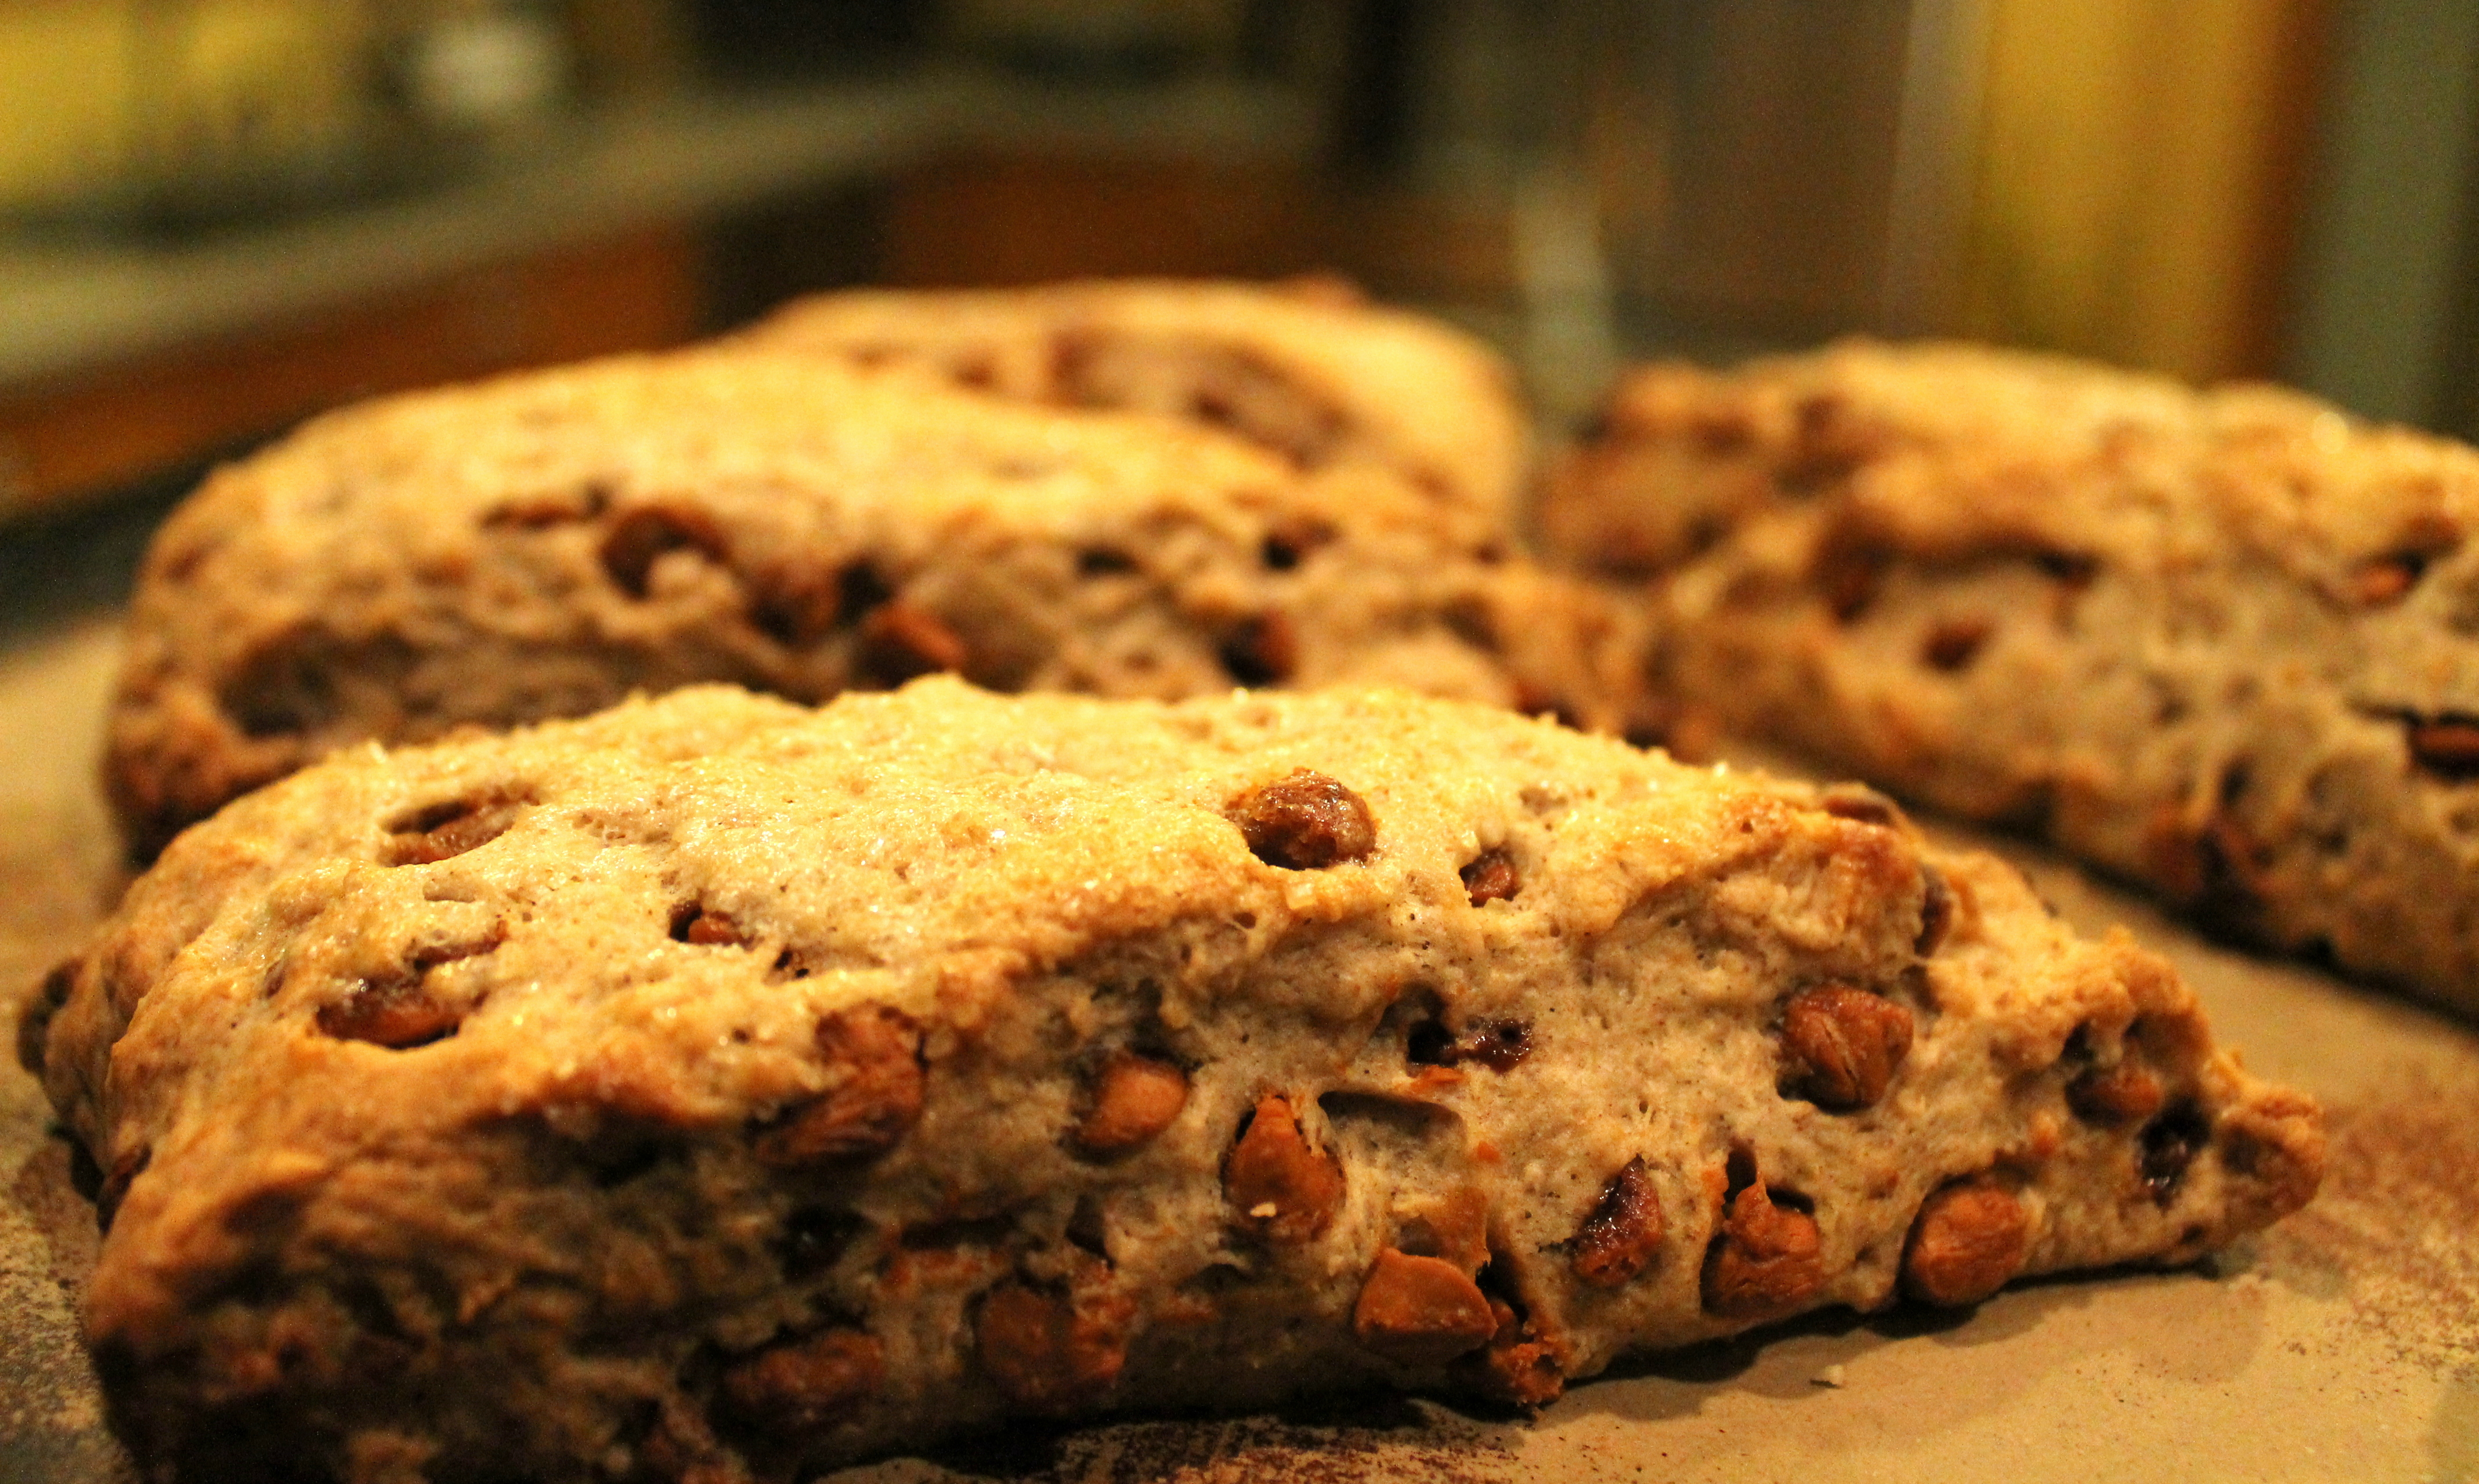
These are truly best served the day they are baked.  If you store them in an airtight container or bag, they get soft and lose the crispy outside that contrasts so well with the tender inside and makes them so amazing.

sc7Hope you’ll give these a try – even if you don’t think you like scones.  I think you’ll be pleasantly surprised.

sc8Enjoy!

Cheers & Hugs,

Jodi

There’s always a reason for a “Woo-Hoo!”

Just Saying in Black and White with Faux Enamel Dots for Freshly Made Sketches 147

I’m almost embarrassed to post this card – it was so simple and easy, but sometimes I think I try to “embellish” toooooo much!

(Nick – my son and oft harshest, but completely honest critic – tells me he likes the simpler ones more often)

I’m in a card “challenge” mood it seems, so I decided to just stick with the sketch layout for Freshly Made Sketches Challenge #147 for this card.

untitled

There’s something elegant about the simplicity of black and white, but then a glittery silver “woohoo” in front of a red starburst background, some red and white baker’s twine and a splattering of faux enamel dots (which I showed how to make back here on this blog post) just gave it a bit of a pop.

Just Saying in Black and White with Faux Enamel Dots for Freshly Made Sketches 147

Ingredients:  StampinUp Whisper White Card stock, Black & White DSP, Just Saying Stamp Set and Framelit Die, Starburst Framelit Die, Bakers Twine and Crystal Effects for “faux enamel”

Tomorrow’s Recipe is NOT a card 🙂 – looking forward to sharing my “almost famous” recipe for homemade Cinnamon Chip Scones.

Cheers & Hugs

Jodi


Christmas in July

jai 224

Just Add Ink Challenge #224

I can’t believe I made a Christmas card…..

in July……

Not at all ready to do the Christmas thing yet – though the crazy chilly weather this week almost makes it feel like Christmas!

Well – that might be exaggerating a bit…  but I did have a sweatshirt  (can you believe SWEATSHIRT) on last evening it was so chilly.  55 degrees F on July 29 in Western PA is CRAZY!  Practically a record low.

When I first saw the Christmas in July Card Challenge at Just Add Ink a few days ago (when the weather was normal 80 degree July weather), I thought – NOPE – no way – not doing this one….

Then, I just kinda got intrigued by the inspiration pictures that were provided to create a card from:

JAI224

and came up with this one.

Well – at least I have my first Christmas card done.

Thanks for the inspiration and the fun Christmas in July Challenge Just Add Ink Team.   Merry Christmas! (in about 147 days)

jai 224

Cheers & Hugs,

Jodi

Real Life ANGRY Birds!

ab 3So at first I thought these new Blue Jays that started visiting the feeders on our back deck were so beautiful.

ab 1Look how dainty this one looks tip toeing across the deck railing.

ab 0and stopping to pose, but then…………….

SHEEEESH!

They sure get mad when the other nice birds (that all got along before) come to the feeders!  And this new GANG in town gets angry and mean with each other too!!

ab 6They holler at each other

ab 4

The pick and peck at each other!

ab 2I actually had to holler at them several times and tell them to share nice!

(even Mikey was yelling at them!)

I shooshed and shooed them a few times, and they seem to have left this side of the forest for now…..

And the sweet ones are happy — – the grosbeaks and wrens and cardinals and goldfinches and woodpeckers and hummingbirds all take their turns nicely.

Anybody else experience this?  Have suggestions for how to get everyone to get along?

I guess there’s always at least one in every group – eh?

Even in the bird world.

Cheers & Hugs,

Jodi


Homemade Rustic Crusty Bread

br 3

Do you think computers, iPads, smartphones will ever have scratch ‘n sniff available?  Perhaps “smell-a-vision,” “smell-a-phone,” “smell-a-computer?”

Oh how I wish you could SMELL this homemade rustic crusty bread!

And you know what is even better?!?!?!  It is SOOOO simple!

Seriously!

I have been having bread-making envy from a couple of folks I know (ahem – Oh Rob and Nancy), who have been talking so much about baking bread, I couldn’t take it anymore – I HAD TO BAKE SOME BREAD!

But, alas, I am not a bread baker, so I searched for the simplest rustic crusty bread to start with – thinking – is there such a thing?!??

THERE IS!  Thank you Mel – from Mel’s Kitchen Café for this amazing recipe that was apparently adapted from a New York Times article  about “Artisan Bread in Five Minutes a Day,” by Jeff Hertzberg and Zoë François (Thomas Dunne Books, 2007).

br

There are THREE ingredients.  That’s it!  Well – ok – four – if you count tap water.

It is simply:

Ingredients

  • 1 1/2 tablespoons instant yeast (equivalent of 2 envelopes)
  • 1 tablespoon salt
  • 6 1/2 cups unbleached, all-purpose flour

Talk about easy – talk about cheap!

This recipe does NOT require a mixer, does NOT require a bread machine, does NOT even required kneading.  I was skeptical, but thought it was worth a try.  I had time while I was doing other things to let it sit, so what the heck!

br 2

Here are the instructions I adapted from Mel:

Directions

  1. In a large bowl mix yeast and salt into 3 cups lukewarm water (about 100 degrees). Stir in flour, mixing until there are no dry patches. Dough will be quite loose. Cover lightly with a kitchen towel but don’t seal the bowl airtight. Let the dough rise at room temperature 2-5 hours until doubled.
  2. Divide the dough in half to form two loaves (or you can make 3-4 smaller round loaves if you prefer).  Turn the dough in your hands to lightly stretch the surface, creating a rounded top and a lumpy bottom. Put the dough on floured baking stone, and let it rest for another 40 minutes at room temperature.
  3. After the dough has rested and is ready to bake, dust the dough lightly with flour, slash the top with serrated or very sharp knife three times, and sprinkle with a little bit of coarse sea salt if desired.
  4. Preheat oven to 450 degrees F.  Place a broiler pan on the bottom rack of the oven.  Pour one cup of hot water into the pan and shut the oven quickly to trap the steam.
  5. Bake the bread until well browned and it sounds a bit “hollow” when you knock on it –  about 20-28 minutes depending on your oven.  (Mine is an electric convection oven and only took about 20 minutes.)
  6. Slice when cooled and ENJOY!

br w pepWe enjoyed ours for Sunday dinner with spicy sausage stuffed banana peppers from my garden.  It was perfect for cutting the heat and soaking up the juice.

I think I’ll be baking some more of this soon, and maybe branching out to try some others.

br 3

Homemade bread that is easy and inexpensive, has no preservatives, and tastes OUT OF THIS WORLD!

You are going to want to try this!

Cheers & Hugs,

Jodi


Hope Anchors the Soul

Hope Anchors the Soul

What a great weekend we had.  A little fun friend time at a Margaritaville Party Friday night.  Thanks Andy and Donna (and Hazel!) for inviting us….

A family wedding celebration – Congrats Jeff and Terri!

A little time to cook and bake on Sunday – – – more on that later this week – but a couple of master bread bakers (ahem Rob and Nancy 🙂 ) had me hankering to bake some fresh crusty rustic bread to go with the sausage stuffed banana peppers from my garden for Sunday dinner.

And a little time to play with my card-making when a thunderstorm busted in on our afternoon.

This card was inspired for someone special I’ve been thinking about and designed for The Paper Players Challenge #206.  I’ve just started trying these out.  It is a fun way to be inspired and challenged with a sketch to see what you can create.  Here is the sketch that inspired my card:

PP 206I love the sentiment on this Neat and Tangled stamp, and had fun using Punchinella, which is basically the leftover sheets from the machine when sequins are made.  Pretty cool – huh?

hope anchors the soul 2

The rest is done using StampinUp products:  Watercolor paper with Daffodil Delight, Marina Mist, and Bermuda Bay inks stamped on a block, then spritzed with water and then pressed onto the water color paper.  I heat embossed the sentiment with gold and used some StampinUp Gold Soiree Designer Series Paper, burlap ribbon, and Chalk Lines stamped onto kraft brown paper for the banner strips.  Natural linen thread was used for the string and bow.  A couple sequins in complimentary colors finished it off.

hope anchors the soul 3Have a great week friends!

Cheers & Hugs,

Jodi


Salted Caramel Black Walnut Brownies

br

We were going to a special event on Saturday (a wedding celebration for my brother, Jeff, and new Sis-in-Law, Terri 🙂 ), and I didn’t want to go empty-handed.  I had figured on taking the usual “Jodi’s Almost Famous Chocolate Chip Cookies” because the kiddos really love them.

But I wanted to make something else special and yummy for the occasion.  I was watching one of my cooking “heroes,” Ree Drumond aka The Pioneer Woman, in the morning and was inspired by her Crazy Brownie recipe.

So I checked the baking shelf (which needed cleaning out desperately – so it led to that!)  Think I have enough stuff???!!

baking shelf

And set out to make my own brownies.  I used some of her tricks, including a box of Duncan Hines Devil’s Food Cake for the base to which I added 1/3 of a cup of evaporated milk and a stick of melted butter.

I pressed about 2/3 of that into the bottom of my round baking dish.  (I’ve always loved to bake my brownies in a round dish – my BFF Jill got me started on that years ago I think….)

br4

Then I had all of these caramels in a Ziploc bag ALREADY unwrapped from some other baking project from who knows when, so I figured I would melt them with the rest of the evaporated milk and make a caramel gooey layer.

It starts like this….

br2

and turns into this yummy goodness!

br3

So I layered that on, sprinkled it with a layer of sea salt, added the rest of the batter in blobs (technical term) on top of it, then a sprinkling of chopped black walnuts, some leftover shaved chocolate and a smidge more sea salt.

br5

It went in the oven looking like this:

br6and came out like this:

br7

and was pretty amazing when I cut into it…

br8

Yummy, sweet, salty, gooey goodness!

br9

at Life In Between.

Cheers & Hugs,

Jodi


Morning Walk with Mikey

Mikey and I often enjoy early morning walks.  One day this past week,  we took the camera along with us, so we could share just a small taste of the beauty we enjoy along the way.  Blackberries are done here in Western Pennsylvania, and now the wild black raspberries are prolific along the wood’s edge of our lane.

MWWM Juicy Berries

Mikey loves berry pickin’ – –  and he only eats the ripe ones.

MWWM Berries

I thought these were stunning with their purple bloom on top.  It is so amazing to see the colors change weekly on our walk as different things blossom and bloom.

MWWM Purple Flower

I never grow tired of the simplicy of daisies….
He loves me…. He loves me not….

MWWM Daisies

These Brown Eyed Susans still had the morning dew on them and just popped out at us in a field of green.

MWWM Brown Eyes Susans

And I loved the way the sun hit the dew on little spider and cob webs showing their fragile and delicate intricateness.

MWWM Spider Web

The sky was so blue above us with a few puffy white clouds to just make it look that much bluer.

MWWM Blue Sky

And wild morning glories were open and welcoming the sunshine.

MWWM Morning Glory

A Daddy Long Leg and an Ant were sharing time on this beautiful orange wild flower.  Do you see how Loooooong that one leg is?

MWWM Orange Wildflower

There is so much beauty to enjoy in the simplest of moments.  And Mikey is such a good partner, who waits patiently while I stop to photograph, soaking up the sun, and possibly wishing for some shades!

MWWM Sun in Eyes Waiting

Happy Weekend!  Hope you take some time to enjoy the simple pleasures along your walk, wherever it takes you to and from…

at Life In Between…

Cheers & Hugs,

Jodi

Hello Friday!

Stampinup By the Tide
Hello there Friday!   Friday is always my day to share a card I made this week, since it is #FreebieFriday for my WheretheRubberHitstheRoad gang.

(and is it just my screen or does the seashell look 3D to you?  Like it is floating off the page?  I think it is so cool how it looks in this shot, though there was not a good shot that I feel captures the essence of this card because it has so many elements of glitter and dimension and wet droplets, but hard to get in one shot – though it could be this amateur photographer’s lack of ability too!)  🙂

stampinup by the tide 3

Anyway, I had so much fun making this card.  I was inspired by a Stamping “Challenge” on JustAddInk’s Website (Challenge #223) when I designed this card, but alas, I was TOO LATE!  The deadline was in Australian Eastern Standard Time AEST – 14 hours AHEAD of us back in little ole’ Mars, PA USA!)  Oh Jodi!!!

I still love the card and can’t wait to share it with someone special to hopefully brighten their day.

stampinup by the tide 2

Stampinup Products Used:
By the Tide Stamp Set
Lost Lagoon, Whisper White and Night of Navy Card Stock
Lost Lagoon, Pacific Point, Pool Party and Stazon Black Inks
Bubble Circle Embossing Folder
Circle Framelit Dies
Crystal Effects for water bubbles
Alcohol Markers for coloring
Wink of Stella Brush for Glittering
Sentiment:  Jillibean Handwritten Sentiments

Happy Weekend!  We are off to some fun picnics and parties and wedding celebrations!  (I’m getting a new sis-in-law Saturday and celebrating a special day with my brother, Jeff and family!!) 🙂

Cheers & Hugs,

Jodi

How does your Garden Grow? With Prickly Cukes and Juicy ‘Maters and Spicy Peppers all in a Row

Ok – so I’m not quite the “Mary Mary Quite Contrary” Nursery Rhyme Poet that Mother Goose was…

But OH How I LOVE to watch my Garden Grow!

tomatoes

I only started vegetable gardening – again – a few years ago – and my garden is just a tiny, manageable patch…

tomatoes2

with enough tomatoes and cucumbers for fresh salads by mid to end of summer (and OH I just can’t wait for these to turn RED! – and my Orange Pineapple Heirloom tomatoes to emerge!)

cukes

and some spicyJalapeno peppers to zip up fresh salsa!

jalapenos

and some banana (Hungarian Wax?) peppers to stuff with spicy sausage!

bpeppers

and I love how fresh and clean everything looks in the morning after a night of nourishing rain.

Cheers & Hugs,

Jodi