Being a Best Friend: A Charlie Dog Guest Post

charlie-and-jaeger

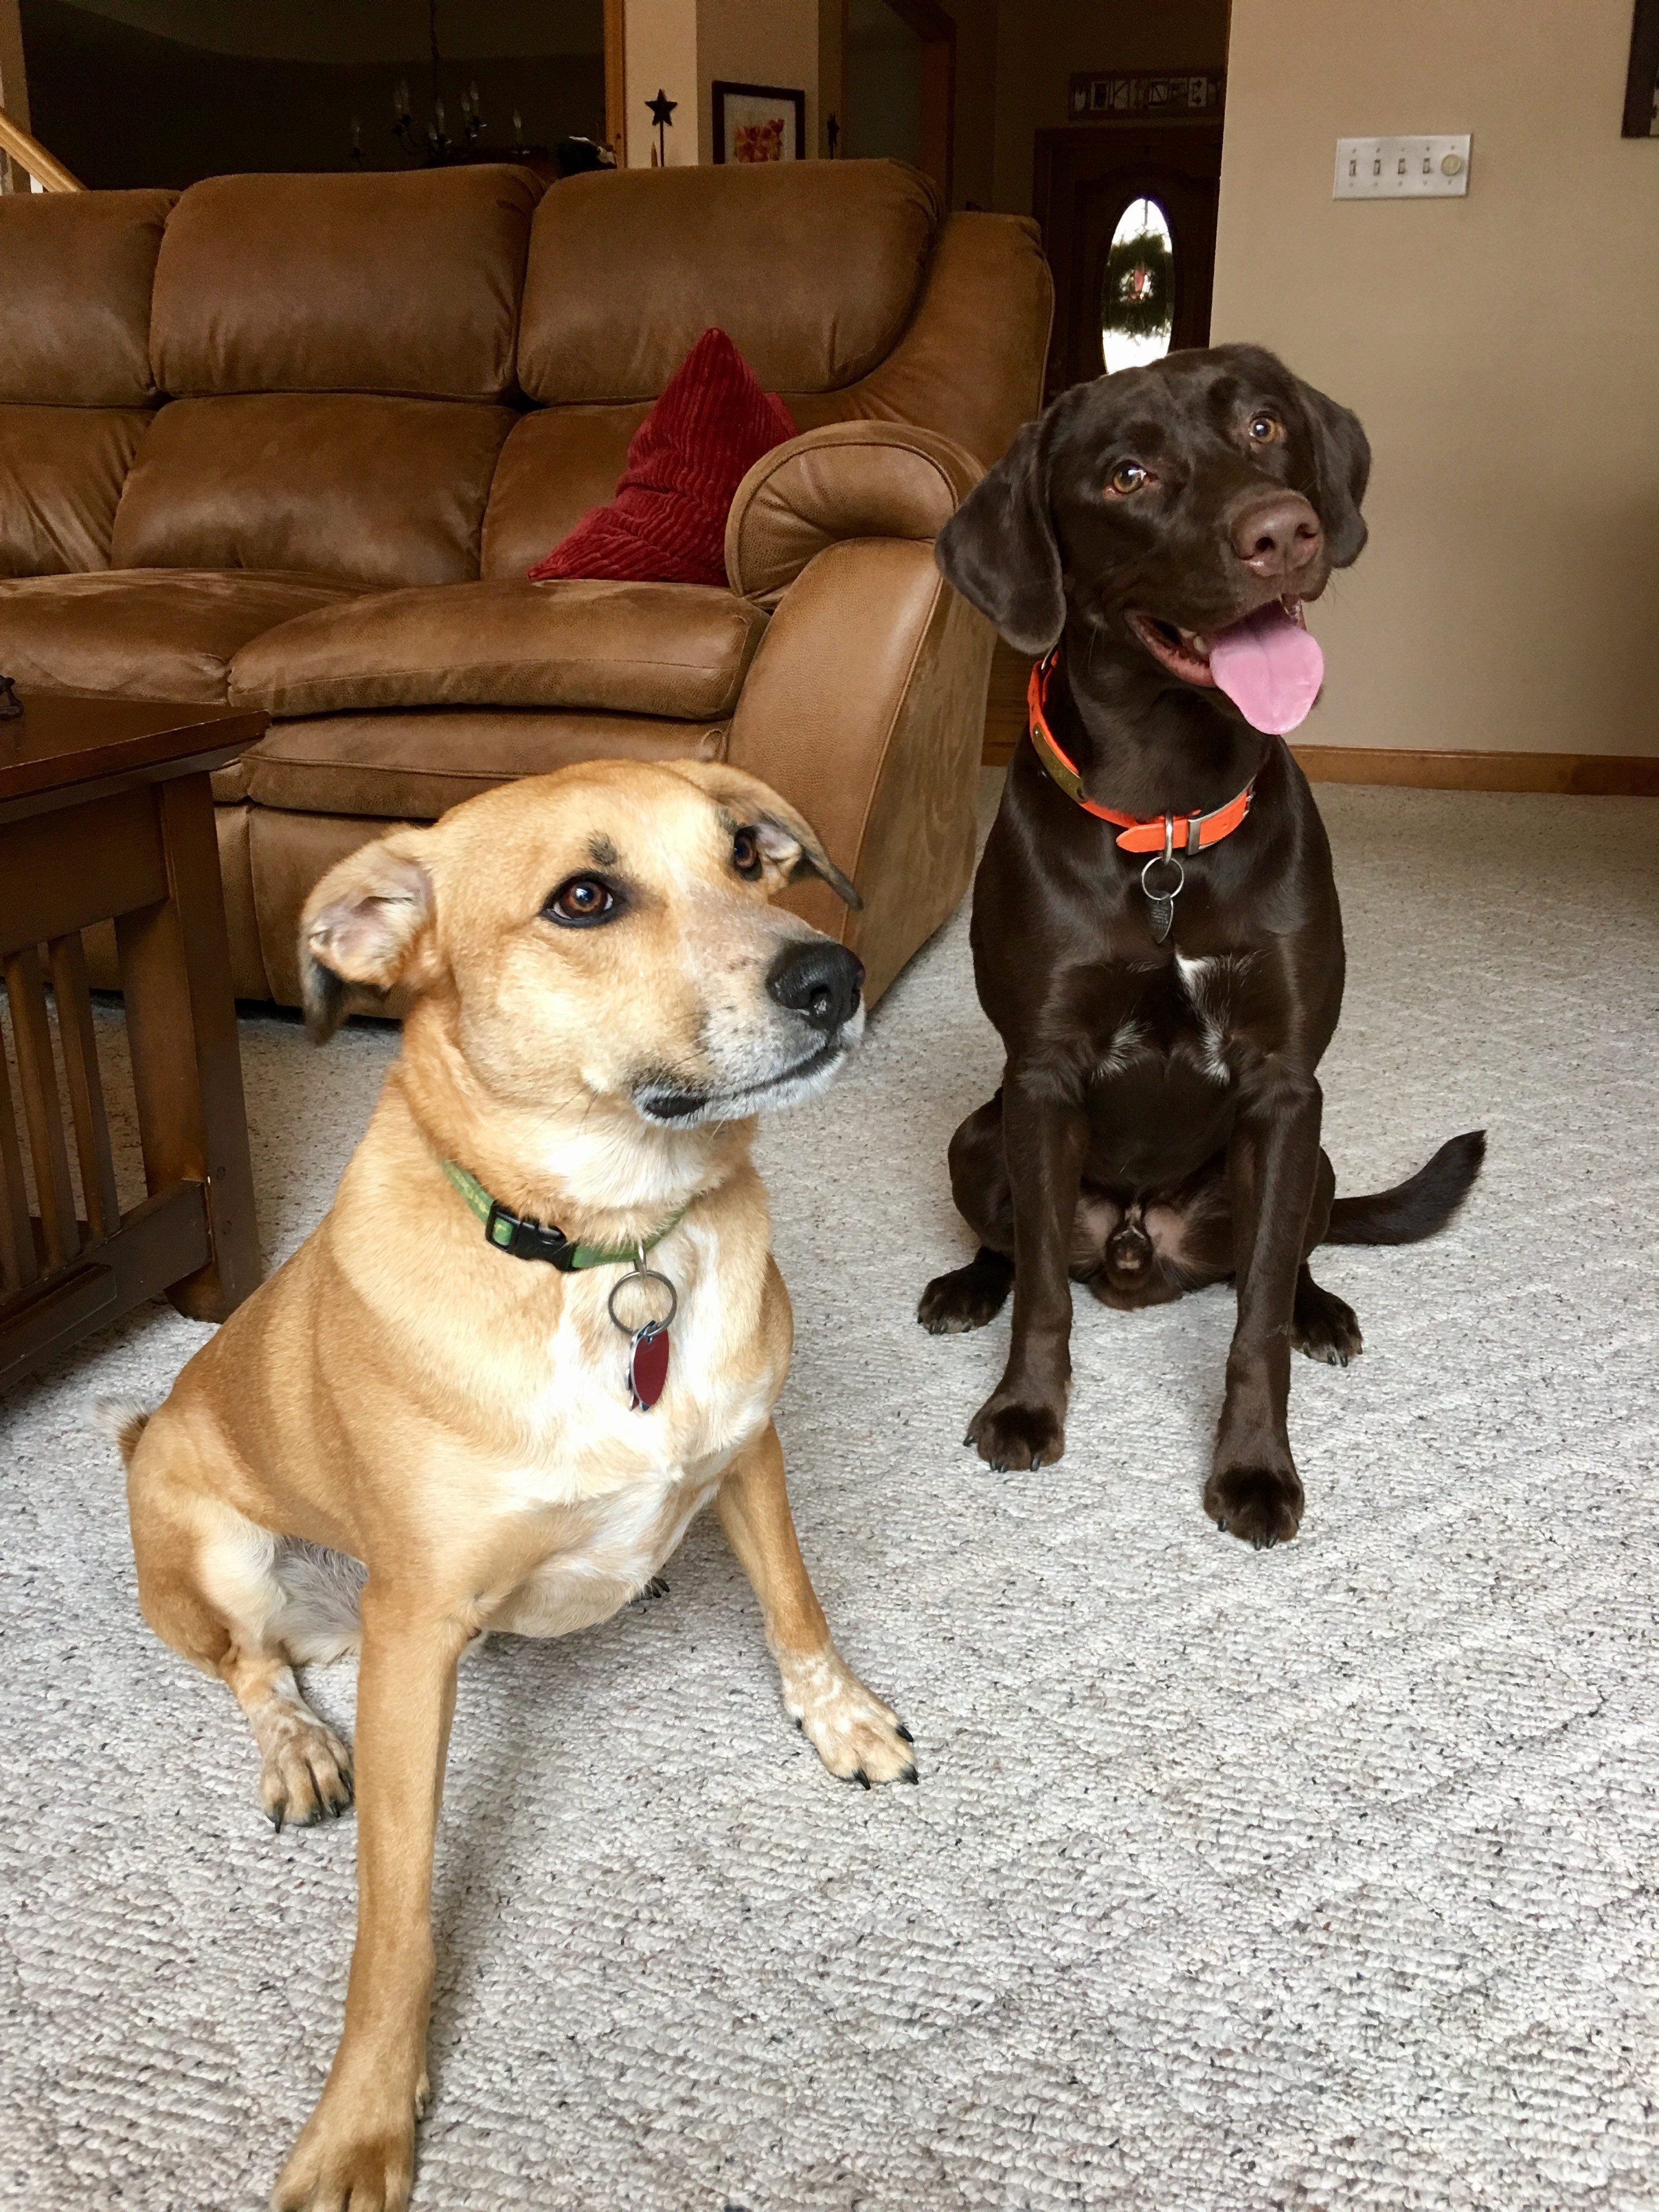
Charlie and his best friend Jaeger, February, 2017 – Mars, PA

Being a Best Friend:  A Charlie Dog Guest Post.

Here are some things I have learned about being a best friend.  I hope you find these helpful:

  • Always act like it has been a hundred trillion years since you’ve last seen each other (even if it’s only been a day)!  Run around like maniacs and chase each other and jump all over each other.  It shows how much you’ve missed them and love them.
  • Share your “stuff” (including your donuts and bones and balls) – even if it is difficult – and its even okay to play tug with them for a while, but always take turns giving in.
  • Share your food and drink – more will always be provided.
  • Invite them into your home – and visit their home too (even if you have to sneak!)
  • Love each other’s families – they are the ones who helped make them the way they are.
  • Tell each other secrets (use secret signals and languages if necessary), and make sure you keep them secrets.
  • Take walks together – its good exercise and company.

These are just a few things I have learned along the way since I met my new best friend about a year ago when he moved into my neighborhood.  Jaeger (that’s my best friend’s name) is a year younger than me even though he is bigger.  Isn’t he handsome?  I love Jaeger, and he loves me.  We are best friends.

Mom tells me that to have a best friend you have to be one, so I try really hard.

Everyone needs at least one best friend.  I’m glad I have Jaeger.

Woofs & Wags,
Charlie

Charlie is an adopted dog with brown eyes and a white-tipped tail who brings joy and laughter to his family and friends.  Charlie is a gifted writer, raving food critic, cat, chipmunk, and donut lover, and exceptionally photogenic model.  Some of his best friends are Mike the UPS Man, Cliff the Mailman, Jaeger the neighbor dog, and ANYONE who delivers pizza to the house.   If you would like to read more guest posts by Charlie, simply type “Charlie” into the Search box at the top right hand corner of this link: thecreativelifeinbetween.com.   If you would enjoy a companion like Charlie, please consider pet adoption.

My New Creation Station

My New Creation Station / Art Studio is just about done.

A few pieces of art need framed for the walls and some fabric is needed for a window treatment, but besides splashes of paint and scraps of paper on the floor, we are about done.

Hubby has been working so hard this past month transforming  a 22′ x 13′ bonus space we had in our home into a usable space for a few of my “creative life in between” hobbies.

Duct work had to be moved for the air flow of heat and air conditioning.
A cold air return had to be added.
Recessed lighting and a ceiling fan were installed.
Walls were painted.
Flooring was laid.  (And I’m so grateful to my son, Nick, for pitching in last Saturday to help Hubby with the underlayment, padding and laminate flooring.  They did it all in a day!)
Trim was stained and cut and nailed in.

And then I got to start filling it with my painting and stamping and crafting and sewing and photography supplies.  The weekend was spent cleaning out a walk-in-closet that could not be walked in anymore and an office that doubled as a craft room.

Our large garbage receptacle was filled.  The office is now streamlined and breathable.  The walk-in-closet can now be walked in.

It was cleansing and fulfilling and back-aching and tiring work, but so wonderful to accomplish.

And one of the best parts about it all is the only new things furnishing my art studio (besides lighting and fan and flooring) are the Husky Adjustable Wood Work Table and Chrome Shelving Hubby bought me for Valentine’s Day and the fabric organization boxes I bought to organize things in.

Leftover cans of paint from other home projects were used to paint the walls and ceiling.

A very old 8′ folding table that was stashed in the basement, as well as a small four-drawer wooden baby dresser, got a fresh new look with a coat of Tuscan red chalk paint.

I’m keeping one tall wall clear and open for possible photography use.  I received the reflector and Genaray light for Christmas.  Another little spot houses my light box for photographing smaller things.

Another corner is reserved for sewing.

A very special corner is set aside for grandies and other children that may visit with a small child’s art desk that holds a roll of paper (gifted to use by some very special peeps), plastic drawers filled with wooden stamps and a carousel of crayons and markers.

It’s been fun organizing paints and supplies.  I even created a long-needed paint chart for my watercolors and am trying to decide which 20 colors to add to a new palette.

Enjoy this little 30-second Hyperlapse visit of my new little Creation Station.  Can’t wait to splash it up!

Cheers & Hugs,
Jodi

PS – If you can’t view hyperlapse video above, click here to watch video on Youtube.

Peanut Butter Banana Bread with Chocolate Chips

peanut-butter-banana-bread-with-chocolate-chips

Peanut Butter Banana Bread with Chocolate Chips.

I had a few bananas hanging out that were getting very ripe, so I decided to make a loaf of banana bread yesterday morning.

Instead of making my usual, I wanted to try something different.  Knowing how yummy peanut butter toast is with sliced bananas (right??!!), I thought peanut butter would be a wonderful addition to banana bread.  And while I was at it, why not throw in a few chocolate chips?!

peanut-butter-banana-bread-with-chocolate-chips-2

Thinking I was a genius for coming up with this idea, I searched online just in case.  Well of course others had tried this combo!  (Where have I been?!) I found a few different versions, so I took what I liked from them and adapted to come up with this one below.  It was delish!  The peanut butter is subtle, but adds a wonderful new twist.  This bread is SUPER moist and really wonderful warm out of the oven.

Hope you’ll give this twist on banana bread a try!

Peanut Butter Banana Bread with Chocolate Chips

Ingredientspeanut-butter-banana-bread-with-chocolate-chips

  • 4 medium ripe bananas, mashed
  • 1/2 cup creamy peanut butter
  • 1/2 cup sugar
  • 1/2 cup brown sugar
  • 1/3 cup buttermilk (I make by mixing milk and a dash of vinegar)
  • 1/4 cup vegetable oil
  • 2 eggs
  • 2 tsp vanilla extract
  • 1 tsp baking soda
  • 1/4 tsp salt
  • 2 1/4 cups all-purpose flour
  • 1 cup semi-sweet chocolate chips or chunks

Directions:

Preheat oven to 350 degrees F.  Grease or spray a large bread loaf pan (of course I use a stoneware bread pan), then line with parchment paper allowing it to hang over the edges for easier removal.

In a large bowl, combine first 8 ingredients.  Mix well.  Add baking soda, salt, and flour.  Mix until combined.  Gently fold in chocolate chips reserving a handful to sprinkle on top. of batter.

Pour batter into prepared pan.  Bake approximately one hour or until toothpick inserted in center comes out clean.   If the bread starts getting too brown, place a tent of foil over top at around 45 minutes.

Cool in pan for 10 minutes, then lift out by grabbing parchment paper.  Cool on wire rack.  

Enjoy!

Cheers & Hugs,
Jodi

Five-Minute Homemade Rustic Artisan Bread

bread-5-minute-rustic-artisan-bread

Five-Minute Homemade Rustic Artisan Bread.

Aren’t these loaves beautiful?!  I recently found this recipe that makes homemade bread so easy!

bread-5-minute-rustic-artisan-bread-2

You can mix this dough together in five minutes.  Then it just needs to rest for two hours while you go about doing something… anything else.  After that, throw it in the fridge – for up to 14 days!  Whenever you want a fresh loaf of bread, grab a hunk of dough, and bake it.  Super simple, super delicious!

bread-5-minute-rustic-artisan-bread-3

So… disclaimer… you obviously can’t make it from start to finish in five minutes, but that really is all the longer the dough takes to mix together, and there is no kneading, so it really is a simple way to make warm, fresh, delicious homemade bread quickly and easily with just a few simple staple ingredients!

Five-Minute Homemade Rustic Artisan Bread

  • Servings: 4 1 lb loaves
  • Print

Ingredients:bread-5-minute-rustic-artisan-bread

  • 3 cups lukewarm water (approx. 100 degrees F)
  • 1 Tbsp active dry yeast
  • 1 1/2 Tbsp coarse salt (I love using Maldon Sea Salt Flakes)
  • 6 1/2 cups flour

Directions:

Pour water in large bowl.  Sprinkle with yeast and salt, and mix until dissolved.  Add flour all at once, and mix until completely incorporated.  That’s it!  Five minutes.  No kneading.

Place a clean kitchen towel over the bowl and let it sit for two hours.

After two hours, cover bowl with saran wrap (but not too tight as it needs a little vent for gases to escape), and throw it in the fridge.

Your dough is ready to use at anytime in the next 14 days.

When you are ready to bake a loaf, preheat oven to 450 degrees F.  Grab a hunk of dough with floured hands.  Do not punch it down, and do not knead or overwork it.  Gently shape as desired into a ball, loaf, rolls – whatever you like.  Place on a baking stone. (I bake absolutely EVERYthing on baking stones – cookies, bread, roasted vegetables, meatloaf, french fries – they are all I use in the oven – and the results are awesome!) You can let it rest for 30-40 minutes or bake right away – depending on the density you desire.  Dust top of dough with flour (and salt if desired).  Slash a few cuts in the dough with a serrated knife.

Place an empty metal broiler pan on bottom rack of oven and fill with warm water right before placing dough in oven.

Bake for 20-30 minutes until the crust is a rich brown color and firm to the touch.  Remove from oven and cool on wire rack.

Enjoy!

Cheers & Hugs,
Jodi

*original recipe found at Leite’s Culinara

Purple Irises in Watercolor

purple-iris-2-black-border-matted

Single Purple Iris Watercolor Loose 8 x 10

Purple Irises in Watercolor.

Continuing on my kick of violet and crimson and gold
and thinking floral…
and thinking Spring… (it continues to be in the 60’s and sunny here this crazy February of Spring in Western Pennsylvania!)

I created a couple iris paintings.

They are both very different, but I kinda love them both.

I painted these on Sunday after dinner on what was such a beautiful sunny, warm day.

I have to admit I gave purple irises a try on Saturday (in the midst of “construction” work on another project in the house).

I painted four or five different versions.  They were all terrible!

I hate days like that.  It makes me feel like I’ve “lost it.”   Not to say I’m anything magnificent in the whole big world of amazing watercolor artists.  But I’ve finally come to a place where I feel like I have some bit of my own style and can often appreciate the beauty in some of my work.

When I did this first one, I was so pleased.  I felt like I finally achieved what I was going for.

I thought I’d try another version, and I like it too.   In fact, I can’t decide between the two.  I wish the photos better represented what they look like – or maybe it ‘s just me, but they look so much better in real life.

purple-iris-1-black-border-matted

Single Violet Iris Loose Watercolor 8 x 10

Wishing you a day filled with simple little victories and moments to feel good about yourself!

Cheers & Hugs,
Jodi

Yellow & Green Grilled Chicken Spring Mix Salad

yellow-and-green-spring-mix-salad-1

Yellow & Green Grilled Chicken & Spring Mix Salad.

They say it is important to balance colors in our diet.

yellow-and-green-spring-mix-grilled-chicken-salad-2

I love to make salads from whatever I can find in the fridge and pantry – especially at lunch time – when it is only me, and I can make it whatever way I want!

I often make a large batch of grilled chicken during the week so I can have leftovers for salads and snacks.

I love mixing veggies and proteins and fruits and nuts in a beautiful, colorful meal.

yellow-and-green-spring-mix-grilled-chicken-salad-3

This yellow and green salad just “happened.”  I had not planned it to be yellow and green, but when it ended it up that way, I marveled at it’s beauty as well as it’s deliciousness.

For this “springy” lunch time salad in the middle of February – when the temperatures in our part of the world have been more spring-like than wintry – I found myself topping a bed of Spring Mix greens with beautiful yellows.

Enjoying yellows and greens not only in my salad, but in the air here in Mars in this beautiful stretch of Spring in February.

Yellow & Green Grilled Chicken & Spring Mix Salad

Ingredients:

  • 2 cups mixed greens -Spring Mix
  • 1/4 cup sliced Vidalia sweet onion
  • 1/2 cup yellow cherry tomatoes, halved
  • 1/4 cup shredded cheddar cheese
  • Handful of golden raisins
  • 1 grilled chicken breast, sliced
  • Balsamic Viniagrette Dressing
  • Salt & Pepper to taste

Directions:

Place Spring Mix salad greens in large salad bowl.

Add onion, tomatoes, shredded cheese, golden raisins and chicken.  A handful of walnuts and/or pumpkin or sunflower seeds  would be great too!

Drizzle with Balsamic Viniagrette and a dash of salt and pepper.

Enjoy!

Cheers & Hugs,
Jodi

Why?

sunny-sky-february-19-2017-mars-pa

Why do I feel the most sad
when it is the brightest most beautiful day?
Some time has passed and life goes on,
but why does my heart not feel better?

Why does the sound that I used to love
of the trains blowing their horns in the distance and echoing through the hills
haunt me so much
that I sometimes want to scream “Shut Up!”

Why do the melodious wind chimes
that sing in the breeze
make me so sad and sometimes mad
that I had to put them away for a while.

Why did you have to take your life
on the day we used to celebrate
the life of another so dear to us
whose life was also ended too soon?

Why – on a most beautiful day in February – the month of your birth,
when it should be cold and snowy and blustery,
did I sit in the sunshine… in bare feet… and short sleeves…
and mourn this beautiful gift you were missing that I know you would have loved?

Why did we often let long periods of time pass
when we didn’t see each other or talk
when I knew you were there and that you loved me,
and I know you knew I loved you too?

But now you are gone,
and now I think of you every day,
and I miss you every day…
and I wish things could be different.

With love always from your sister,
Jodi

Friends – I usually try to keep my blog upbeat and encouraging, but I really felt the need to share that even in the best of days and times and all the blessings in life, there are still times of grief and sadness.  We can’t ignore it.  Grief is something we all must face when we love.  When we love someone and lose them, it hurts deeply.  But it is still worth it to love and bear the hurt, for what would life be like without the love?  To grieve means you have loved.  And to love and lose is far greater than to have never loved at all.

I also want to thank a dear friend, who somehow always seems to know the right time and right thing to say.   This dear friend – out of the blue and from far away – sent me a text telling me he was thinking of me and my brother when he heard a song, and he thought I should listen to it as it could be my brother’s parting song.  If you care to listen, this is the song he recommended to me: “Go Rest High On That Mountain

Smack in the Middle of Winter

february-18-2017-sunrise-mars-pa

Smack in the Middle of Winter

The sunrise was beautiful
that mid-February day
when Charlie and I went
on an early morning walk.

And the sun just shone brighter,
and the sky turned bluer,
and the air grew warmer,
until it reached a sunny 68 degrees!

A record was set that caused
the robins to sing and the breeze to gently whisper.
It encouraged the daffodils to pop out of the ground,
and the earth smelled like Spring.

Charlie snoozed on the porch,
and we opened the window
while we painted and pounded
wearing light t-shirts.

It was a beautiful Spring day…
smack in the middle of winter.

Cheers & Hugs,
Jodi