Reward

reward

This week’s WordPress Daily Post Weekly Photo Challenge is “Reward.”

There are so many things I could think of to post that represent “reward” in a photo, but I decided upon this one that brings so much joy to my heart and such a huge smile to my face – e v e r y single time I look at it!

As a baker, there is no greater reward than for someone to completely and thoroughly enjoy what you baked – right?

Have you ever seen greater enjoyment over eating a sweet treat than this little guy eating a chocolate Thanksgiving Turkey Oreo Cookie Ball I made this past Thanksgiving?

I snapped the photo from across the table trying to freeze the joyous moment in time.

This is REWARD to me!

Can you look at it without smiling?

Cheers & Hugs,
Jodi

Come On Get Happy

hello you thinlits circle framelits so social happy birthday card

A very special little lady reminded this past week that her birthday is coming soon, so I wanted to come up with a fun, unique card for her.

I was inspired by a cute idea I saw done using circle framelits in fun colors with a die cut greeting by Mayuri at Candles in the Garden.  Once I made my card and checked the link to credit, I realized I hadn’t even come close to doing Mayuri’s design justice!  She used a beautiful inlaid technique on her card which I may have to try some time.

For my card, I cut multiple sizes of circles using the StampinUp Circle Framelits and layered them on top of each other on black paper.  I then cut out two layers of the word “happy” from the StampinUp Hello You Thinlit Set.  I covered “happy” with a glossy layer of Crystal Effects to give it a little more pop.  I then stamped “@birthdaygirl” from the StampinUp So Social Stamp set and added a few sequins for embellishment.

For some reason this card reminds me of the song, “Come on Get Happy” with the psychedelic Partridge Family bus colors, and it makes me smile.  (I know – sometimes I’m living in my own little happy place…)  🙂

I hope the birthday girl will enjoy her card.

Happy Friday friends!

Cheers & Hugs,
Jodi

Shrimp & Vegetable Lo Mein

Lo Mein

Anyone who has followed along here at LifeinBetween.me for any length of time might be wondering what an ole’ Hunky Polish chick that loves baking cookies and cakes and breads and makes halupkis and haluski and pierogies is doing trying her hand at Chinese comfort food….

Well – why not?!

And oh YUMMMM!

Lo Mein 2

Who knew how easy and healthy it could be without buying it from the local Chinese take-out?

And is there anything more versatile?!

The sky is seriously the limit with all the things you can mix into this!

Change up the protein from shrimp to chicken or pork or even beef.

Almost any vegetable works too!

Can’t find Lo Mein Noodles at your local grocery?  Spaghetti noodles work just fine!

lo mein prep

I used inspiration from the real experts like the gang at The Woks of Life and  Chungha at Damn Delicious.

Here’s my version.

Homemade Lo Mein

  • Servings: Enough for a Hungry Family
  • Print

 Ingredients:

1 – 1.5 lbs Thin Spaghetti (or Lo Mein noodles) – cooked al dente
1 lb Cooked, Deveined Shrimp, Tails removed (or chicken or pork or beef)
5 cups spinach leaves
1 cup shredded julienne carrots
1 cup diced celery
1 cup sliced mushrooms
1 cup thin asparagus tops
1 cup green onions, cut into 2 inch lengths
1 cup sugar snap peas
2 red peppers, cut into strips
2-3 cloves minced garlic
3 tsp. Olive Oil
Sauce:
5 Tbsp. Soy Sauce
1 Tbsp. Sesame Oil
2 Tbsp Sugar dissolved in 2 Tbsp hot water
1 tsp Salt-Free Asian Spice Seasoning
1 Tbsp freshly minced ginger
1 tsp Siracha Sauce

Directions:

Heat olive oil in large wok or skillet. Add garlic and cook for 1 minute. Add rest of vegetables, except spinach (any of the above or any that you like) and cook for 4-5 minutes. Stir frequently. Add cooked shrimp (or protein of your choice or simply keep vegetarian). Cook 2-3 more minutes. Add spinach and cook 1-2 more minutes. Stir in noodles and sauce mixture. Gently toss.

Serve and enjoy!

Need to see it again?

Lo Mein 2

Cheers & Hugs,
Jodi

Iridescent Ice Bubbles

icicle droplets

I was talking with a friend yesterday who asked how I was doing.   You know… just the usual small talk.

She commented, “I’ll bet you wish you were back in Florida with your friend in the warmth.”

And yes – I do wish I was back there, especially with my dear friend.  And especially because our high temperatures have barely reached double digits for the past two weeks let alone get above freezing….

Yet, as I explained to my friend, if it weren’t for these bone-chilling temps, I’m not sure I would appreciate the warmth of Spring and Summer or trips to Florida as much….

I truly love the beauty of the four distinct seasons we are fortunate to experience in my part of the world –  life here in Mars.  It always amazes me that our yard can look so differently in the different seasons, and the snow and ice I tromp through in the Winter to get to the mailbox is the same yard I lay in and walk through in bare feet in the Summer and pile leaves on in Autumn and watch life burst through in Spring.

And though the temperature was a mere 9 degrees F yesterday, the sky was a deep azure blue and the sun was shining so brightly and reflecting on the snow that I needed sunglasses.

It was melting the icicles on the back of our house, and they were glistening and sparkling like bright diamond shards against the clear sky.  And the crystal droplets created a beautiful sheet of frozen iridescent ice bubbles on the deck beneath.

Through the lens of my camera, there is so much beauty to be found.

Thanks for the reminder, Lori, and your continued support and friendship.    🙂

ice bubbles on deck from icicles dripping

Cheers & Hugs,
Jodi

PS  My top photo is another entry for the WordPress Daily Post Weekly Photo Challenge Rule of Thirds with Bokeh

A Star was Born

Stella Star

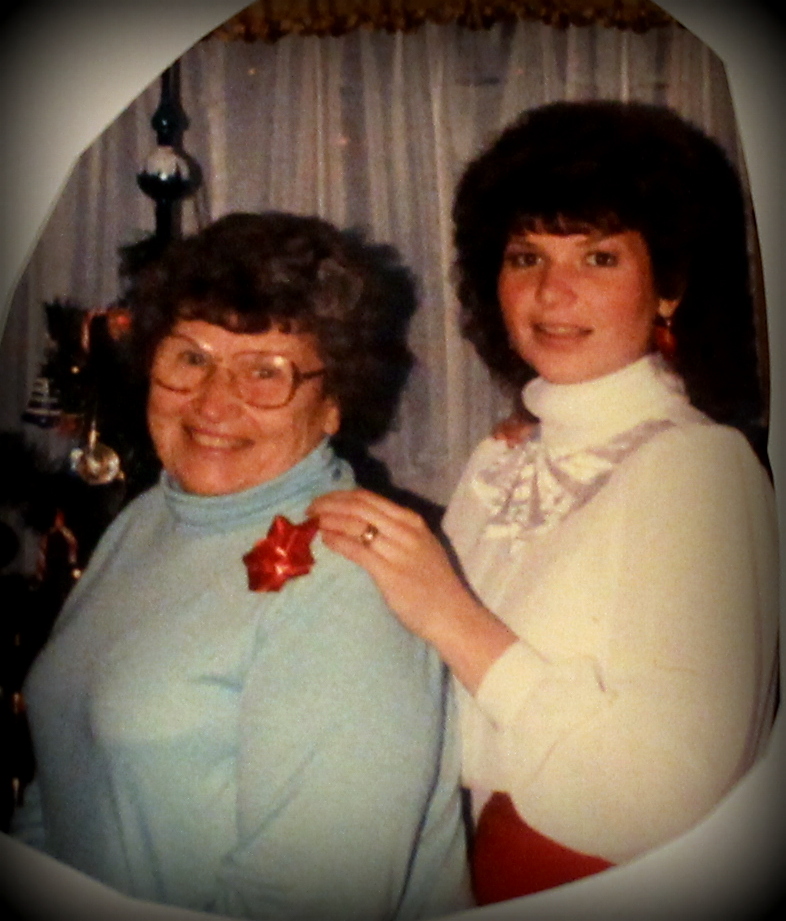
30 years ago – Grandma (Stella Star) 72 – Jodi 22

A Star was born
on a warm summer’s eve
destiny’s daughter
Stella Louise.

A Star was born
in a coal mining town
a new life, a new country
her parents danced round.

A Star was born
It was 1913
Her parents worked hard
but life was still lean.

A Star was born
when Stella turned nine
with three little brothers
and Dad in the mine.

A Star was born
when her mom passed away
and Dad shared the news
she must now the role play.

A Star was born
to cook and clean and no longer play
for Dad had work and brothers school
Stella took over the chores each day.

A Star was born
that raised brothers so dear
they all grew in love
and days turned to years.

A Star was born
that married my Pap
She laughed and sang and chattered
while I sat on his lap.

A Star was born
that taught me about life
the meaning of love
what’s wrong and what’s right.

A Star was born
that died too soon
but is always with me
like a warm cocoon.

A Star was born
as my memories reveal
the best, greatest gifts of love
for me she made real.

A Star was born
on that warm summer’s eve
My Grandma, my hero
Her memory my reprieve.

Grandma & Grandpap, Johnny & Jodi - 1968

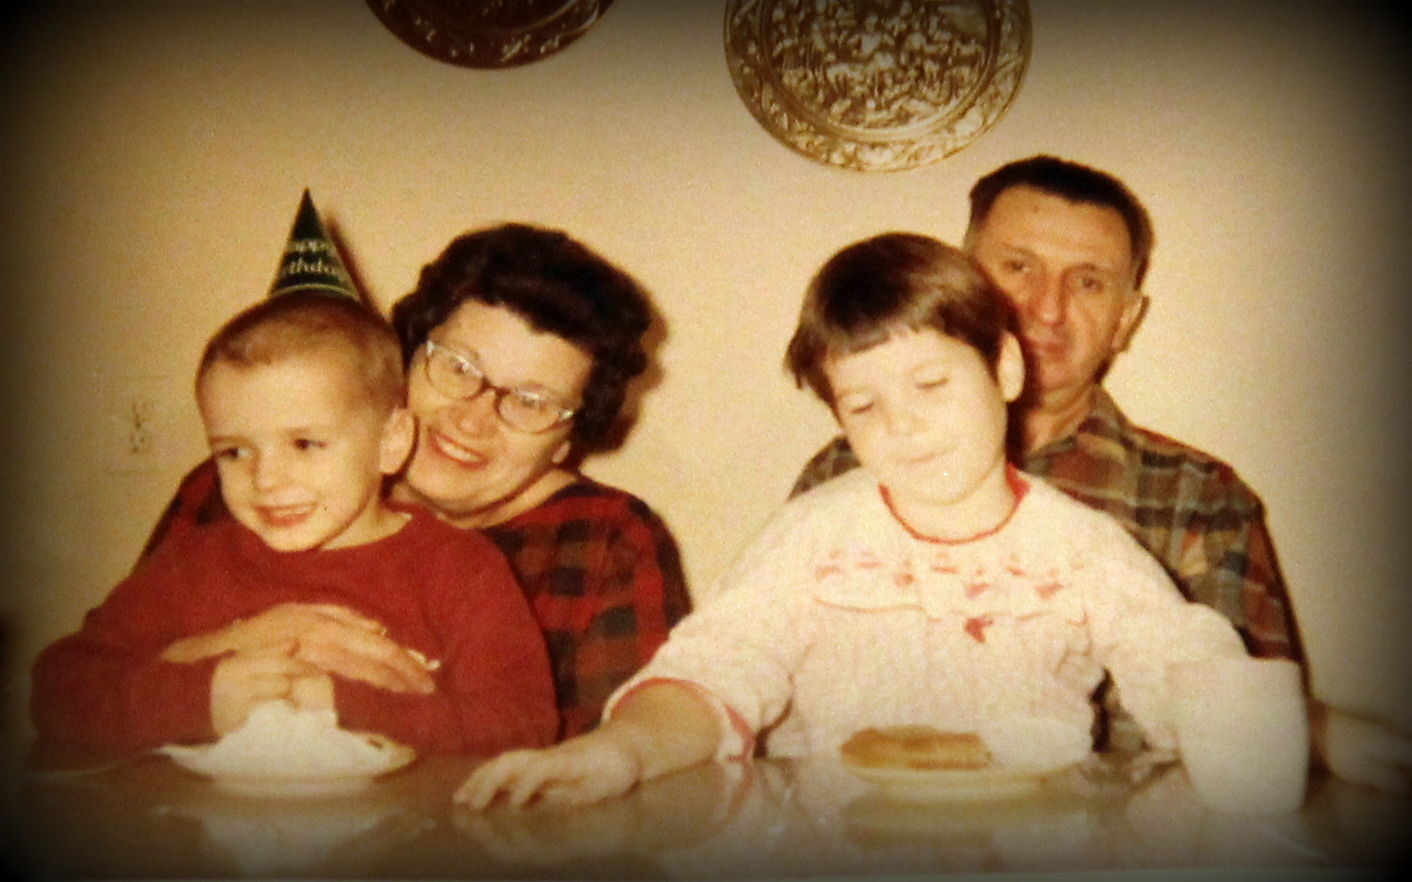
Grandma & Grandpap, Johnny & Jodi – 1968

This poem is dedicated to my Grandma, my hero – Stella Star, and done in response to the WordPress DailyPost Writing 201 Poetry Challenge:

Prompt:  Hero(ine)
Form:  Ballad
Device:  Anaphora/Epistrophe

Grandma died 20 years ago at the age of 82.  I was 32.  I still miss her every day, but I try to live each day carrying out her legacy and making her proud of the person she helped mold me into.  She will always be my guiding star.

Cheers & Hugs,
Jodi

Celebrate Today

celebrate today pp233

I had so much fun making this birthday card, and I’m pretty happy with how it turned out.  I must give credit for the inspiration to Justin Krieger at jkcardsonline.com.

I knew I needed a birthday card this week, and I was anxious to get back to playing in The Paper Players Challenge.  When I saw Jason’s watercolor confetti balloons card and the sketch from Sandy at The Paper Players Challenge #233 this week…

pp233… this was the result.

celebrate today pp233 flat

I even carried the theme to the inside.

celebrate today pp233 inside

So here are the details for my stampin’ friends:

Supplies:

StampinUp Whisper White Cardstock for the Base
Watercolor paper
Vellum Paper
StampinUp Celebrate Today Stamp Set
StampinUp Balloon Framelit Die
Jim Holtz Distress Inks: Broken China, Salty Ocean, Peeled Paint
Versamark Ink
White Embossing Powder
Silver Embossing Powder
White Linen Thread
Foam Adhesive Tape, Glue Dots, Snail Adhesive

Directions:

Cut the Whisper White Card Stock into 4 1/4 x 11 and fold in half at 5 1/2
Cut watercolor paper to 4 x 5 1/4
Brush with clear water, then watercolor with distress ink colors
When dry, sprinkle with droplets of water, dab dry
Cut Balloon Shape out with framelit die, and reserve cut-out for inside of card
Adhere foam adhesive tape to back, and affix to card base
Cut three balloons from vellum
Emboss with Celebrate Today stamps
Adhere to card using glue dots discretely behind embossed dots and words
Stamp Happy and Birthday with VersaMark and heat emboss with silver
Adhere balloon strings
Adhere balloons and strings to inside of card

Wishing anyone with a birthday today or this week a very happy day!

Celebrate Today!

Cheers & Hugs,
Jodi

Weekly Photo Challenge: Rule of Thirds with Bokeh

Weekly Photo Challenge Rule of Thirds with Bokeh

This week’s WordPress Daily Post Photo Challenge is to use the Rule of Thirds with a Bokeh Effect.

It’s been snowing non-stop here in Mars this weekend, but I took this photo a week ago when in Florida.  I always love the way flowers look after a rain shower.  I thought this photo was a good example of the challenge effect, and it also reminds me of warmer sunny days and wonderful memories with a dear friend.

Happy Sunday!

Cheers & Hugs,
Jodi

Chocolate Chunk & Peanut Butter Chip Cookies

chocolate chunk and peanut butter chip cookies

Some days just call for baking cookies…  Like when you wake up and it is 13 degrees BELOW ZERO F!…  What a great way to warm up the house – right?

chocolate chunk and peanut butter chip cookies 3

And besides, my son, Nick, has been whining for requesting some chocolate chip cookies for a couple of weeks now.  I’m kind of “famous” for my chocolate chip cookies, but I hate doing the same old thing.  I’m a change junkie.  So instead of the usual chocolate chip cookies, I kicked it up a notch by mixing chocolate chunks and peanut butter chips in my classic recipe.

chocolate chunk and peanut butter chip cookies 4

They taste pretty awesome…  with a glass of milk…. coffee… hot chocolate… red wine (LOL!  Everything goes with red wine – right?).

chocolate chunk and peanut butter chip cookies 2

Chocolate Chunk & Peanut Butter Chip Cookies

  • Servings: 5 dozen large cookies
  • Print

Ingredients:

1 lb (4 sticks) butter, softened to room temperature
1 1/2 cups packed brown sugar
1 1/2 cups granulated sugar
4 eggs
2 tsp vanilla extract
4 3/4 cups flour
2 tsp baking soda
1 1/2 tsp salt
1 bag Nestle’s Semi-Sweet Chocolate Chunks
1 bag Reese’s Peanut Butter Chips

Mix softened butter and sugars with mixer until well blended. Add vanilla and eggs and mix until creamy. Add dry ingredients (flour, salt, baking soda) until well incorporated. Fold in chocolate and peanut butter chips.

Refrigerate dough for several hours or overnight.

Preheat oven to 375 degrees F. Shape dough into 1 1/2 – 2 Tbsp balls and flatten slightly. Bake on baking stone for 8-9 minutes. Let cool on stone for approximately 5 minutes, then remove to cooling rack to cool completely.

Cookies freeze well in Ziploc bags.

Enjoy!

Cheers & Hugs,
Jodi

Friends become our Chosen Family

painted petals friends chosen family

Isn’t that the truth?  I daresay no family is perfect, but isn’t it wonderful when we are blessed with friends that are so special they are like family?  Our “chosen” family.

I just got back from spending a wonderful week with one of my “friend families” and had to make a special card to thank them.

For this card, I used StampinUp’s Painted Petal stamp set.  Instead of just stamping the flower onto the card stock, I wanted to give it more of a loose “watercolor” kind of look, so after inking up the stamp, I spritzed it lightly with water, then stamped the flower image.  I like the effect.  Then I just mixed a bit of water with some ink and flicked it on with a paint brush for the random speckles.  I’m also loving the stitch embossed effect that the Lil Inker Designs rectangle framelits creates and achieved on this somewhat CAS (Clean and Simple) design.  And dang it, I just couldn’t help myself and had to add a couple of tiny pearl embellishments.  🙂

Happy Friday to you and your families – the ones you were assigned by birth – and/or those you chose!

Cheers & Hugs,

Jodi