Old-Fashioned Hard Tack Christmas Candy

Old Fashioned Hard Tack Christmas Candy

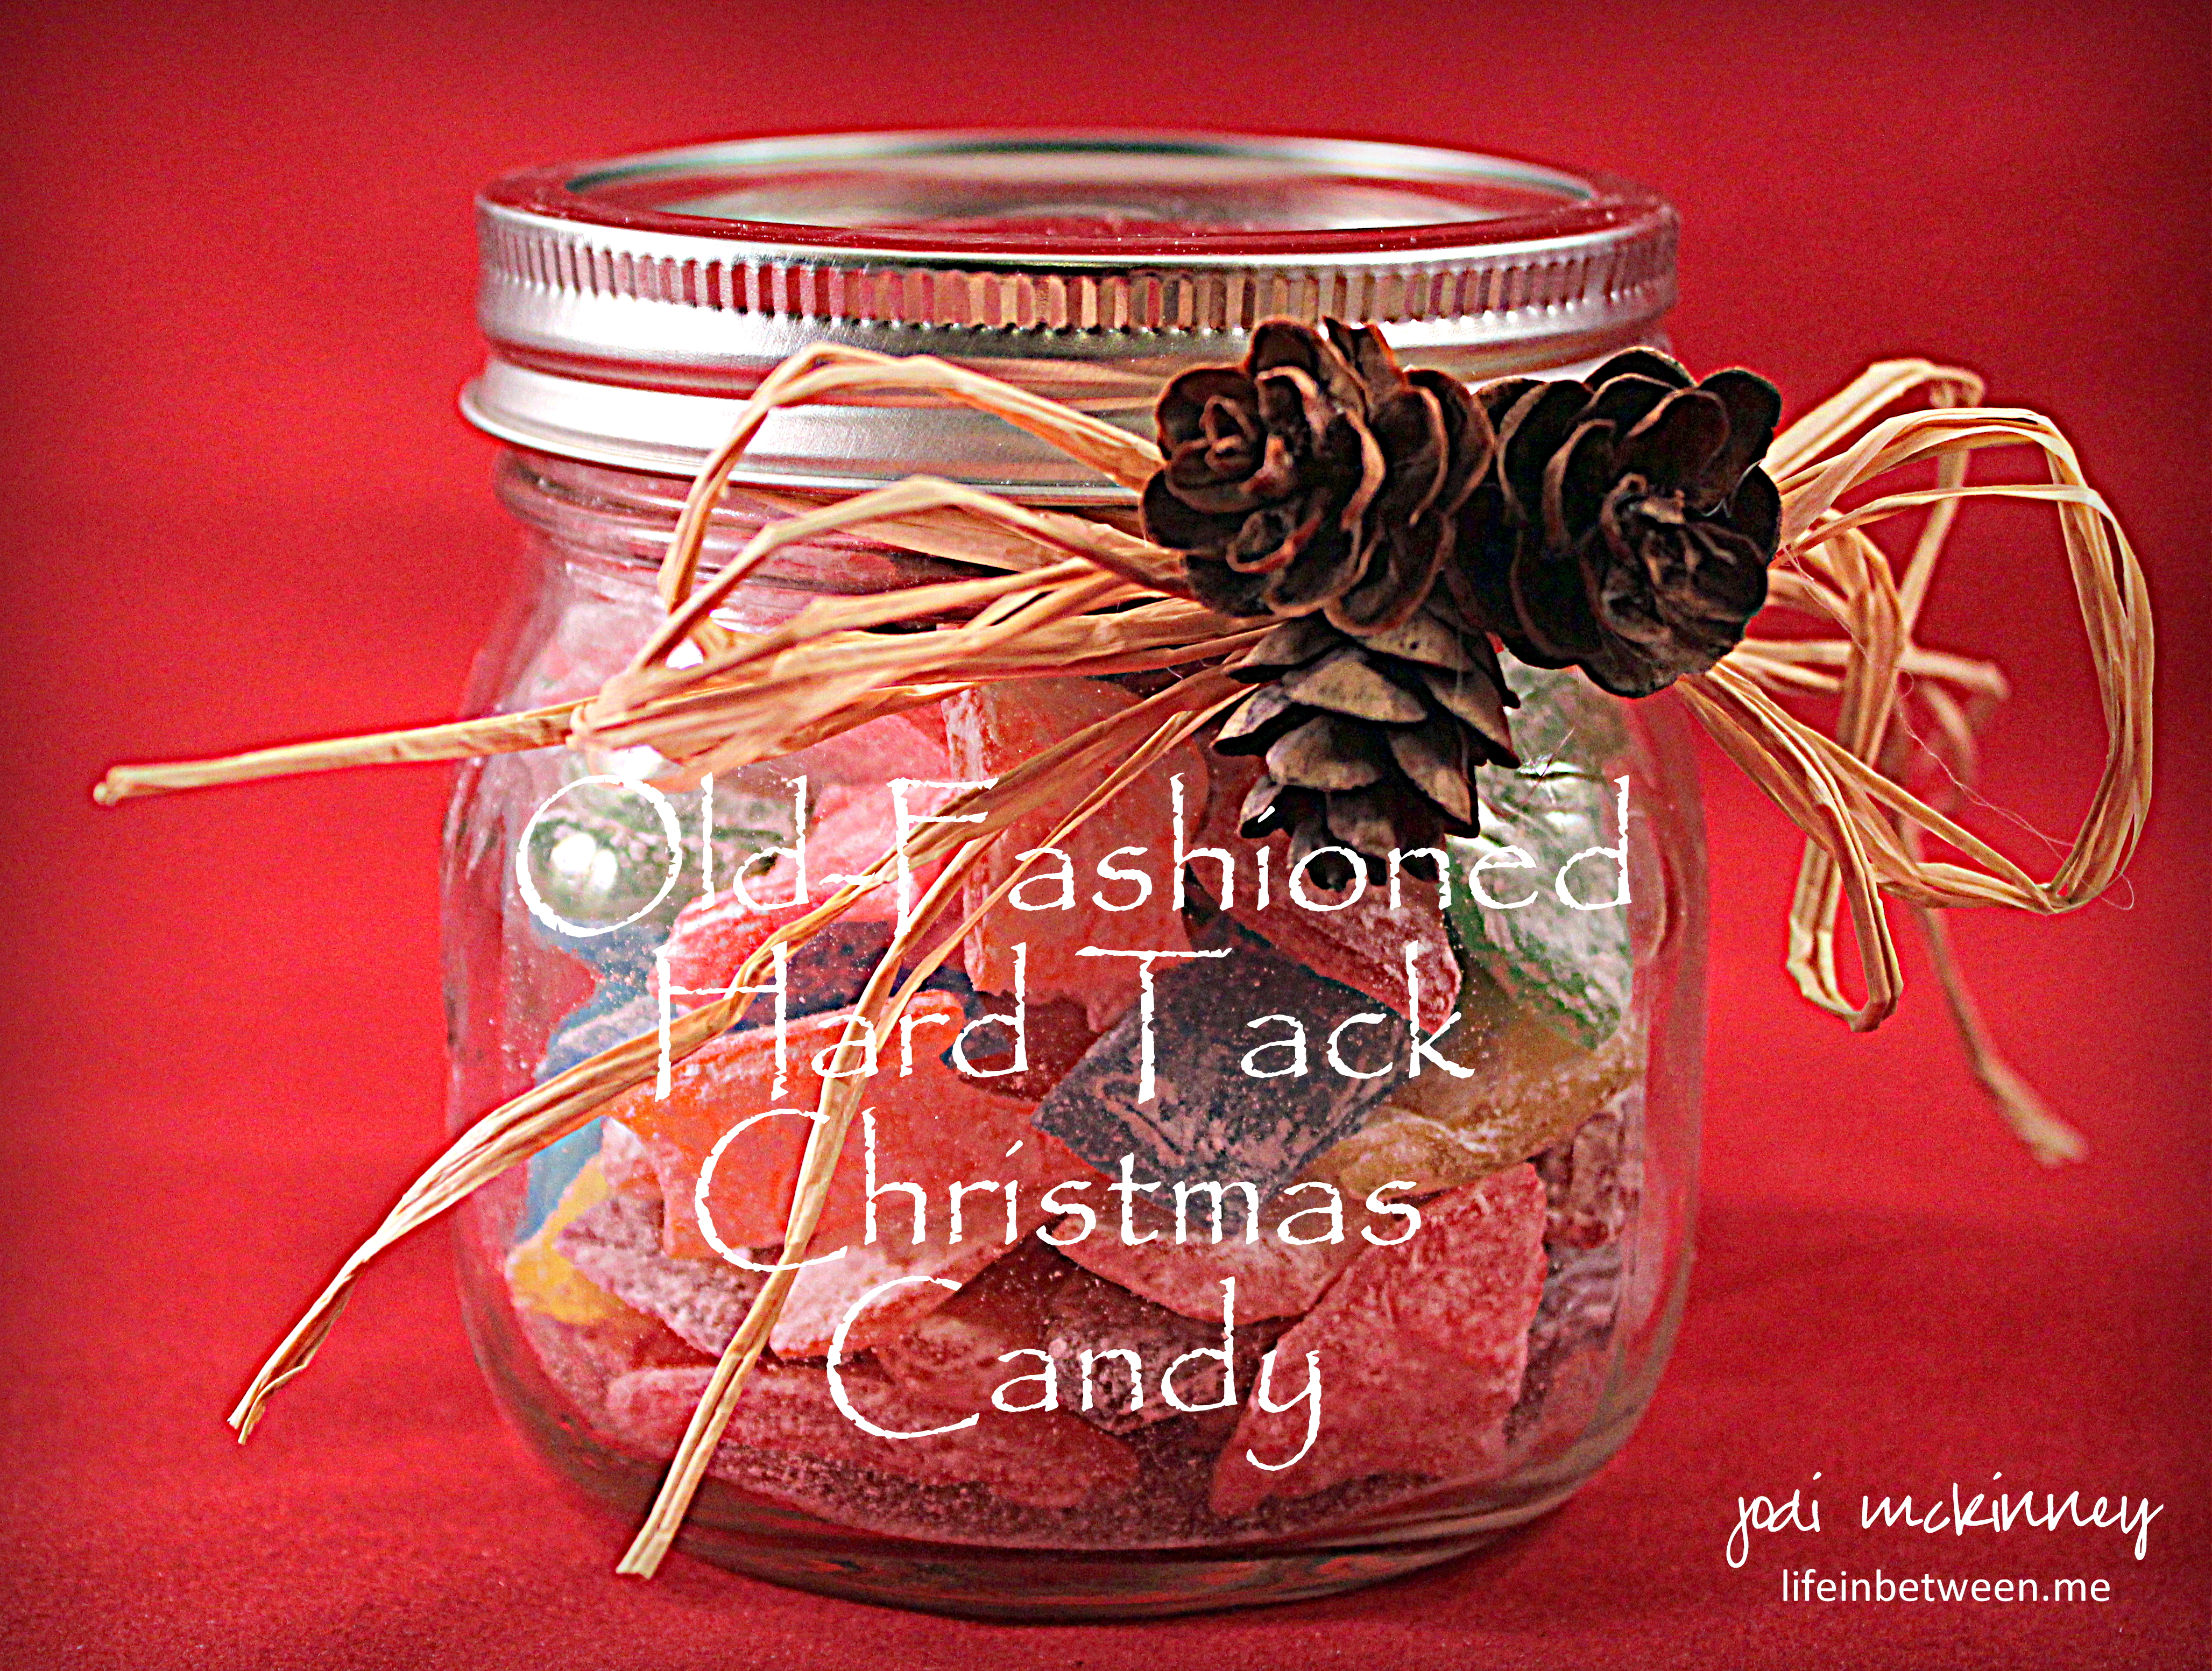
Making Old-Fashioned Hard Tack Christmas Candy is more than just “making candy.”

It is an opportunity to pass down family holiday traditions.

It is an opportunity to create memories.

A chance to spend time with those you love,

and a way to make a homemade Christmas gift.

hard tack candy flavors

So when my daughter-in-law, Colleen asked if we could make hard tack candy this year, I was so excited!

It has been quite a few years since the days when I was about her age and my mother-in-law taught me.

My sister-in-laws and I got together every year with my mother-in-law to make hard tack candy around this time (Thanksgiving weekend), so that the guys could take a bagful in their pockets for their annual deer-hunting trip, which always opens the Monday after Thanksgiving in our neck of the woods, and we would have plenty to enjoy and share as a special homemade gift.

hard tack christmas candy boiling

The recipe is quite simple, but also a bit messy, so we were very fortunate to have an extra helper this year in Charlie, who kept the floor lickety-split clean from any powdered sugar, butter or flying candy that hit it!

charlie christmas 2015

Colleen and her sweet sister, Katie, caught on amazingly quick, and we ended up making 10 batches to split between the three of us.

colleen hard tack christmas candy

katie hard tack christmas candy


hard tack jodi colleen katie 2015 christmas candy

We were happy with our results, and now the tradition has been started for the next generation.

hard tack christmas candy 2015

I hope you will give it a try!

Old Fashioned Hard Tack Christmas Candy 2

There is still plenty of time to make this sweet treat and create some memories with a new family tradition.

Here’s our recipe:

Old-Fashioned Hard Tack Christmas Candy

  • Servings: approx. 2 cups
  • Print

Ingredients:Old Fashioned Hard Tack Christmas Candy 2

  • 1 cup water
  • 3 3/4 cup white sugar
  • 1 1/4 cup Karo Corn Syrup
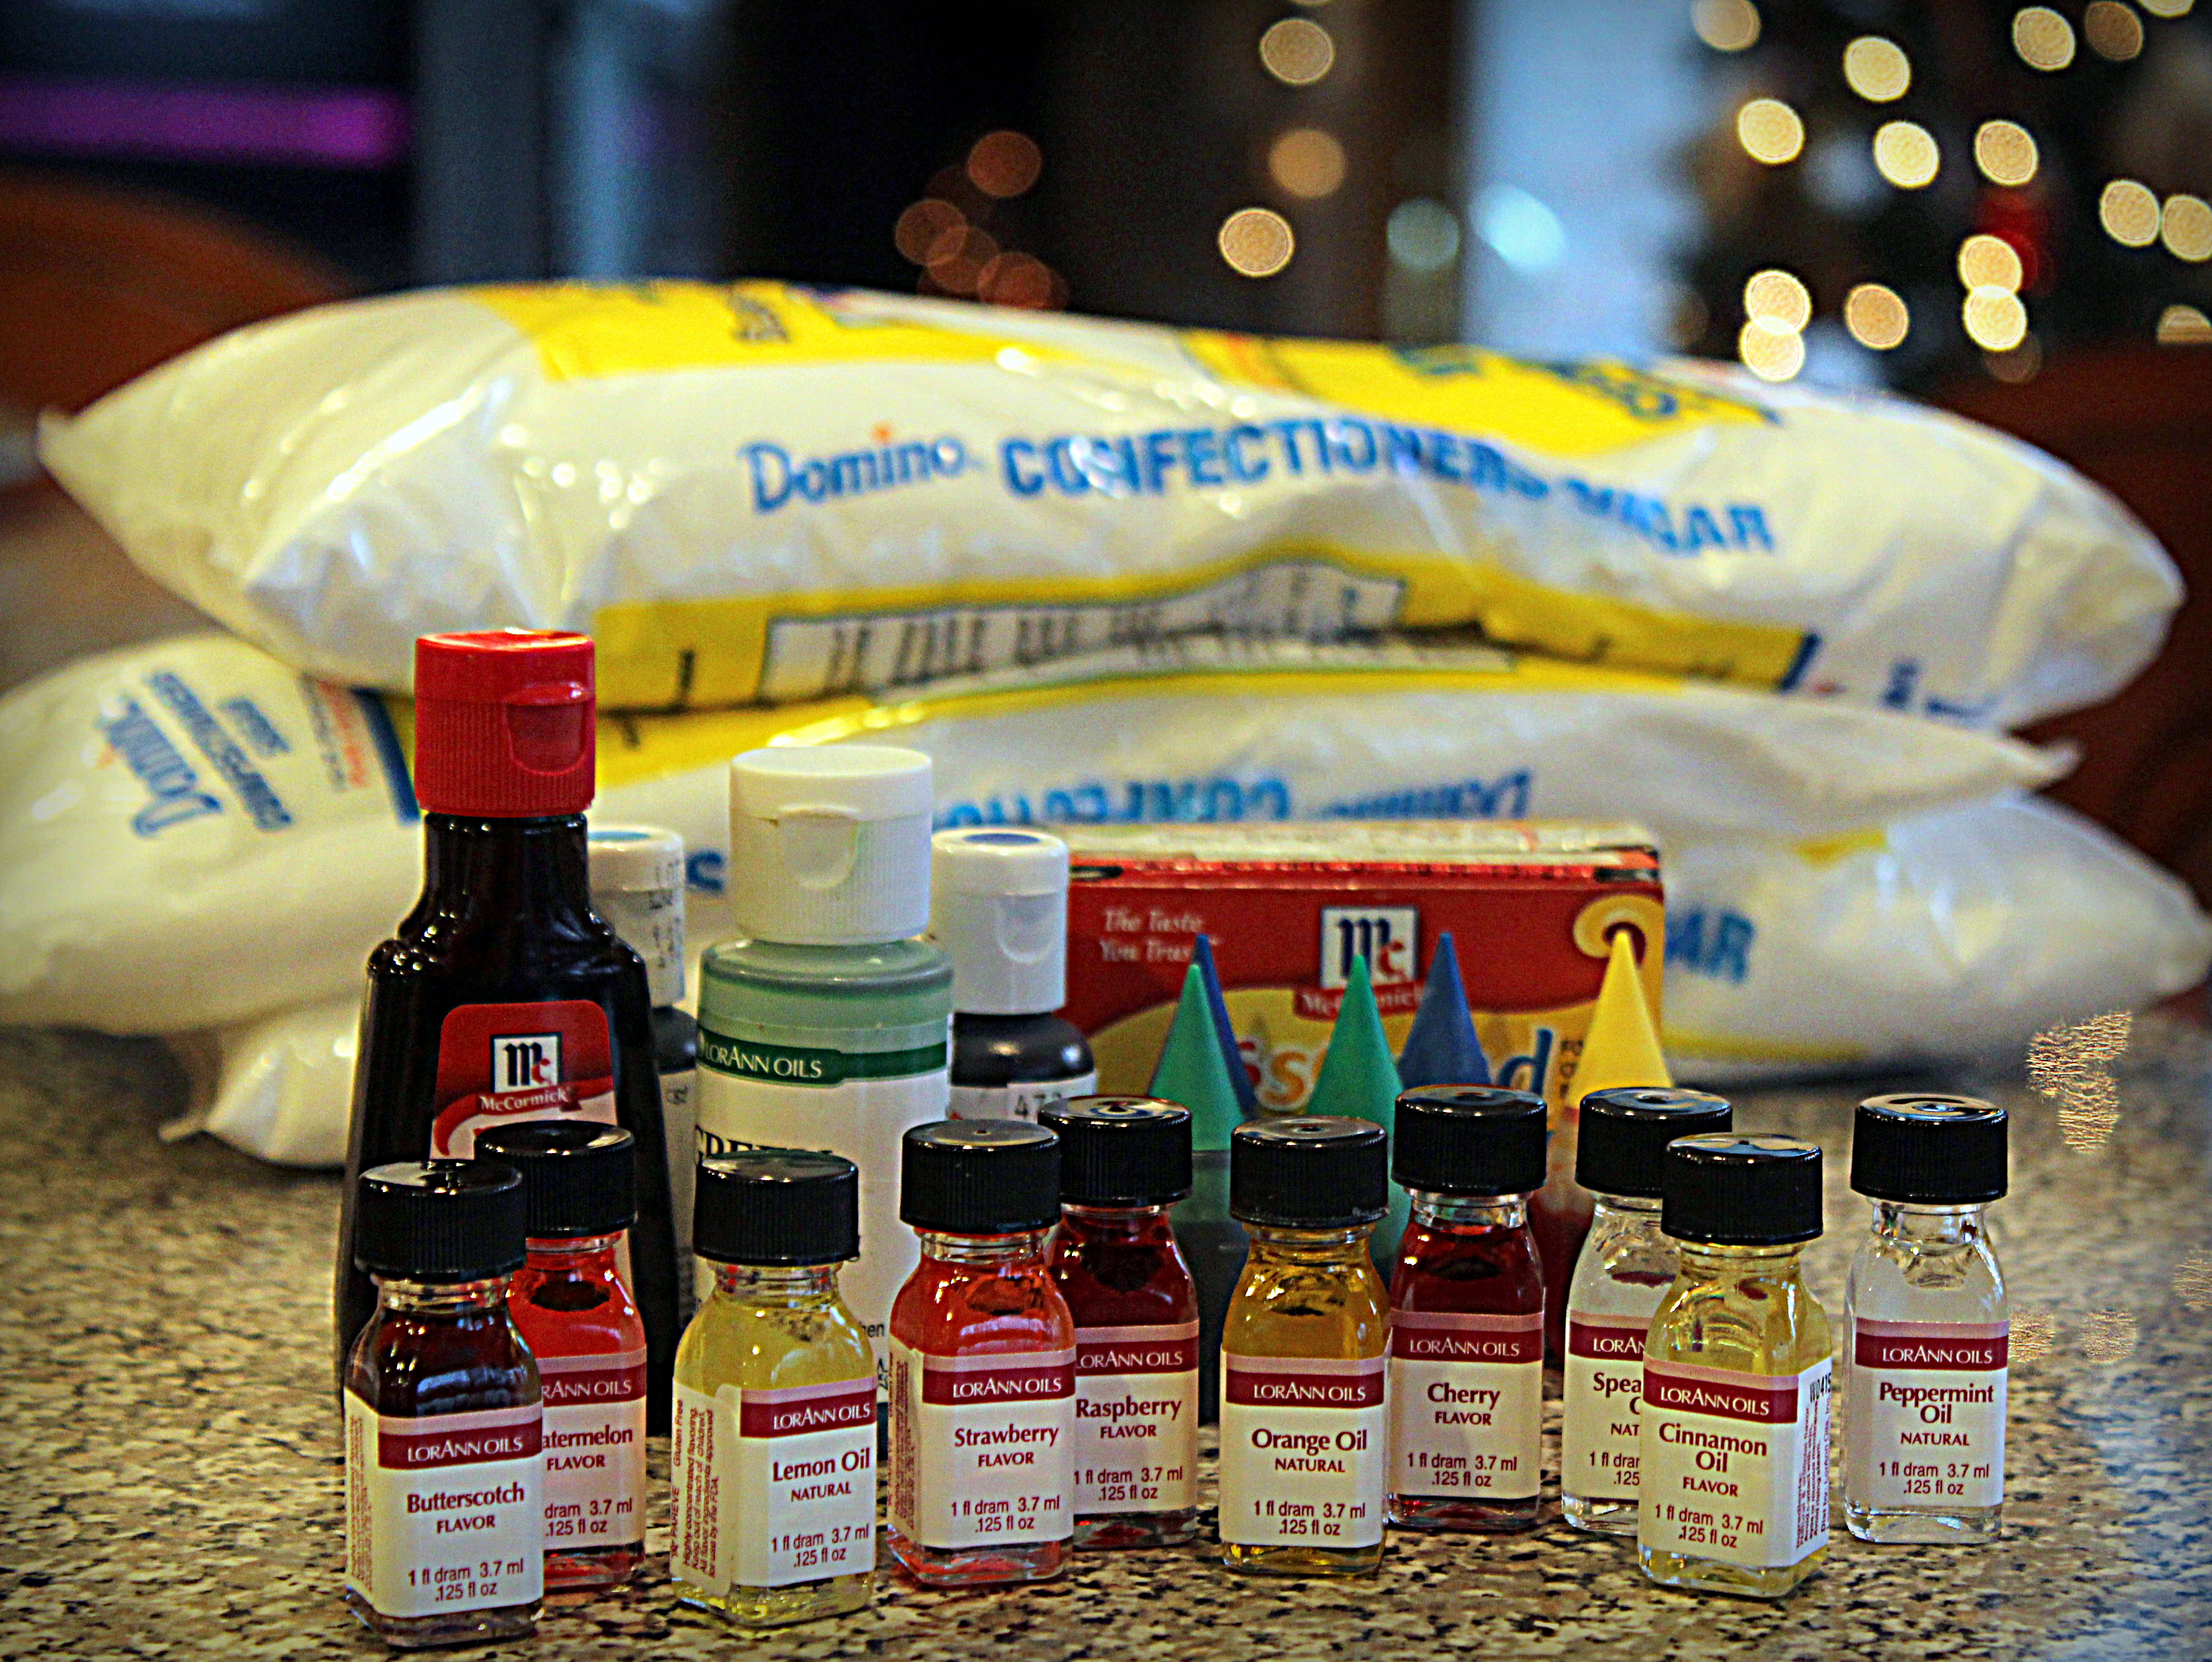
  • Food Coloring
  • 1 dram (tsp) LorAnn Oil & Candy Flavoring of your choice (we used Cherry, Lemon, Strawberry, Raspberry, Watermelon, Orange, Butterscotch, Spearmint, Peppermint, and Cinnamon)
  • 2 cups powdered sugar
  • Butter (room temperature)

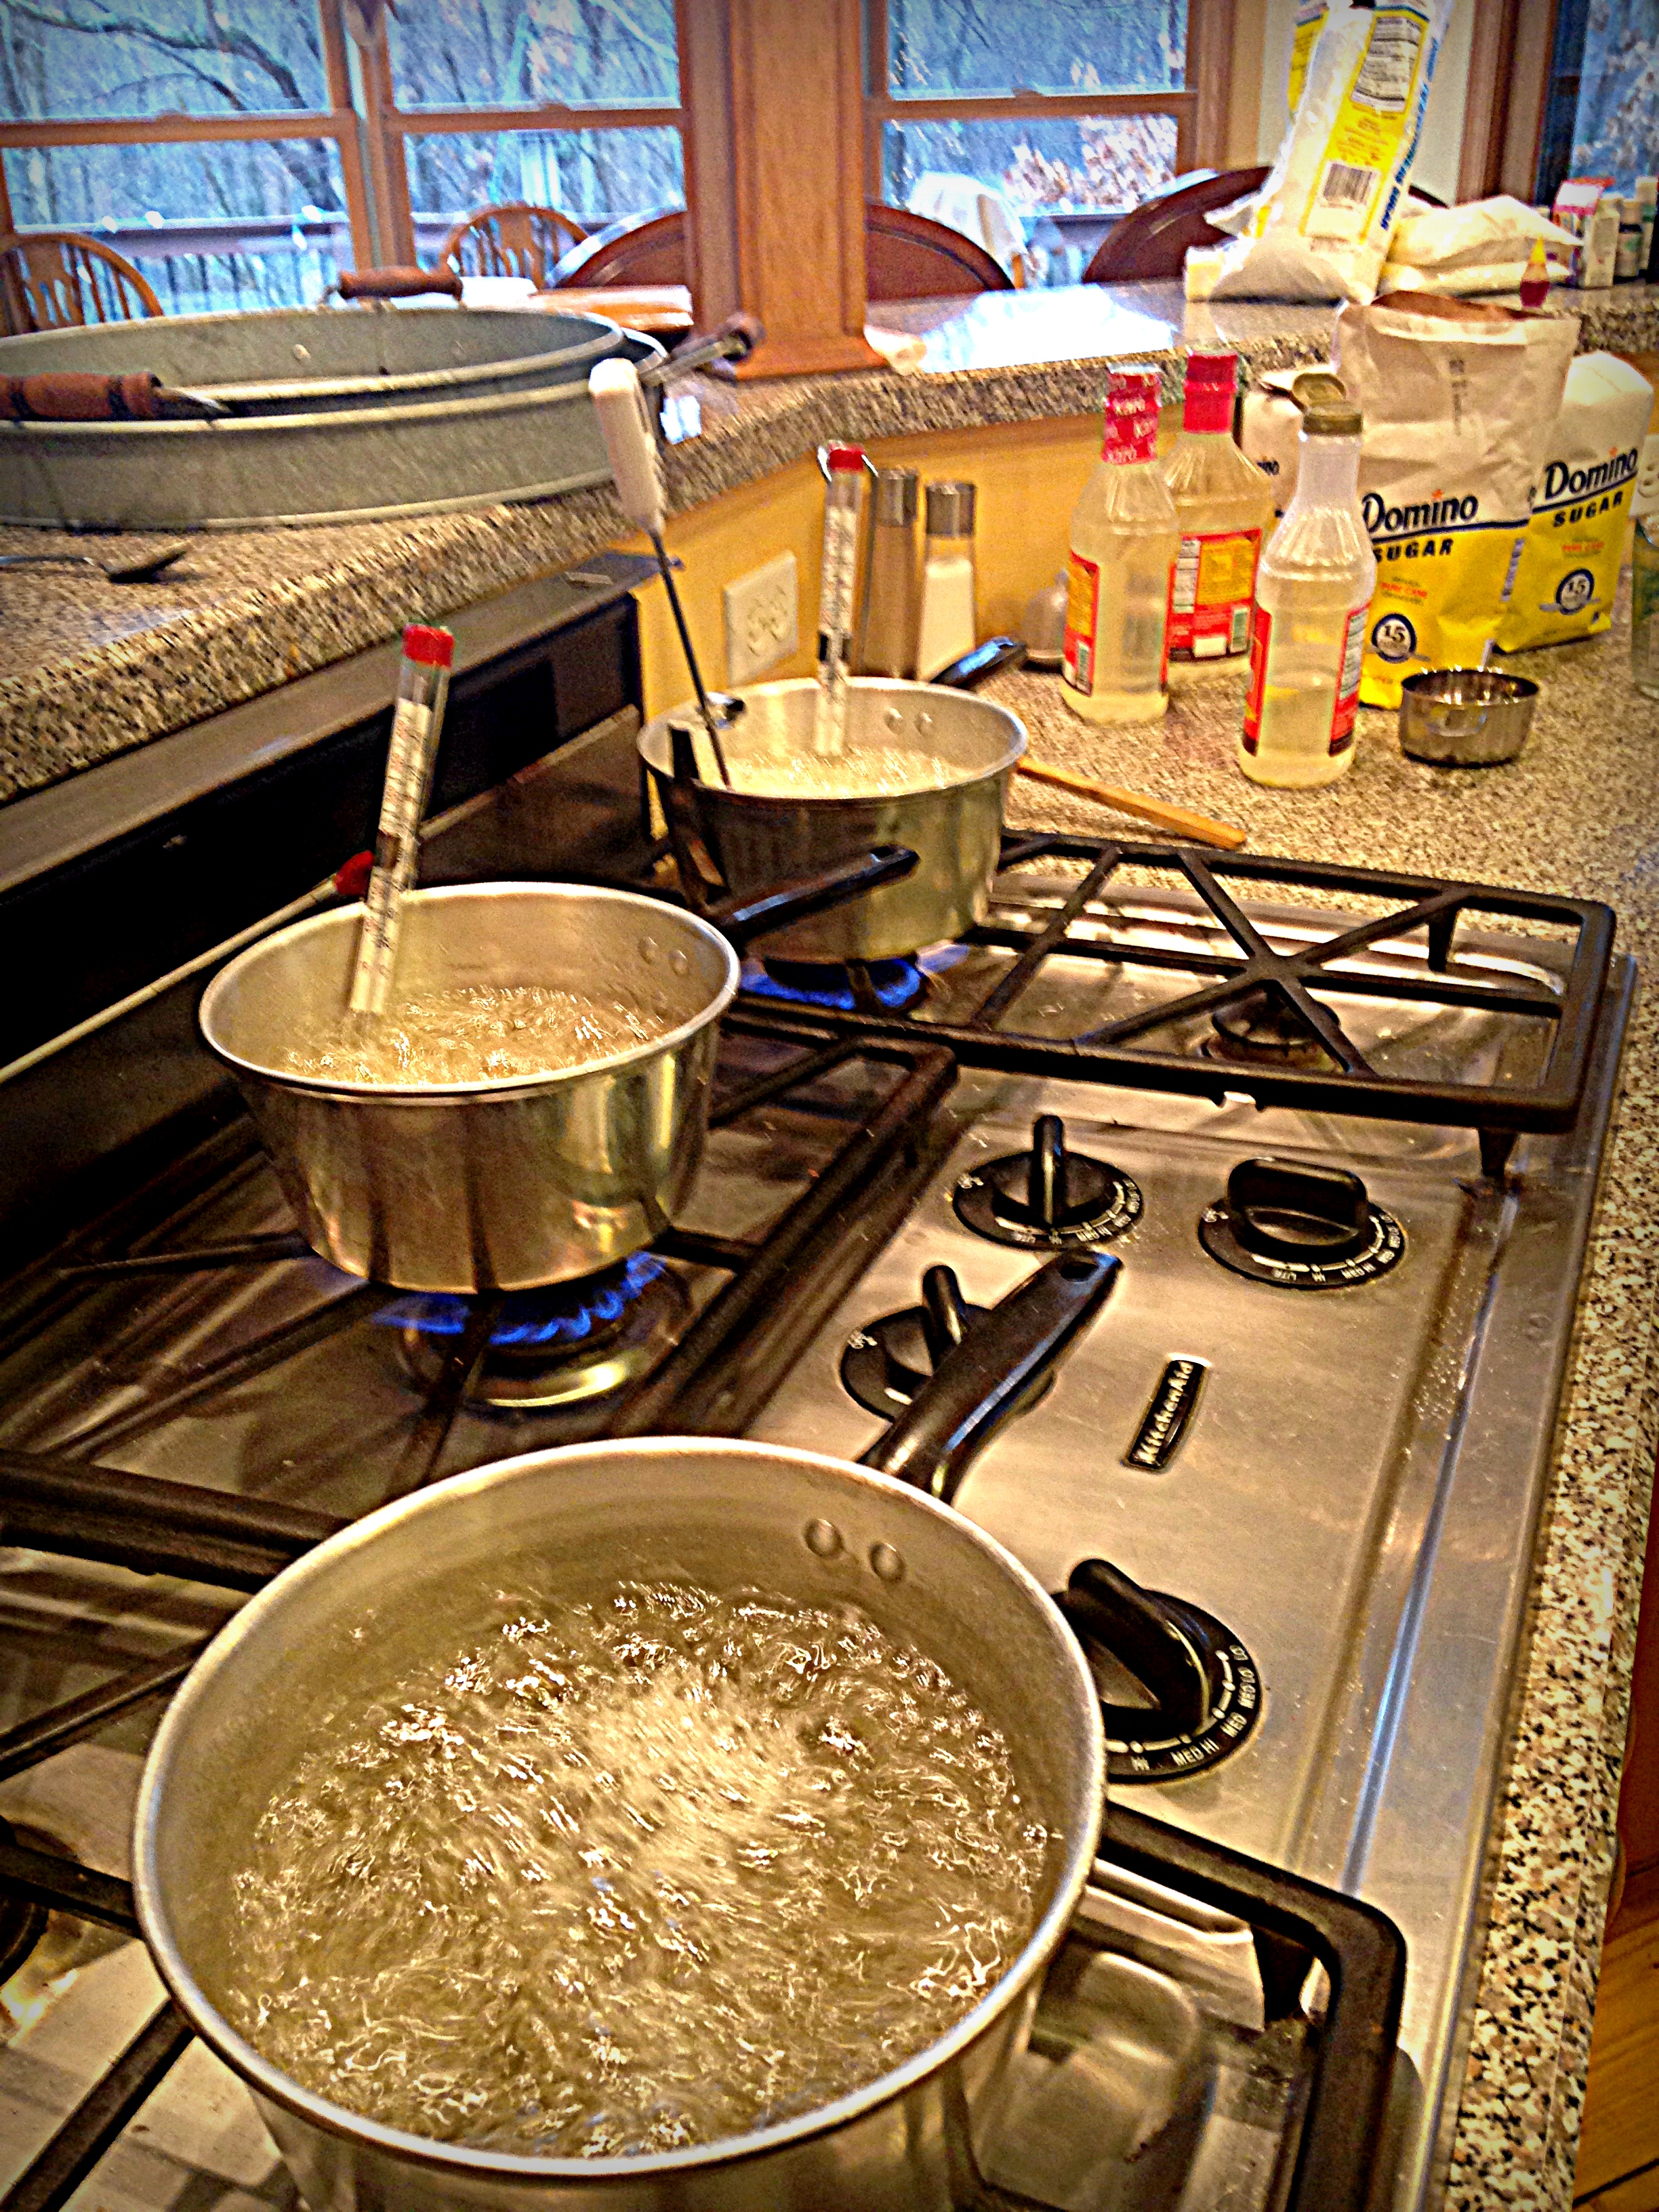
Mix water, sugar, and corn syrup in a saucepan.  Heat to boiling and boil until it reaches 300 degrees F (hard tack) on a candy thermometer (takes about 20 mins).

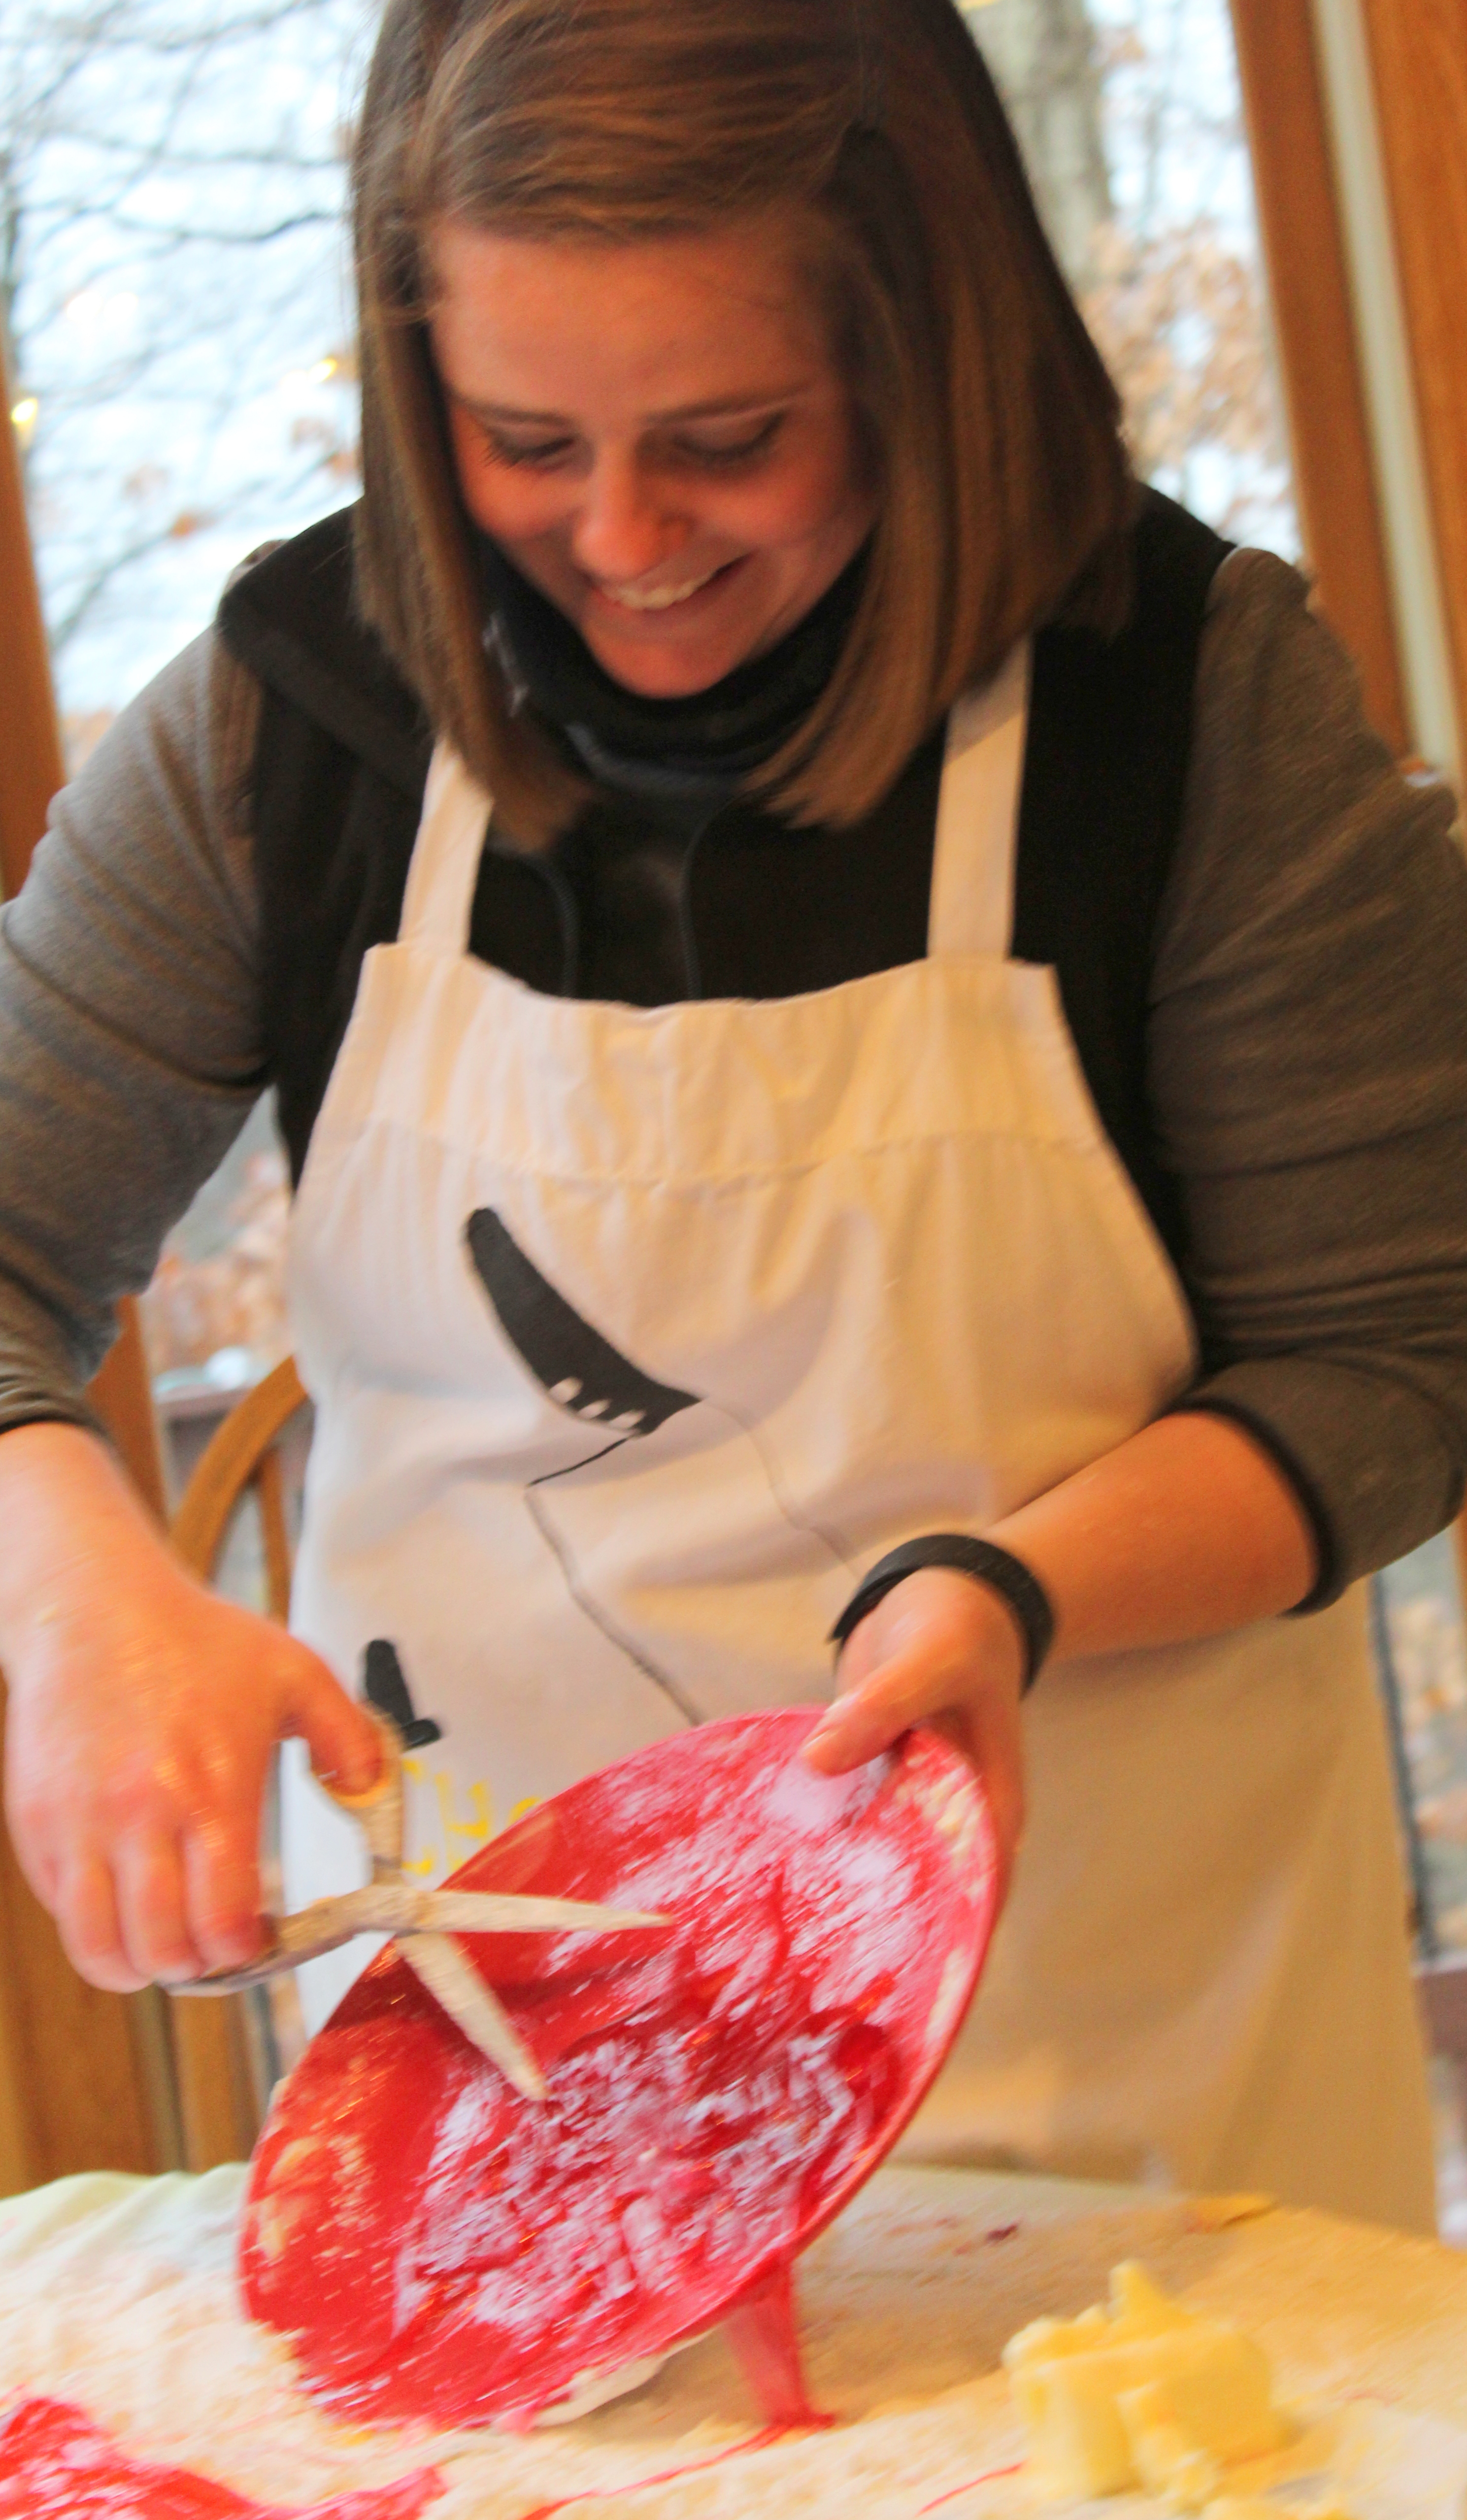
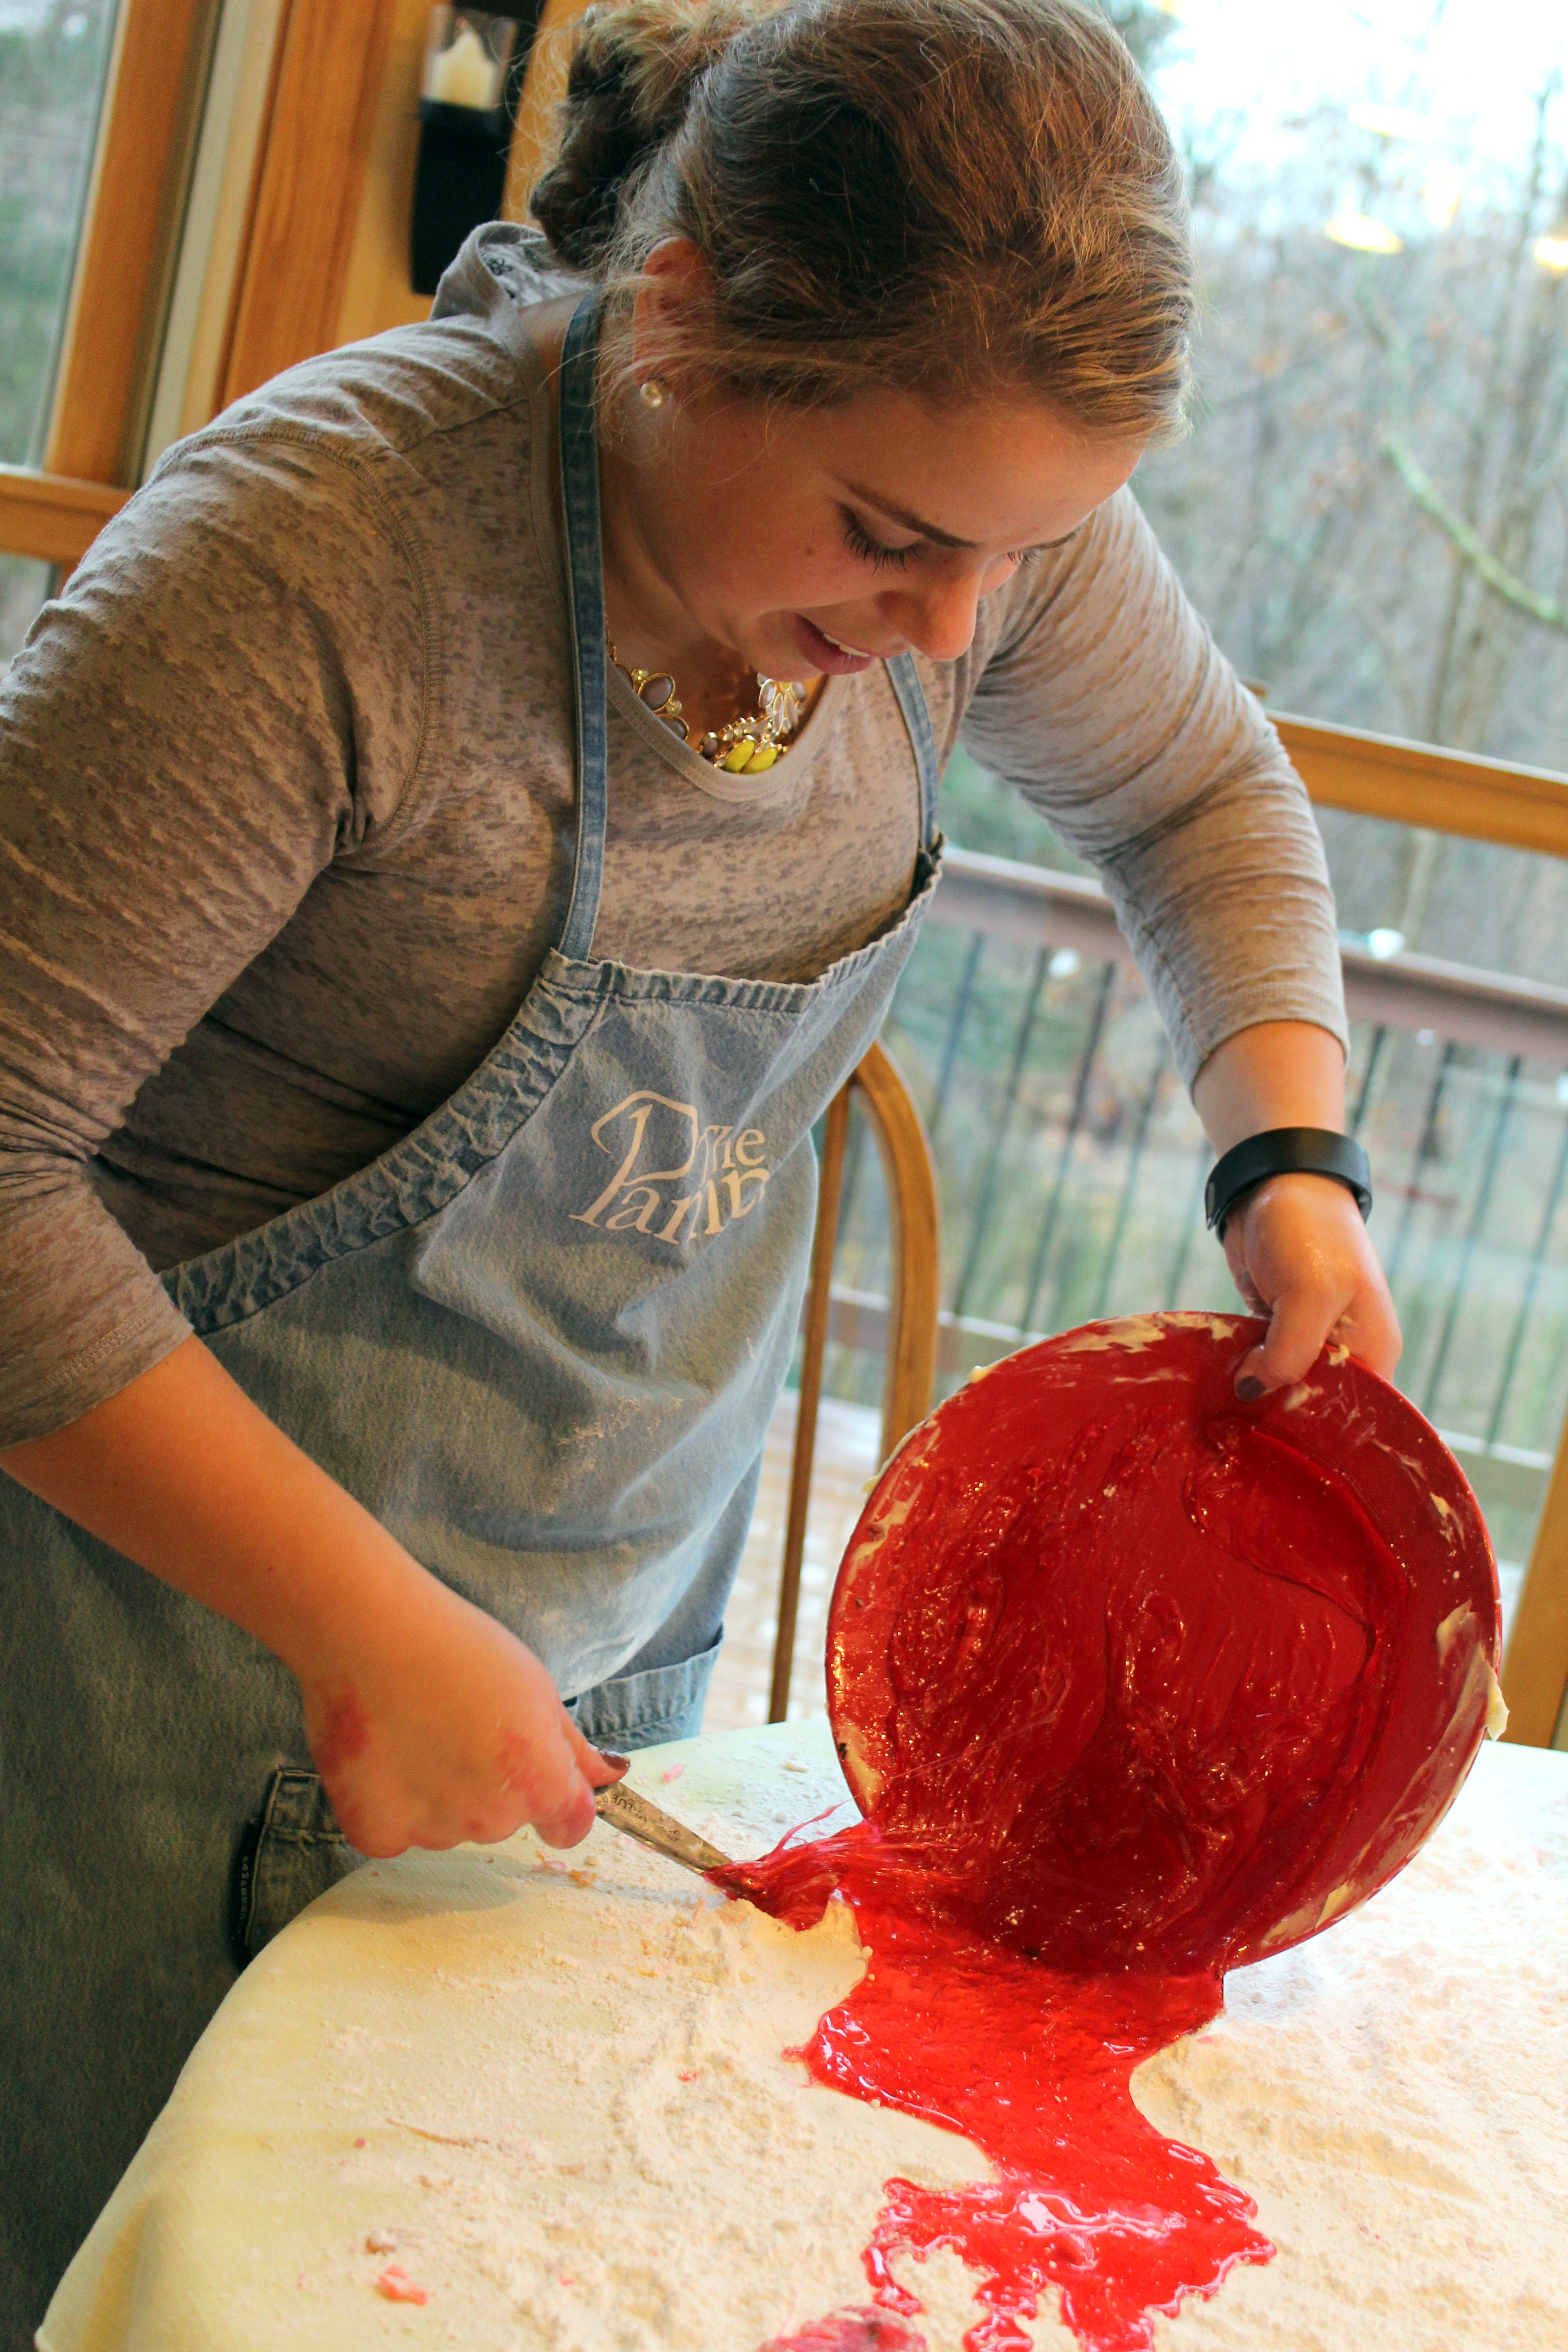
While that is cooking, prepare your cutting station.  Cover counter or table with an old tablecloth.  Pour powdered sugar directly onto the tablecloth and spread around. Amply butter three dinner plates and place on table amidst the powdered sugar.  Sterilize scissors or kitchen shears in a pot of boiling water.

When the mixture reaches 300 degrees F, remove from heat and add food coloring and oil flavoring.  Stir until combined.

Pour onto prepared buttered dishes, dividing evenly between the three.  Let it cool for up to a minute, then begin gently pulling with scissors to edge of plate.  With buttered hands, begin to pull and cut it off into the powdered sugar.  You can snip a little at a time, or pour off large dollops into the powdered sugar.  Let cool slightly and turn over to assure both sides have powdered sugar on them, but do not allow the powdered sugar to mix INTO the candy.  Snip with shears into bite-sized pieces.  Place in a colander and shake off excess powdered sugar.  Spread out on a platter to cool completely.   Store in air-tight containers, mason jars, or Ziploc baggies.

A couple of pointers:

  • I can’t even imagine making this by myself.  I think a minimum of three people are needed to keep it moving as you need to work fast once you pour it as it cools quickly.  Plus – it is so much more fun doing it together!
  • It is HOT!  Be prepared!  Butter your hands and plate liberally to be able to deal with it, and work quickly.
  • Be careful when pouring in the oil flavorings as some are very potent – cinnamon and the mints especially.  Be sure not to breathe in directly over the pot, and have the room well ventilated – open the door or window if necessary and have your exhaust fan on.
  • Some people pour the hot liquid into a pan, let it cool, and then crack it by banging the pan on the counter or table or using a gentle small hammer or tool to pound and crack.  I think that makes it very sharp, but you can do that if you prefer.
  • If you make cinnamon and mint along with fruit flavors – store separately until you put together to gift or serve as the cinnamon and mint flavors can overpower all others.

I hope this was helpful.  Any questions, let me know.

What is your favorite flavor?

Do you have a favorite holiday cooking or baking or crafting tradition?

Cheers & Hugs,

Jodi

Festive Flurry of Snowflakes

Turquoise Brusho Festive Flurry Sparkle Snowflake Card

This week’s challenge at The Paper Players is a Tic Tac Toe Challenge.   These are always so fun to choose which way to go.

For my Design Team Inspiration Card this week, I choose the Diagonal: Snowflake-Sparkle-Die Cut.

pp273

I had an idea in mind, but when I saw a card done by one of my favorite stamper/ cardmakers, Sharon White of Copy Cat Cards, I was totally blown away and completely inspired to create my version featured here (with her permission of course – gracious CAS’er that she is!)

Turquoise Brusho Festive Flurry Sparkle Snowflake Card 2

This card combines Brusho Watercolor Crystals with embossing and stamping and die-cutting.

I started with Arches 140lb watercolor paper.

Using the StampinUp Festive Flurries Stamp Set, I randomly stamped a few snowflakes with VersaMark Ink and then heat embossed with Sparkle Embossing Powder.

I then taped the watercolor paper down, masking off the edges with painter’s tape and painted the paper with water.  I then sprinkled Turquoise Brusho Crystals onto the paper and spritzed with some additional water before letting it thoroughly dry.

While that was drying, I stamped a festive flurry snowflake in turquoise on white card stock for the the first card and one in Versamark on Pacific Point Blue card stock for the second one and then heat embossedwith some more Sparkle Embossing Powder.  Once dry, I die cut them with the matching Festive Flurry Die.

I then attached each to a card base, the first to Whisper White, and the second to Pacific Point.  I used some different fun sparkly ribbon for each and added a snowflake embellishment to the center of the large snowflake.

I’m thinking these will make beautiful Hanukkah cards for a few dear friends!

Hope my stamping and paper crafting friends will join us this week for our Tic-Tac-Toe Challenge at The Paper Players.

Cheers & Hugs,

Jodi


Are you Jingling Your Bells Yet?

jingle bells

I am!

Not only am I jingling, but I am singing too!

And sometimes I like to sing in Ubbi Dubbi….  especially Christmas songs….  like Jingle Bells.

And especially when little ones are around who laugh and laugh when I do it.

So – yes – at the breakfast table the morning after Thanksgiving – I was singing:

Jubinguble Bubells, Jubinguble Bublells,

Jubinguble uball thube wubay.

Uboh whubat fubun ubit ubis tubo rubide

ubin uba ubone huborse ubopuben slubeigh

Hubey!


Doesn’t Christmas bring out the child in all of us?

Chubeers & Hubugs,

Jubodubi

Reese’s Peanut Butter Thanksgiving Turkey Treats

Reeses Peanut Butter Chocolate Thanksgiving Turkey Treats 1

Whether you are a white turkey breast lover or a dark turkey leg, thigh or wing lover, you have to love these adorable Reese’s Peanut Butter Cup Chocolate Thanksgiving Turkeys!

When I saw these cute little treats on Pinterest made by MomonTimeOut,  I knew I had to make these for a couple of little sweeties we will be spending Thanksgiving with.  (And I’m guessing even a few of the big “sweeties” might love them too!)

A Reese’s lover’s dream come true using full size, miniature size, and Reese’s pieces all in one amazing treat!

I had some colorful candy-coated chocolate sunflower seeds I picked up at Trader Joe’s that I used for the noses, but you could use a Reese’s Piece turned sideways too.  I melted some Wilton’s Light Cocoa Candy Melts for the “glue,” but you could use chocolate chips if that is what you have on hand.  For me, it’s all about improvising and using what you have on hand or can get locally.  And these go together super quick!  (Believe it or not, I keep a few sizes of candy eyes on hand!  I know – I have issues!  But I’m betting you can find them at your local craft store like Michael’s or Joann’s or a candy or bake shop – and of course there is always Amazon!)

Reeses Peanut Butter Chocolate Thanksgiving Turkey Treats

There’s still plenty of time to throw these together for your Thanksgiving festivities.

I made 12, and it only took about a half hour.

Reeses Peanut Butter Chocolate Thanksgiving Turkey Treats 2

Reese's Peanut Butter Cup Chocolate Thanksgiving Turkeys

Ingredients:Reeses Peanut Butter Chocolate Thanksgiving Turkey Treats 1

Directions

  • Melt Candy Melts or Chocolate Chips by heating in microwave for 1 minute, stir, then heat 30 more seconds, and stir again.
  • Spoon into a zipper sandwich baggie, push to one corner, seal, and then snip a tiny corner to allow you to squeeze chocolate out for “gluing” chocolate pieces together.
  • “Glue” Miniature Reese’s Cup to Full-Size Reese’s Cup with a dab of chocolate.
  • “Glue” on Reese’s Pieces Feathers using a strip of chocolate squeezed across top of full-size Reese’s Cup.
  • “Glue” on eyes and nose.

Enjoy!

Cheers & Hugs,

Jodi

Autumn’s Final Act

Autumns final act

Dancing in the Autumn sunlight
amidst coffee-colored trunks and wispy branches
with marshmallow fluff and smoky gray clouds floating
in an azure blue sky
above a carpet of fading green grass…

A few bright leaves hang on to life
in bold and brilliant bursts
of crimson and honey and marmalade.

Autumn’s Final Act.

Cheers & Hugs,
Jodi


Photo taken 11/21/15 from my front porch (my blog cover photo) of the weeping cherry tree that has the only leaves left in the front yard.  

A Turkey Day Card for The Paper Players

Thanksgiving Turkey Paper Players Sketch Challenge PP272

Soon will be Thanksgiving Day – Gobble Gobble Gobble!
Children run and laugh and play, but I think that I will stay,
and hide until the day is done – Gobble Gobble Gobble!”

This is a silly Turkey Song my kids and I sang when they were little (and I have to admit I still get it stuck in my head this time of year!)  I sang it with my family as a little girl, so it is hard to think of Thanksgiving week without singing it!

pp272_A

This week is Sketch Challenge #272  at  The Paper Players , and I had turkey on the brain for my Design Team inspiration card.

Thanksgiving Turkey Paper Players Sketch Challenge PP272 Close Up

My turkey looks a bit concerned – doesn’t he?!   I’m guessing turkeys are not so fond of Thanksgiving!

I had fun making this whimsical card and giving it to my sweet daughter-in-law with a few of those decadent Heavenly Hot Cocoa Brownies I made last week as a little surprise.  She works really close to our house, and I practically pass her office to get to mine, so it is fun to drop by with a little surprise every once in a while.  (And sweetheart that she is, sometimes I find little surprises in my mailbox from her too!)  🙂

For my stamping and papercrafting friends, below are the supplies and instructions.  You can certainly improvise with colors and shapes and scissors and stamps, but I thought I would share what I used.   There are lots of cute ideas on Pinterest to inspire you and which inspired me.  I just made due with things I had on hand.  Hope you will join us for this week’s Paper Players Sketch Challenge.  So many fun things you can do with it and lots of other great inspiration from our creative design team.

Supplies & Instructions

  • Card Stock:  StampinUp (SU) Hello Honey Yellow, Pumpkin Orange, Real Red, Chocolate Chip Brown, Crumb Cake, Very Vanilla, Whisper White, Papercraft Nordic Noel DSP
  • Ink:  Stazon Black for greeting, Tim Holtz Ranger Tea Dye Distress Ink for sponging around all pieces
  • Stamp:  Paper Smooches Sentiment Sampler for “Celebrate”
  • Signo White Gel Pen for white stitched outlines and eyes
  • Paper Studio Embossing Folder for feather texture and swirls
  • Punches:  SU Owl Punch and SU Bird Punch for cutting out turkey parts and SU Scalloped Tag Topper for Tag
  • Framelits:  SU Circles (second smallest for head, third smallest for round body part, largest for scalloped circle for cutting out feathers) and SU Ovals (smallest oval for body)
  • Tombow Mutli Mono Liquid Glue and Tombow Mono Permanent Adhesive Tape
  • SU Linen Thread to put on top of tag

Happy Thanksgiving Week!  I sure am thankful for all of you!

Cheers & Hugs,
Jodi

Clouds: from Both Sides Now

november clouds 2

November Clouds – McKinney Home, Mars, PA

After posting my November Clouds photo and post yesterday, a very dear friend sent me this YouTube video early in the morning saying it was a “cloud song to go with my pic.”

Well, I got busy working and didn’t have a chance to listen to it until Charlie and I went for our lunch time walk.

The air was a bit cooler than it has been the past few days, but 55 degrees F is still pretty lovely for late November here in Mars.

So with my iPhone in hand and Charlie leading the way down our usual path, I hit “play.”

I then hit “play” five more times while we walked a few miles.

I had forgotten how much I love this song.

Or did I just realize how much I love this song?

Joni Mitchell wrote “Both Sides Now” in 1967 (I was only 4-5 years old), and recorded it in 1969 on her second album entitled, “Clouds.”

Needless to say, I was a bit young to truly appreciate it at that time.  It is, however, #171 in Rolling Stone’s Top 500  greatest songs of all time.

So I listened to the words yesterday – – –  over and over – – – and I found such deep meaning, such contentment, such freedom and liberation …

Next month, I will turn 53.  Still hard to believe, but I also realize I am on the “other side” of life.

I am obviously past “middle age” as I surely don’t expect to see 106!

And it has taken me a while to believe and “accept” this “stage” of life – this “over 50” stage…  But somehow, somewhere, at some point, it all became clear.  It all became fine.  It all became great!

It all became real and wonderful and the best time of life.

I’ve had my teens and twenties and thirties and every wonderful and  not-so-wonderful thing that comes with each of those stages.  When 50 came, I mourned it a bit.

I can’t pinpoint exactly when or why or how it happened, but I became content – even happy – maybe happier than ever – with this phase of life.

I’ve seen life and love and even clouds – from both sides now.

And life is clearer.

Life has more meaning.

Life is sweeter.

Clouds are “bows and flows of angel hair and ice cream castles in the air.”

They have also “blocked the sun and rained and snowed on everyone.”

But – “I’ve looked at clouds from both sides now, from up and down, and still somehow it’s cloud illusions I recall.  I really don’t know clouds at all.”

And I LOVE that!

I’ve also seen love and life from “both sides now.”

From “give and take”

From “win and lose”

And maybe I don’t have all of the answers….

But I realize that even though “something’s lost…”

there is still….

“something gained in living every day.”

And I am cherishing every single one…

from this side now.

Cheers & Hugs,
Jodi

“I have always thought of myself as a painter derailed by circumstance” – Joni Mitchell (June, 2000)

Hmmmmmm……

PS Thank you, Dick! ❤