Cheesy Chicken Prosciutto Roll-Ups in White Wine Sauce

Cheesy Chicken Prosciutto Roll-Ups in White Wine Sauce.

This past Sunday, I made a new recipe with chicken that turned out so yummy, I couldn’t wait to share.

With a few simple ingredients, but also the finest you can find or afford, you can create this amazing dish in just a few minutes before putting in the oven for a half hour.

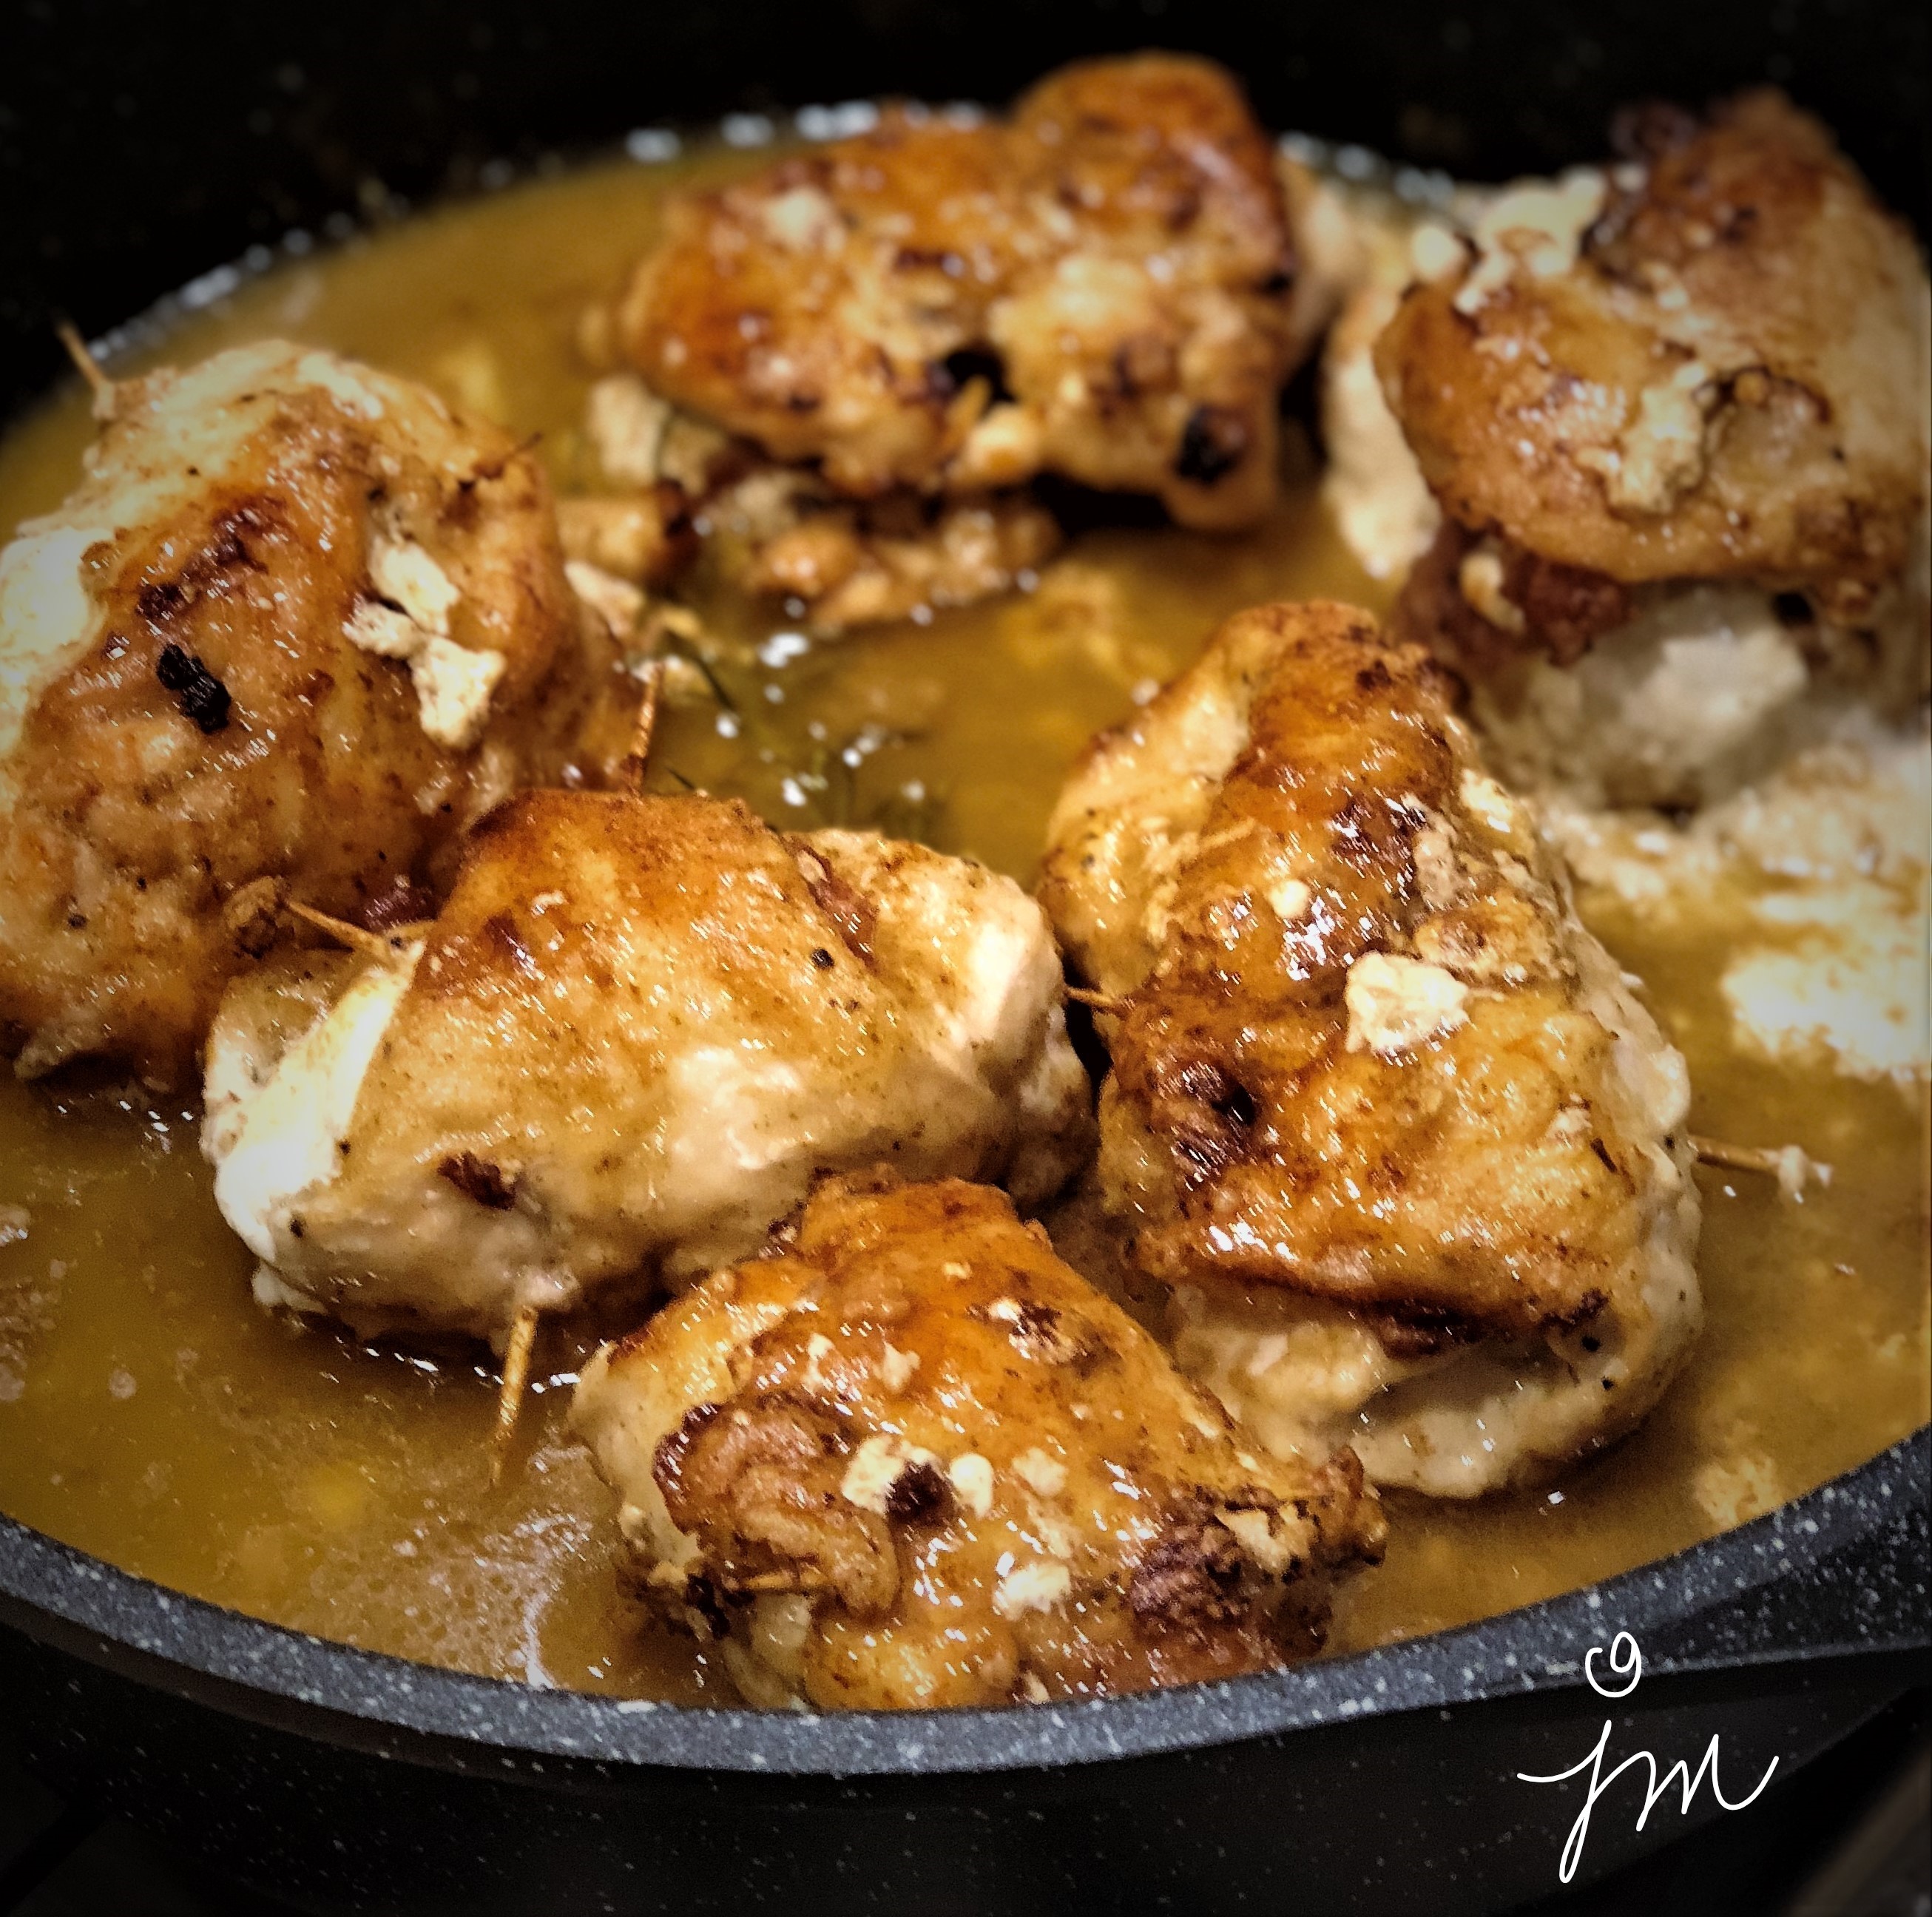
Turn your sound on for just a few seconds, and click the arrow below to experience the glorious sizzling of these little gems as they brown in olive oil and a bit of butter!

These chicken breasts, pounded as flat as possible, are stuffed with thinly sliced salty, high-quality prosciutto,  fresh, creamy mozzarella cheese and a few simple spices before being rolled in flour and browned in olive oil and butter.

Once browned,  white wine is poured in to blend with the browned bits and juices to create the most amazing gravy!

We enjoyed our Cheesy Chicken Prosciutto Roll-Ups with a fresh garden salad.  The only thing we were missing was some crusty bread to sop up every last bit of gravy.

I cannot recommend this winner of a chicken dinner more highly.  I slightly revised a recipe I found at mangiamichelle.com.

Here is how I made it.

Cheesy Chicken Prosciutto Roll-Ups in White Wine Sauce

Ingredients:

  • 2 lbs. (3 large) chicken breasts, sliced in half horizontally to create 6 pieces
  • 6 paper-thin sliced high-quality proscuitto
  • 1 lb. fresh mozzarella ball, sliced
  • 1 tsp. Italian Seasoning (or your favorite i.e. oregano, sage, thyme)
  • Salt and pepper to taste
  • 3 Tbsp. olive oil
  • 2 Tbsp. butter
  • 2 cups white wine
  • 1/2 cup flour

Directions:

Preheat oven to 350 degrees F.

Pound the chicken pieces until they are as flat as possible to about 1/3 inch thick.  Sprinkle with salt and pepper and seasoning.  Lay a slice of prosciutto on top followed by a slice of mozzarella.  Roll up and secure with a toothpick or two to secure.  Dredge each chicken roll-up in flour.

Heat olive oil and butter in a large oven-safe skillet over medium heat.  Brown each roll-up on each side for about 4-5 minutes.  Pour wine over all, and stir up browned bits and butter to incorporate.  Baste sauce over chicken.  Place in oven, and bake for 30 minutes. 

Enjoy!

Cheers & Hugs,
Jodi

Red Raspberry Dark Chocolate Puff Pastry Tarts

Red Raspberry Dark Chocolate Puff Pastry Tarts.

Phew!  That name is a mouthful….

But it really does say it all!

And I’m betting you would love a mouthful of these simple, but elegant and amazingly delicious treats!

I made these this past weekend for a Sunday family football dinner.

Would you believe me if I told you there are only three ingredients?!?!

Well – four if you count the powdered sugar you sprinkle on top.

Puff Pastry is such a dream to work with!

Keep these ingredients on hand and this recipe up your sleeve when you need a quick, but fabulous dessert or treat.

I’m betting you won’t be sorry. 😉

Red Raspberry Dark Chocolate Puff Pastry Tarts

Ingredients:

Directions:

Preheat oven to 375 degrees F.

Roll out one sheet of puff pastry, and cut into 9 squares approximately 3 1/2 x 3 1/2 inches.  Place a teaspoon of raspberry jam in center of each square.  Top with a piece of dark chocolate.  Pull all four corners to center and pinch to seal.

Bake for 15-18 minutes on baking stone or cookie sheet until puffed and lightly browned.    Remove to cooling rack.  Sprinkle with powdered sugar.

Serve warm or cold.  

Enjoy!

Cheers & Hugs,
Jodi

Perfect Prime Rib Roast

Perfect Prime Rib Roast.

On Christmas Eve this year, we decided on a Simple Surf and Turf Dinner menu to have with the family.  The Surf was Bacon Wrapped Scallops.  The Turf was Prime Rib.  Both were prepared simply, and turned out delish!  Baked potatoes, Roasted Brussels Sprouts and a Salad of romaine lettuce, apples, dried cranberries and walnuts accompanied the entrees.

I managed to quickly snap this iPhone photo of Hubby cutting the prime rib.  Not the best photo, but this recipe I found and slightly modified is such a keeper, I had to share!  The roasted vegetables not only help to make the perfect base for the au jus, they also taste great too as an extra veggie.

Whenever you want a simple, but elegant entree, this is a winner you will want to try.

Perfect Prime Rib Roast

Ingredients:

  • 7-8 lb Prime Rib Roast (with bones)
  • 1-2 Tbsp Horseradish
  • 1-2 Tbsp Dijon Mustard
  • 2 tsp coarse salt
  • 2 tsp coarsely ground black pepper
  • 4 tsp fresh thyme
  • 2 tsp garlic powder
  • 4-6 stalks celery, cut into 1-2 inch pieces
  • 1 cup carrots, cut into 1-2 inch pieces
  • 1 large sweet onion, quartered
  • 2 beef bouillon cubes
  • 1 1/2 cups water
  • 1 tsp cornstarch
  • 1 tsp water

Directions:

Preheat oven to 450 degrees F.  Rub roast with horseradish and mustard.

Combine salt, pepper thyme and garlic powder, and sprinkle over roast.

Place celery, carrot, and onion chunks in the bottom of a large roasting pan.  Place roast on top of vegetables.

Roast for 30 mins.  Reduce oven temperature to 350 degrees F, and roast until meat is 135 degrees F.

Remove from oven, cover with foil, and allow to rest for 30 mins.

Make  au jus sauce by placing pan drippings in roasting pan (veggies removed and reserved to serve) over a burner set to medium.  Stir in beef bouillon and water.  Bring to a boil.  Combine cornstarch and water, and whisk into sauce.  Allow sauce to thicken slightly, and serve with roast.

Enjoy!

Cheers & Hugs,
Jodi

Cake Pops! Tips for Beginners


chocolate-dipped-german-chocolate-cake-pops

Cake Pops!  Tips for Beginners.

I adore cake pops!

Because… really…  what could be better than a bite-sized morsel of cake dunked in chocolate?  And then maybe adorned with sprinkles?!

They are delicious and pretty and cute; but until this past weekend, I had never tried to make them.

I wanted to practice for an upcoming event or two, so I read and researched and asked around and gave them a whirl this past weekend.

white-and-gold-elegant-cookie-pops

They are really not that difficult, but there are a few tricks to success.  I thought I would provide a few tips that helped make mine turn out delicious and beautiful!  At least that is the consensus I got from the party I took them to as “practice” pops.

cake-pops-german-chocolate-before-dipping

To make cake pops, bake a cake mix – whatever you favorite flavor is.  Then follow these tips for success.

  • Freeze cake – even if overnight.  It allows you to plan ahead and also adds to the moisture of the cake.  Simply place baked  cake – crumbled, broken pieces, or all in one piece – in a large Ziploc bag in the freezer.
  • 1 boxed cake mix  makes approximately 3 dozen cake balls.
  • When ready to assemble, defrost the cake and crumble to fine crumbs with your hands in the bag.
  • Add only enough frosting (ready made works perfect) to add a bit of “glue” for forming and holding balls together.  I used 1 heaping tablespoon – that is it!  This allows your cake balls to truly taste like cake.
  • Scoop crumb mixture with a small scoop to form uniformly-sized 1 inch balls.  Then roll with your hands to round ball.
  • Melt chocolate candy melts in microwave in a deep cup that is not too wide to allow for ease of dipping.  It only takes 1 1/2 – 2 minutes.
  • Dip tips of sticks into candy melts and insert into cake balls.
  • Refrigerate or freeze for at least a half hour or several hours.
  • Remelt chocolate at 30 second intervals until desired consistency.
  • Dip cake balls on sticks into chocolate candy melts.  Allow excess to drain.
  • Place on parchment paper if using with stick up, and sprinkle with jimmies or edible glitter.
  • Stick into styrofoam if using cake ball up and decorate as desired.
  • Make ahead up to 3-5 days if needed – no more than 7 days.  (there are horror stories of moldy cake balls made too far ahead of time)
  • I found this site – Heavenly Cake Pops – to be extremely informative.

Have fun and enjoy!

Cheers & Hugs,
Jodi

Strawberry Chocolate Ganache Tart with Oreo Cookie Crust

chocolate-strawberry-tart-valentines-day-couples-camp-dessert

Strawberry Chocolate Ganache Tart with Cookie Crust (No Bake).

You may recall seeing this dessert I made for our Valentine’s Couple Camp Party.  I promised then that I would share the recipe.

I have to tell you… this dessert is not only beautiful and elegant looking, it is so simple, uses only five basic ingredients, and is possibly the most luscious chocolate dessert I have EVER tasted.  And I’m really not exaggerating.  I absolutely loved this tart!

I typically make dessert, but just taste enough to know it is okay to serve.  This one, however… I not only had the evening of our party, I ate the last leftover slice!

I am certain I will make this tart again.. and again.  It is a great dessert for ANY occasion, any season, anybody.  I would take this to a summer picnic.  I would make this for a birthday “cake.”  I would make this for a Christmas dinner dessert.  I would make this for ANY reason.

chocolate-strawberry-tart-valentines-day-couples-camp-dessert-2

I originally came across this recipe posted by Mary at HomeisWheretheBoatis, and I only tweaked it slightly.  Thanks for sharing Mary!

I so hope you will give this a try, and I cannot wait to hear how you like it!

Strawberry Chocolate Ganache Tart with Oreo Cookie Crust (No Bake)

Ingredients:chocolate-strawberry-tart-valentines-day-couples-camp-dessert

  • 1 pkg. Oreo Cookies (approx. 32 cookies)
  • 1/2 cup (1 stick) butter, melted
  • 12 oz. of Your Favorite Chocolate (I used Baker’s German Sweet)
  • 1 1/2 cups Heavy Cream
  • Strawberries

Directions:

  • Place Oreo cookies in a gallon size Ziploc bag.  Then place entire bag in another bag to double (so you can crush them without making a mess!)  Crush Oreo cookies using a heavy rolling pin, your hands, or whatever way you prefer to smash them fine enough to make a crust from.  (The original recipe calls for pulsing them in a food processor, so feel free to do that if you have one.)  
  • Pour melted butter into the bag.  Zip to close again and  completely incorporate the cookie crumbs and butter using your hands.  Pour crumb and butter mixture into an 11″ tart pan.  Pat onto bottom and up sides of tart pan.  Refrigerate to firm up for one hour before preparing and adding filling.
  • To make filling, break up chocolate and place in a heat-proof bowl.  Bring heavy cream to a boil in a small sauce pan.  As soon as it boils, pour over chocolate.  Let sit for a couple minutes to soften the chocolate, then slowly whisk until until smooth and fully incorporated.  Pour into chilled, firm crust.  Refrigerate for 4-6 hours or overnight.
  • Garnish with strawberries (red raspberries would amazing too if you prefer!).  Drizzle melted chocolate over all if desired.  I also sprinkled just a tiny bit of sea salt flakes, which gave it an amazing, but subtle taste burst.  And then – any cookie crust crumbs that fall off when you remove the tart bottom from the sides of the pan can be thrown on top too. 

Enjoy!  I know you will!

Cheers & Hugs,
Jodi

Green Acres & Christmas Cards

So it’s getting down to crunch time on Christmas cards, and one or two cards a week is probably not going to cut it at this point…  (… but if that’s all I get to – that’s okay too!  Too much pressure takes the fun out of it – right?!)

I did get around to making two last night.  They are two completely different cards – which is the joy of hand creating cards to me.  I rarely (if ever) make the same card twice.  The fun is in the creating for me.  And even more fun is individualizing them for the recipient.

The first one is a more elegant card with white glittery, silver, sparkly, shiny snowflakes in clean and simple simplicity.

festive flurry silver elegant christmas 2014

I made it to enter into two challenges.  It meets the requirements for 3 in a row down at The Paper Players PP224 Tic-Tac-Toe Challenge this week for white, snowflake, and glitter.  It also meets the Friday Mashup FM187 It’s All About Weather criteria for using a metal embellishment (SU Frosted Finishes embellisment) and having a weather inspiration (snowflakes from SU Festive Flurry).

festive flurry silver elegant christmas 2014 inside

I just love this “Mingle all the Way” stamp sentiment and was dying to use it, so I came up with this simple, rustic, country design in brown craft and red with a big red bow.  I distressed and sponged all the edges and added just a few tiny pearls for a little pop.

mingle all the way christmas card 2014

I used the SU Holiday Home stamp for the inside to continue the rustic classic theme on the inside.

holiday home inside card

So welcome into my mind….

this is the wacky way it works sometimes…

As I looked at these two completely different cards, all I could think about was the old classic television show from the late sixties when I was a wee-one, called “Green Acres.”

Anybody remember?  (Take a moment to listen and travel down memory lane...)

So the first card is for Eva and the second is for Eddy.

Which is more your style?  Are you an Eva or an Eddy?

Though I am FAR from a farm girl, country life is more to my liking – with visits to the city.

Green Acres is the place to be…

I dare you to try and get this song out of your head now!  (No thank yous necessary)  🙂

So whether your holiday is in the “fresh air” or in “Times Square,” make it merry and bright!

Cheers & Hugs,

Jodi