Apple Cider Roasted Chicken and Butternut Squash

Apple Cider Roasted Chicken with Butternut Squash.

The calendar says it’s Spring in our little corner of the world, but Mother Nature insists it’s Winter.  I guess since our Winter this year was often more like Spring, we have to deal with a bit of Winter in Spring.

The day I made this recipe last week (the second official day of Spring), we had more snow fall in one day than we have had in one day in the past eight years (approximately 8 inches).

So this super easy, healthy, delicious one pan oven-roasted meal I found at TheLemonBowl.com and tweaked slightly was a welcomed delight.

Using cinnamon as a spice for a savory meal is a surprising delight!   Don’t be afraid to use it liberally.  When combined with salt and coarse black pepper and lots of garlic, it just sings with flavor.

The original recipe called for apple cider, which I did not have, so I found a lonely bottle of Angry Orchard Hard Cider in the back of the fridge that kicked butt in this recipe!  I’m sure you could also substitute apple juice.

I was really tempted to throw in a handful of cashews or pecans (and might next time).  What do you think?

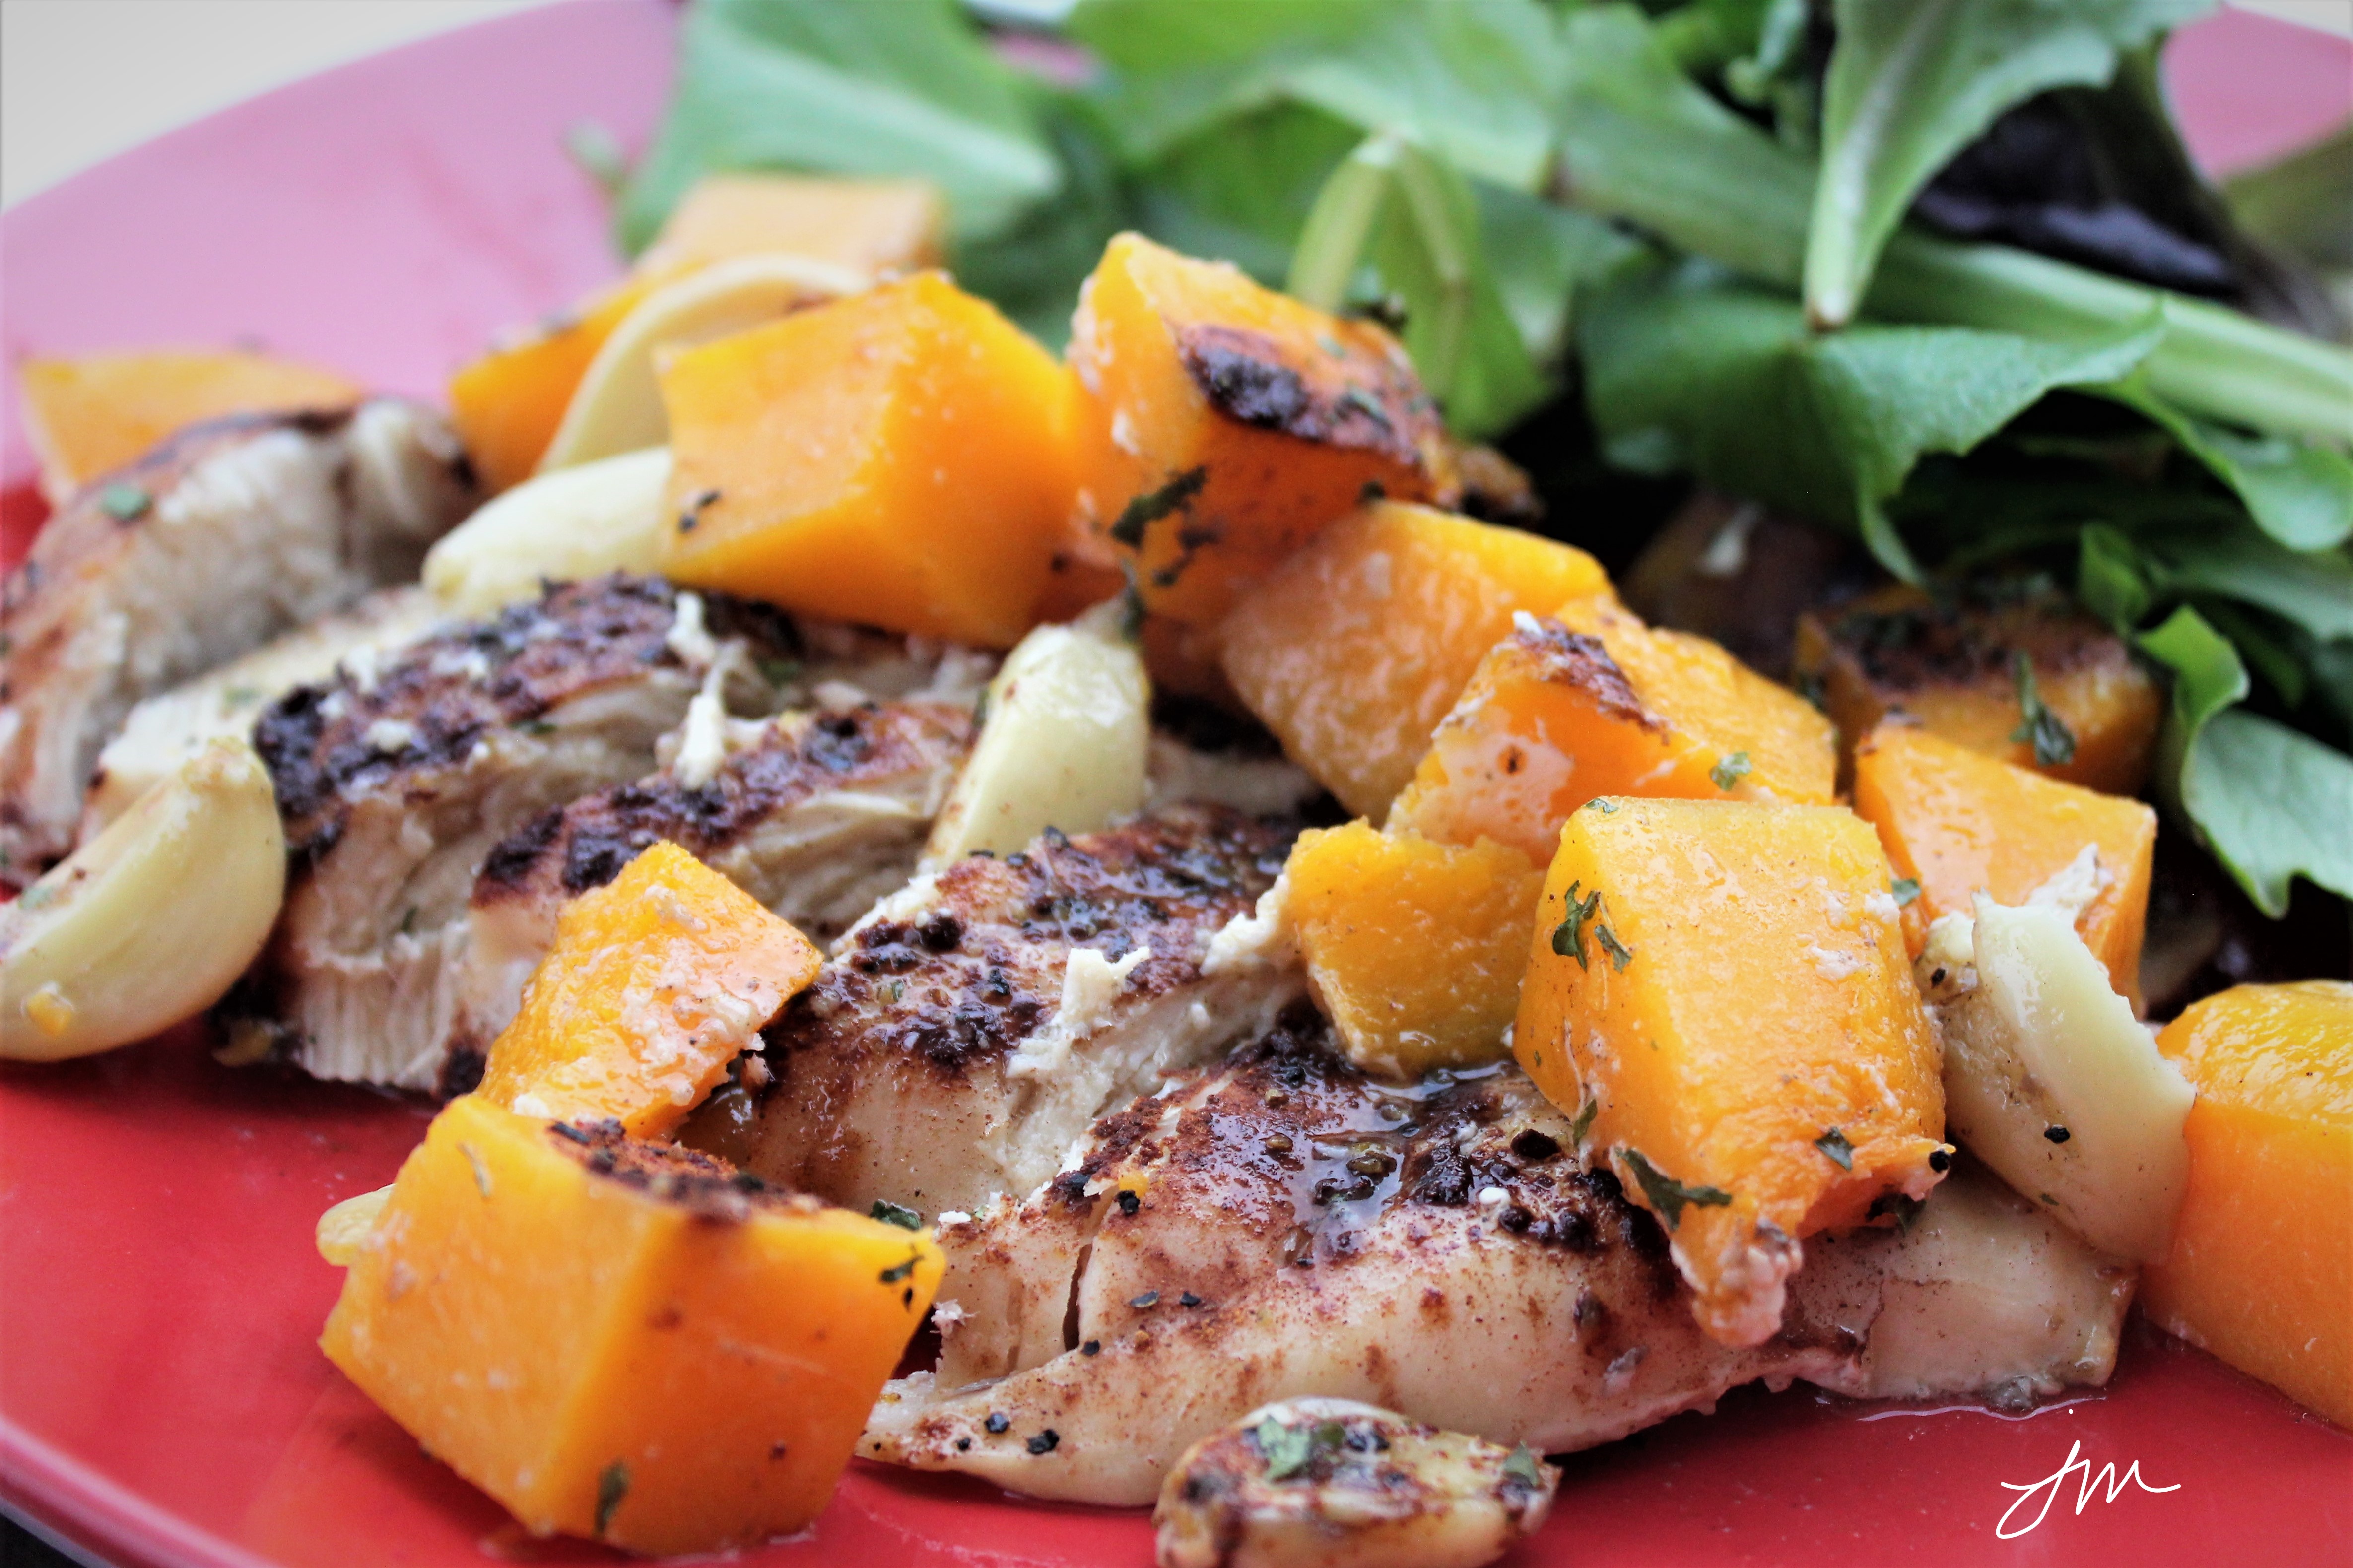
I served this with a simple salad of fresh greens, and  here is how I made it.  Hope you will give it a try.

Apple Cider Roasted Chicken and Butternut Squash

Ingredients:

  • 1 large butternut squash, peeled and cubed (approx 4 cups
  • 1 large bulb garlic (approx. 12 cloves), peeled
  • 2/3 cup apple cider (I used Angry Orchard Hard Apple Cider!)
  • 3 large boneless, skinless chicken breasts, cut in half horizontally
  • 1 Tbsp cinnamon
  • 2 Tbsp olive oil
  • 1 tsp salt
  • 1 tsp coarsely ground black pepper
  • Chopped parsley for garnish (optional)

Directions:

Preheat oven to 350 degrees F.  Place butternut squash cubes and whole peeled garlic cloves on bottom of large cast iron skillet or roasting pan.  Pour cider over all.

Place chicken breasts on top.  Drizzle with olive oil.  Season all with cinnamon, salt, and pepper.

Cover loosely with foil and bake for 45 minutes.  Remove foil and bake an additional 5 minutes or until chicken is done and butternut squash is soft.

Enjoy!

Cheers & Hugs,
Jodi

Buttermilk Pound Cake

Buttermilk Pound Cake.

I am a total sucker for pound cake!

So Friday – after a long, difficult week – I decided to do some baking therapy and teach my 16-month old granddaughter how to bake her first cake.  It was so fun to put her sweet little apron on for the first time that was a baby gift from a kind friend who knew it would surely get a lot of use.

We made this AMAZING pound cake from a recipe recently shared with me by a dear blog-following friend, Dena, who originally found it from Taste of Home.

The original recipe called for using 1 teaspoon of vanilla.  Dena changed it up by using almond  and lemon extract.  I tweaked it a smidge further by using fresh lemon zest and lemon juice.  Dena makes hers in two loaf pans (which you surely can too – and adjust the baking time to 40-50 mins), but we made ours in a fluted Bundt pan and enjoyed with some fresh strawberries.

This recipe is so wonderful.  It is not super heavy like many pound cakes.  In fact, it is almost a bit light and airy.  But it is also dense enough to be super moist.  I love the way the edges turned out a bit crispy and the center moist and tender.

My granddaughter loved it too, so she got to take half of it home to share with Mommy and Daddy.

It snow flurried most of the day and was so cold, so it was the perfect day for us to hang out, have the oven on for an hour, and enjoy the aroma and taste of this delicious, comforting cake.

Thanks so much for sharing Dena!  This recipe is a real winner!

Buttermilk Pound Cake

  • Servings: approx. 16
  • Print

Ingredients:

  • 1 cup (2 sticks) butter, softened
  • 2 1/2 cups sugar
  • 4 eggs
  • 1 tsp almond extract
  • Lemon – zest of whole, juice of half (approx. 1 Tbsp.)
  • 1/4 tsp baking soda
  • 3 cups flour
  • 1 cup buttermilk (or 1 cup milk + 1 Tbsp white vinegar left to sit for 5 min.)
  • Powdered sugar for dusting on top

Directions:

Cream butter and sugar in electric mixer until light and fluffy.  Add eggs, one at a time, beating well.  Beat in almond extract, zest of 1 fresh lemon, and juice of half of a fresh lemon (approx. 1 Tbsp).  Add baking soda and 1 1/2 cups flour.  Mix just until incorporated.  Pour in half of milk, and beat just until combined.  Gently beat in remaining 1 1/2 cups flour followed by second half of milk.

Pour batter into greased and floured 10″ fluted tube (Bundt) pan.  Bake for approximately one hour or until toothpick inserted into the center comes out clean.  Cool in pan 15 mins, then remove to wire rack to cool completely.  Dust with powdered sugar.

Enjoy!

Cheers & Hugs,
Jodi


Quick and Easy Steak Fajita Flatbread

Quick and Easy Steak Fajita Flatbread.

We all have those days….

Those days when we want something delicious, but don’t feel like fussing…

Well… what a great discovery I made a few days ago when I decided to throw some fajita toppings on a piece of Naan flatbread.

Well – maybe Hubby thought of this first…. but I gave it a name – so let’s call it a collaboration.

The plan was to have steak salads, but when Hubby discovered the Naan, well…..  the plan changed.

And oh YAY!

This Steak Fajita Flatbread creation is like a sandwich/pizza/wrap/salad all in one!

It’s a great, quick and easy, delicious meal that would be great with chicken too.

Here is how we made it.

Quick and Easy Steak Fajita Flatbread

Ingredients:

1 Naan Flatbread (I found these at Aldi’s)
1 thin Sirloin steak, sliced into strips
1/4 sweet onion, sliced
1/4 sweet red pepper, sliced
Salt and Pepper to taste
1/4 cup Lettuce (I used butter lettuce)
Italian or Balsamic Dressing
1/4 cup Shredded Cheddar, Mozzarella, or Monterrey Jack cheese

Directions:

Sprinkle all but 1 Tbsp shredded cheese on Naan Flatbread and place in toaster oven or oven for 5-10 minutes until cheese is melted and flatbread is warm.

Meanwhile, saute onions and peppers in a hot skillet with 1 Tbsp olive oil until wilted and browned.  Salt and pepper to your liking.  Remove from skillet.  Add sirloin beef strips seasoned with salt and pepper, and saute until doneness you desire.

Place onions and beef on top of toasted flatbread. Top with lettuce.  Drizzle with dressing.  Top with remaining shredded cheese.

Enjoy!

Cheers & Hugs,
Jodi

Sprinkle Cookies

Sprinkle Cookies.

There was an old lady (well – let’s call her middle-aged)
who lived in a house.

She had so many sprinkles,
she didn’t know what to do.

So she poured them in batter
with butter and sugar,

and whipped them all soundly
and put them in the oven.

I found a recipe for Half Pound Sugar Cookies, which I slightly adapted to “normal” sized cookies, from Cookies & Cups.

These fun, buttery cookies just make you smile and are a great way to celebrate!  They kind of remind you of eating birthday cake in a cookie!

The family loved them.  They are just enough crispy on the outside with a tender, chewy inside to be the perfect combination.

Here is how I made them.

Sprinkle Cookies

Ingredients:

  • 1 cup (2 sticks) butter, room temp.
  • 1 1/2 cups sugar
  • 2 eggs
  • 2-3 tsp. vanilla
  • 1 tsp salt
  • 1 tsp baking soda
  • 3 cups flour
  • 1 cup sprinkles

Directions:

Preheat oven to 375 degrees F.

Mix butter and sugar with electric mixer until creamy, about 2 minutes.  Add eggs, vanilla, salt, and baking soda, and continue mixing until well incorporated.  Add in flour on low speed just until combined.  Stir in sprinkles with wooden spoon.

Roll dough into 1 inch balls, and bake on a baking stone or cookie sheet for 9-11 minutes until edges just begin to brown.  Cool on cooling rack.

Enjoy!

Cheers & Hugs,
Jodi

Fresh Blueberry Scones

Fresh Blueberry Scones.

I had a friend come over Saturday morning.

HOORAY!  Excuse to bake something yummy.

I surely couldn’t know someone is coming and not have something freshly baked to share if I could help it.  Right?

Surprise visitors might not be as lucky – but are equally welcomed!   (They may just have to look beyond my make-up-less face, a potentially less than clean house, and deal with frozen cookies.)

It was so good to catch up with this friend I haven’t seen in a while – munching on these tender, buttery, lightly sweet biscuits bursting with tart blueberries and sipping on Cinnamon Dolce coffee with Italian Sweet Cream.

Sometimes it takes a guest to make us sit back and relax and truly appreciate our home.  My friend asked me how I ever get anything done with the beautiful view and comfy surroundings?

It made me think….

I need to quit apologizing for the carpet that needs replaced or the walls that need a fresh coat of paint or the old “stuff” I have.

The greatest compliment I receive is when someone tells me they feel completely comfortable and relaxed and welcome in my home.

Isn’t that what makes a house a home?   I have two signs in my home (one I bought and one made for me by my BFF who didn’t know I had bought the same sign!) that say “The thing I love best about my home is who I share it with.”

That could not be truer for me.  A house is made of wood and nails, but a home is made with love and family and friends.

And maybe fresh Blueberry Scones!

Here’s my recipe.

Fresh Blueberry Scones

Ingredients:

2 1/2  Cups Flour
1/2 cup Sugar
2 1/2 Tbsp Baking Powder
Pinch of Salt
1 tsp Cinnamon
1 1/2 Sticks Cold Butter
1 tsp Vanilla
1 Cup Buttermilk (easy substitute is 1Tbsp white vinegar added to 1 cup milk)
1 cup Blueberries
Coarse Raw Sugar for Sprinkling

Directions:

Preheat oven to 400 degrees F.

In a large bowl, mix together flour, sugar, baking powder, salt, and cinnamon.  Cut butter into small cubes and cut into dry ingredients with a pastry blender until coarse crumbs are formed.  Pour in vanilla and buttermilk, and mix with pastry blender just until incorporated.  Dump dough onto counter, gently incorporate blueberries into dough, and gently shape into a 15″ x 3″ rectangle.  Cut dough in half, then each half in half, then each quarter in half, so that you have 8 rectangles.  Cut each rectangle on the diagonal to form 16 triangular shaped scones.

Place on backing stone or cookie sheet, brush with some milk or water, and sprinkle with coarse raw sugar.  Bake at 400 degrees F for 10-15 minutes.  Cool for a few minutes on stone or cookie sheet, then remove to cooling rack to cool completely.

Enjoy!

Cheers & Hugs,
Jodi

Chocolate Chip & Dried Tart Cherry Cookies

Chocolate Chip and Dried Tart Cherry Cookies.

I have shared many versions of cookies here at The CreativeLifeinBetween.

In fact, in some homes (very few indeed), I am known as the Cookie Queen.

And it seems no matter what kind I make, the all-time favorite is the Chocolate Chip Cookie.

I often change it up a little, but when I add dried tart cherries, I know I am going to make at least one guy smile ( who happens to be my youngest son).

So this week, I made a batch that I hope will bring a smile to our busy family as we prepare for exciting days and years ahead.

New homes – growing families – lots of love.


Here is how I make them.

Chocolate Chip and Dried Tart Cherry Cookies

Ingredients:

4 sticks (1 lb.) butter, softened
1 1/2 cups packed brown sugar
1 1/2 cups white granulated sugar
2 tsp vanilla
4 eggs
2 tsp baking soda
2 tsp salt
5 cups all purpose flour
1 12-oz bags Nestle Chocolate Chunk Morsels (or your favorite)
8-oz  Dried Tart Cherries (I used Trader Joe’s)

Directions:

With electric mixer, beat butter and sugar together until completely incorporated. Add vanilla and eggs, and beat until light and fluffy. Add baking soda and salt, and mix another minute. Gradually add flour and beat until well incorporated, but do not overbeat.

Fold in chocolate chunk morsels and dried cherries.  Refrigerate dough for at least 2 hours or up to 2 days.

When ready to bake, preheat oven to 375 degrees F. With your hands, form a cookie dough ball about 1-1/2 inches in diameter.  Place on baking stone. Bake for 8-10 minutes. Do not overbake. Allow to cool on baking stone for 5-6 minutes, then remove to cooling rack to cool completely.

Enjoy!

Cheers  & Hugs,
Jodi

Prosciutto Apple Gorgonzola Pizza

Prosciutto Apple Gorgonzola Pizza.

We went out to dinner with friends a few weeks ago to an amazing local Italian restaurant  near us (Della Terra) that served a too-die-for 5-course dinner with wine pairings that included appetizers, salad, pizza, pasta, and dessert.

One of the things we all went nuts over was a pizza that had apples, prosciutto and  Gorgonzola cheese.

Well – who am I kidding?!  We loved EVERY single course we had, but this pizza was something I thought I might be able to recreate at home.

And O. M. G!!  This turned out so delicious!

It really went together pretty quickly and easily, and it so satisfied my pizza craving!

We often order in pizza on Friday nights at our house.  Just one of our routine guilty pleasures.

But this pizza is worth going to the trouble of making.

Be flexible with it, and make it with ingredients you love.  Add some spinach.  Switch out the apples for pears.  Throw on a few roasted pine nuts.  Add some rosemary and garlic to the pizza dough.

Have fun and be creative!

Here is the recipe for how I made it.  Hope you’ll give it a try.

Prosciutto Apple Gorgonzola Pizza

  • Servings: 1 large pizza
  • Print

Ingredients:

Pizza Crust:

  • 2 cups flour
  • 1 Tbsp yeast
  • 1/4 tsp salt
  • 1 Tbsp sugar
  • 3/4 cup lukewarm water

Pizza Topping:

  • 2 Tbsp Dijon mustard
  • 2 Tbsp honey
  • 8 oz ball fresh Mozzarella cheese, thinly sliced
  • 1 large apple, thinly sliced (I used Gala)
  • 1 large sweet onion, caramelized with 2 Tbsp butter
  • 6 oz. Prosciutto, thinly sliced and fried
  • 1/2 cup Gorgonzola cheese, crumbled

Other:

  • 1-2 Tbsp corn meal

Directions:

Prepare crust by mixing 1 cup flour with yeast, salt, sugar, and water.  Gradually add 2nd cup of flour until a ball is formed.  Knead dough for 2 minutes.  Let rest 10-15 minutes in a bowl covered with dish towel.

Preheat oven to 450 degrees F, and prepare toppings while dough is resting.

Whisk mustard and honey to form sauce, slice Mozzarella and apple, caramelize onions, fry prosciutto, and crumble Gorgonzola.

Sprinkle corn meal on a large round baking stone, press dough on top until thin, using fingers and/or rolling pin.

Spread mustard/honey sauce on dough.  Top with Mozzarella, apple, caramelized onions, prosciutto, and Gorgonzola cheese.

Bake approximately 12 minutes or until crust is golden brown and cheese is bubbly and brown.

Remove from oven, and let rest 2-3 minutes before slicing and serving.

Enjoy!

Cheers & Hugs,
Jodi

Red Velvet Oreo Chocolate Truffles (Cookie Balls)

Red Velvet Oreo Chocolate Truffles  (or Cookie Balls if we’re being less “fancy!”).

If you are looking for a simple, sweet, but festive little treat to share with friends or neighbors or with those you love, these little Red Velvet Oreo Chocolate Truffles might be just the ticket.

They are so simple to make, but turn out so elegant and delish!

You simply crush red velvet (or your favorite flavor) Oreo cookies in the food processor, mix with a block of cream cheese, and make into balls that you dip into chocolate.

Easy Peasy!

Sprinkles make them even more fun! (always!)

I gave little bags to neighbors with silly notes like “You are a SWEET neighbor” and “We LOVE having you for our neighbors.”  I shared others with friends and family.  They were a big hit!

Here is the recipe:

Red Velvet Oreo Chocolate Truffles (Cookie Balls)

Ingredients:

Directions:

Crush oreo cookies in food processor to fine crumbs.  Add softened cream cheese and combine until “dough” forms.

Roll dough mixture into approximately 30 one-inch balls.  Refrigerate for approximately 30 minutes.

Melt chocolate.  I put mine in a tall, microwave-safe cup for one minute, stir, and then microwave for 30 more seconds.

Dip balls into melted chocolate with a fork, allowing excess to drip.  Place on parchment paper.  Decorate with sprinkles if desired.  Allow to set approximately 30 minutes.

Enjoy!

Cheers & Hugs,
Jodi

Finger-Lickin’ Baby Back Ribs

Finger-Lickin’ Baby Back Ribs.

Any rib lovers out there?

We decided on ribs for our Super Bowl Sunday meal this past Sunday.  They are great football feasting food!

Hubby learned a great way to make them.

The secret to making them tender and fall-off-the-bone wonderful is in boiling them first in Coca-Cola.

After boiling them for a couple hours, you drain them, put them in a container, drench with your favorite barbecue sauce, cover tightly, and marinade overnight.

When you are ready to eat them, you simply throw them on the grill, or in our case, Hubby likes to throw them in our Pit Barrel Cooker and smoke them a bit.  In a half hour, you have the most amazing tender, fall-off-the bone, juicy pork ribs you’ve ever eaten.

I like to add a little more sauce on when I eat mine.  (I’m a little saucier than Hubby!)

I know many folks have their own way of making ribs with varying techniques – dry rubs, wet sauces, marinades, etc., but I have not found a way I like better than this simple full-proof recipe.

Hope you’ll give it a try and let me know.

Finger-Lickin' Baby Back Ribs

Ingredients:

Directions:

Cut ribs into 4 pieces.  Put in large pot.  Pour Coca-Cola over ribs until they are completely covered.  Put lid on pot, and bring to boil.  Reduce heat, and simmer about an hour or so until they are fully cooked.

Remove ribs from pot, and discard Coca-Cola.  Place ribs in airtight container.  Cover with barbecue sauce and lid.  Marinade overnight or for at least 6-8 hours.

A half hour before ready to serve, place on grill or in Pit Barrel Cooker and grill/heat through.

Serve with additional barbecue sauce if desired. 

Enjoy!

Cheers & Hugs,
Jodi

Raspberry-filled Vanilla Cupcakes

Raspberry-Filled Vanilla Cupcakes.

If you are looking for a super special, absolutely rock-your-world delicious treat to bake for your special Valentine(s), look no further thank these amazing Raspberry-Filled Vanilla Cupcakes!

I have always admired beautiful cupcakes and love those special gourmet ones that have surprise fillings and are extravagantly decorated, but I have never had much success making them.

I had the urge to give it another try yesterday after purchasing some fun sprinkles I was dying to use somehow.

Disclaimer – I have a weird “thing” for sprinkles and buy way more than I ever use!  I bought three different kinds of red/pink Valentiney ones and one big container of regular ones.  My granddaughter had fun shaking them in the cart while we were shopping!

I found a recipe at RockRecipes.com that I tweaked up a bit.  I was so excited with how beautiful and YUMMY they turned out.

When I handed one to Hubby to taste test, I said,  “Are you ready to have your world rocked by this?”

He loved it!

Here is how I made them.  Hope you give them a try.

Raspberry Filled Vanilla Cupcakes

Ingredients:

Cupcake Batter:

  • 1 1/2 cups flour
  • 1 1/2 tsp baking powder
  • 1/4 tsp salt
  • 1 stick (1/2 cup) butter, softened
  • 1 cup sugar
  • 2 eggs
  • 2 tsp. vanilla
  • 1/2 cup evaporated milk

Raspberry Filling:

  • 1 cup fresh raspberries
  • 1/4 cup sugar
  • 1 tsp corn starch
  • 1 oz. water

Vanilla Cream Cheese Frosting:

  • 1 stick (1/2 cup) butter, softened
  • 1/2 cup (4 oz.) cream cheese
  • 3 1/2 cups powdered sugar
  • 1 tsp vanilla
  • 2-3 Tbsp milk

Directions:

To make cupcakes, preheat oven to 325 degrees F.

Cream together butter and sugar until light and fluffy.  Add eggs, one at a time, beating until well incorporated.  Stir in vanilla.  Add baking powder and salt, then fold in flour.  Finally stir in milk to create batter.

Pour into paper-lined cupcake/muffin pan.  Bake for approximately 20 minutes, or until toothpick inserted into center comes out clean.

While cupcakes are baking, prepare raspberry filling by stirring 1 cup raspberries and 1/4 cup sugar in small saucepan.  Simmer over low heat for about 10 minutes.

Dissolve cornstarch in water, and slowly pour into boiling berries.  Stir constantly until thickened.  Allow to cool.

Prepare frosting by blending together butter, cream cheese, and vanilla.  Add powdered sugar and enough milk to make a smooth, creamy consistency.

When cupcakes are cooled, use an apple corer to remove a small section from center of cupcake.  Fill with raspberry filling.

Decorate with cream cheese frosting and sprinkles and fresh raspberries if desired.

Enjoy!

Cheers & Hugs,
Jodi