Homemade Spiced Pear Liqueur

Spiced Pear Liquer

Have you seen Chef Mimi’s Blog?  Oh My My!   Talk about mouth-watering photos and unbelievably talented cooking skills!

When I saw a post where Chef Mimi shared this recipe for Spiced Pear Liqueur, I had to try it.

I have never tried making anything like this before (with the exception of the ever-popular and classic Apple Pie Moonshine 🙂 that didn’t turn out too shabby!), so I am excited to see how it goes and what other wonderful libations I may want to try concocting…

Here is the recipe as Chef Mimi shares:
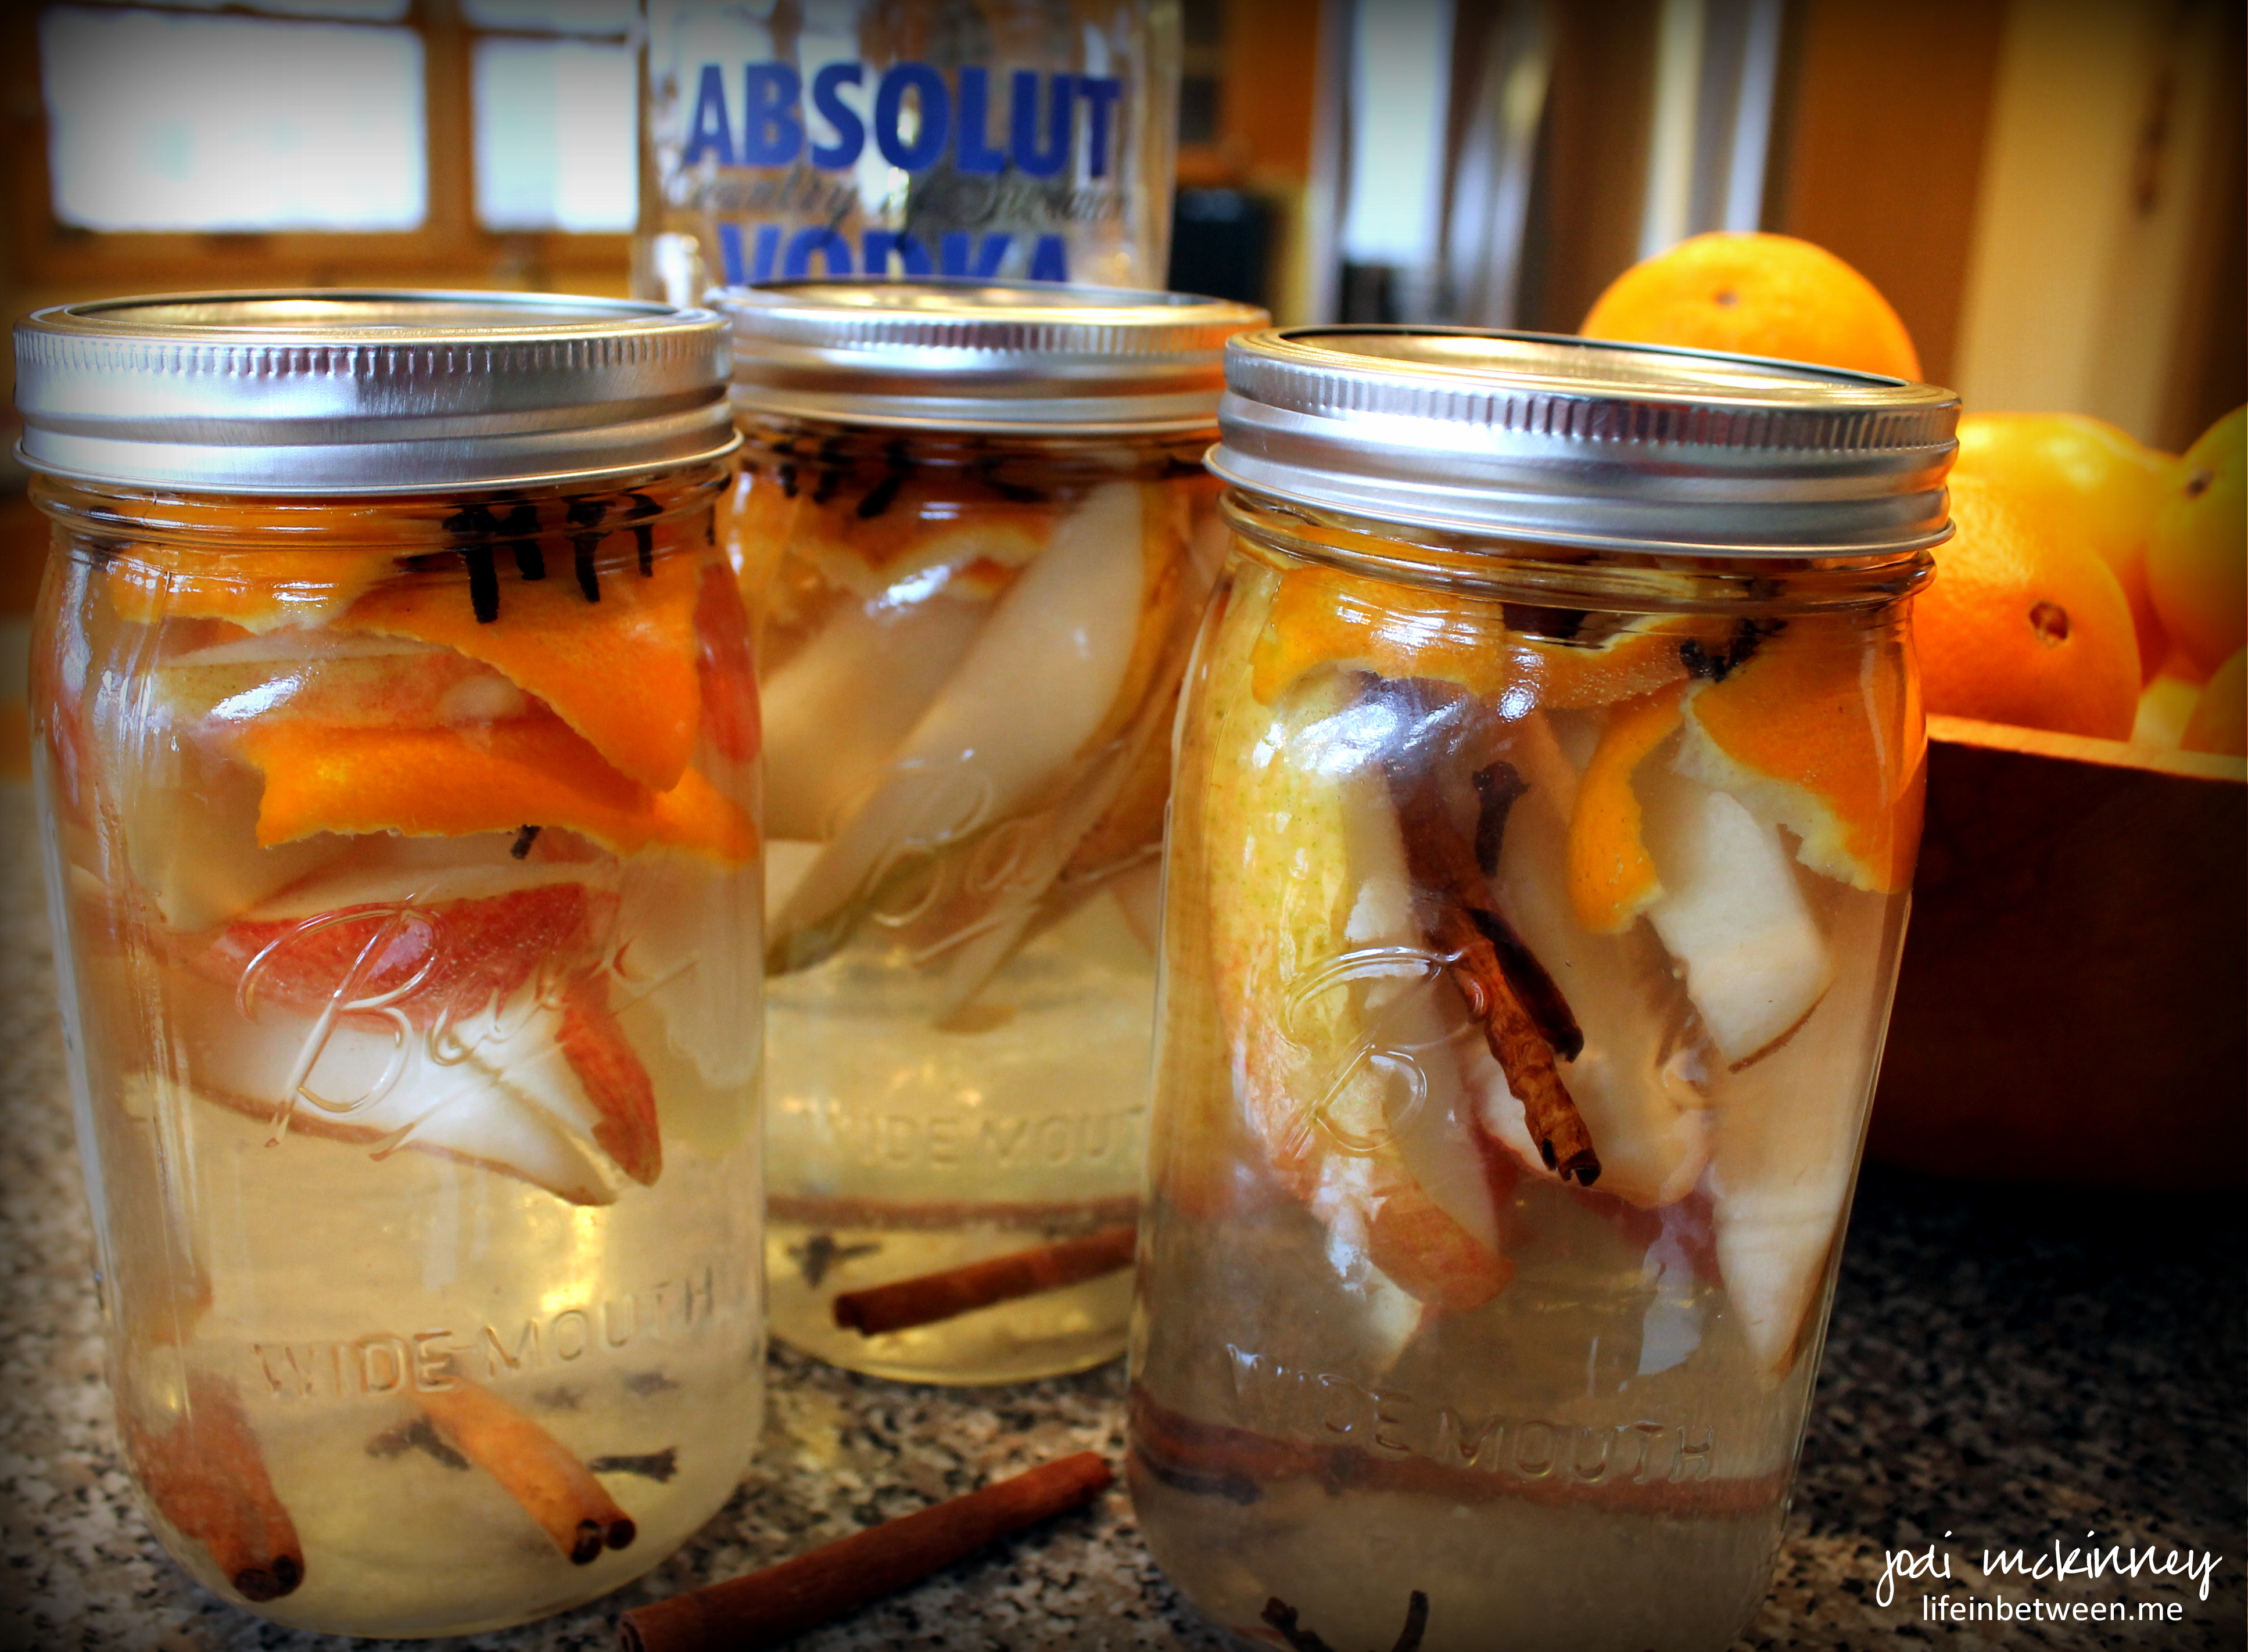
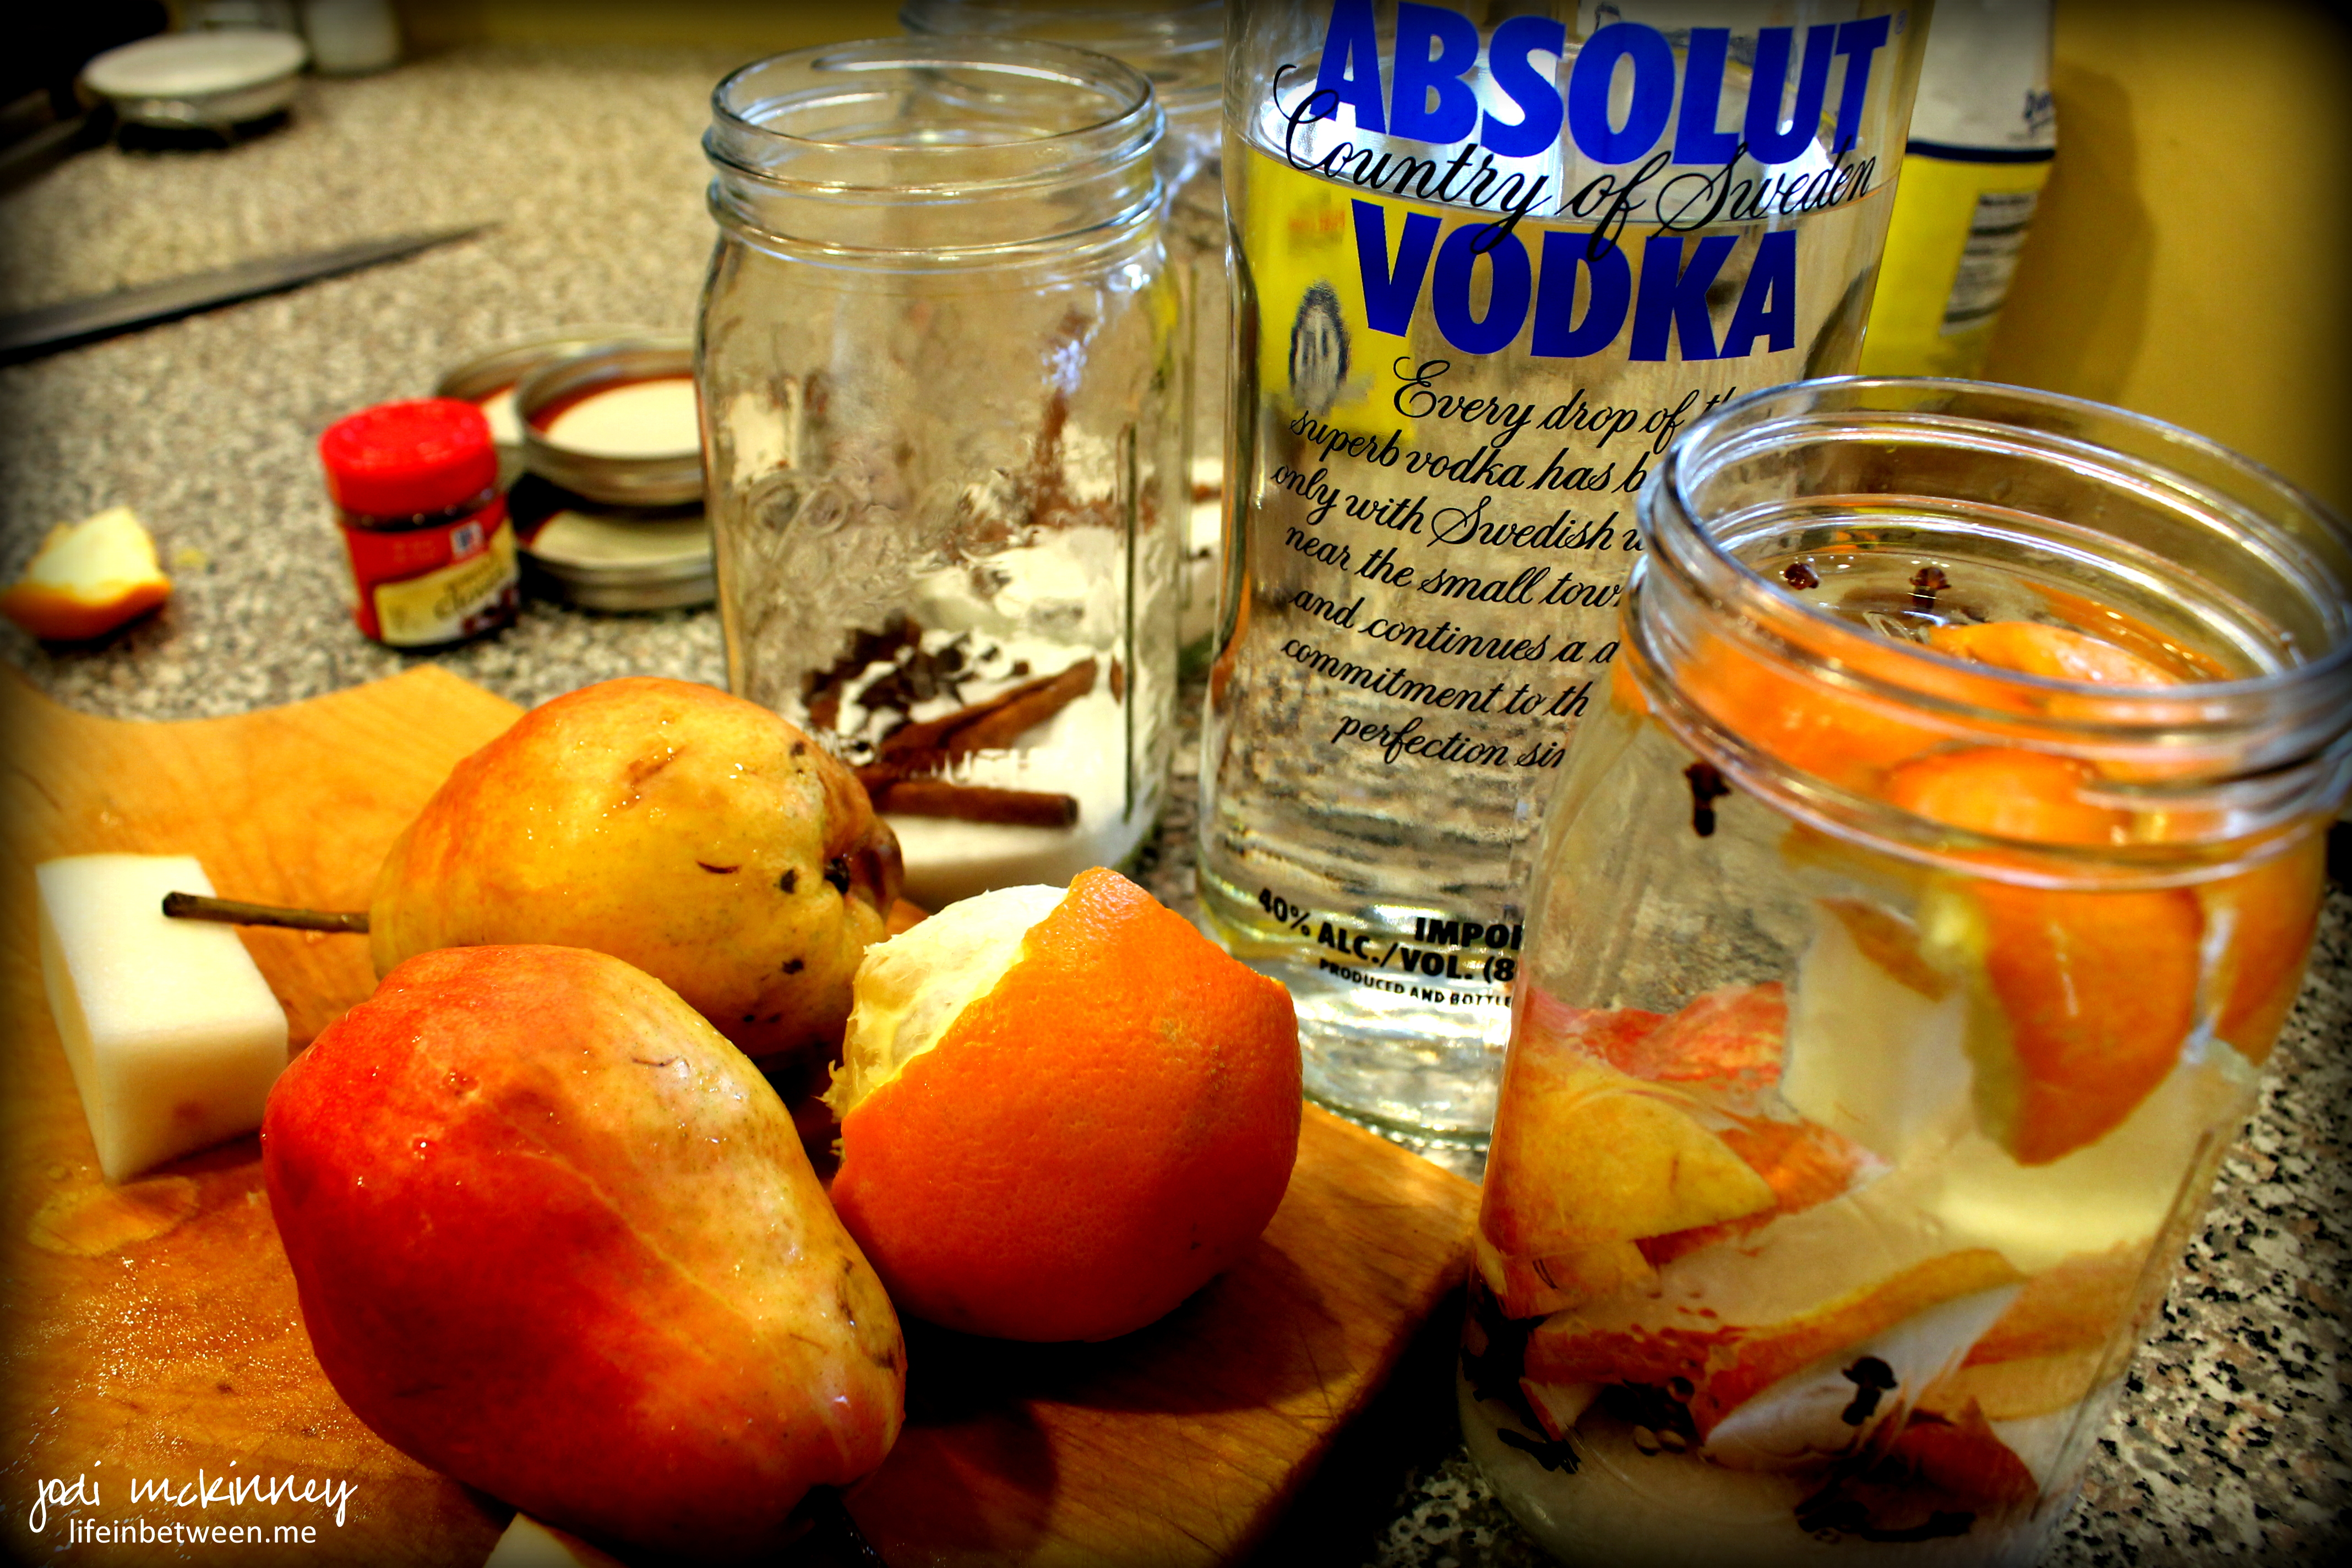
Spiced Pear Liqueur

1/2 cup sugar
Small handful whole cloves
Small handful whole allspice (I did not have allspice, so did not use)
2 cinnamon sticks
1 ripe pear, I used red D’anjou
Few pieces of orange peel
Vodka, approximately 3 cups

Place the sugar, cloves, allspice and cinnamon sticks in a large, clean bottling jar with a lid. Slice up the pear, avoiding the core, and place wedges into the jar. Add the orange peel.

Pour vodka until it reaches the top. I used approximately 3 cups. Shake well until the sugar dissolves. Then store away for 4-6 weeks.

spiced pear liquer 2

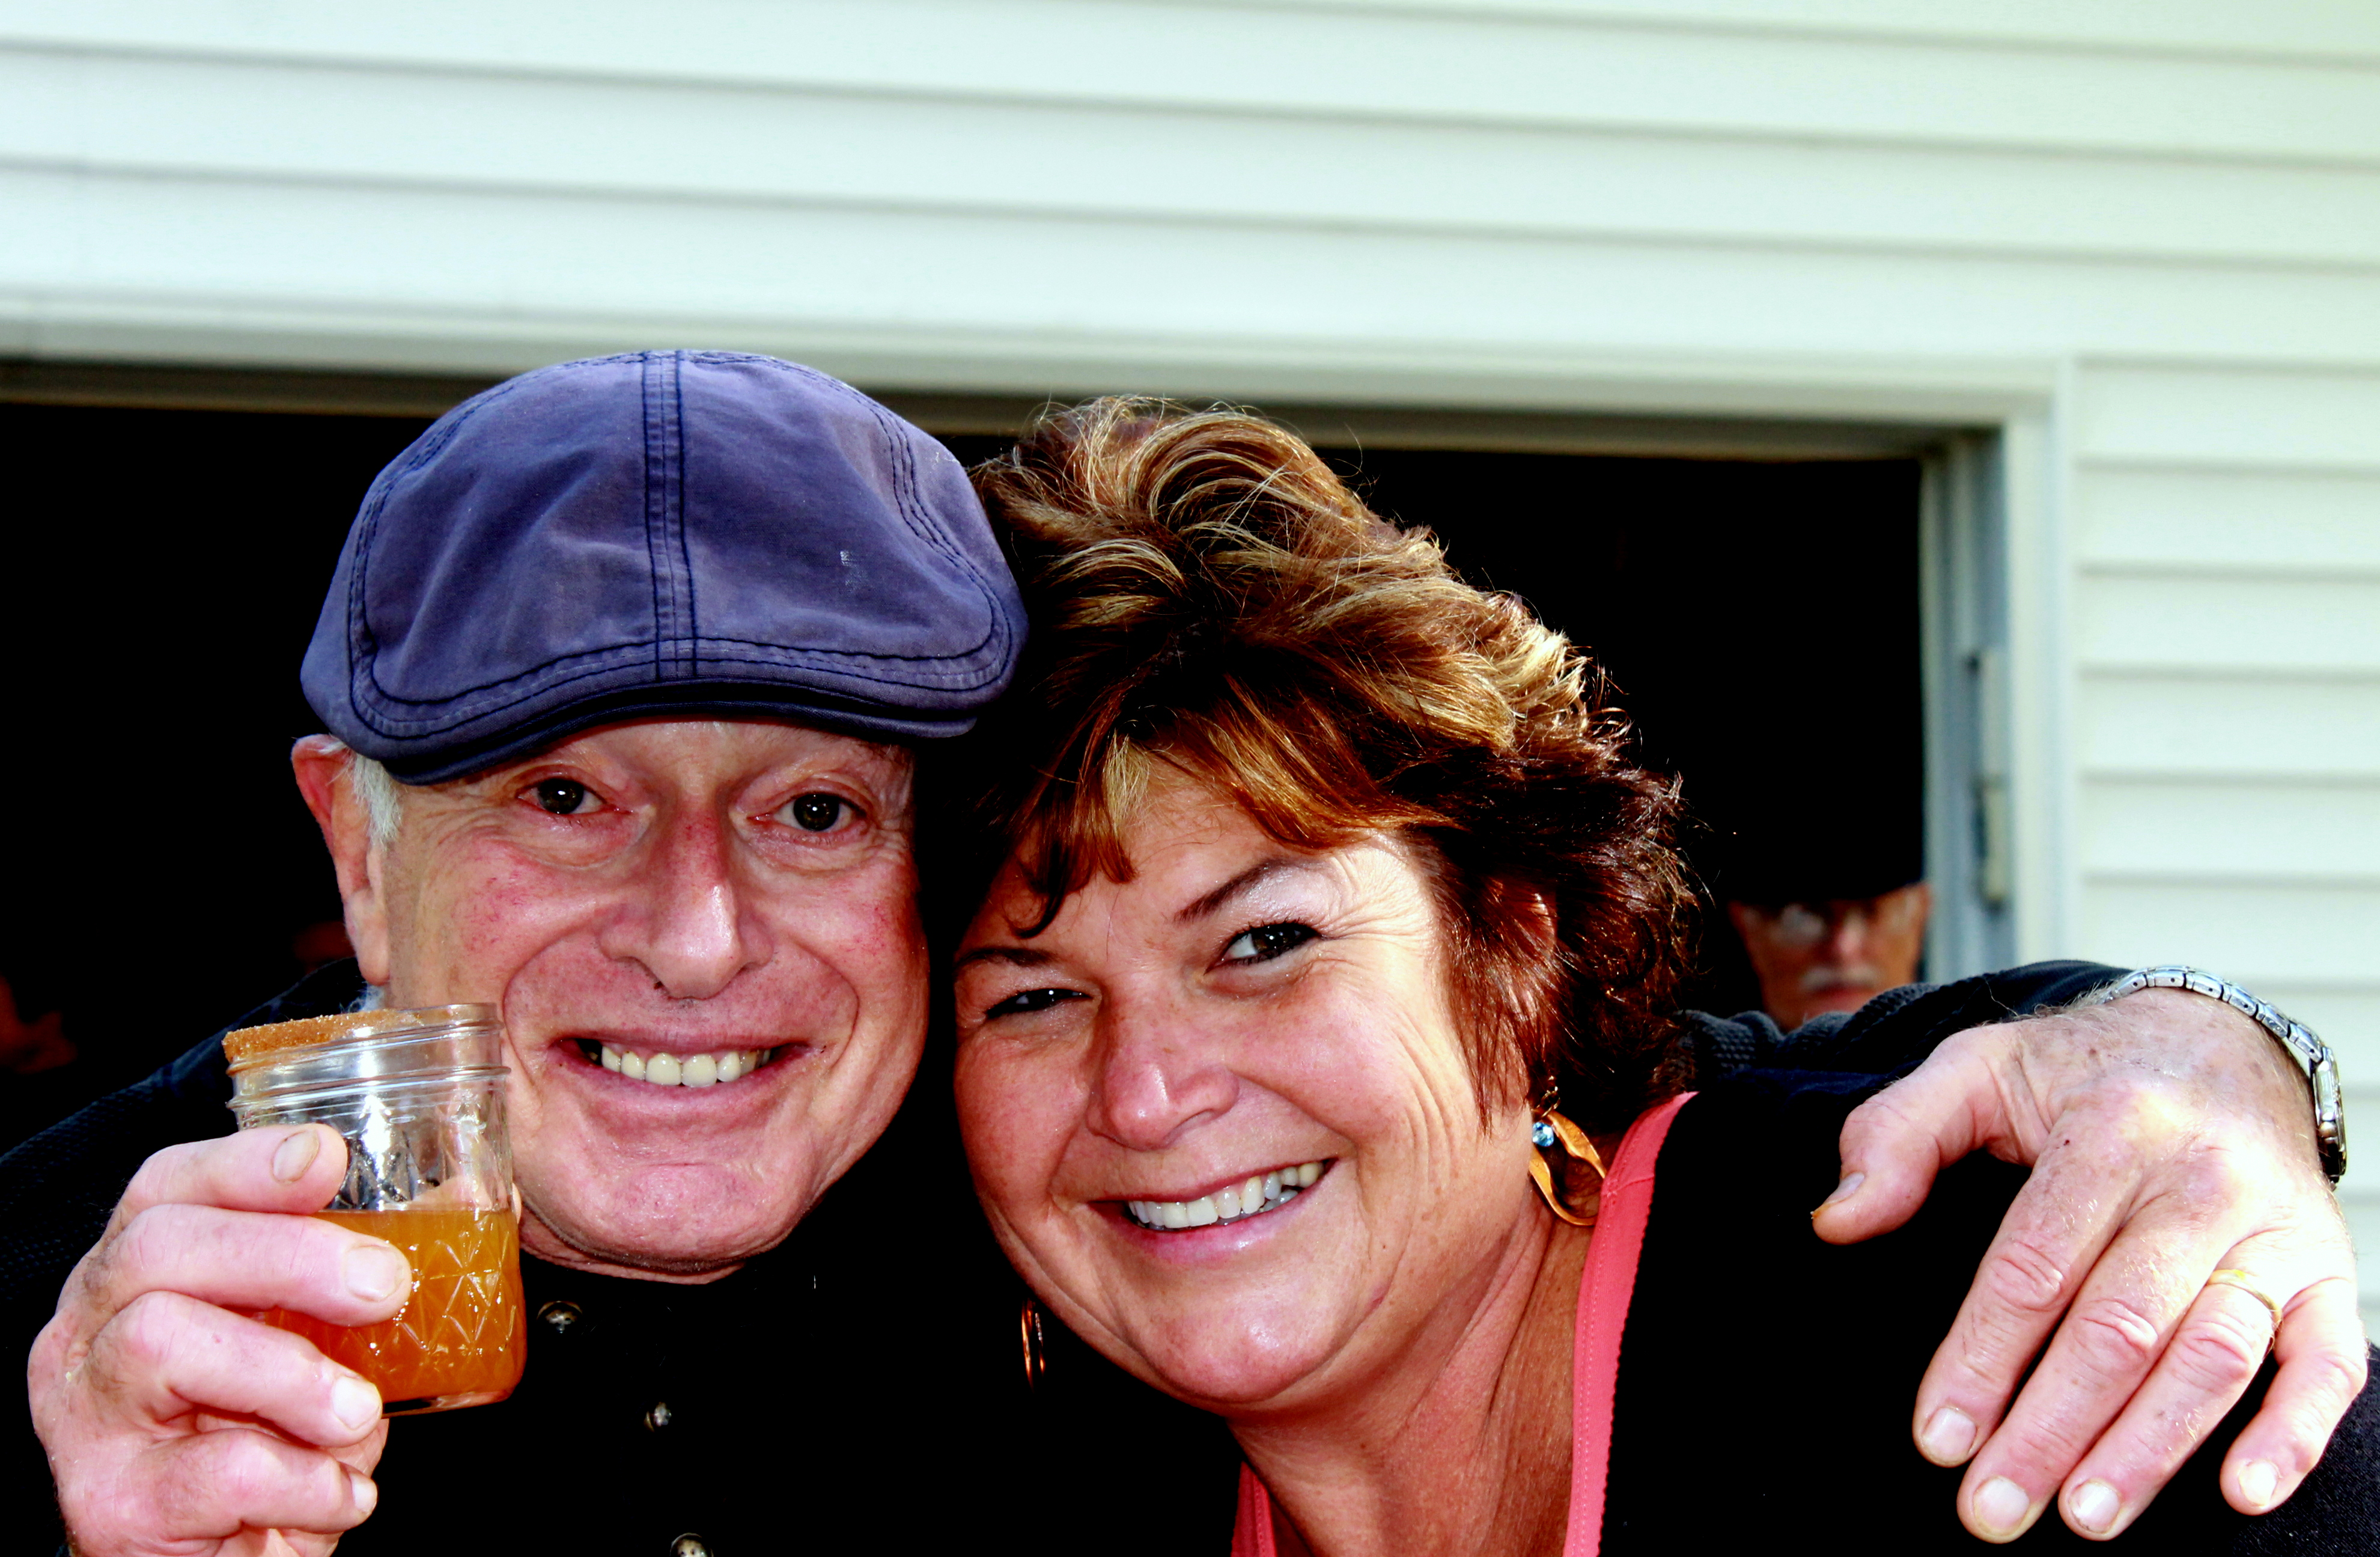
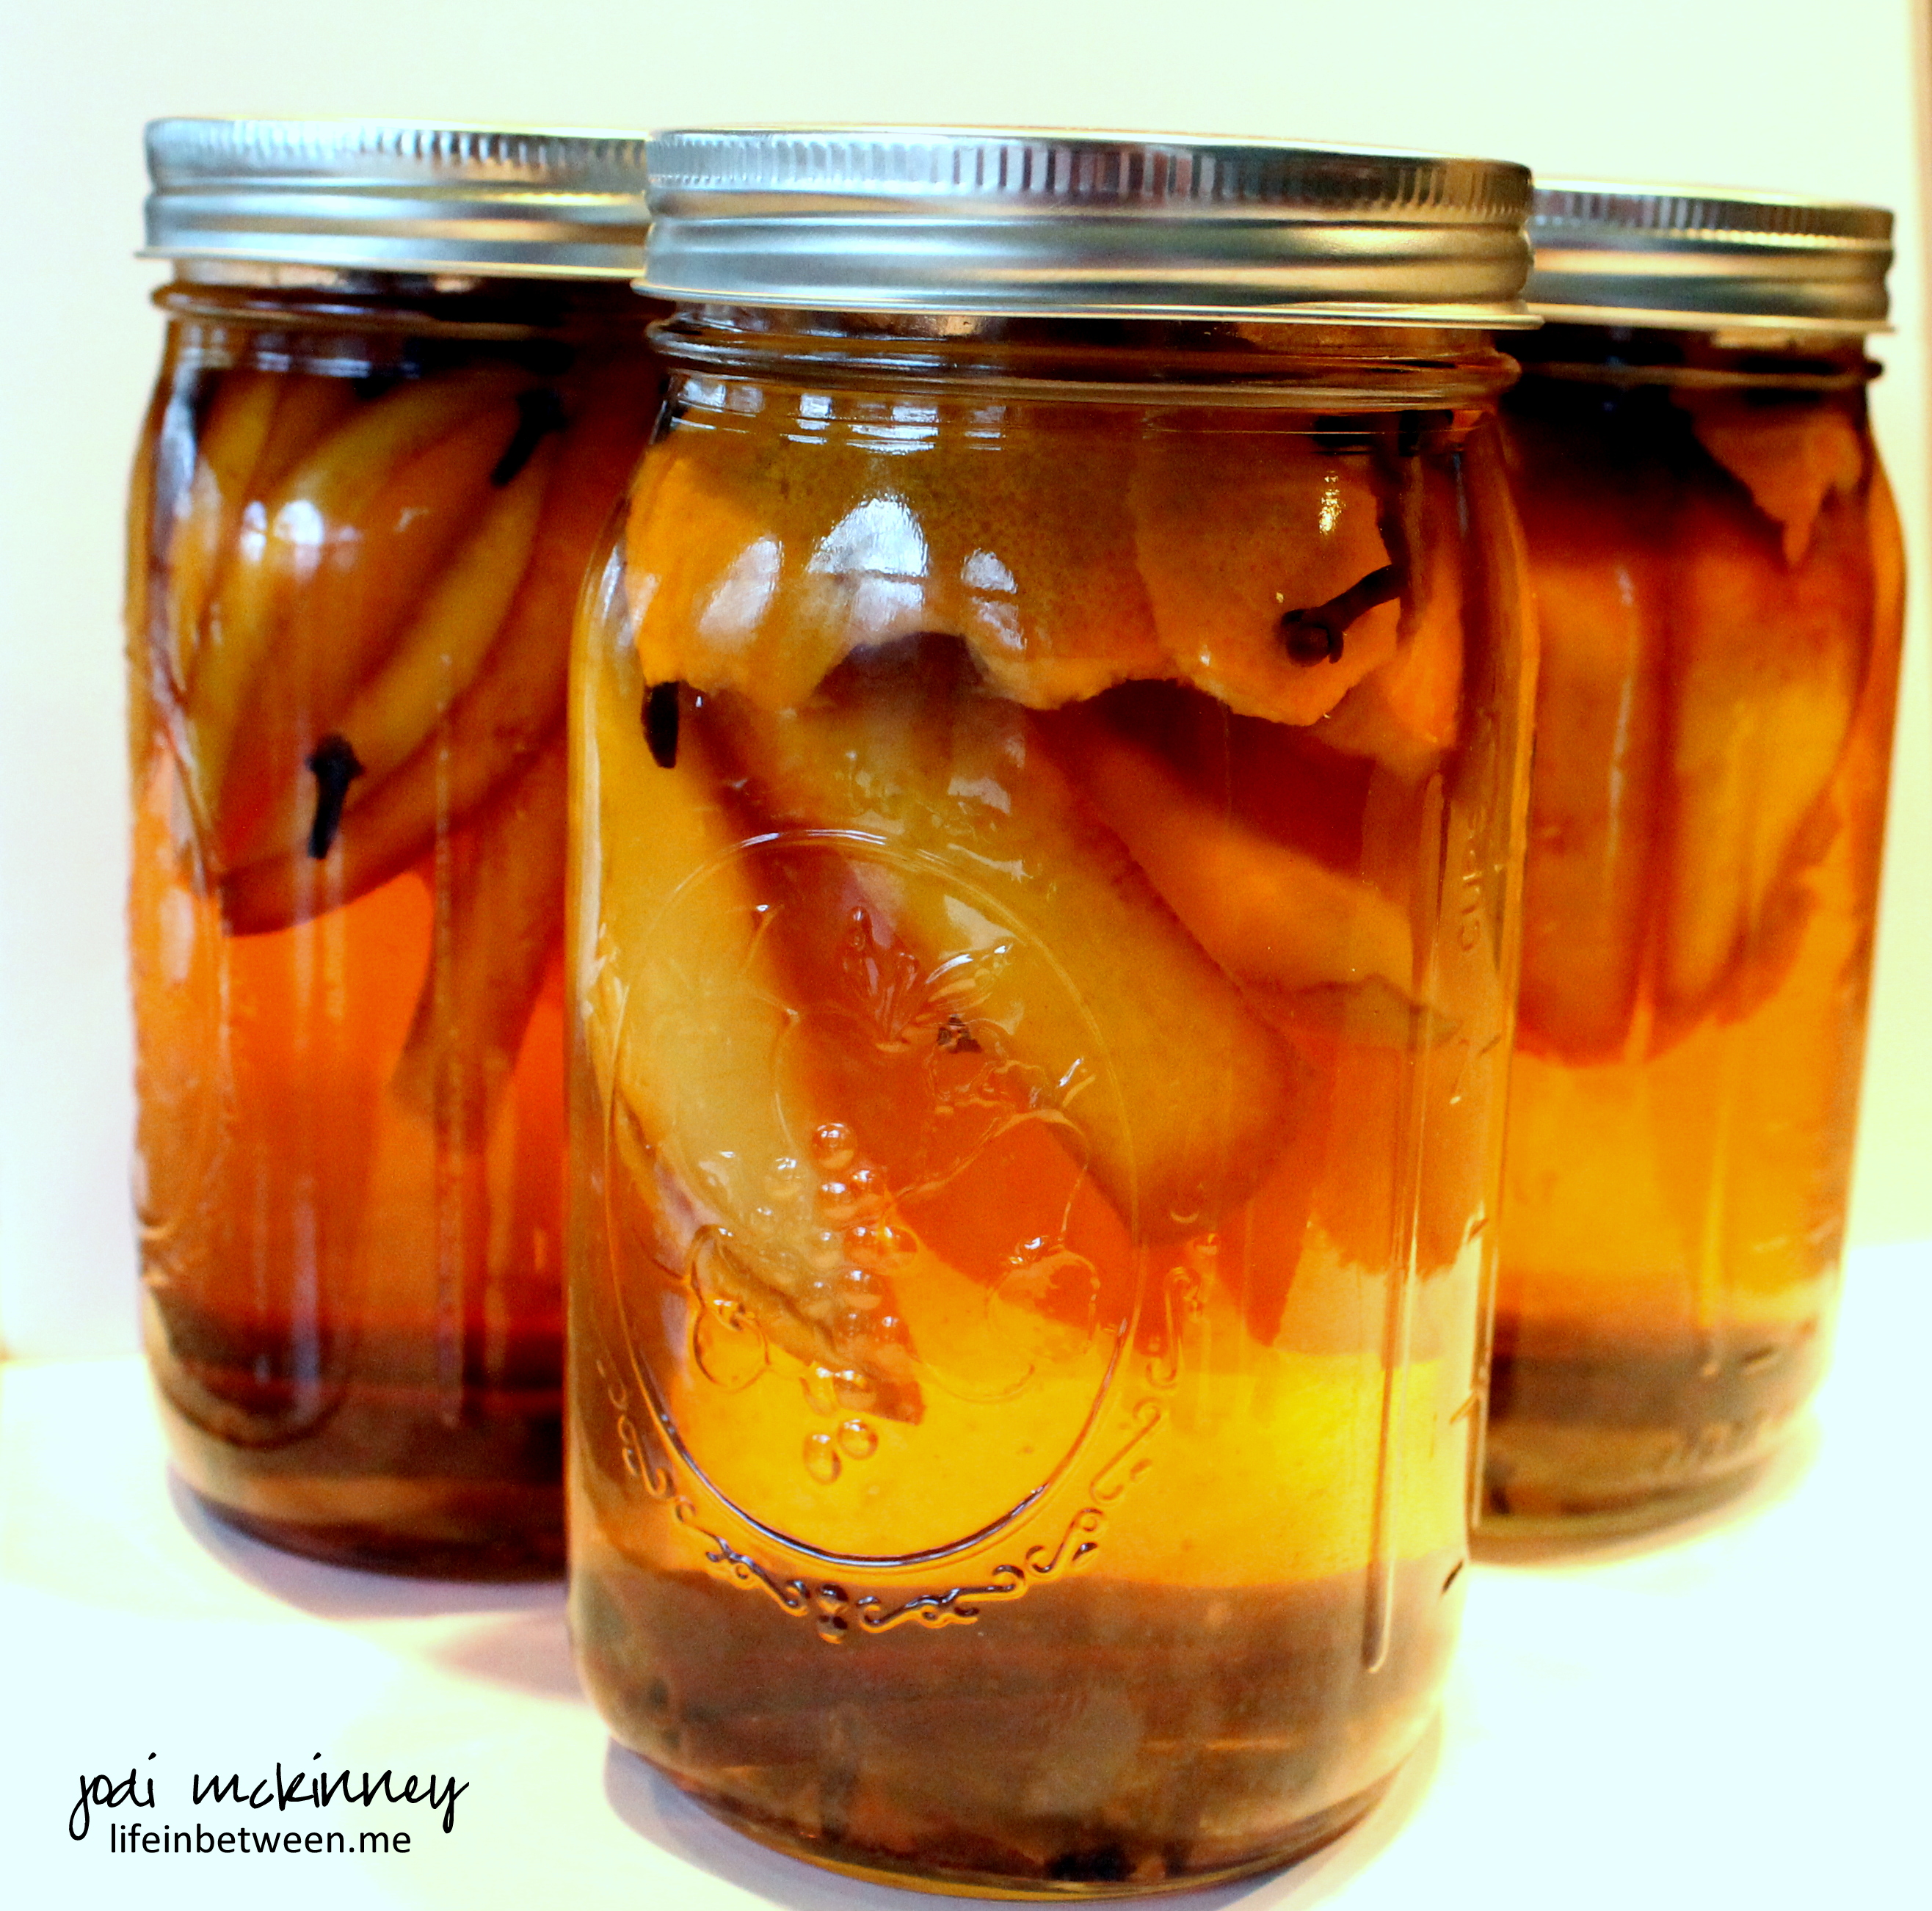
I love all the wonderful colors and aromas of the ingredients that went into this, and after almost a week, it has achieved this beautiful amber color below.

Can’t wait to try taste-testing in a few more weeks!

spiced pear liquer 3

Spiced Pear Cheers & Warm Hugs,

Jodi


Rosemary Roasted Cashews

roasted rosemary cashews

I am completely OBSESSED these days with fresh rosemary!

I’ve been adding it to sourdough pretzels, potatoes,  butternut squash, pot roast (My PERFECT Post Roast Recipe coming soon!), chicken, veggies.

I am utterly addicted to the smell – it reminds me of Christmas and winter and Bombay Gin 🙂 , the taste – so earthy and woodsy, the PUNCH – it completely kicks up any recipe it is added to!

rosemary obsession

So when looking for a different snack to take and share at “The Best Book Club Ever,” I came across this recipe, and had to try.

O M G is all I can say!  Served warm, these will ROCK your WORLD!

roasted rosemary cashews 3

Here is the recipe I found on the Food Network’s website from Ina Garten.

ENJOY!!!

Rosemary Roasted Cashews (original recipe can be found on Food Network’s website from Ina Garten)

1 1/4 lbs cashews
2 Tbsp coarsely chopped fresh rosemary
1/2 tsp ground cayenne pepper
2 tsp brown sugar
2 tsp coarse kosher salt
1 1/2 Tbsp melted butter

Preheat the oven to 375 degrees F.

Place cashews on ungreased baking sheet (I used a stone bar pan) and roast for 10 mins.

While the cashews are warmly roasting in the oven, combine the rosemary, cayenne pepper, brown sugar, and salt.

When you remove the cashews from the oven, drizzle with the melted butter and toss to coat thoroughly.

Then sprinkle with spice mixture, and toss again to coat thoroughly.

Serve warm.

Go Crazy!  I dare you to eat just one!

(If you for some reason I would not be able to understand, are not a cashew fan, I’ll bet this would work great with pecans, peanuts, brazil nuts, hazelnuts, or whatever you fancy!)

roasted rosemary cashews 2

Cheers & Nutty Hugs,

Jodi


Banana Chocolate Chip Muffin Top Cookies

There are certain foods that just love each other…
peanut butter & jelly… bacon & eggs…. macaroni & cheese…
and bananas & chocolate!

Banana Chocolate Chip Muffin Top Cookies

Banana Chocolate Chip Muffin Top Cookies – photo by Nick

So when I saw a recipe for Banana Chocolate Chip Cookies on Rantings of an Amateur Chef’s Maggie Monday yesterday, I knew I had to try them.

And I had some perfectly over-ripe bananas on the counter just waiting to be used.

Banana Chocolate Chip Muffin Top Cookies

Banana Chocolate Chip Muffin Top Cookies – photo by Nick

I hesitated a bit messing with chocolate chip cookies, but when I read that these were more like muffin tops in their taste and texture, I was sold.

Be warned, these are not your normal chocolate chip cookie, and they taste nothing like my “almost famous” chocolate chips cookies, but they are a surprisingly delightful treat.

Banana Chocolate Chip Muffin Top Cookies

Banana Chocolate Chip Muffin Top Cookies

Even Nick, who was skeptical with me messin’ with chocolate chip cookies, gave them a big thumbs up (and shared some of his photography talent by taking some of the photos I’m sharing today).

If you are looking for something different, and you love banana bread, muffins, and chocolate chips cookies, these are a must try.

Banana Chocolate Chip Muffin Top Cookies

Banana Chocolate Chip Muffin Top Cookie & Milk – Photo by Nick

Here is the recipe as posted yesterday on Rantings of an Amateur Chef:

Banana Chocolate Chip Cookies

2/3 cup butter, softened
1 cup sugar
2 eggs
2 ripe bananas, mashed
1 tsp vanilla extract
2 cups flour
2 tsp baking powder
½ tsp salt
¼ tsp baking soda
2 cup chocolate chips

Cream butter and sugar until light and fluffy. Mix in the eggs, vanilla and bananas. Combine the dry ingredients in a separate bowl, then gradually add this to the creamed mixture and blend well. Stir in the chocolate chips. Chill dough for at least one hour. Drop by tablespoonfuls about 2” apart on baking sheets covered with parchment paper. Bake at 350° for 9-11 minutes until edges are lightly browned. Remove to wire racks to cool.

Enjoy!

Cheers & Hugs,

Jodi


Peanut Butter & Chocolate Halloween Spider Cookies

spider cookies 2

Halloween is a week away, and I had more fun than any normal middle-aged (ugh) woman with no children left at home should have making these adorable little peanut butter and chocolate spider cookies!  Heck – we don’t even get a single trick-or-treater, but who says you can’t have fun anyway?!?

spider cookies 4

I had seen a photo of these somewhere, and then a friend texted me a picture from Pinterest by Sommer Collier of A Spicy Perspective saying, “You need to make these for your blog.”  Well… that’s about all it took to get me excited, so I went in search of candy eyes at the local Michael’s Store – but none to be found…

Not giving up, I went to good ole’ Amazon Prime and had them in my hot little hands in two days!

spider cookies 3

They are basically a simple peanut butter cookie with a chocolate truffle in the middle, much like the Hershey Kiss peanut butter cookies (just on Halloween steroids!)

spider cookies

I thought they would be adorable, but wasn’t sure if anyone around here would eat them.

Well – I was wrong!  They loved them!

And it was fun to send some to Nick’s girlfriend, Liz’s office for my blog-following girlfriends at TS 🙂 and deliver some to my daughter-in-law, Colleen at work for a silly surprise.

spider cookie

I must give credit where credit is due.  I found this recipe on A Spicy Perspective’s Blog (which I am a total new fan of!).  She used Lindt Lindor truffles, which I think would be awesome too!  Here is Sommer’s recipe, which I tweaked just a bit for my own brevity’s sake:

Chocolate Peanut Butter Spider Cookies

  • 1/2 cup butter, softened
  • 3/4 cup smooth peanut butter
  • 1/3 cup brown sugar
  • 1/2 cup granulated sugar
  • 1 teaspoon vanilla extract
  • 1 large egg
  • 1 1/4 cup all purpose flour
  • 3/4 teaspoon baking powder
  • 1/4 teaspoon baking soda
  • 1 teaspoon salt
  • 24 round chocolate truffles (I used Ferrero Rocher Truffles, but you can use anything you like best)
  • 3/4 cup Nestle’s semisweet chocolate chips
  • 48 candy eyes
  1. Preheat the oven to 350 degrees F.
  2. Beat the butter and peanut butter until fluffy. Then add sugars, and beat again until fluffy. Scrape the bowl, and beat in the vanilla and egg.
  3. In a separate bowl mix the flour, baking powder, baking soda and salt together. Slowly incorporate into the butter and sugar mixture.
  4. Roll the cookie dough into 24 – 1 1/2 Tbsp-sized balls.   Bake for 7 minutes. Quickly press a cavity in the middle of each cookie with your thumb or pestle, then bake another 6 minutes, until golden.
  5. Cool until almost at room temperature (but not very warm) and place a truffle in the cavity of each cookie.
  6. Melt the chocolate chips in the microwave in 30 second increments, stirring in between, until melted and smooth. Scoop the melted chocolate in a zip bag. Close the bag and snip off a small portion of one corner to create a hole. Pipe 8 legs on each cookie, starting from the truffle body down.
  7. Use remaining melted chocolate to glue 2 eyes onto each truffle spider.

ENJOY!

Cheers & Hugs,

Jodi

PS  Hope you enjoyed this T!  🙂

Sea Salt Caramel Chocolate Chunk Cookies

Who can resist Sea Salt Caramels mixed with Semi-Sweet Chocolate Chunks??!!??

And baked into a warm, crisp on the outside, chewy on the inside homemade cookie!

Sea Salt Caramel Royal Chocolate Chip Cookies Close

I saw these new yummy Brach’s Sea Salt Caramel Royals at the store recently and thought they might make a nice addition to my basic “almost famous” chocolate chip cookies for a little change up.

Sea Salt Caramel Royal Chocolate Chip Cookies Caramels

So I chopped up a bag of these amazing little bites of heaven and substituted them for half of the chocolate chunks in my cookies.  The only tricky thing about these is that the melted caramel makes the cookies a bit tricky to remove from you baking sheets (stones), so I recommend letting them cool almost completely on the sheet before removing.

salted caramel chocolate chunk cookies mix

Two thumbs up from the guys in the McKinney house (and if Mikey had an opposable thumb, he’d give one too).

Sea Salt Caramel Royal Chocolate Chip Cookies Plated with milk

Sea Salt Caramel Chocolate Chunk Cookies

Mix together:

1 lb softened butter (YEPPERS – you heard me right – I did say O N E   P O U N D – 4 sticks – 2 cups – – – don’t get too shook up – recipe makes A LOT!)
1-1/2 cups packed brown sugar
1-1/2 cups white sugar
2-3 tsp vanilla (just pour some in)
4 eggs

Then add:

5 cups flour
2 tsp baking soda
1 tsp salt

Mix well, then fold in:

1 12-oz bag Nestle Semi Sweet Chocolate Chunks
1 10-oz bag Brach’s Sea Salt Caramel Royals, chopped

Chill for several hours.

Drop by heaping tablespoons on baking stone, and bake at 375 for 9-11 min.

Sea Salt Caramel Royal Chocolate Chip Cookies Plated

ENJOY!

Cheers & Hugs,

Jodi

Penne with Butternut Squash & Goat Cheese

Ohhh was this D E L I C I O U S !
Penne with Butternut Squash plated
My sweet friend, Janet, brought us over some butternut squash from her garden the other day.
I was excited to try something new with it, and found this amazing recipe from Giada at the Food Network.
I just happened to have all the ingredients on hand, so Score!  A simple (and no meat) dinner last night.  I added a big, green tossed salad, and we were set.
(My guys do prefer to have “meat,” but I’ll keep trying with baby steps to slip in alternatives occasionally.)
Penne with Butternut Squash Squash
So seriously – how can you go wrong with…
Penne pasta,
Creamy goat cheese,
Sweet onions and butternut squash roasted to perfection with a little olive oil, salt, and pepper,
Crunchy toasted walnuts,
Fresh, fragrant basil,
and salty grated Parmegiano Reggiano cheese
(well – – – Marty says omit the walnuts and add chicken – – – spoil sport!     Might work – but I LOVED it this way!!)
Penne with Butternut Squash Roasted Walnuts
I just love roasting vegetables.  The way this process caramelizes and brings out the sugars and flavors of vegetables is so amazing!
Penne with Butternut Squash roasted
 So – here is the recipe Giada shares from The Food Network that I tweaked up just a bit.
1 butternut squash, peeled, seeded and cut into 3/4-inch cubes
1 sweet onion, diced into 1/2-inch pieces
Olive oil, for drizzling
Kosher salt and freshly ground black pepper
1 pound penne pasta (or whatever shape you like)
1 1/2 cups goat cheese, crumbled – or how much ever you like
1 cup coarsely chopped walnuts, toasted
1 cup chopped fresh basil leaves
1/2 cup coarsely grated Parmigiano Reggiano cheese

Preheat the oven to 425 degrees F.

Arrange the squash and onion together in a single layer on a baking sheet (I always use baking stones). Drizzle with olive oil and season with salt and pepper to taste. Bake for 30-40 minutes stirring occasionally making sure to not overbake – or squash will become “mushy” when mixed in with pasta.

While the squash mixture is cooling, bring a large pot of salted water to a boil over high heat. Add the pasta and cook until al dente – about 8 minutes. Drain and reserve about 2 cups of the pasta water. Mix the pasta, goat cheese and pasta water together and stir until the cheese melts into a creamy sauce. Add the squash and onion mixture, the walnuts and the basil. Toss well and season with salt and pepper, to taste. Garnish with Parmesan and serve.

To toast the walnuts, arrange them in a single layer on a baking sheet. Bake in a preheated 350 degree F oven until lightly toasted, about 6 to 8 minutes Cool completely before using.

I hope you enjoy it as much as I did!

Cheers & Hugs,

Jodi

It’s Krautfest Time!

kf cover

It was an absolutely gorgeous Fall weekend, and a great one for the Annual Brugnoli Krautfest Party!  What a joy to be a part of the amazing festivities.

You may be thinking to yourself – “What the heck is a Krautfest?”

Our family has a long-running tradition of making homemade saurkraut, and our amazing Joyce and Rob know how to turn a “chore” into a party!

So about 40-50 family members and friends ranging in ages from 2 to 82 got together on Saturday with 600 pounds of cabbage and made a party out of making kraut!

Join me through a pictorial journey of the wonderful day.

It started with cutting…

cutting

cabbage girls

then chopping and slicing and dicing…

marty choppingMarty used his grandfather’s 100-year old cabbage cutter and embraced the heritage of using something today his grandfather used in exactly the same way all those years ago.

mason cabbage  mason cabbage 2and new generations learned the tradition.

chopping

there were measurers and salters…

measuring  measuring and salting

Then lots and lots of pounding and stomping and smooshing and smashing.

pounding

pounding close up

pounding 5

pounding 4

pounding 3

pounding 2

There was food galore!

reuben pierogies
One of my favorite treats of the day were these Reuben Pierogies!  We sauteed potato and cheese pierogies in butter until browned, then layered with a slice of pastrami, swiss cheese, picked purple cabbage, and a small dollop of Thousand Island Dressing.

mason pretzels

Warm soft pretzels were served with homemade mustard and cheese sauces.

pierogies

We also had Parmesan Ranch Crusted Pierogies and Buffalo Hot Sauce Pierogies.

painting 3There was pumpkin painting,

painting 4

painting

painting 2

ella painting

ella painting 2There were games…

mother daughter

joyce

donut game

donut game 2

dg 6

dg 5

dg 4

dg 3

dg 2

dg 1

game

laughs 3Zip-lining and Swinging

zip line

zip line 1

zip line 2

zip line 3

swinging

swinging 4

swinging 3

swinging 2

Friendship, Hugs, and Laughs

watching

talking

talking 3

talking 2

rob

rob jodi

nikole

Michael and Ella

laughs

marty nik

games face

babies

bear

babies 2

Delicious cocktails – my favorite was the Bourbon Apple Cider with Rosemary Sprig!

bourbon apple cide

bourbon apple cider

We ate halushki, halupkis, pork and saurkraut, kielbassi, german potato salad, cheese polenta with homemade sauce. Oh the delicousness!!

We sang!

singing

The saurkraut is divided up evenly between all the crocks and buckets to send home with each family…

to wait – and taste test – and wait some more – remembering the special memories we created and looking forward to enjoying the fruits of our labor throughout the year.

kraut

It was a BOOtiful day!  Thanks Joyce and Rob for your amazing hospitality.  We love you dearly!

boo

Cheers & Hugs,

Jodi

Easy Roasted Butternut Squash

roasted butternut squash

A variety of squash is plentiful this time of year.

I love butternut squash, and I love to make it this simple way that I did this week for dinner.

The hardest part is “peeling” the squash.

Here is how I make it:

Roasted Butternut Squash
1 Butternut squash halved, seeded, peeled.
5-6 Tbsp butter
1/4 c brown sugar
1 sprig fresh rosemary, minced
salt and pepper to taste

Cut butternut squash into cubes and spread onto baking dish/stone. Melt butter, add brown sugar, and mix well. Drizzle over squash cubes. Sprinkle rosemary and salt/pepper over all. Roast in 400 degree F oven for 20-30 minutes, until tender and brown.

ENJOY!

Cheers & Hugs,

Jodi

Homemade Dill Bread

Dill Bread

One Christmas holiday season about 15 years ago, some dear friends, Jan and Mike, showed up at our front door on a snowy, blustery day with a warm loaf of this amazing Dill Bread.

I thought I had died and gone to heaven.

After sharing with my family devouring this luscious loaf, I quickly begged for the recipe.  Jan sweetly obliged, and I have been making this bread at least once a year ever since.

This bread is so right up my alley of flavor fiestas!   Sauteed buttery onion flakes and dill seed baked into this dense, no-knead bread and topped with a sprinkling of coarse sea salt.  A cup of cottage cheese in the dough makes it moist and dense.

Yesterday was a bit windy and rainy and seemed a perfect day to let an easy loaf of bread raise and bake for dinner to accompany a beef pot roast and caramelized butternut squash.  A perfect Fall feast.

Here’s the recipe for “Jan’s Dill Bread”

1 pkg dry yeast
1/4 cup warm water
2 Tbsp sugar
1/4 c olive oil
2 Tbsp minced onion flakes
2 Tbsp butter
1 c cottage cheese
1/4 tsp baking soda
1 egg
2 Tbsp dill seed
1 tsp salt
2 1/2 c flour

Soften onion in butter over low heat and let cool.

Dissolve yeast in warm water. Add all ingredients except flour, and mix well. Then stir in flour to make stiff dough.

Let rise until doubled (an hour or so). Punch down and place in greased 2 qt casserole or baking stone. Let rise 40 min. Bake for approx. 30 minutes at 350 degrees F until well browned.

Brush top with butter and sprinkle with coarse sea salt.

ENJOY! (and thanks Jan!)

Cheers & Hugs
Jodi

Food Photography – for National Homemade Cookie Day

Candy Corn Cookies cover

Did you know yesterday, October 1, was NATIONAL HOMEMADE COOKIE DAY?!??!

In my house, it is Homemade Cookie Day AT LEAST once a week, so I almost missed this monumental celebration.

Thankfully, I had made cookies anyway on National Homemade Cookie Day that I took to the office to share with some special visitors.  THEY were the ones that pointed out that today was this wonderful holiday, and I was excited that I could oblige!

In honor of that, and because my son, Nick, told me I need to vary up my cookie photography pictures since they were all starting to look the same, I thought I would share some varying photographs of the cookies I made yesterday.

Now please bear in mind that I have never taken a photography course, not even a single lesson.  Never even read the full manual that came with my favorite Christmas present of all time (this year) that Marty got me last year – a DSLR Camera (Cannon EOS Rebel T3) – but I just LOVE to have fun with it.

I really do want to take some classes.  I know when I do, I will probably look back at the ones I have taken thus far with great embarrassment, but hey – it’s just me having fun at life in between!

Now I know there are some professional photographers out there that follow my blog, so please give me some feedback, critique, provide constructive criticism/feedback.  But please be kind.  I have this ridiculous habit of taking everything personally!  UGH!

So here are some fun photos of these Peanut Butter M&M and Candy Corn M&M cookies I made yesterday morning.  I just used my standard chocolate chip cookie dough recipe, but substituted the M&Ms for the chocolate chips.  They turned out pretty yummy.

Candy Corn Cookies 8

Candy Corn Cookies 3


Candy Corn Cookies 1


Candy Corn Cookies 2


Candy Corn Cookies 12


Candy Corn Cookies 11


Candy Corn Cookies 10


Candy Corn Cookies 4


Candy Corn Cookies 14


Candy Corn Cookies 15

Ok – so I think I’m ready…  Any that you particularly like?  Particularly dislike?  Love?  Hate?  Tips??  Am I going to regret this..???  🙂

Cheers & Cheers & Hugs  – – – I think I might need that second “Cheers” 🙂 ,

Jodi