Classics

red-chevelle

Things that are Classic…
a short list…

Red sports cars, Red Woolrich flannel, Red lipstick
Converse tennis shoes, Peep toe pumps, Timberland Boots
Ray ban sunglasses, Blue blazers, Black dresses
Levi’s jeans, Heather grey hoodies, crisp white cotton shirts
Cashmere, Herringbone, Houndstooth
Diamonds, Pearls, Mood rings
Chanel, Armani, Dior
Aerosmith, Beatles, Elton John
Chocolate chip cookies, Apple pie, Birthday cake
Champagne, Martinis, Cabernet Sauvignon
Monet, Picasso, Van Gough
Kindness, Honor, Grace
Smiles, Hugs, I love you’s

Cheers & Hugs,
Jodi


#Nostalgia
#Local


Heavenly Hot Cocoa Brownies

Heavenly Hot Cocoa Brownies 1

Chocolate lovers look out!

Heavenly Hot Cocoa Brownies 2

Brownie lovers beware!

Heavenly Hot Cocoa Brownies 3

If you are still baking boxed brownie mixes, get ready to rock your world.

I have discovered the ultimate homemade brownie recipe that is not only easy, but has an amazingly crispy, crinkly, chewy cracked crust floating atop a rich fudgy center that is going to cause you to hear angels rejoicing from your taste buds singing.

Heavenly Hot Cocoa Brownies 4

I wanted to create a brownie that was like taking a bite of a sip of hot cocoa.

So tweaking this amazing recipe (originally from Taste of Home) up just a bit made a real winner.

Get ready to bake and taste and share and treat those you love with a brownie that is simply beyond anything you have ever tasted before.  I dare you!

Heavenly Hot Cocoa Brownies

  • 3/4 cup cocoa (I used Hershey’s)Heavenly Hot Cocoa Brownies 1
  • 1/2 tsp. baking soda
  • 2/3 cup melted butter, divided
  • 1/2 cup boiling water
  • 2 cups sugar
  • 2 large eggs
  • 1 1/3 cups flour
  • 1 1/2 tsp pure vanilla extract
  • 1/4 teaspoon salt
  • 12 oz. package semi-sweet chocolate chips (I used Trader Joe’s, which I found delightful, but I often use Nestle’s also)
  • 3/4  cup miniature marshmallows

Directions:

  • Preheat oven to 350 degrees F.
  • In a large bowl, combine cocoa and baking soda.
  • Blend in half (1/3 cup) of the melted butter.
  • Add boiling water and stir until well blended.
  • Stir in sugar, eggs and remaining 1/3 cup melted butter.  Mix until well incorporated
  • Add flour, vanilla, and salt.
  • Stir in chocolate chips and 1/2 cup marshmallows.
  • Pour into a greased 9×13 pan and bake for 30-35 mins. until top begins to crack
  • After removing from oven, top with remaining 1/4 cup mini marshmallows and lightly brown tops with Chef’s Torch (optional)

Cheers & Chocoately Brownie Hugs,

Jodi

Real can’t be ugly…

stuffed bunny watercolor card

How could I have missed this?

It is a classic novel.

It was made into a film, a musical, and a soundtrack.

It is a story that caused my heart to swell,
reminded me of the past,
gave me pause to consider the future.

It made me smile broadly.

It gave me a lump in my throat.

It caught me off guard and caused me to gasp.

Tears welled up, and then magic appeared.

The Velveteen Rabbit, illus. William Nicholson:

How could this be considered a “Children’s Novel” when it teaches such relevant adult life lessons?

“How about this old Bunny?” she asked.
“That?” said the doctor.  “Why, it’s a mass of germs!  Burn it at once.  What?  Nonsense!  Get him a new one.  He mustn’t have that any more!”
And so the little Rabbit was put into a sack with the old picture-books and a lot of rubbish, and carried out to the end of the garden behind the fowl-house.

How often does this happen in real life….
to real people….
whose hearts and souls are young,
but their bodies are aged, broken, weak, and have germs….?

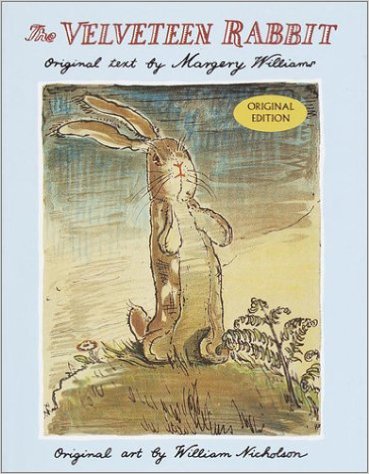
How could I have missed this beautiful story that was never read to me as a child and that I never read to my children?

The Velveteen Rabbit.

Written almost 100 years ago, and I just bought my first copy this week…. via Amazon Prime….   for ages 3 – 7… and I am 52… and I LOVED it!

The life lessons are so deeply profound.
I so encourage you to read this… slowly – and at least twice:

The Gahan Girls: Thank you, Skin Horse. I couldn't have said it better myself.:

Thank you, Skin Horse, for your insightful wisdom.
I will try very hard to remember this every day.

Whether you have children or not, The Velveteen Rabbit is a MUST-READ!  It will be the best 10-15 minutes (depending on how long you linger over the beautiful illustrations) you’ve spent in a long time, and the best $7.49 you will spend this year.

A new, old, profound classic on our bookshelf!

It is waiting to be read to or by anyone who visits our home….   anyone who wants to know what it means to be REAL.

velveteen rabbit

Cheers & Hugs,

Jodi

P.S.  I was so amazed by this story (which I discovered after a friend posted a quote on Facebook), that I had to draw a version of a stuffed bunny (a velveteen rabbit) late one night.  It came freely.   From a Google Search of stuffed bunnies, I saw a photo similar to this one I painted.  It came quickly and easily, and I was delightfully surprised when I saw how it turn out the next morning – when the paint had dried, and my eyes were clear, and it became “Real.”  And “Real can’t be ugly, except to people who don’t understand.”

Old-Fashioned Homemade Butter Mints

old fashioned homemade butter mints

I have always loved these soft smooth buttery mints. Not those hard so-called “party” mints that crack your teeth (and like Grandma sometimes had in her candy dish), but the butter mints in soft yellow or pastel shades that were often put out as “after dinner” mints at special occasions or for parties when I was growing up.

I had pinned a recipe for homemade butter mints some time ago on my Pinterest page, not knowing when I’d get around to making them, and/or deciding on an occasion to make them so I wouldn’t eat them ALL myself! Then a friend recently asked me about them for a special party she is working on, and it was the perfect opportunity to give the recipe a whirl.

And whirl I did indeed! Woohoo! Are these ever EASY peasy and even better than I remember.

old fashioned homemade buttermints 2

Did your Grandma always have a candy dish full of these little treats at her house like mine?

Grandma kept hers in a special candy dish atop the server in her dining room.

I can still picture it vividly. It sat on the far left back corner of the server, and it was amber glass with a pointed dome lid on a pedestal. We always tried to carefully lift the lid when we were sneaking taking a piece so as not to “clink” the glass and make it ring throughout the entire house (at least that is what it felt like!)   Because if you did happen to just tap it ever so lightly to make a tiny tingy noise, Grandma’s little dog, Felix, would come a running! Felix loved those mints, and you always had to throw him one if you wanted to prevent the entire house from knowing you were in the candy jar again!

My brother was often known for purposely rattling the jar just to get Felix all worked up.  The poor little thing did practiccandy dishally have a heart attack when he heard that dish a ringing!

When I was trying to describe the candy dish, I thought I’d google it using the descriptive words I came up with, and to my surprise, I found what I believe would be the EXACT match (at least as far as my memory serves)!  It is actually for sale on Etsy.  I saw several.  I guess they are considered somewhat prized antiques at this point.  I’m kinda tempted to get it, but I think I’ll just keep the memory.

Here is the recipe I found on Barefeet in the Kitchen.  (Mary even made a cocoa mint version if you want to check that out too, and her recipe is slightly adapted from Averie Cooks)

Homemade Old-Fashioned Butter Mints

  • Servings: Approx. 200 mints or 3 cups
  • Print

Ingredients:old fashioned homemade buttermints

1/4 cup softened butter
1/4 tsp salt
1/3 cup sweetened condensed milk
3 1/4 – 3 1/2 cups powdered sugar
1/2 teaspoon peppermint extract
Optional: Food coloring for the desired shade you would like

Using an electric stand mixer, combine the soft butter and salt, and beat to combine. Add the condensed milk and beat again to combine. Add the powdered sugar one cup at a time, beating to combine thoroughly. Add the peppermint extract and food coloring if you are adding. The dough will be mostly crumbs, but should stick together when squeezed into a ball.  If it is sticky, add a little more powdered sugar.

Remove the dough from the mixer and pull off golf ball size pieces. Roll each ball with the palm of your hand into a long skinny log about 1/2″ in diameter – just as if you were making a snake with play dough.  Slice the strips into tiny mint-size pieces. A pizza cutter works great for this, and you can cut several strips at a time quick and easily.

Spread the soft pieces across a baking sheet and allow them to sit at room temperature overnight. You could speed up the process and put them in the refrigerator uncovered.  When they have hardened enough to store, transfer the mints to an airtight container.   Enjoy!

Cheers & Hugs,

Jodi

Zucchini Lasagna

z
The Challenge:  Take a classic recipe, and make a healthier version.

That was the assignment my son, Nick’s girlfriend, Liz, had for her final assignment in a cooking class she is taking as part of her Master’s Degree Program in Nutrition.

We were excited to help her out and have her cook dinner for us last evening.

And she rocked it!  This Zucchini Lasagna recipe is a KEEPER!  I do believe I like it even better than the classic version.

Liz was sweet enough to allow me to photograph her and share the adventure and recipe here with all of you.

z1

One of the joys of cooking is appreciating and embracing the fresh ingredients that make a recipe so wonderful – like the smell of fresh basil.

z2

And the only thing better than smelling fresh basil is the smell of sauteed onions and garlic in olive oil!

z5

For the meat sauce, Liz used lean ground turkey instead of beef or sausage, and when mixed with crushed tomatoes, fresh basil, onions and garlic, you would never know you are “missing” anything – except you get the bonus of less fat and calories!

Z3

This adorable amateur in the kitchen totally mastered using a mandolin (which she formerly only knew as a musical instrument 🙂 ) to perfectly slice the zucchini to replace the pasta noodles.

Z4

And of course Mikey was on his steadfast “clean the floor” duty making sure no crumb is left behind (and yes – he even likes raw zucchini).

z6

This recipe even includes mastering the grill, so Nick was in charge of instructions here, and the zucchini strips were char-grilled beautifully.

z7

Yummy ricotta and Parmesan cheeses are mixed with some parsley, salt, pepper, and an egg for the traditional filling.

z8

Everything was layered, using the zucchini strips as “noodles” and topped with fresh slices of mozzarella for that extra yumminess.

z9

And who can’t resist an extra sprinkle of freshly grated Parmesan on top before diving in?!

Here is the recipe Liz used as adapted from Skinnytaste.com:

Zucchini Lasagna

Ingredients:  z

  • 1 lb ground turkey
  • 4 cloves garlic, minced
  • 1/2 onion, chopped
  • 1 tsp olive oil
  • salt and pepper to taste
  • 1 28 oz can crushed tomatoes
  • 4 Tbsp chopped fresh basil
  • 4 medium zucchini, sliced thin
  • 24 oz part-skim ricotta cheese
  • 1 Tbsp fresh or dried parsley
  • 1 1/2 lbs. part-skim fresh mozzarella cheese, sliced
  • 1/2 cup shredded Parmigiano Reggiano
  • 1 large egg

Directions:

In a medium sauce pan, brown ground turkey.   Season with salt.  Remove from pan to bowl, and add olive oil to the pan.   Saute garlic and onions about 2 minutes.  Return the meat to the pan, add tomatoes, basil, salt and pepper. 

Simmer for 30-40 minutes, covered.

While sauce is simmering, slice zucchini into 1/8″ thin slices.  Salt lightly, and set aside for 10 minutes. Zucchini has a lot of water when cooked, salting it takes out some of the moisture. After about 10 minutes, aggressively blot excess moisture with a paper towel.

On a gas grill or grill pan, grill zucchini on each side, until cooked, about 1-2 minutes per side. Place on paper towels to soak any excess moisture.

Preheat oven to 375° F.

Stir together ricotta and Parmesan cheese, parsley, salt, pepper and egg in a medium bowl.

With zucchini, sauce, and cheese mixture complete, you are ready to begin assembling the lasagna.

In a 9×12 inch casserole, spread half the sauce on the bottom and layer the zucchini to cover. Then place the ricotta cheese mixture topped with half  of the mozzarella cheese.

Repeat with remaining sauce, another layer of zucchini, mozzarella and a bit of extra Parmesan.

Cover with foil, and bake for 45 minutes.

Uncover, and bake an additional 15 minutes.

Let stand 10 minutes before serving to “set.”

ENJOY!

Thanks, Liz, for being such a good sport and for being such a bright spot in our lives.  We love you!  🙂

And you all are going to love this recipe!

Cheers & Hugs,

Jodi