Strawberry Chocolate Ganache Tart with Oreo Cookie Crust

chocolate-strawberry-tart-valentines-day-couples-camp-dessert

Strawberry Chocolate Ganache Tart with Cookie Crust (No Bake).

You may recall seeing this dessert I made for our Valentine’s Couple Camp Party.  I promised then that I would share the recipe.

I have to tell you… this dessert is not only beautiful and elegant looking, it is so simple, uses only five basic ingredients, and is possibly the most luscious chocolate dessert I have EVER tasted.  And I’m really not exaggerating.  I absolutely loved this tart!

I typically make dessert, but just taste enough to know it is okay to serve.  This one, however… I not only had the evening of our party, I ate the last leftover slice!

I am certain I will make this tart again.. and again.  It is a great dessert for ANY occasion, any season, anybody.  I would take this to a summer picnic.  I would make this for a birthday “cake.”  I would make this for a Christmas dinner dessert.  I would make this for ANY reason.

chocolate-strawberry-tart-valentines-day-couples-camp-dessert-2

I originally came across this recipe posted by Mary at HomeisWheretheBoatis, and I only tweaked it slightly.  Thanks for sharing Mary!

I so hope you will give this a try, and I cannot wait to hear how you like it!

Strawberry Chocolate Ganache Tart with Oreo Cookie Crust (No Bake)

Ingredients:chocolate-strawberry-tart-valentines-day-couples-camp-dessert

  • 1 pkg. Oreo Cookies (approx. 32 cookies)
  • 1/2 cup (1 stick) butter, melted
  • 12 oz. of Your Favorite Chocolate (I used Baker’s German Sweet)
  • 1 1/2 cups Heavy Cream
  • Strawberries

Directions:

  • Place Oreo cookies in a gallon size Ziploc bag.  Then place entire bag in another bag to double (so you can crush them without making a mess!)  Crush Oreo cookies using a heavy rolling pin, your hands, or whatever way you prefer to smash them fine enough to make a crust from.  (The original recipe calls for pulsing them in a food processor, so feel free to do that if you have one.)  
  • Pour melted butter into the bag.  Zip to close again and  completely incorporate the cookie crumbs and butter using your hands.  Pour crumb and butter mixture into an 11″ tart pan.  Pat onto bottom and up sides of tart pan.  Refrigerate to firm up for one hour before preparing and adding filling.
  • To make filling, break up chocolate and place in a heat-proof bowl.  Bring heavy cream to a boil in a small sauce pan.  As soon as it boils, pour over chocolate.  Let sit for a couple minutes to soften the chocolate, then slowly whisk until until smooth and fully incorporated.  Pour into chilled, firm crust.  Refrigerate for 4-6 hours or overnight.
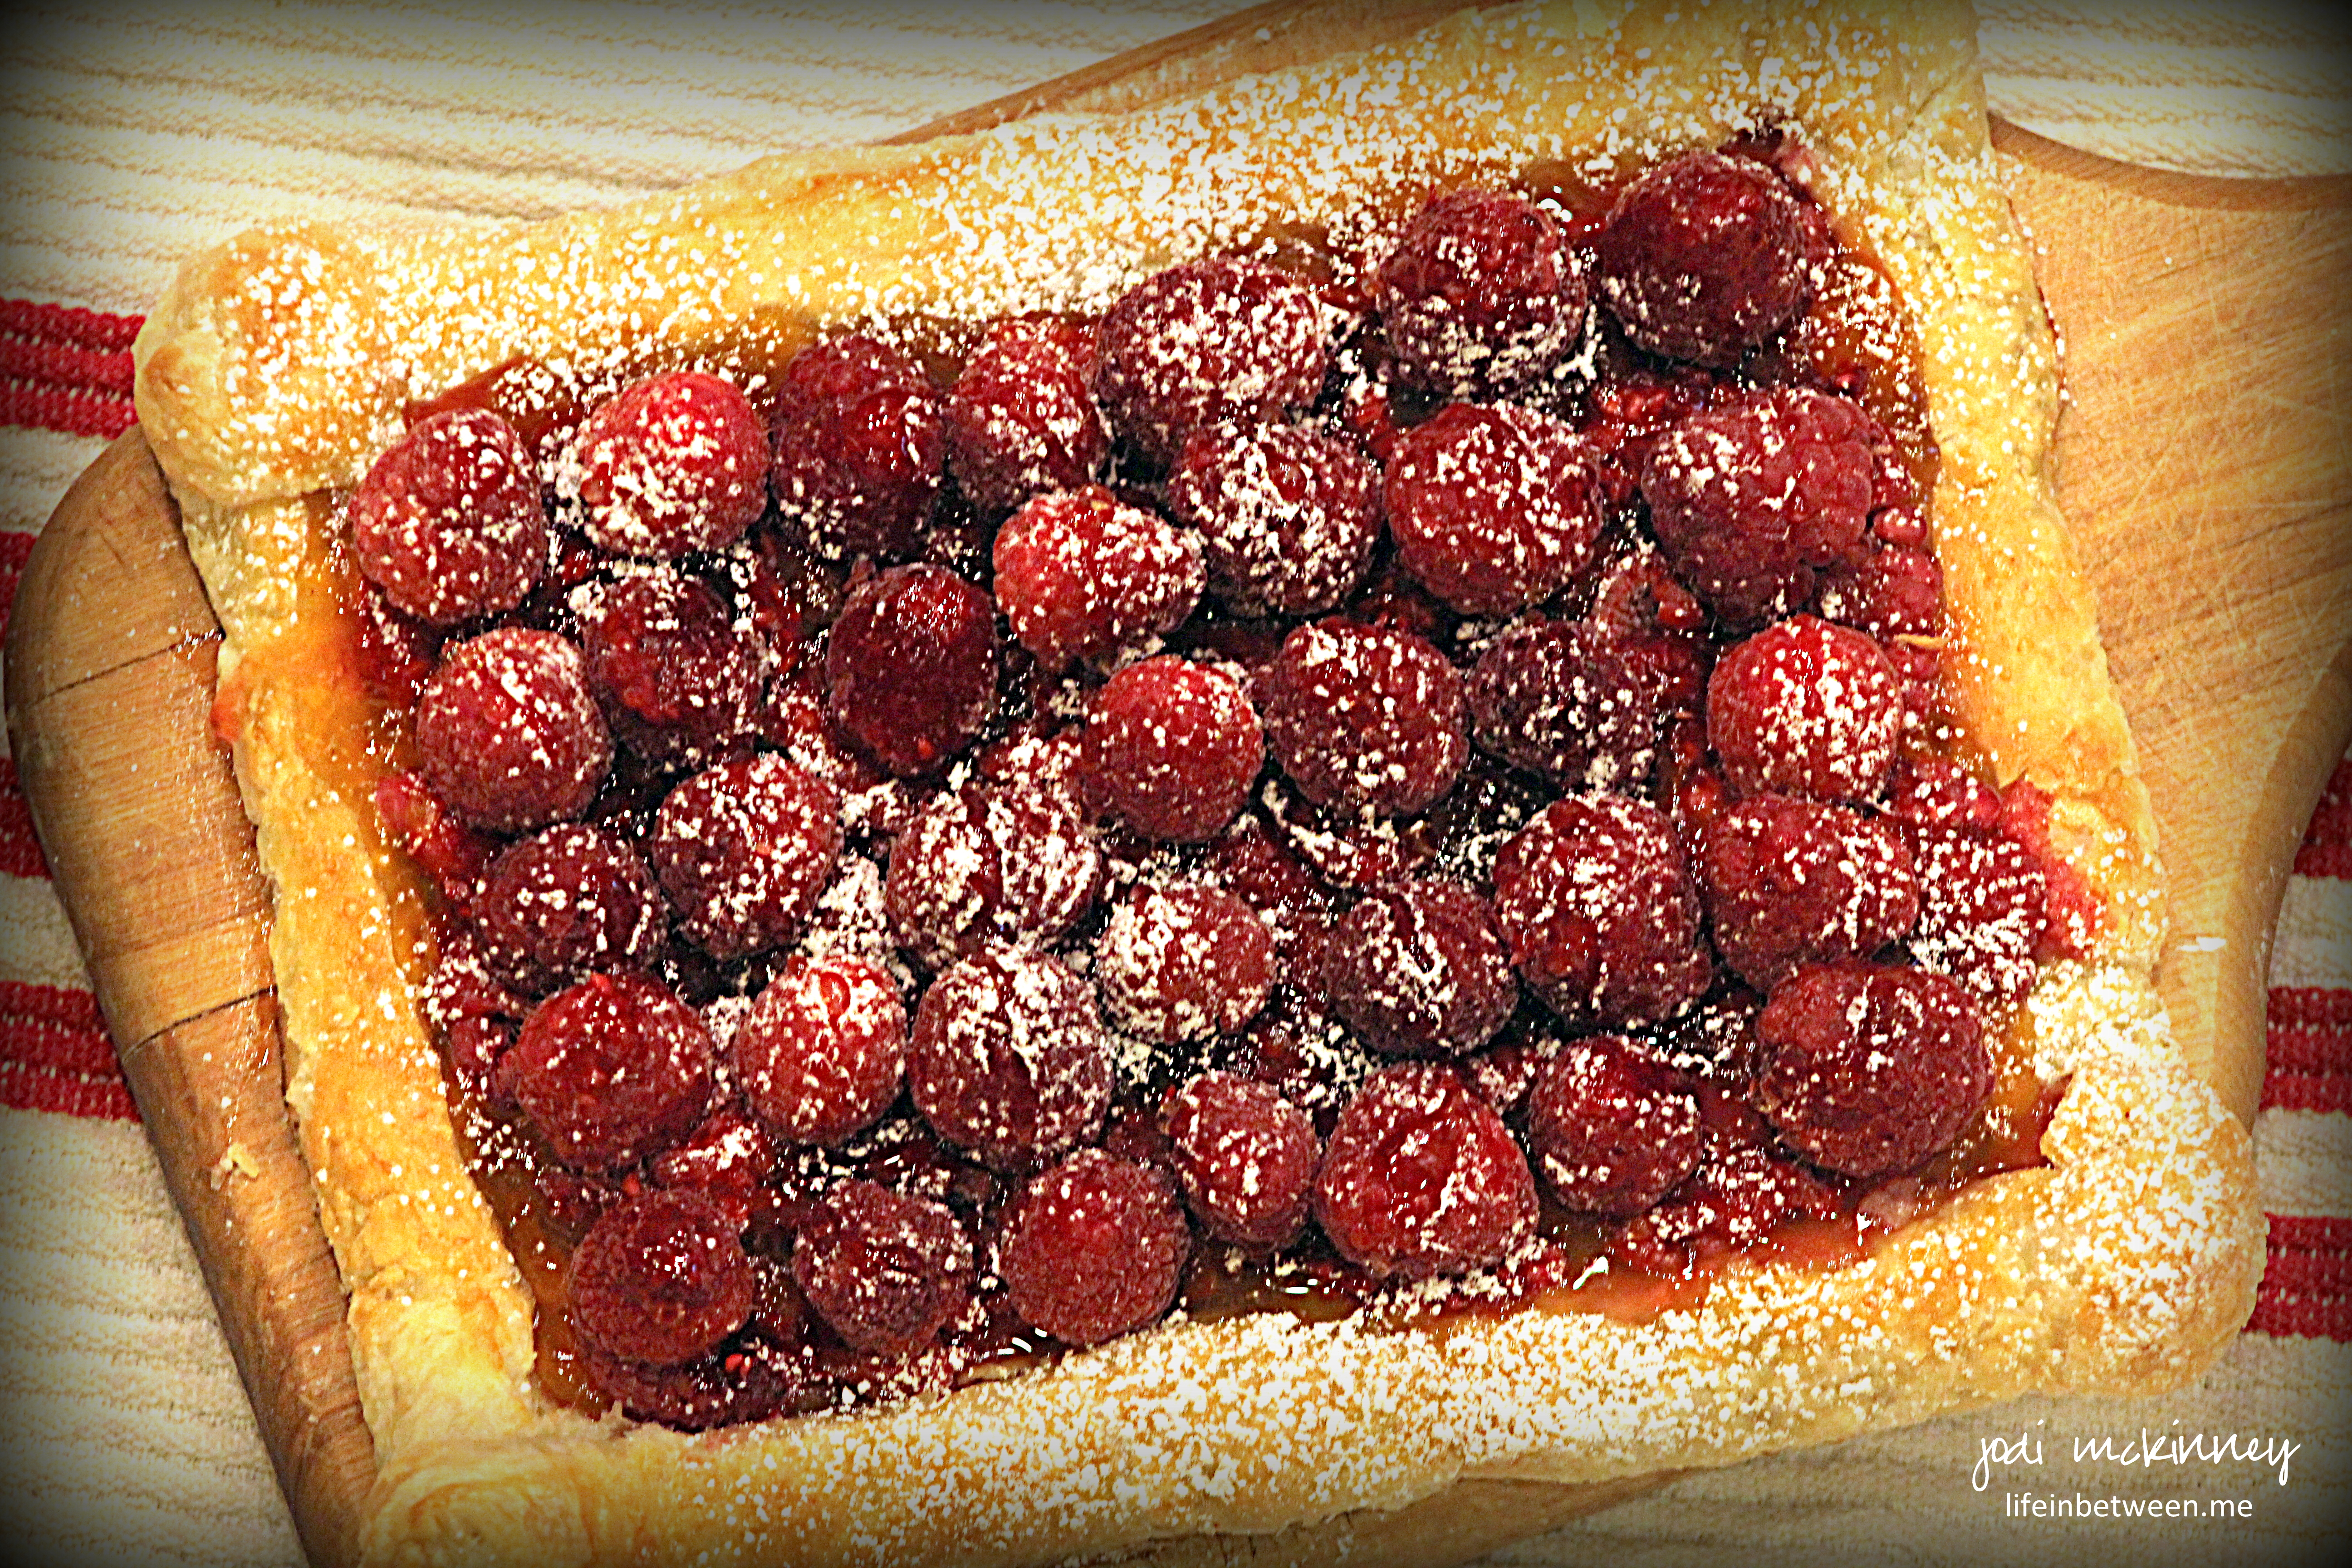
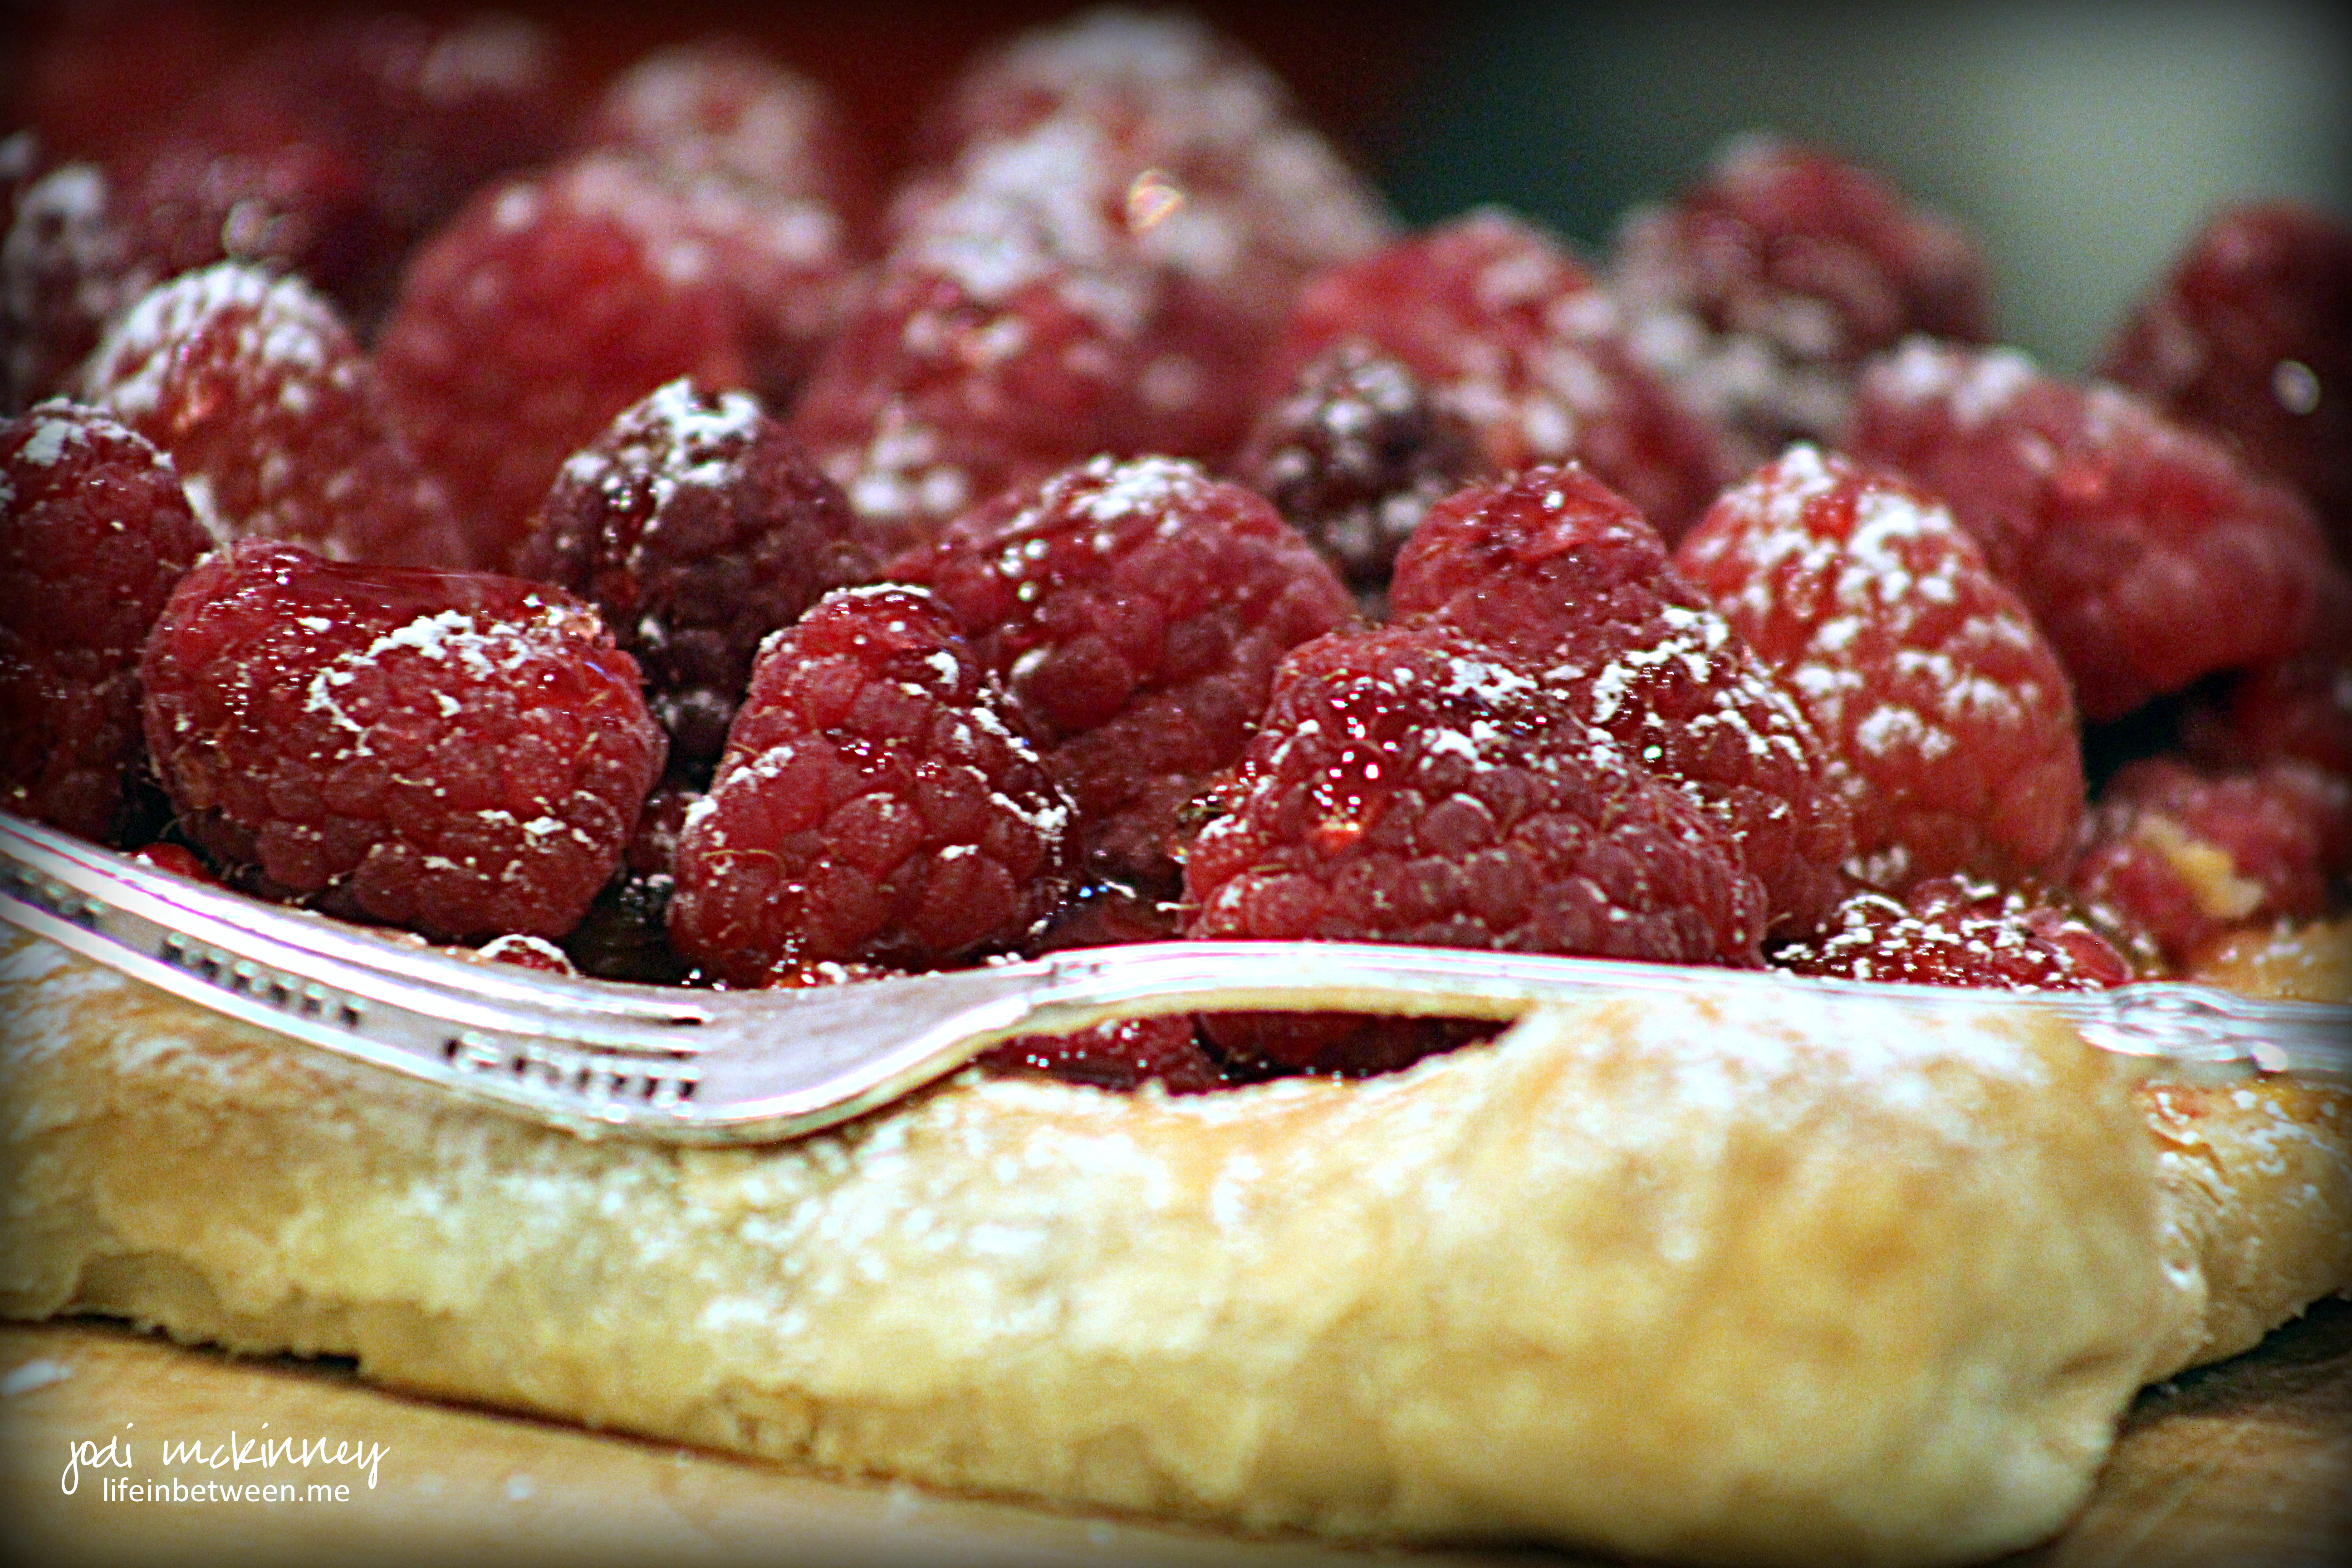
  • Garnish with strawberries (red raspberries would amazing too if you prefer!).  Drizzle melted chocolate over all if desired.  I also sprinkled just a tiny bit of sea salt flakes, which gave it an amazing, but subtle taste burst.  And then – any cookie crust crumbs that fall off when you remove the tart bottom from the sides of the pan can be thrown on top too. 

Enjoy!  I know you will!

Cheers & Hugs,
Jodi

Best Ever Pecan Pie

pecan-pie-2

If you have it with coffee, it counts as breakfast.
Right??
Confession – I ate a slice of pecan pie for breakfast the day after Thanksgiving.

There.
It’s out!

And O M G – was it delicious!

pecan-pie-1

I made this pecan pie for Thanksgiving, and I have to admit,  I was too full of turkey and stuffing and much too busy holding my new granddaughter to even give a second thought to dessert that day.

pecan-pie-3

But the next morning (while decorating for Christmas 😉  ), I decided to have my piece.

This recipe is simply divine.  If you’ve never tried making a pecan pie, you really should try this.  You won’t be sorry!  MMM MMM Good!

Best Ever Pecan Pie

Ingredients:pecan-pie-2

Pie Crust:

  • 1 cup flour
  • Heaping 1/3 cup Crisco shortening
  • Dash of Salt
  • 1/3-1/2 cup cold water

Filling:

  • 1 cup brown sugar, packed
  • 1 1/2 cups light corn syrup
  • 4 eggs
  • 1/4 cup butter
  • 2 tsp. vanilla
  • 2 cups whole pecans

Directions:

Preheat oven to 350 degrees F.

Prepare pie crust by blending flour, shortening and salt with pastry blender until fine crumbs form.  Add cold water and mix just until dough comes together and can be formed into a ball.  Do not overwork dough – this makes it tough.  Place ball on floured surface and roll out to fit into 9″ pie plate.  Fold dough in half and then in quarters.  Life and unfold in pie plate.  Pinch edges to flute.

Prepare filling by boiling brown sugar and corn syrup in a saucepan for 2-3 mins.  Set aside to cool slightly.

In a large bowl, beat eggs lightly.  Slowly pour the syrup mixture into the eggs, stirring constantly.  Stir in butter, vanilla and pecans, and pour into crust.

Bake for approximately 50-60 minutes or until set.  Cool completely.

Cheers & Hugs,
Jodi


Chewy Pumpkin Cinnamon Chip Cookies

chewy-pumpkin-cinnamon-chip-cookies-3

Is there anything better this time of year than pumpkiny, cinnamony treats fresh from the oven?!!

chewy-pumpkin-cinnamon-chip-cookies

I’ve discovered a way to make a FABULOUS Pumpkin Cinnamon Chip Cookie that is like no other pumpkin cookie you’ve ever had!  These are crispy on the outside, chewy and gooey on the inside, and they are seriously BURSTING with cinnamon!

chewy-pumpkin-cinnamon-chip-cookies-2

Most pumpkin cookies are “cake-like,” which is fine, but when you want a “cookie” to sink your teeth into, you have got to try these!

I had some pumpkin and was trying to decide what to make.  I perused some recipes on Pinterest and came across a recipe that reminded me of my standby cookie recipe I use to make chocolate chips and blueberry white chocolate chips and so many other of my family and friends’ favorites.  I decided to tweak it up a bit and found if I use my standard recipe, but substitute pumpkin for the eggs, change the ratio of sugars to a bit more brown, up the vanilla a tinch, and add a zip of cinnamon, I get these amazing Chewy Pumpkin Cinnamon Chip Cookies.

Make some to share with your family and friends.  They are sure to bring smiles. They would make a great addition to a Thanksgiving cookie tray or even a new one to add to your holiday cookie faves.  Go stock up on you Hershey’s Cinnamon Chips and get baking!

Chewy Pumpkin Cinnamon Chip Cookies

  • Servings: 4 dozen large cookies
  • Print

Ingredients:chewy-pumpkin-cinnamon-chip-cookies-2

  • 1 lb. (4 sticks) butter, room temperature
  • 2 cups brown sugar, packed
  • 1 cup white sugar
  • 4 tsp vanilla
  • 1 cup pumpkin puree
  • 2 tsp baking soda
  • 1 tsp salt
  • 3 tsp cinnamon
  • 5 cups all purpose flour
  • 5 cups cinnamon chips (I use Hershey’s)

Directions:

Preheat oven to 375 degrees F.

Cream butter in electric stand mixer about 2 minutes.  Add sugars and continue beating.  Add vanilla and continue beating.  Add pumpkin and slowly mix in to incorporate.  Next add the baking soda, salt, and cinnamon.  Gradually mix in the flour on very low speed and just until all is incorporated.  Stir in cinnamon chips with rubber spatula or wooden spoon.

Scoop dough with 1/4 measuring cup and roll into a golf ball sized ball.  Place two inches apart on baking stone or prepared cookie sheet.  Bake approximately 15 minutes until golden brown on the outside with crisp edges.  Allow to cool on baking stone/cookie sheet for 15 minutes before removing to cooling rack.

Enjoy!  

Cheers & Hugs,
Jodi

Jodi’s Peanut Butter Cup Cookies

jodis-peanut-butter-cup-cookies

If you stopped by our house, and there weren’t any cookies (in the freezer)… well….

it just wouldn’t be our house.

jodis-milk-chocolate-peanut-butter-cup-cookies

Nothing fancy really.  Usually just some sort of chocolate chip or oatmeal raisin, but always some cookies in the house.

jodis-white-peanut-butter-cup-cookies

This week, I baked some peanut butter cup cookies.  One batch with Reese’s White Mini Cups and the other with traditional milk chocolate Reese’s Peanut Butter Cup Minis.  You could combine the two in one cookie if you like, but I think people typically take pretty firm stances on liking white or milk chocolate, so I kept them separate.

I’ll be taking these to our book club party this weekend, but if you stop by, there will be some I’d be happy to offer you.

I share my cookies with Mike the UPS man, Cliff the mailman, and Adam the bug spray guy.  Most of our friends and family who stop by know to just check the freezer drawer to see what this week’s treat is and help themselves.  I love that! When you are comfortable enough in my house to help yourself to whatever is in the fridge or freezer, I am in my happy place.

Here is  my recipe if you are looking for a delightful treat that is sure to please.  You can substitute the peanut butter cups with chocolate chips or any other type of chopped candy you love.

Jodi's Peanut Butter Cup Cookies

  • Servings: 4 doz large cookies
  • Print

Ingredients:jodis-peanut-butter-cup-cookies

  • 2 cups (4 sticks) butter, softened
  • 1 1/2 cups white sugar
  • 1 1/2 cups packed brown sugar
  • 2 Tbsp vanilla
  • 4 eggs
  • 2 tsp salt
  • 2 tsp baking soda
  • 5 cups all-purpose flour
  • 2 cups (16 oz) miniature Reese’s Milk Chocolate or White Chocolate Peanut Butter cups, coarsely chopped

Directions:

In the bowl of electric mixer, beat butter until creamy.  Add sugars, vanilla and eggs, and continue beating until light and fluffy.

Add salt and baking soda.  Then gradually add in flour, one cup at a time, and mix just until incorporated.  Stir in coarsely chopped peanut butter cups.

Chill dough in refrigerator for several hours.

Preheat oven to 375 degrees F.

Form dough into golf ball sized balls and place on baking stone or cookie sheet.  Bake approximately 10 minutes until lightly golden brown.

Allow to cool on baking stone/cookie sheet for 10 minutes.  Transfer to cooling rack, and cool completely.  

Enjoy, and Happy Friday!

Cheers & Hugs,
Jodi

Fresh Peach and Blueberry Greek Yogurt Cake

Peach Blueberry Greek Yogurt Cake 1

Sunday was a rather rainy, oppressively humid, relaxing, fabulous, lazy, stay-in-the-house kinda day.  What better kind of day to bake a beautiful treat like this Greek yogurt cake with fresh, juicy, ripe peaches…

Peach Blueberry Greek Yogurt Cake fresh peaches

and tart, tangy, locally-grown blueberries…

Peach Blueberry Greek Yogurt Cake fresh blueberries

for a lovely dessert!

Peach Blueberry Greek Yogurt Cake slice

OH How Yummy…

Peach Blueberry Greek Yogurt Cake

and OH How Beautiful!

Peach Blueberry Greek Yogurt Cake 2

Moist and sweet – but not too sweet, bursting with fresh summer fruit flavor, delicious warm or cold, amazing alone – and possibly even more amazing with a dollop of whipped cream or melting vanilla ice cream.

Hope you’ll give this a try.

Here is the recipe slightly adapted from JuliasAlbum.

Fresh Peach and Blueberry Greek Yogurt Cake

Ingredients:Peach Blueberry Greek Yogurt Cake 1

  • 1/2 stick (1/4 cup) butter, softened
  • 1 cup sugar
  • 2 eggs
  • 1 tsp vanilla
  • 1/2 cup Greek vanilla yogurt
  • 1 tsp baking powder
  • 1/2 tsp baking soda
  • 1 1/2 cups all-purpose flour
  • 3 fresh, ripe peaches, sliced into wedges
  • 1 cup fresh blueberries
  • 1 Tbsp raw or granulated sugar
  • 1/4 cup powdered sugar

Directions:

Preheat oven to 350°F. Spray the side and bottom of a 9″ springform pan with Pam cooking spray.  Line bottom with parchment paper, and spray it too.

Cream butter, sugar, and eggs until light and fluffy for approx. 2-3 minutes on high speed of an electric mixer.  Add vanilla and Greek yogurt, and continue beating for another minute.

With the mixer on low, add baking powder, baking soda, and then flour, and mix just until combined.

Pour batter into the prepared pan. Top with two of the peaches, sliced, and two-thirds of the blueberries in any design you like.  Sprinkle the fruit with sugar.

Bake for 30 minutes.  Pull cake out and add the third peach, sliced, and the remaining blueberries.  Return to oven, and continue baking for 15-20 more minutes until cake is golden, and a toothpick inserted into the center comes out clean.

Allow to cool in pan for about 40 minutes, and then release cake from the springform pan.   Sprinkle with powdered sugar, and serve warm or cold.  Enjoy!

Cheers & Hugs,
Jodi

Blueberry Shortbread Tart

blueberry shortbread tart 2

I thought it would be nice to make a sweet treat this past weekend for the guys since I had been away for awhile.  I didn’t have enough blueberries to make a pie, but I had a nice amount to make this yummy blueberry shortbread tart.

blueberry shortbread tart 1

What could be bad about a shortbread crust, some jam and blueberries, fresh lemon juice and zest, and a crumbly topping?!?!

blueberry shortbread tart 3

It went together easily, only took 30 minutes to make, and was a hit!  (Hubby said it reminded him of a toasted blueberry Pop-Tart (and that was meant as a compliment – lol!)

I can’t recall the last time I bought Pop-Tarts, but this is a tart, and it is filled with fruit, and it is baked, so I guess that pretty well qualifies it to taste a bit like it.  I can imagine this would also be great with many other fruit fillings (aka Pop-Tart flavors) –  Cherry, Raspberry, Blackberry, Peach, Apple & Cinnamon, Strawberry, or Peach – to name a few.

My guys topped theirs with a scoop of vanilla ice cream, because, well…. just because!

It was a great dessert to end a hot summer day and meal of grilled sausage sandwiches with onions and peppers on hard rolls, fresh sweet corn on the cob rolled in butter and sprinkled with Old Bay Seasoning, and a cucumber and tomato salad fresh from the garden drizzled with tangy red wine vinegar, salt and pepper.

Hungry yet?!

Blueberry Shortbread Tart

Ingredients:blueberry shortbread tart 2
  • 2 sticks butter,  room temperature
  • ½ cup sugar
  • ¼ cup brown sugar, packed
  • 1 Tbsp lemon juice
  • Zest of 1 lemon
  • 2⅓ cups all-purpose flour
  • ½ tsp salt
  • 1 cup blueberry preserves or jam
  • 1 cup fresh blueberries
Directions:

Preheat the oven to 350 degrees F.

Grease 9-inch tart pan.

Beat butter, sugars, lemon juice and zest with electric mixer approx. 3 mins until well incorporated.  Add flour and salt, and mix until well blended and forming clumps.

Press 2/3 of the mixture evenly into the prepared pan and going up sides.

Spread with the blueberry preserves or jam evenly over the dough, leaving a ¼-inch border.  Sprinkle with blueberries.

Crumble the remaining dough into large crumbs and  sprinkle evenly over filling.

Bake 30 – 40 mins. until lightly browned.


Cheers & Hugs,
Jodi

*recipe slightly adapted from Erren’s Kitchen

A Watercolor Ice Cream Cone

Watercolor Ice Cream Cone 5 x 7 140 lb Arches Cold Press - Raw Sienna & Permanent Rose

Watercolor Ice Cream Cone 5 x 7 140 lb Arches Cold Press – Raw Sienna & Permanent Rose

It has been HOT HOT HOT here this week!
Sweet, steamy summer time.

What better way to celebrate…
to embrace…
to bask in the gloriousness…

than with a sweet, cool, summertime treat –
an ice cream cone!

Strawberry no less!

And this Sunday, July 17 is #NationalIceCreamDay!  National Ice Cream Day is celebrated each year on the 3rd Sunday in July and is a part of National Ice Cream Month.  This day is a fun celebration enjoyed with a bowl, cup or cone filled with your favorite flavor of ice cream.

I really enjoyed painting this strawberry ice cream cone for #WorldWatercolorMonth in just two colors – raw sienna for the cone using a wet in dry technique, and wet in wet permanent rose for the sweet, creamy, juicy, ice cream.

May your hot summer days be filled with sweet, cool treats!

Cheers & Hugs,
Jodi

Cream Puff Cloud

cream puff cloud coconute cream recipe 2

This heavenly cream puff cloud dessert has been a family favorite for a long time.

My sweet father-in-law used to request it every year for his birthday, and Hubby loves it too!

So when we had my Dad and Mom II over yesterday to celebrate Dad’s birthday, I made this special dessert that I made the first time we celebrated Dad’s birthday together (again) six years ago when we reunited.

Cream Puff Cloud Coconut Cream slice recipe

Dad loves coconut cream just like Hubby does and Pap did, so this is something I love making for my special guys.

Dad ate his first piece, and then asked for a second “little” slice.  He sure knows the way to my heart! 

And if you are not a coconut cream fan, this cream puff cloud DELIGHT is wonderful in a French Vanilla or Chocolate version too!

It is light, simple, and amazingly delightful!

cream puff cloud coconute cream recipe

Years ago, when my boys were young and I was a stay-at-home mom, I sold Pampered Chef kitchen tools as a little side job that got me out a bit, helped me make some extra money for the family, and provided Hubby and I with some amazing FREE trips that I earned for achieving sales bonus levels!  This was one of the recipes I made at cooking shows I did in people’s homes, and it was ALWAYS a huge hit.

I hope you will add this recipe to your collection of “special occasion desserts.”  It is so wonderful to have recipes that are easy, but delicious and impressive.

Happy Birthday Dad!  It was so wonderful to celebrate with you.  I love you!

Cream Puff Cloud

Ingredients:Cream Puff Cloud Coconut Cream slice recipe

  • Cream Puff Shell
    • 1 cup water
    • 1 stick (1/2 cup) butter
    • 1 cup flour
    • 4 eggs
  • Filling
    • 1 small package Instant Coconut Cream Pie Filling (or French Vanilla or Chocolate or your Fave!)
    • 1 1/2 cups Milk (any kind you prefer from Skim to Half and Half)
    • 1 12 oz. Cool Whip
  • Garnish
    • Toasted Coconut – for Coconut Cream Pie Filling
    • Fresh Strawberries and/or shaved chocolate for French Vanilla Pie Filling
    • Shaved Chocolate for Chocolate Pie Filling

Preheat oven to 400 degrees F.

For Puff Pastry Shell:  Microwave or boil water and butter.  Once boiling, remove from heat and add flour.  Stir until batter comes away from sides of bowl/pan.  Add eggs, one at a time, beating with whisk until batter looses shine.

Spray a Deep Dish Baker or 10 inch quiche pan with Pam cooking spray.  Spread batter on bottom of pan and slightly up sides.  Bake for 20-30 minutes.  Shell will puff up and then shrink back when cooled.

Cool completely.

For filling, combine pudding and milk in large bowl, and chill to set.  Fold in 3/4 of the Cool Whip.  For coconut cream version, I also add 1/2 cup toasted coconut.  For chocolate, I add a 1/2 cup chocolate chips or chocolate chunks.

When shell is cooled, pour filling into shell.  Garnish with remaining cool whip and any additional garnishes you prefer.  Chill until serving.

Enjoy!

Cheers & Hugs,
Jodi

Fresh Red Raspberry Puff Pastry Tart

red raspberry puff pastry tart 1

If you are looking for a fresh, light, simple, yet surprisingly impressive dessert to take to a holiday picnic or serve for a simple weekend dinner party, I’ve created this quick, but scrumptious and beautiful fresh red raspberry puff pastry tart using fresh fruit combined with the convenience of frozen puff pastry.

red raspberry puff pastry tart

For the Memorial Day holiday weekend (or Fourth of July or Labor Day), you could use some blueberries in this one too for a red, white, blue theme.

red raspberry puff pastry tart 2

Here’s my easy peasy recipe that is bound to to get rave reviews!

Fresh Red Raspberry Puff Pastry Tart

Ingredients:red raspberry puff pastry tart 1

  • I pint fresh red raspberries
  • 1/4 cup apricot or raspberry or your favorite jam (I used apricot, because it is what I had, and it made a nice combination of flavors)
  • 1 sheet Pepperidge Farms Frozen Puff Pastry (thawed 40 mins. at room temperature)
  • 1 Tbsp Honey
  • Powdered Sugar for Garnish

Directions:

Unfold and place sheet of puff pastry on baking stone or baking sheet and turn up edges on all sides to create a crust edge.  Poke center with fork 6-8 times to prevent center from raising up too high.  Bake at 400 degrees F for approximately 15 minutes or until golden brown.

While still warm, spread jam on bottom of baked puff pastry. Place half of fresh raspberries on top and mash with a fork.  Allow to cool completely.

Once cooled, place whole fresh red raspberries on top.  Drizzle with honey, and sprinkle with powdered sugar.

To serve, cut into 6 pieces and garnish with a dollop of whipped cream or vanilla ice cream.  

Hope you enjoy!

Cheers & Hugs,
Jodi

Fresh Orange Date Walnut Bread

Orange Date Walnut Bread 3

I was looking for something new to try baking early yesterday morning before I settled into work for the day.

It was a cool, rainy day after a wonderful stretch of warmth and sunshine.  I was in the mood for a nut bread, but after traveling most of the week, I didn’t have a lot of fresh ingredients on hand.

Orange Date Walnut Bread 1

I found a bag of dates, but I wanted to “Springify” a date and nut bread recipe up a bit, so I thought fresh orange flavor might just do the trick.  Adding a bit of freshly squeezed orange juice and fresh orange zest was just the ticket to brighten up this lovely bread.

Orange Date Walnut Bread 2

It’s nice to have something like this on hand for a quick breakfast with coffee, a nice little treat for a guest or a late night or after dinner urge for something just a bit sweet, but not too.

I’m sure this would freeze well and be great to pull out when needed.

Hope you enjoy your weekend!

May it be bright and fresh and Springy, but a little nutty too!

Fresh Orange Date Walnut Bread

Ingredients:Orange Date Walnut Bread 3

3/4 cup sugar
1/2 cup butter, softened
1/2 cup sour cream
1/3 cup fresh orange juice
1 Tbsp freshly grated orange zest
2 eggs
1  3/4 cups all-purpose flour
3/4 tsp baking powder
 3/4 tsp baking soda
1 cup chopped dates
1 cup chopped walnuts


Directions:

Preheat oven to 350°F. Grease bottom only of 9×5-inch loaf pan. Set aside.

Beat sugar and butter at medium speed with mixer, scraping bowl often, until creamy. Add sour cream, orange juice, orange zest and eggs; continue beating until well mixed. Add flour, baking powder and baking soda; beat at low speed until well mixed. Gently stir in dates and walnuts.

Pour into prepared pan. Bake 45 minutes or until toothpick inserted in center comes out clean. Let stand 10 minutes; remove from pan. Cool completely.

*Adapted from LandoLakes Recipe

Cheers & Hugs,
Jodi