Jodi’s White Chocolate Macadamia Nut Cookies

white-chocolate-macadamia-nut-cookies-1

I made another trip to Aldi this past week, and was once again blown away by the great prices and quality of products.  I was a skeptic, but am a total new fan.   I found a super deal on a beautiful bag of roasted, salted Macadamia nuts.  I also bought some of their white chocolate chips knowing exactly the cookie I wanted to bake this week!

white-chocolate-macadamia-nut-cookies-2

It was so hard not to eat all of those wonderful macadamia nuts before coarsely chopping them and adding them to the cookie batter!

white-chocolate-macadamia-nut-cookies-3

I can’t swear to you that the whole 10 oz. bag was used in this recipe as it is likely a bit less from my lack of willpower, but these cookies still turned out to be one of my top faves!  I must give them away before I eat too many.  Luckily that is not a problem this week as there are plans for these tempting treats.

Here is my simple, classic recipe.

Jodi's White Chocolate Macadamia Nut Cookies

Ingredients:white-chocolate-macadamia-nut-cookies-1

  • 1 lb. (4 sticks) softened salted butter
  • 1 1/2 cups white sugar
  • 1 1/2 cups packed brown sugar
  • 4 eggs
  • 2 tsp pure vanilla extract
  • 2 tsp salt
  • 2tsp baking soda
  • 5 cups flour
  • 1 10 oz bag macadamia nuts (more or less), coarsely chopped
  • 1 12 oz bag white chocolate chips

Directions:

Blend butter and sugar until creamy with electric mixer on high speed for approximately 2 minutes.  Add eggs, one at a time, and continue beating.  Add vanilla, then salt and baking soda.  Turn mixer to low.  Slowly add flour, and mix just until fully incorporated.   Gently fold in macadamia nuts and white chocolate chips with wooden spoon or spatula.  Refrigerate dough at least 2 hours or up to 2 days.

Preheat oven to 375 degrees F.  Roll refrigerated dough into 1″ balls.  Place on backing stone or cookie sheet.  Flatten slightly.  Bake approximately 10 minutes until golden brown.

These cookies freeze well, and defrost quickly, so I store in Ziploc bags in the freezer.

Enjoy!

Cheers & Hugs,
Jodi

October is #NationalCookieMonth!

Crockpot Honey Garlic Chicken

crockpot-honey-garlic-chicken-2

It is such a great time of year to slow cook meals in the crockpot.  And if you love the sweet and spicy flair of many Asian chicken dishes, you are going to love this fast and easy way to make a real crowd pleaser.

crockpot-honey-garlic-chicken

It seriously goes together in under 10 minutes, makes your house smell wonderful all day, and creates a dinner that tastes like you slaved.

crockpot-honey-garlic-chicken-3

Serve it with your favorite rice or noodle.  My son even liked it shredded up on a bun as a sandwich as it is so tender and juicy and falls apart that easy.  Serve with a salad, and you know it – you have another….

Winner Winner Chicken Dinner!

I made this for the last dinner before my son moved out this weekend and sent the leftovers with him.  He can enjoy it again in his new home.

Here is the recipe the way I made it.  Feel free to adjust hot sauces and seasonings to your taste.

Crockpot Honey Garlic Chicken

Ingredients:crockpot-honey-garlic-chicken-2

  • 2 lbs. Boneless Chicken Breast and Thighs (combo or one or the other if you prefer)
  • 3/4 cup ketchup
  • 3/4 cup low sodium soy sauce
  • 1/2 cup honey
  • 1 Tbsp dried oregano
  • 2 Tbsp dried parsley
  • 1 Tbsp Sriracha hot sauce
  • 1 Tbsp Cholula hot sauce
  • 4-5 cloves fresh minced garlic
  • 1 tsp black pepper
  • 1 tsp smokey paprika chipotle (optional)

Directions:

  • Place chicken pieces in bottom of crockpot.
  • Combine remaining ingredients and pour over top of chicken.
  • Cook on low 4-5 hours.  Sprinkle with 1 Tbsp sesame seeds.
  • Serve over rice (I love brown rice and quinoa combo) and sprinkle with additional sesame seeds if desire.

Enjoy!

Cheers & Hugs,
Jodi

Jewish Apple Cake (Bread)

jewish-apple-cake-3

What better smell is there in Autumn than cinnamon and apples baking up in yummy cakes and pies and breads?

This recipe for Jewish Apple Cake is one I got from my BFF Jill, who doesn’t necessarily love to bake or cook, but when she does, she has some amazing recipes.  This is one of them.  The first time I tasted it, I had to have the recipe, and now I make it more than her.

In fact, she texted me yesterday morning, and I said, “Guess what I just took out of the oven?”  She mentioned she hasn’t made it in “forever.”  (That might be why she is thin, and I’m – well  – Not!)

jewish-apple-cake-1

I’m not sure why this is called “Jewish” Apple Cake, so I did a little Wiki research (and I’m going to look forward to hearing what my BFF Bubby has to say.)

Per Wikipedia:  Jewish apple cake is a kind of dense cake made with apples and sold mostly in Pennsylvania in the United States. It has limited known connections to Jewish cuisine. It is thought that this cake is actually a Pennsylvania Dutch culinary item that was erroneously attributed to Jews because it seemed “old world.”  It may also be considered Jewish because it contains no dairy, and it may therefore be eaten with meals containing meat, in accordance with Jewish laws of kashrut.

jewish-apple-cake-2

Seems most people make this in a bundt cake or springform cake pan, but Jill always made it in loaves of bread, so that is the way I do too!

Besides… when you do, you can keep one, and give two away… which is exactly what I plan on doing.

jewish-apple-cake-4

This cake/bread tastes delicious with coffee or tea for breakfast or a snack or dessert.  It is not too sweet, but cinnamony, and apply, and nutty enough to rock your world!

Hope you’ll give it a try.  Let me know if you do.

Jewish Apple Cake (Bread)

Ingredients:jewish-apple-cake-3

  • 4-5 pared apples, sliced thin (I used Honeycrisps)
  • 1 cup chopped walnuts
  • 2 1/2 cup sugar
  • 2 tsp. cinnamon
  • 4 eggs, beaten
  • 2 1/2 tsp vanilla
  • 1/2 cup orange juice
  • 1 cup oil
  • 3 cups flour
  • 2 tsp baking powder

Directions:

Preheat oven to 350 degrees F.  Grease and flour 3 bread loaf pans (approx. 8″x4″).

Mix together, apples, walnuts, 1/2 cup sugar, and cinnamon.  Set aside for sugar and cinnamon to soak into the apples and nuts.

Whisk together 2 cups sugar, eggs, vanilla, orange juice, and oil.  Add baking powder and flour, and stir just until batter is incorporated.

Alternate layering:  batter, apples, batter, apples, batter.

Bake 45 minutes or until toothpick inserted comes out clean.  Cool  in pan 10-15 mins.  Remove from pans and cool on wire rack.

Sprinkle with powdered sugar if desired.  Store in airtight bag.  Freezes well.

Enjoy!

Cheers & Hugs,
Jodi

New Lighter Chicken Parmesan

new-lighter-chicken-parmesan

Our little garden is just bursting with tomatoes this time of year, and the little cherry tomatoes are so juicy and sweet and delicious and plentiful that I wanted to use them creatively in a recipe instead of the usual simple throwing of them into our dinner salad.

I also have a really healthy crop of fresh basil.

new-lighter-chicken-parmesan-5

Anyone that’s been around thecreativelifeinbetween.com for more than a minute likely knows I LOVE chicken for dinner and am always looking for new, creative ways to prepare it.

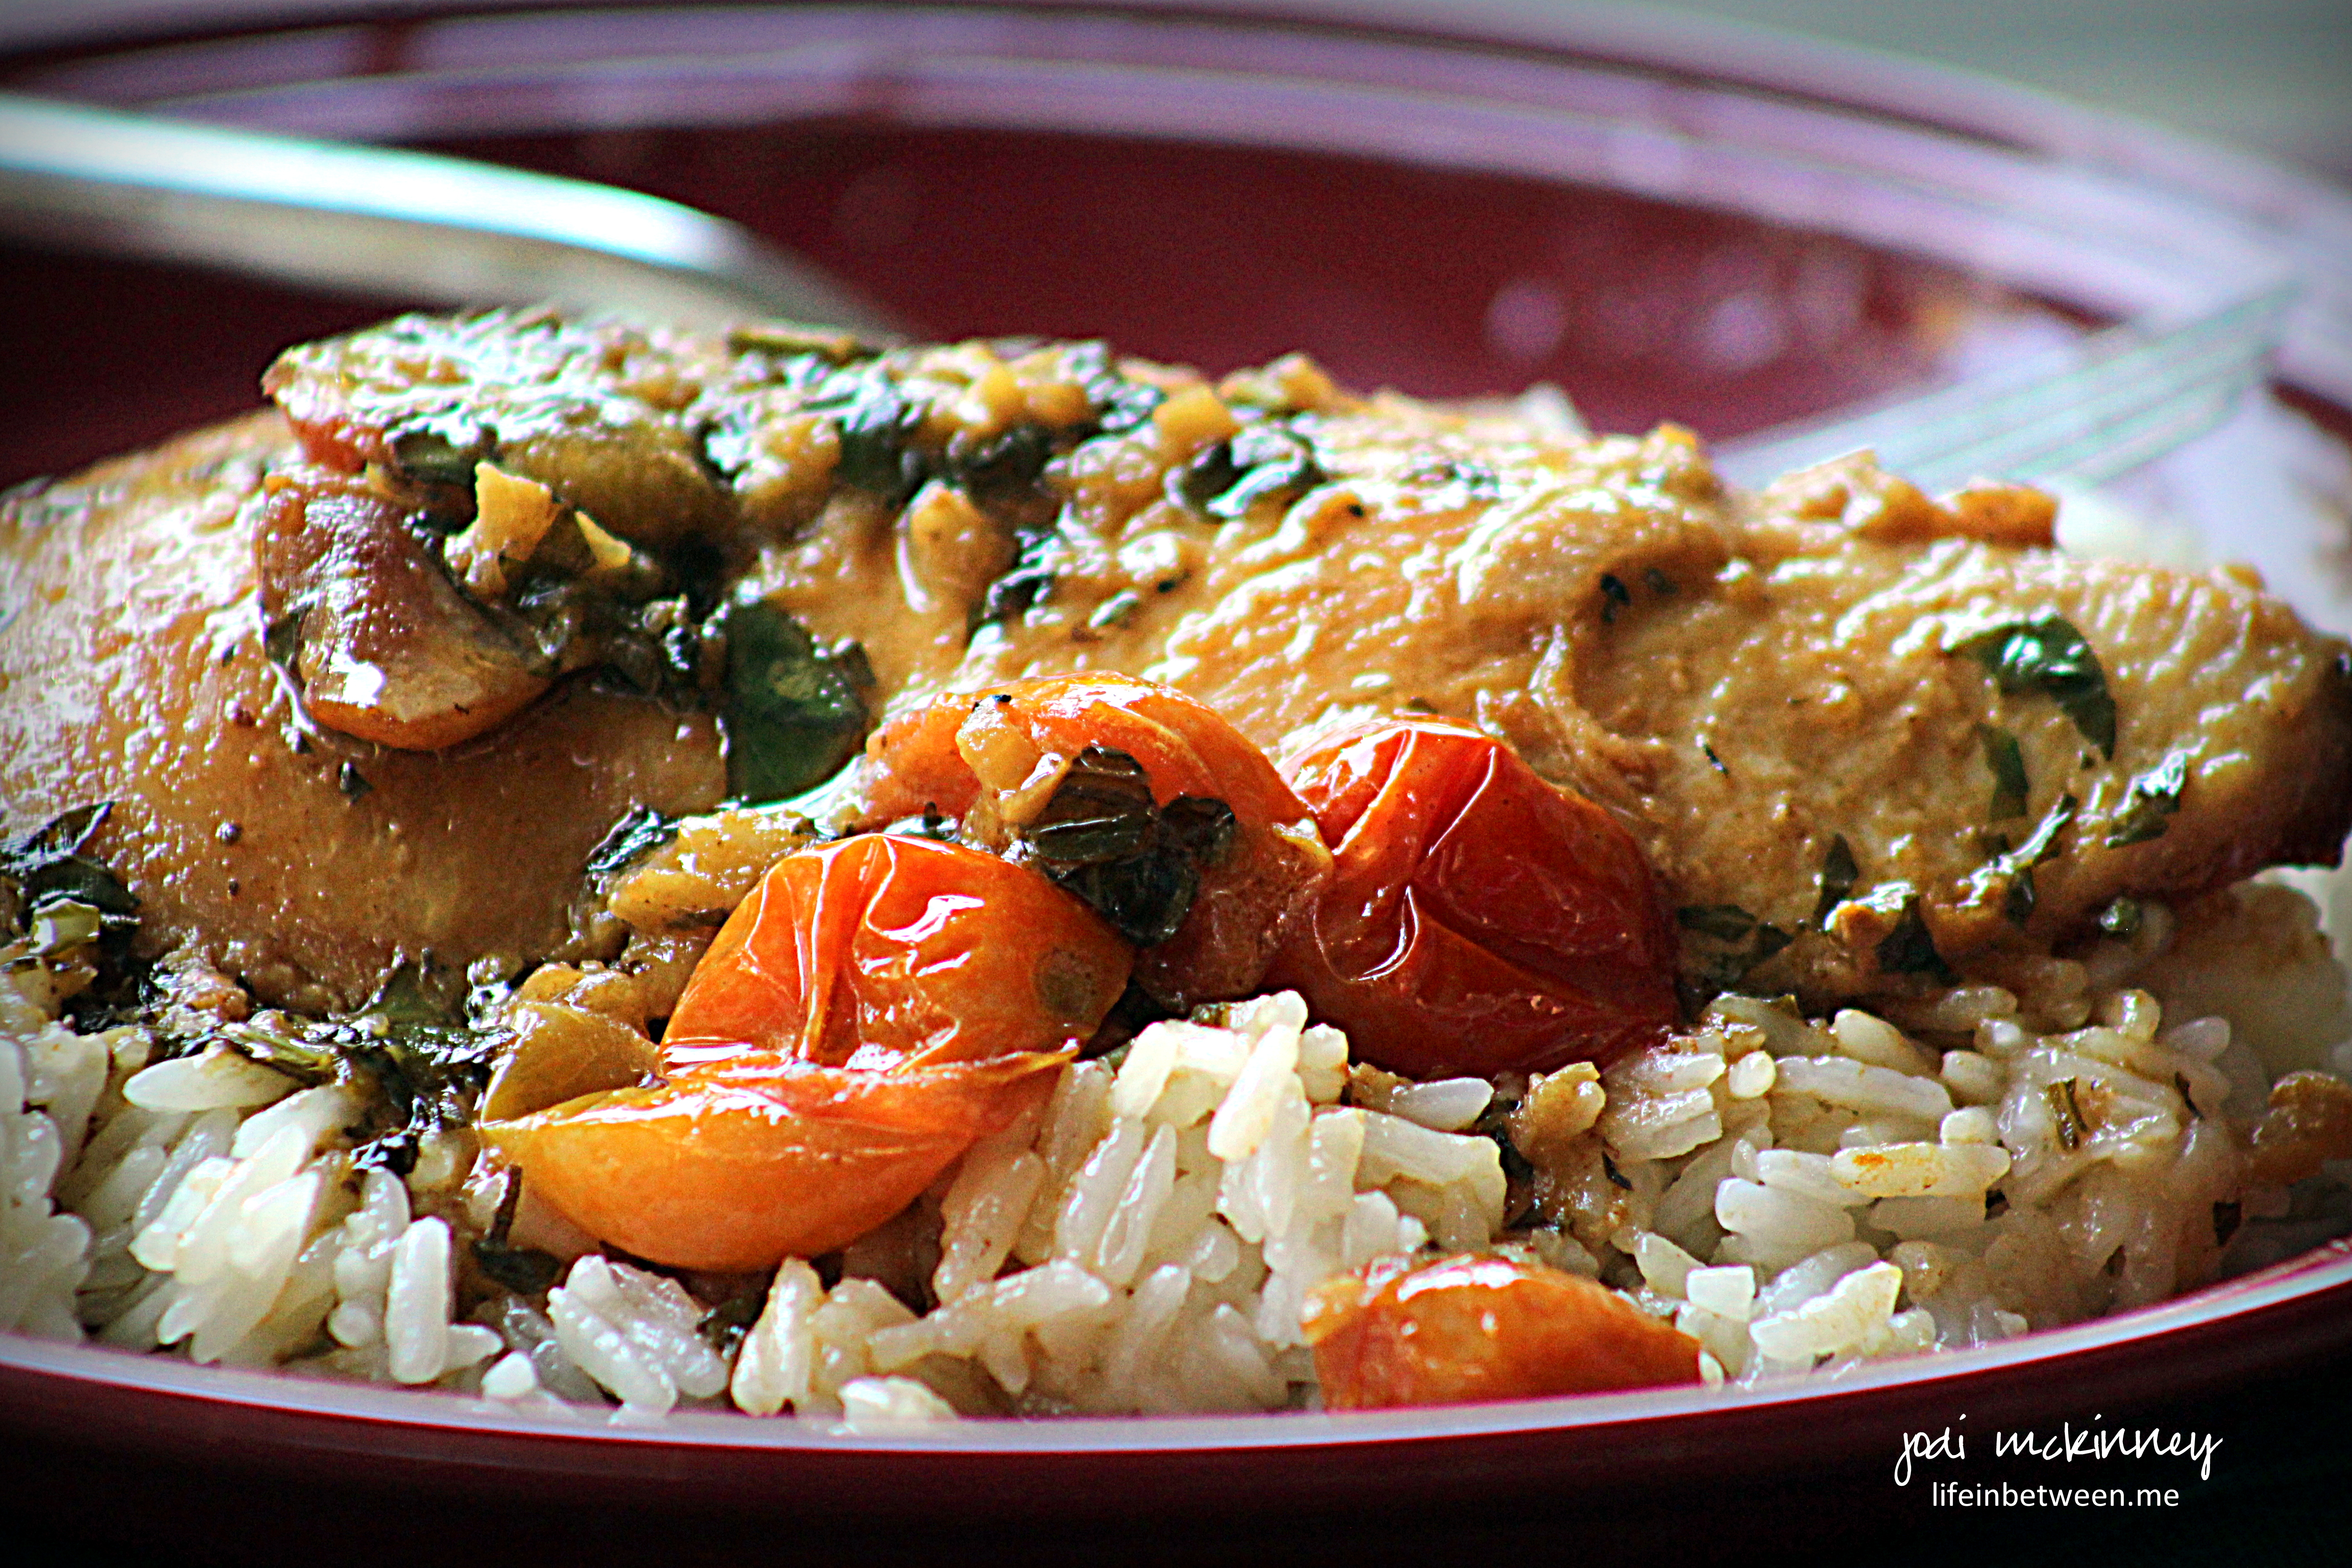
So last night, I decided to try a newer, lightened-up version of the classic chicken parmesan recipe that is typically dipped in milk and egg wash, rolled in bread crumbs and fried in oil before topping it with cheese and baking it.

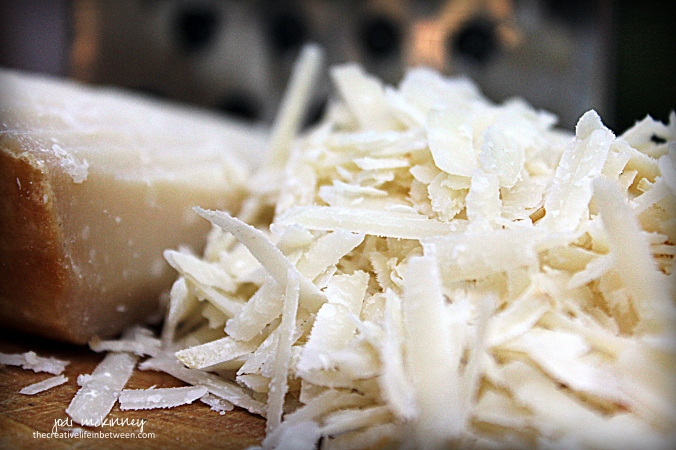
For this recipe, I marinaded the chicken in buttermilk – a great tip for making baked (or fried) chicken moist and tender – and then simply topped it with freshly grated Parmigiano-Reggiano instead of rolling it in bread crumbs.

I’ve said it before, and many of you know this well, but there really is no substitute for the real Parmigiano-Reggiano cheese.  Powdered cheese in a green plastic container will not do.   Other cheeses called “Parmesan” will not do.  The real deal –  Parmigiano-Reggiano is worth the spend (even if you have to skimp somewhere else – like that Starbucks latte or the pricey bottle of red wine).  Nothing can compare to the sharp, complex, fruity/nutty, strong savory flavor and slightly gritty texture of Parmigiano-Reggiano.  Inferior versions can impart a bitter taste, so if you think you do not like “Parmesan” cheese, because you ate the powdered stuff from the green plastic container as a kid, please give the real “parmesan” a try!  You won’t regret it.

new-lighter-chicken-parmesan-4

I then roasted it along with lots of sweet, juicy marinated tomatoes with tons of fresh garlic and basil and healthy extra virgin olive oil.

new-lighter-chicken-parmesan-3

We ate ours over whole grain thin spaghetti and a tossed fresh green salad.  It was divine!

Don’t expect it to taste like the familiar fried version soaked in sauce (which is quite yummy in moderation!), but allow yourself to enjoy the fresh, lighter flavors of this wonderful winner, winner of a chicken dinner!  (You knew I had to say it – right?!)

new-lighter-chicken-parmesan-2

Here is my recipe, which is adapted from one I found on Epicurious.  Hope you’ll give it a try and let me know how you like it.

New Lighter Chicken Parmesan

Ingredients:new-lighter-chicken-parmesan

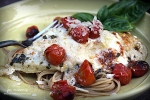
  • 3 lbs boneless chicken breasts and thighs
  • 1 cup buttermilk (you can easily make by adding 1 Tbsp vinegar to 1 cup milk)
  • 3 cups cherry tomatoes
  • 1/3 cup olive oil
  • 1/4 cup finely minced fresh garlic
  • 1/4 cup finely minced fresh basil
  • 1 tsp dried oregano
  • 1 tsp salt
  • 1 1/2 cups freshly grated Parmigiano-Reggiano cheese
  • 8 oz. fresh Mozzarella cheese, sliced

Directions:

Wash and prepare chicken.  If chicken breasts are thick, cut them in half horizontally so they will cook faster and more evenly.  Marinade chicken in buttermilk for a minimum of 2 hours or up to overnight in an airtight container or large Ziploc bag.

Whisk together olive oil, garlic, basil, oregano, and salt.  Pour over tomatoes and stir.  Let marinade a couple hours if time allows.

Preheat oven to 450 degrees F.  Remove chicken from buttermilk marinade and place on a baking stone or dish with sides that will fit all pieces evenly without overlapping.  Top with grated Parmigiano-Reggiano cheese and pat to press into chicken.  Spoon marinated tomatoes in between chicken pieces pouring remaining oil marinade over top.

Bake for approximately 15 minutes until chicken is cooked, cheese begins to brown, and tomatoes begin to bubble and brown.  Add a slice of Mozzarella cheese on top of each piece of chicken, and return to oven for approximately 5 minutes until the Mozzarella is browned and bubbly.

Serve over whole wheat or regular pasta or by itself with a fresh green salad.

Enjoy!

Cheers & Hugs,
Jodi

Chocolate-Covered Cookie Butter-Stuffed Oreos

About

chocolate-covered-cookie-butter-stuffed-oreos-7

O. M. G!  Have you tried the new Oreo Thins yet?  If there is one store bought cookie I love, it is Nabisco’s Oreo.  There’s really nothing like them.

I rarely buy them, but I have been curious about the new Oreo Thins I’ve been hearing about.  Double Stufs are DIVINE, so how are the Thins?

I needn’t wonder long, because when I saw an incredible idea for Cookie Butter Stuffed Oreos from Ruthanne, the incredibly creative baker at Easybaked, I knew I had to try them.

And they are AMAZING!

chocolate-covered-cookie-butter-stuffed-oreos

But who stops at amazing, when you can make them doubly amazing by topping them with a scoop of cookie butter…

chocolate-covered-cookie-butter-stuffed-oreos-4

placing another on top of that…

chocolate-covered-cookie-butter-stuffed-oreos-2jpg

sandwiching….

chocolate-covered-cookie-butter-stuffed-oreos-3

and covering with chocolate?!

chocolate-covered-cookie-butter-stuffed-oreos-6

I was dying to try them, but knew we didn’t need a batch of these around the house for the three of us.  So when my son Nick was heading over to celebrate his future father-in-law’s birthday yesterday, I asked if I could make them for him to take over for a little birthday gift.

He offered to help, so I gave him the jobs of “hand model” and sampler to assure they were okay to send.

chocolate-covered-cookie-butter-stuffed-oreos-5

He approved!

I filled a little pint-sized red berry basket with a dozen, wrapped it in clear cellophane and tied with some raffia to send on it’s way.

chocolate-covered-cookie-butter-stuffed-oreos-8

And now we only have to worry about having eight of these decadent little buggers around to taunt us with their amazingness!

Such a fun treat!  I hope you’ll give them a try.  And for more cuteness, check out Ruthanne’s Emoji Oreo Pops!    I’m kinda tempted!!   😉

Chocolate Covered Cookie Butter Stuffed Oreos

Ingredients:chocolate-covered-cookie-butter-stuffed-oreos-7

Directions:

Place 20 Oreo Thins Cookies on a cookie sheet.  Top each cookie with a teaspoon-sized scoop of cookie butter.  Press a second Oreo Thin on top to make a sandwich.  Freeze for approximately 30 minutes.

Melt Candy Melts in microwave in 30 second increments, stirring after each increment, until chocolate is melted and smooth.  (It took mine about 3 increments.)

Take 3-4 cookies out of the freezer at a time, and carefully dip – one at a time – in the melted chocolate.  Use a fork to tap excess off, and slide the bottom of the cookie along the edge of the bowl to remove excess.  Set on parchment or wax paper to harden.

Add sprinkles (if desired) before chocolate hardens, or drizzle with white or contrasting chocolate after it hardens.

Enjoy!

Cheers & Hugs,
Jodi

Roasted Yukon Gold Potatoes with Garlic & Rosemary

roasted-rosemary-and-garlic-yukon-gold-potatoes

There aren’t many meals potatoes don’t go wonderfully with in my opinion.  I do love potatoes no matter what way they are prepared.

roasted-rosemary-and-garlic-yukon-gold-potatoes-2

One of my favorite ways to make them is to roast them.  Add some garlic, fresh rosemary, a dash of salt, and a drizzle of olive oil, and I’m pretty much in heaven.

roasted-rosemary-and-garlic-yukon-gold-potatoes-3

And Yukon Golds have become one of my favorite varieties to roast.  They crisp up beautifully on the outside and remain tender and flavorful on the inside.

This recipe is simple, but so delicious and complimentary to most any meal.  They go great with chicken, beef, pork, and even eggs (and are great reheated for breakfast “home fries”).  Sprinkle some cheese on top if you like – parmesan, cheddar, swiss,  or muenster.  Dunk them in ketchup or barbecue or hot sauce.  Dip them in ranch dressing or honey mustard.  Or just enjoy them plain.

Here is how I make them.  Hope you will give them a try.

Roasted Yukon Gold Potatoes with Garlic & Rosemary

Ingredients:roasted-rosemary-and-garlic-yukon-gold-potatoes-2

  • 6 medium Yukon Gold Potatoes
  • 3 large cloves garlic, minced
  • 3 Tbsp minced fresh rosemary
  • 3 Tbsp olive oil
  • 1 tsp salt

Directions:

Preheat oven to 450 degrees F.

Wash and cut potatoes (leaving skin on) into bite-sized chunks.

Spread potatoes evenly in single layer onto a baking stone with sides (stoneware bar pan) or aluminum jelly roll sized pan.  Drizzle with half of the olive oil.  Sprinkle with minced garlic, minced rosemary, and salt.  Drizzle remaining olive oil over top.

Roast for 20-30 minutes until golden brown – tossing with a spatula halfway through cooking time.  Serve immediately.  

Enjoy!

Cheers & Hugs,
Jodi

Jodi’s Peanut Butter Cup Cookies

jodis-peanut-butter-cup-cookies

If you stopped by our house, and there weren’t any cookies (in the freezer)… well….

it just wouldn’t be our house.

jodis-milk-chocolate-peanut-butter-cup-cookies

Nothing fancy really.  Usually just some sort of chocolate chip or oatmeal raisin, but always some cookies in the house.

jodis-white-peanut-butter-cup-cookies

This week, I baked some peanut butter cup cookies.  One batch with Reese’s White Mini Cups and the other with traditional milk chocolate Reese’s Peanut Butter Cup Minis.  You could combine the two in one cookie if you like, but I think people typically take pretty firm stances on liking white or milk chocolate, so I kept them separate.

I’ll be taking these to our book club party this weekend, but if you stop by, there will be some I’d be happy to offer you.

I share my cookies with Mike the UPS man, Cliff the mailman, and Adam the bug spray guy.  Most of our friends and family who stop by know to just check the freezer drawer to see what this week’s treat is and help themselves.  I love that! When you are comfortable enough in my house to help yourself to whatever is in the fridge or freezer, I am in my happy place.

Here is  my recipe if you are looking for a delightful treat that is sure to please.  You can substitute the peanut butter cups with chocolate chips or any other type of chopped candy you love.

Jodi's Peanut Butter Cup Cookies

  • Servings: 4 doz large cookies
  • Print

Ingredients:jodis-peanut-butter-cup-cookies

  • 2 cups (4 sticks) butter, softened
  • 1 1/2 cups white sugar
  • 1 1/2 cups packed brown sugar
  • 2 Tbsp vanilla
  • 4 eggs
  • 2 tsp salt
  • 2 tsp baking soda
  • 5 cups all-purpose flour
  • 2 cups (16 oz) miniature Reese’s Milk Chocolate or White Chocolate Peanut Butter cups, coarsely chopped

Directions:

In the bowl of electric mixer, beat butter until creamy.  Add sugars, vanilla and eggs, and continue beating until light and fluffy.

Add salt and baking soda.  Then gradually add in flour, one cup at a time, and mix just until incorporated.  Stir in coarsely chopped peanut butter cups.

Chill dough in refrigerator for several hours.

Preheat oven to 375 degrees F.

Form dough into golf ball sized balls and place on baking stone or cookie sheet.  Bake approximately 10 minutes until lightly golden brown.

Allow to cool on baking stone/cookie sheet for 10 minutes.  Transfer to cooling rack, and cool completely.  

Enjoy, and Happy Friday!

Cheers & Hugs,
Jodi

Chunky Homemade Granola

Chunky Homemade Granola 0

I was itching to get back in the kitchen and make something after almost a week away.

Chunky Homemade Granola 1

And after a week of indulging, I thought I’d make something a bit healthy, but yummy to have on hand for the coming week.

chunky homemade granola 3

Homemade granola it was, and oh how yummy too!  Made with healthy ingredients like oats and nuts and dried fruits and held together with raw local honey and coconut oil, this recipe is delish just as is, but also delicious as a cereal with some extra fresh fruit like blueberries,

chunky homemade granola 4

or on top of Greek yogurt with some fresh fruit like blackberries!

chunky homemade granola 5

It also makes a lovely hostess or nice “thinking of you” gift in a clear bag with a pretty bow.

chunky homemade granola 2

It’s as simple as mixing everything together, packing it into a baking sheet, and baking.

Hope you’ll give it a try.  Enjoy!

Chunky Homemade Granola

  • Servings: a large batch!
  • Print

Ingredients:Chunky Homemade Granola 0

  • 1/3 cup raw local honey
  • 1/4 cup pure maple syrup
  • 2 Tbsp brown sugar
  • 4 tsp pure vanilla extract
  • 1/2 tsp salt
  • 1/2 cup coconut oil
  • 5 cups old-fashioned rolled oats
  • 1 cup walnuts, chopped
  • 1 cup raw cashews or almonds, chopped (I used cashews)
  • 1 1/2 cups dried fruit of your choice
    • I used:
      • 1/2 cup dried cranberries
      • 1/2 cup dried blueberries
      • 1/2 cup dried tart cherries
    • You could also use:  raisins, dates, apricots, goji berries, coconut, or any other dried fruit you like

Directions:

Preheat oven to 325 degrees F.

Whisk honey, maple syrup, brown sugar, vanilla, salt, and oil in a large bowl.

Add the oats and nuts, and stir until well coated and incorporated.  Add dried fruit and combine well.

Pour and spread mixture evenly onto a jelly roll sized  baking stone or parchment-lined baking sheet and pack down to compress.

Bake for 30 minutes until lightly browned.  Cool at least one hour in pan.

Break into pieces of your desired size, and store in airtight container.

Cheers & Hugs,
Jodi

*recipe adapted from Foolproofliving

Lemon Butter Chicken

Lemon Butter Chicken 2

We found yet another way to make an easy and oh so delicious chicken dinner this past week.  My son, Nick, actually made this from a recipe he found and we adapted slightly.

lemon butter chicken

He’s been practicing cooking more, and is getting really good (at breakfast and chicken at least!).

He will soon be moving out, and I am trying very hard not to be sad.  I am trying to focus on the fact that we have done a great job in raising our boys to be independent, competent men who have found wonderful partners to share their lives with.

Both of my boys know how to cook and are very handy.  They are smart and kind and generous.  (I’m not partial at all – right?!)   They both have found amazing women who are just right for them, and who we love dearly.

I digress….

Back to the point….   Chicken!

Here is another Winner Winner Chicken Dinner we hope you will try.

Lemon Butter Chicken

Ingredients:Lemon Butter Chicken 2

  • 2 lbs boneless skinless chicken breasts and/or thighs
  • 1 stick butter
  • 4-6 cloves garlic, finely minced
  • Juice of 3 lemons
  • Zest of 1 lemon
  • 1/2 cup Half and Half, Milk, or Cream
  • 1 pt cherry tomatoes, halved
  • 1/4 cup fresh basil, chopped
  • Salt & Lemon Pepper to taste
  • 2-3 Tbsp olive oil
  • Cooked Rice to serve with it (I love Jasmine)

Directions:

Season chicken with salt and lemon pepper.  Heat olive oil in large skillet.  Add chicken and sear until golden and cooked through, about 5-7 mins. per side depending on thickness.  Transfer chicken to a plate and make the sauce.

Add butter to pan drippings and let melt.  Add garlic and stir until fragrant, about 1 minute.  Add lemon juice and zest and half and half.  Bring to a simmer.  Add cherry tomatoes and basil.  Simmer until thick, about 5 minutes.  Add chicken back to sauce and coat.   Serve over rice.

Enjoy!
I’m sure we will be making this one again.

Cheers & Hugs,
Jodi

Summer Vegetable Tart

Summer Vegetable Tart Baked

My sweet friend Janet found a recipe for this amazing summer vegetable tart, and I told her she had to come over so we could make it together and enjoy.

And that we did one evening this week.

Besides being so great to see her and spend time in the kitchen slicing and chopping and chatting….

O. M. G. –  this turned out so delish!

Summer Vegetable Tart Before Baked

With summer coming to an end and the abundance of zucchini and red-ripe tomatoes and eggplant and squash, this recipe is a must-do for a hot August evening dinner or Sunday lunch or brunch – or anytime really!

Summer Vegetable Tart Before Baked with Cheese

Anything smothered with Parmegiano Regianno is a winner in my book, but this savory summer vegetable tart is seriously a new favorite.  Dare I admit I had 4 pieces?!

I think you are going to want to try this, so here is the recipe.

Summer Vegetable Tart

Ingredients:Summer Vegetable Tart Baked

  • 1 medium zucchini squash, thinly sliced
  • 1 medium yellow squash, thinly sliced
  • 1 medium eggplant, thinly sliced
  • 2 large tomatoes, thinly sliced
  • 1 sheet frozen puff pastry, thawed (or pie crust or crescent rolls)
  • 1/4 cup tomato or pizza sauce
  • 1 cup freshly grated Parmegiano Reggiano Parmesan cheese
  • Olive Oil
  • Salt

Directions:

Preheat oven to 400 degrees F.  Roll out puff pastry or pie crust or crescent rolls on a baking stone or cookie sheet to rectangle or circle to form “pizza” tart crust.

Thinly slice vegetables with mandolin or sharp knife.  Lay out on parchment paper or paper towel.  Sprinkle with salt, and let set for 15 minutes.  Pat dry with paper towel to absorb excess moisture.

Spread tomato sauce on pastry.  Layer with vegetables.  Drizzle with olive oil.  Top with Parmesan cheese.

Bake for 30-40 minutes until crust is golden brown, vegetables are tender, and cheese is melted and browned.  Let set for 5-10 minutes, cut, serve, and enjoy!

Happy Eating!

Cheers & Hugs,
Jodi