Raspberry-filled Vanilla Cupcakes

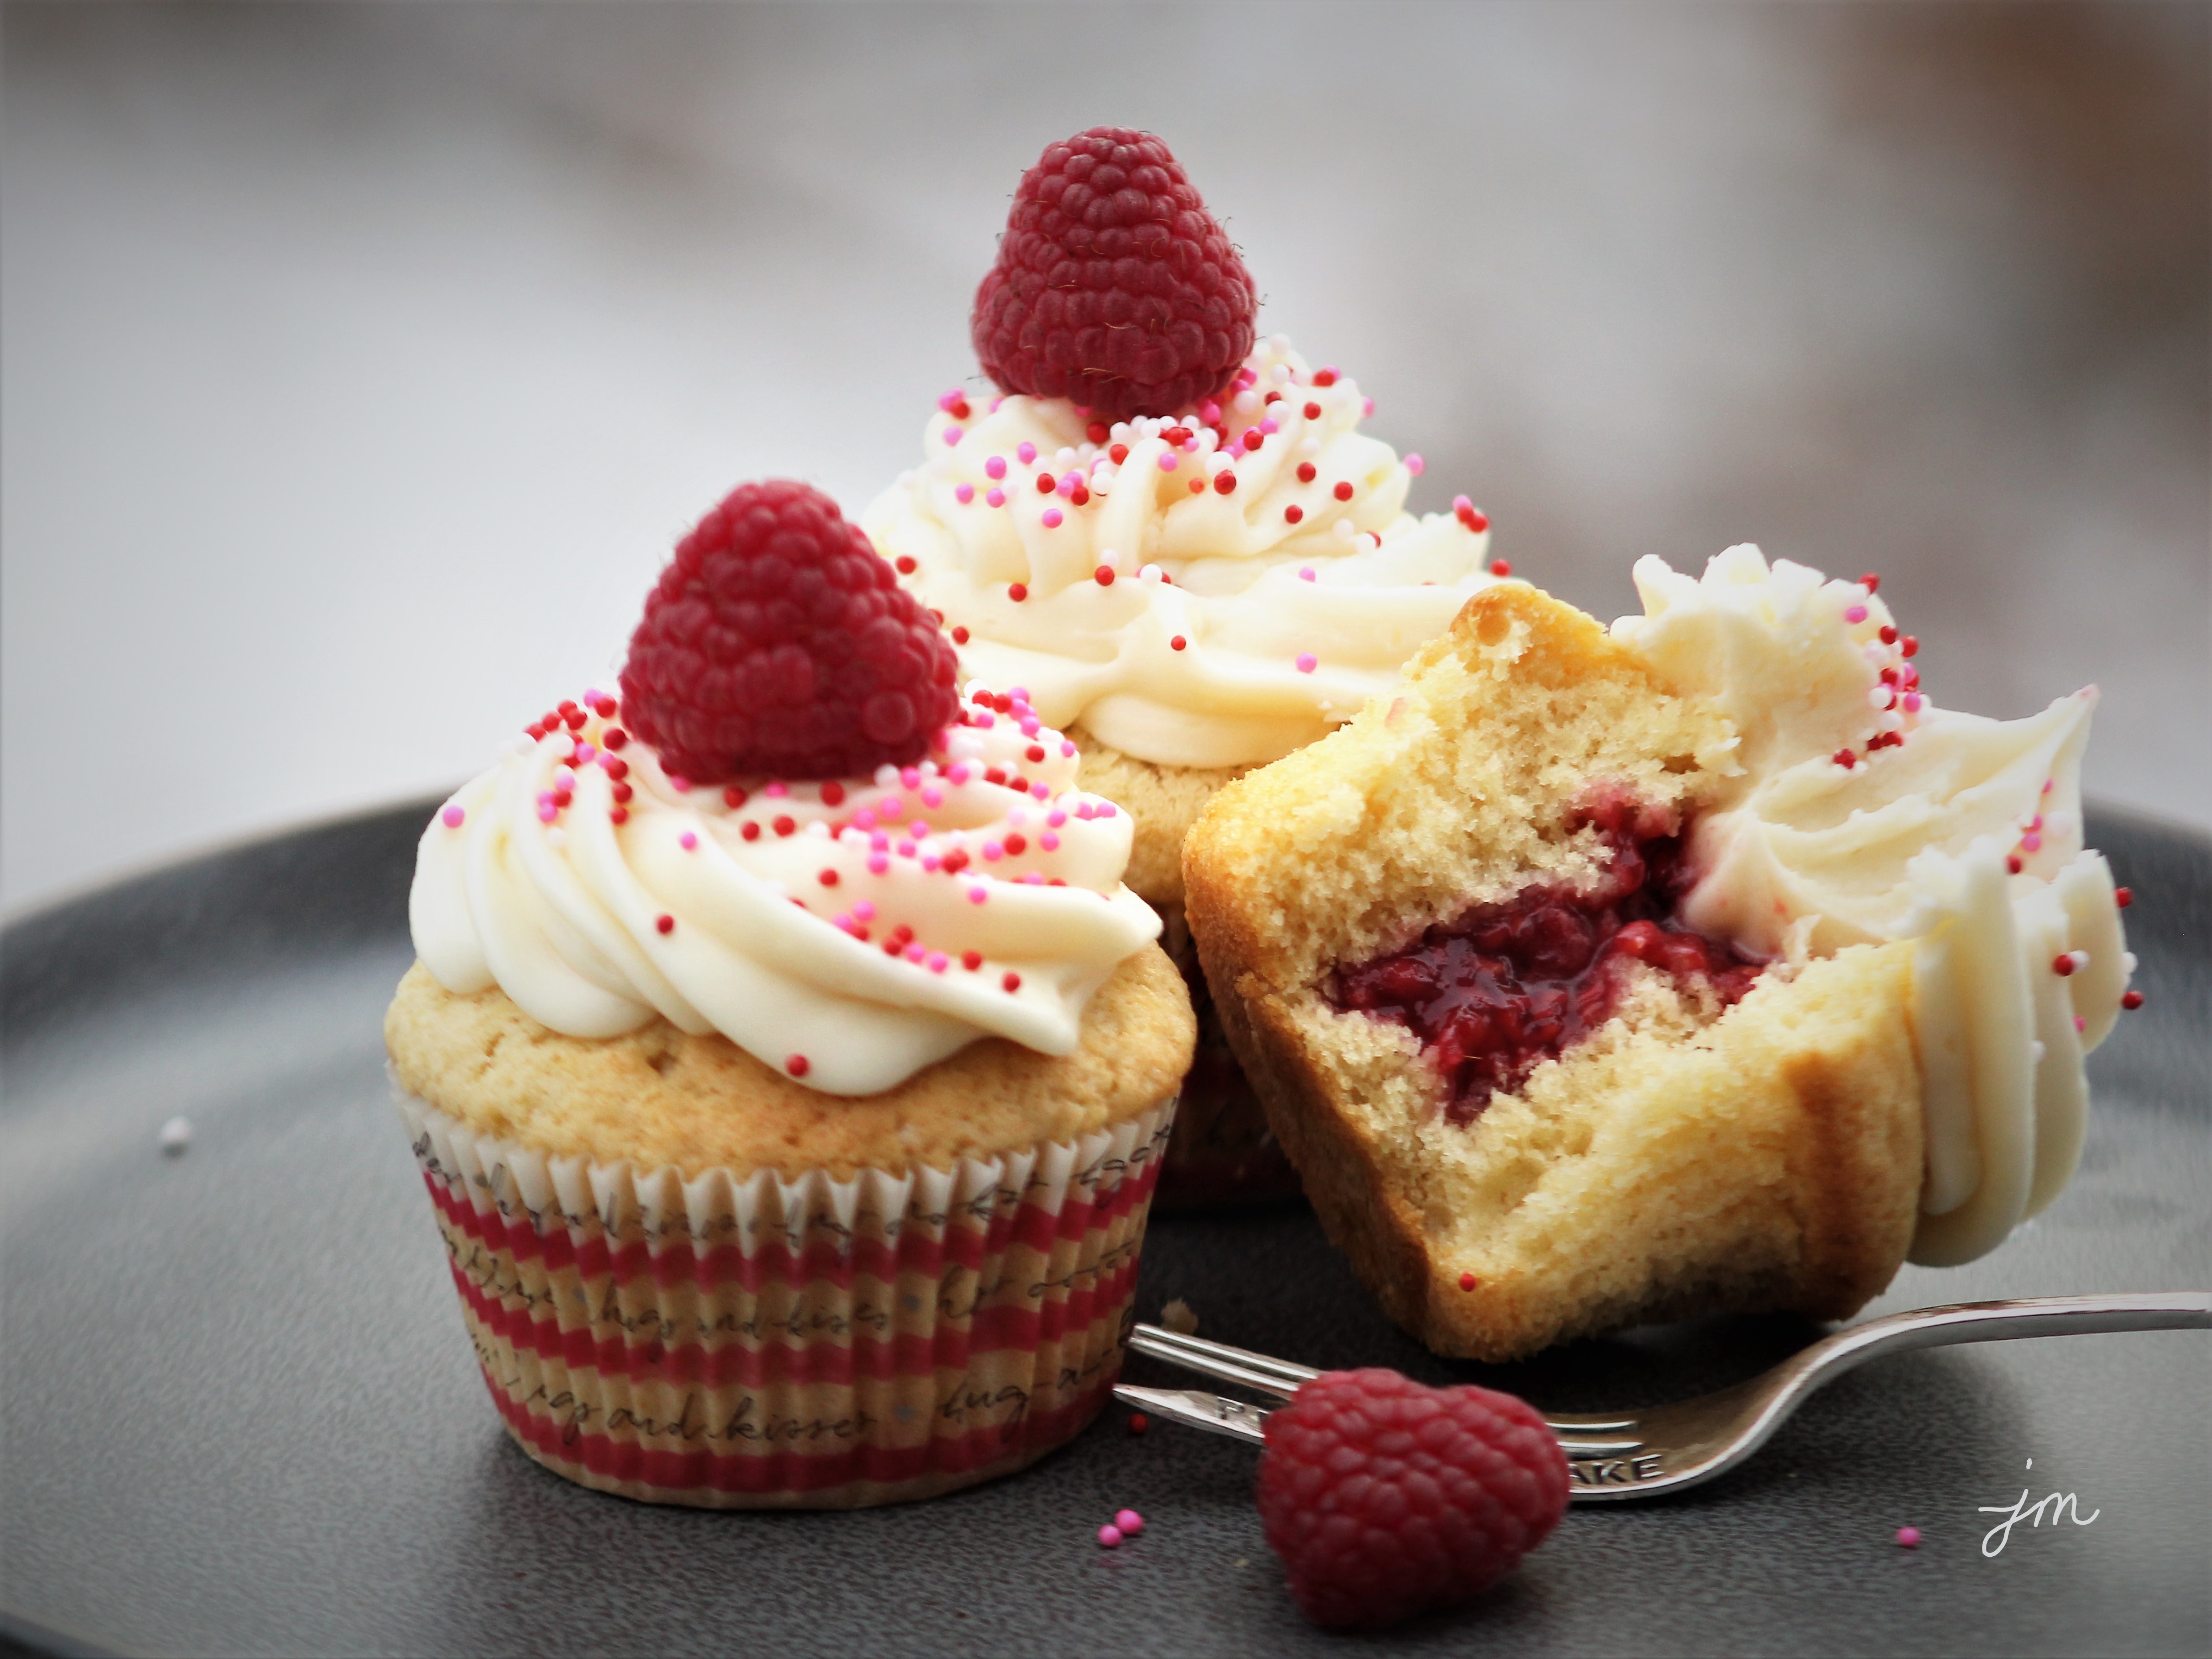
Raspberry-Filled Vanilla Cupcakes.

If you are looking for a super special, absolutely rock-your-world delicious treat to bake for your special Valentine(s), look no further thank these amazing Raspberry-Filled Vanilla Cupcakes!

I have always admired beautiful cupcakes and love those special gourmet ones that have surprise fillings and are extravagantly decorated, but I have never had much success making them.

I had the urge to give it another try yesterday after purchasing some fun sprinkles I was dying to use somehow.

Disclaimer – I have a weird “thing” for sprinkles and buy way more than I ever use!  I bought three different kinds of red/pink Valentiney ones and one big container of regular ones.  My granddaughter had fun shaking them in the cart while we were shopping!

I found a recipe at RockRecipes.com that I tweaked up a bit.  I was so excited with how beautiful and YUMMY they turned out.

When I handed one to Hubby to taste test, I said,  “Are you ready to have your world rocked by this?”

He loved it!

Here is how I made them.  Hope you give them a try.

Raspberry Filled Vanilla Cupcakes

Ingredients:

Cupcake Batter:

  • 1 1/2 cups flour
  • 1 1/2 tsp baking powder
  • 1/4 tsp salt
  • 1 stick (1/2 cup) butter, softened
  • 1 cup sugar
  • 2 eggs
  • 2 tsp. vanilla
  • 1/2 cup evaporated milk

Raspberry Filling:

  • 1 cup fresh raspberries
  • 1/4 cup sugar
  • 1 tsp corn starch
  • 1 oz. water

Vanilla Cream Cheese Frosting:

  • 1 stick (1/2 cup) butter, softened
  • 1/2 cup (4 oz.) cream cheese
  • 3 1/2 cups powdered sugar
  • 1 tsp vanilla
  • 2-3 Tbsp milk

Directions:

To make cupcakes, preheat oven to 325 degrees F.

Cream together butter and sugar until light and fluffy.  Add eggs, one at a time, beating until well incorporated.  Stir in vanilla.  Add baking powder and salt, then fold in flour.  Finally stir in milk to create batter.

Pour into paper-lined cupcake/muffin pan.  Bake for approximately 20 minutes, or until toothpick inserted into center comes out clean.

While cupcakes are baking, prepare raspberry filling by stirring 1 cup raspberries and 1/4 cup sugar in small saucepan.  Simmer over low heat for about 10 minutes.

Dissolve cornstarch in water, and slowly pour into boiling berries.  Stir constantly until thickened.  Allow to cool.

Prepare frosting by blending together butter, cream cheese, and vanilla.  Add powdered sugar and enough milk to make a smooth, creamy consistency.

When cupcakes are cooled, use an apple corer to remove a small section from center of cupcake.  Fill with raspberry filling.

Decorate with cream cheese frosting and sprinkles and fresh raspberries if desired.

Enjoy!

Cheers & Hugs,
Jodi

Chocolate Dipped Sugar Wafer Cookies

chocolate-dipped-sugar-wafer-cookies-2

Chocolate Dipped Sugar Wafer Cookies.

Remember those light, crispy, sweet wafer cookies you loved as a child that came in fun colors and flavors?  Vanilla, Strawberry, Chocolate, even Peanut Butter…  Oh how I loved them!

Grandma would occasionally get them as a special treat, and we would enjoy them as a late night treat on a hot summer night while sitting outside on the swing catching a cool breeze that could not be felt sitting in the overheated non-air conditioned house.

chocolate-dipped-sugar-wafer-cookies

I hadn’t thought about these sugary treats for years, but I recently stopped in a local candy shoppe where they featured a pair of these sweet little cookies dipped in chocolate, sprinkled with colorful sprinkles, and wrapped in cellophane.   I couldn’t resist trying – even at the crazy price they were asking… several dollars for two little treats.

chocolate-dipped-sugar-wafer-cookies-3

Well – OMG – there were delish!  And I realized they would be so easy to make!  So I found them at my local grocery store, where a whole package of sugar wafer cookies cost a whopping 99 cents!

I dipped them in chocolate, sprinkled them with fun Valentine sprinkles, and I’ll be sharing them with some friends I love dearly this weekend!

Cheers & Hugs,
Jodi

Cream Puff Cloud

cream puff cloud coconute cream recipe 2

This heavenly cream puff cloud dessert has been a family favorite for a long time.

My sweet father-in-law used to request it every year for his birthday, and Hubby loves it too!

So when we had my Dad and Mom II over yesterday to celebrate Dad’s birthday, I made this special dessert that I made the first time we celebrated Dad’s birthday together (again) six years ago when we reunited.

Cream Puff Cloud Coconut Cream slice recipe

Dad loves coconut cream just like Hubby does and Pap did, so this is something I love making for my special guys.

Dad ate his first piece, and then asked for a second “little” slice.  He sure knows the way to my heart! 

And if you are not a coconut cream fan, this cream puff cloud DELIGHT is wonderful in a French Vanilla or Chocolate version too!

It is light, simple, and amazingly delightful!

cream puff cloud coconute cream recipe

Years ago, when my boys were young and I was a stay-at-home mom, I sold Pampered Chef kitchen tools as a little side job that got me out a bit, helped me make some extra money for the family, and provided Hubby and I with some amazing FREE trips that I earned for achieving sales bonus levels!  This was one of the recipes I made at cooking shows I did in people’s homes, and it was ALWAYS a huge hit.

I hope you will add this recipe to your collection of “special occasion desserts.”  It is so wonderful to have recipes that are easy, but delicious and impressive.

Happy Birthday Dad!  It was so wonderful to celebrate with you.  I love you!

Cream Puff Cloud

Ingredients:Cream Puff Cloud Coconut Cream slice recipe

  • Cream Puff Shell
    • 1 cup water
    • 1 stick (1/2 cup) butter
    • 1 cup flour
    • 4 eggs
  • Filling
    • 1 small package Instant Coconut Cream Pie Filling (or French Vanilla or Chocolate or your Fave!)
    • 1 1/2 cups Milk (any kind you prefer from Skim to Half and Half)
    • 1 12 oz. Cool Whip
  • Garnish
    • Toasted Coconut – for Coconut Cream Pie Filling
    • Fresh Strawberries and/or shaved chocolate for French Vanilla Pie Filling
    • Shaved Chocolate for Chocolate Pie Filling

Preheat oven to 400 degrees F.

For Puff Pastry Shell:  Microwave or boil water and butter.  Once boiling, remove from heat and add flour.  Stir until batter comes away from sides of bowl/pan.  Add eggs, one at a time, beating with whisk until batter looses shine.

Spray a Deep Dish Baker or 10 inch quiche pan with Pam cooking spray.  Spread batter on bottom of pan and slightly up sides.  Bake for 20-30 minutes.  Shell will puff up and then shrink back when cooled.

Cool completely.

For filling, combine pudding and milk in large bowl, and chill to set.  Fold in 3/4 of the Cool Whip.  For coconut cream version, I also add 1/2 cup toasted coconut.  For chocolate, I add a 1/2 cup chocolate chips or chocolate chunks.

When shell is cooled, pour filling into shell.  Garnish with remaining cool whip and any additional garnishes you prefer.  Chill until serving.

Enjoy!

Cheers & Hugs,
Jodi

Sprinkle Birthday Cake

sprinkle birthday cake

Oh the sprinkles were plentiful this past weekend as we celebrated our daughter-in-law, Colleen’s birthday.  Here is the wonky cake I made that I mentioned yesterday when I posted my sprinkle birthday cake watercolor card I made.

sprinkle birthday cake cut

It might have been a bit wonky, but it was soooo yummy!  This white, vanilla cake filled with colorful, celebratory sprinkles is really worth the extra effort to make from scratch!

sprinkle birthday cake slice

And serve it with some fresh churned birthday cake ice cream (like we can get around here from Bruster’s Ice Cream), and you will really be sparkling!

Sprinkle Birthday Cake*

Cake Ingredients:Sprinkle Birthday Cake thumbnail

  • 3 and 3/4 cups (431g) all-purpose flour
  • 3/4 tsp baking powder
  • 3/4 tsp baking soda
  • 1 tsp salt
  • 1 1/2 cups (3 sticks; 345g) butter, softened
  • 1 3/4 cups (350g) granulated sugar
  • 4 large eggs
  • 2 large egg whites
  • 3 tsp. (15ml) vanilla
  • 1 1/2 cups (360ml) buttermilk (or buttermilk substitute:  1 1/2 cups milk mixed with 1 1/2 Tbsp vinegar)
  • 3/4 cup (142g) rainbow sprinkles

Vanilla Frosting Ingredients:

  • 1 1/4 cups (2.5 sticks; 287g) butter, softened
  • 5 cups (580g) confectioners’ sugar
  • 1/3 cup (80ml) heavy cream or half and half or milk (all work)
  • 3 tsp (15ml) vanilla
  • 1/8 tsp salt
  • Additional sprinkles or other decorations

Directions:

  1. Preheat oven to 350°F (177°C). Grease and lightly flour three 9-inch cake pans.
  2. Whisk flour, baking powder, baking soda, and salt together in a large bowl. Set aside. Mix butter on high speed of mixer until smooth and creamy – about 1 minute. Add sugar and beat on high for 5 more minutes.  On medium-high speed, add 1 whole egg at a time, beating well after each addition until all 4 whole eggs are mixed in.   Beat in vanilla.
  3. With the mixer on low speed, add the dry ingredients in three additions alternating with the buttermilk, beginning and ending with the dry ingredients, and mixing each addition just until incorporated. Do not overmix. The batter will be smooth, velvety, and slightly thick.
  4. In a separate mixing bowl, beat the 2 additional egg whites until thick, foamy, and soft peaks form- about 3 minutes. Gently fold into the batter. Finally, gently fold sprinkles in.
  5. Pour batter evenly into each cake pan.  Bake for approximately 25 minutes or until a toothpick inserted in the center comes out clean.   Allow cakes to cool completely in the pans set on a wire rack.
  6. To make frosting, beat the butter on medium speed in mixer until creamy – about 2 minutes. Add confectioners’ sugar, cream, vanilla, and salt with the mixer on low. Increase to high and beat for 3 minutes. Add more confectioners’ sugar if frosting is too thin, more cream if frosting is too thick, or a pinch more of salt if frosting is too sweet.
  7. To assemble:  Place one cake layer on serving plate. Evenly cover the top with frosting. Top with second and third layers and repeat. Spread remaining frosting on sides.   You can tint small portions of the frosting to make decorations or use decorator frosting and decorate with additional sprinkles.  

Jodi’s Cake Tip:  If at all possible, I always try to bake my cake at least one day ahead of time or even the night before serving so that it can be frozen.  I bake the layers, cool, and then place each un-frosted layer in a large Ziploc bag and freeze.  For one thing, this makes the cake much easier to frost.  But secondly, and most importantly, freezing the cake, even if only for a few hours overnight, makes for a much moister cake.  I learned this by accident when I used to always make cakes fresh the day of serving thinking that was best, and then had to do ahead one time years ago because of time constraints.  It was the first time everyone ooooohhhed and awwwwhhed over the cake.  I’ve frozen ahead ever since.

And here is the birthday girl blowing out the candles.  A bit blurry, but a quick snap with my iPhone after we sang.  I love doing special things for this special girl!

colleen sprinkle birthday cake

Cheers & Hugs,
Jodi

*FULL Credit for this recipe goes to Sally’s Baking Addiction Funfetti Cake.