My First Watercolor

My first watercolor 040115

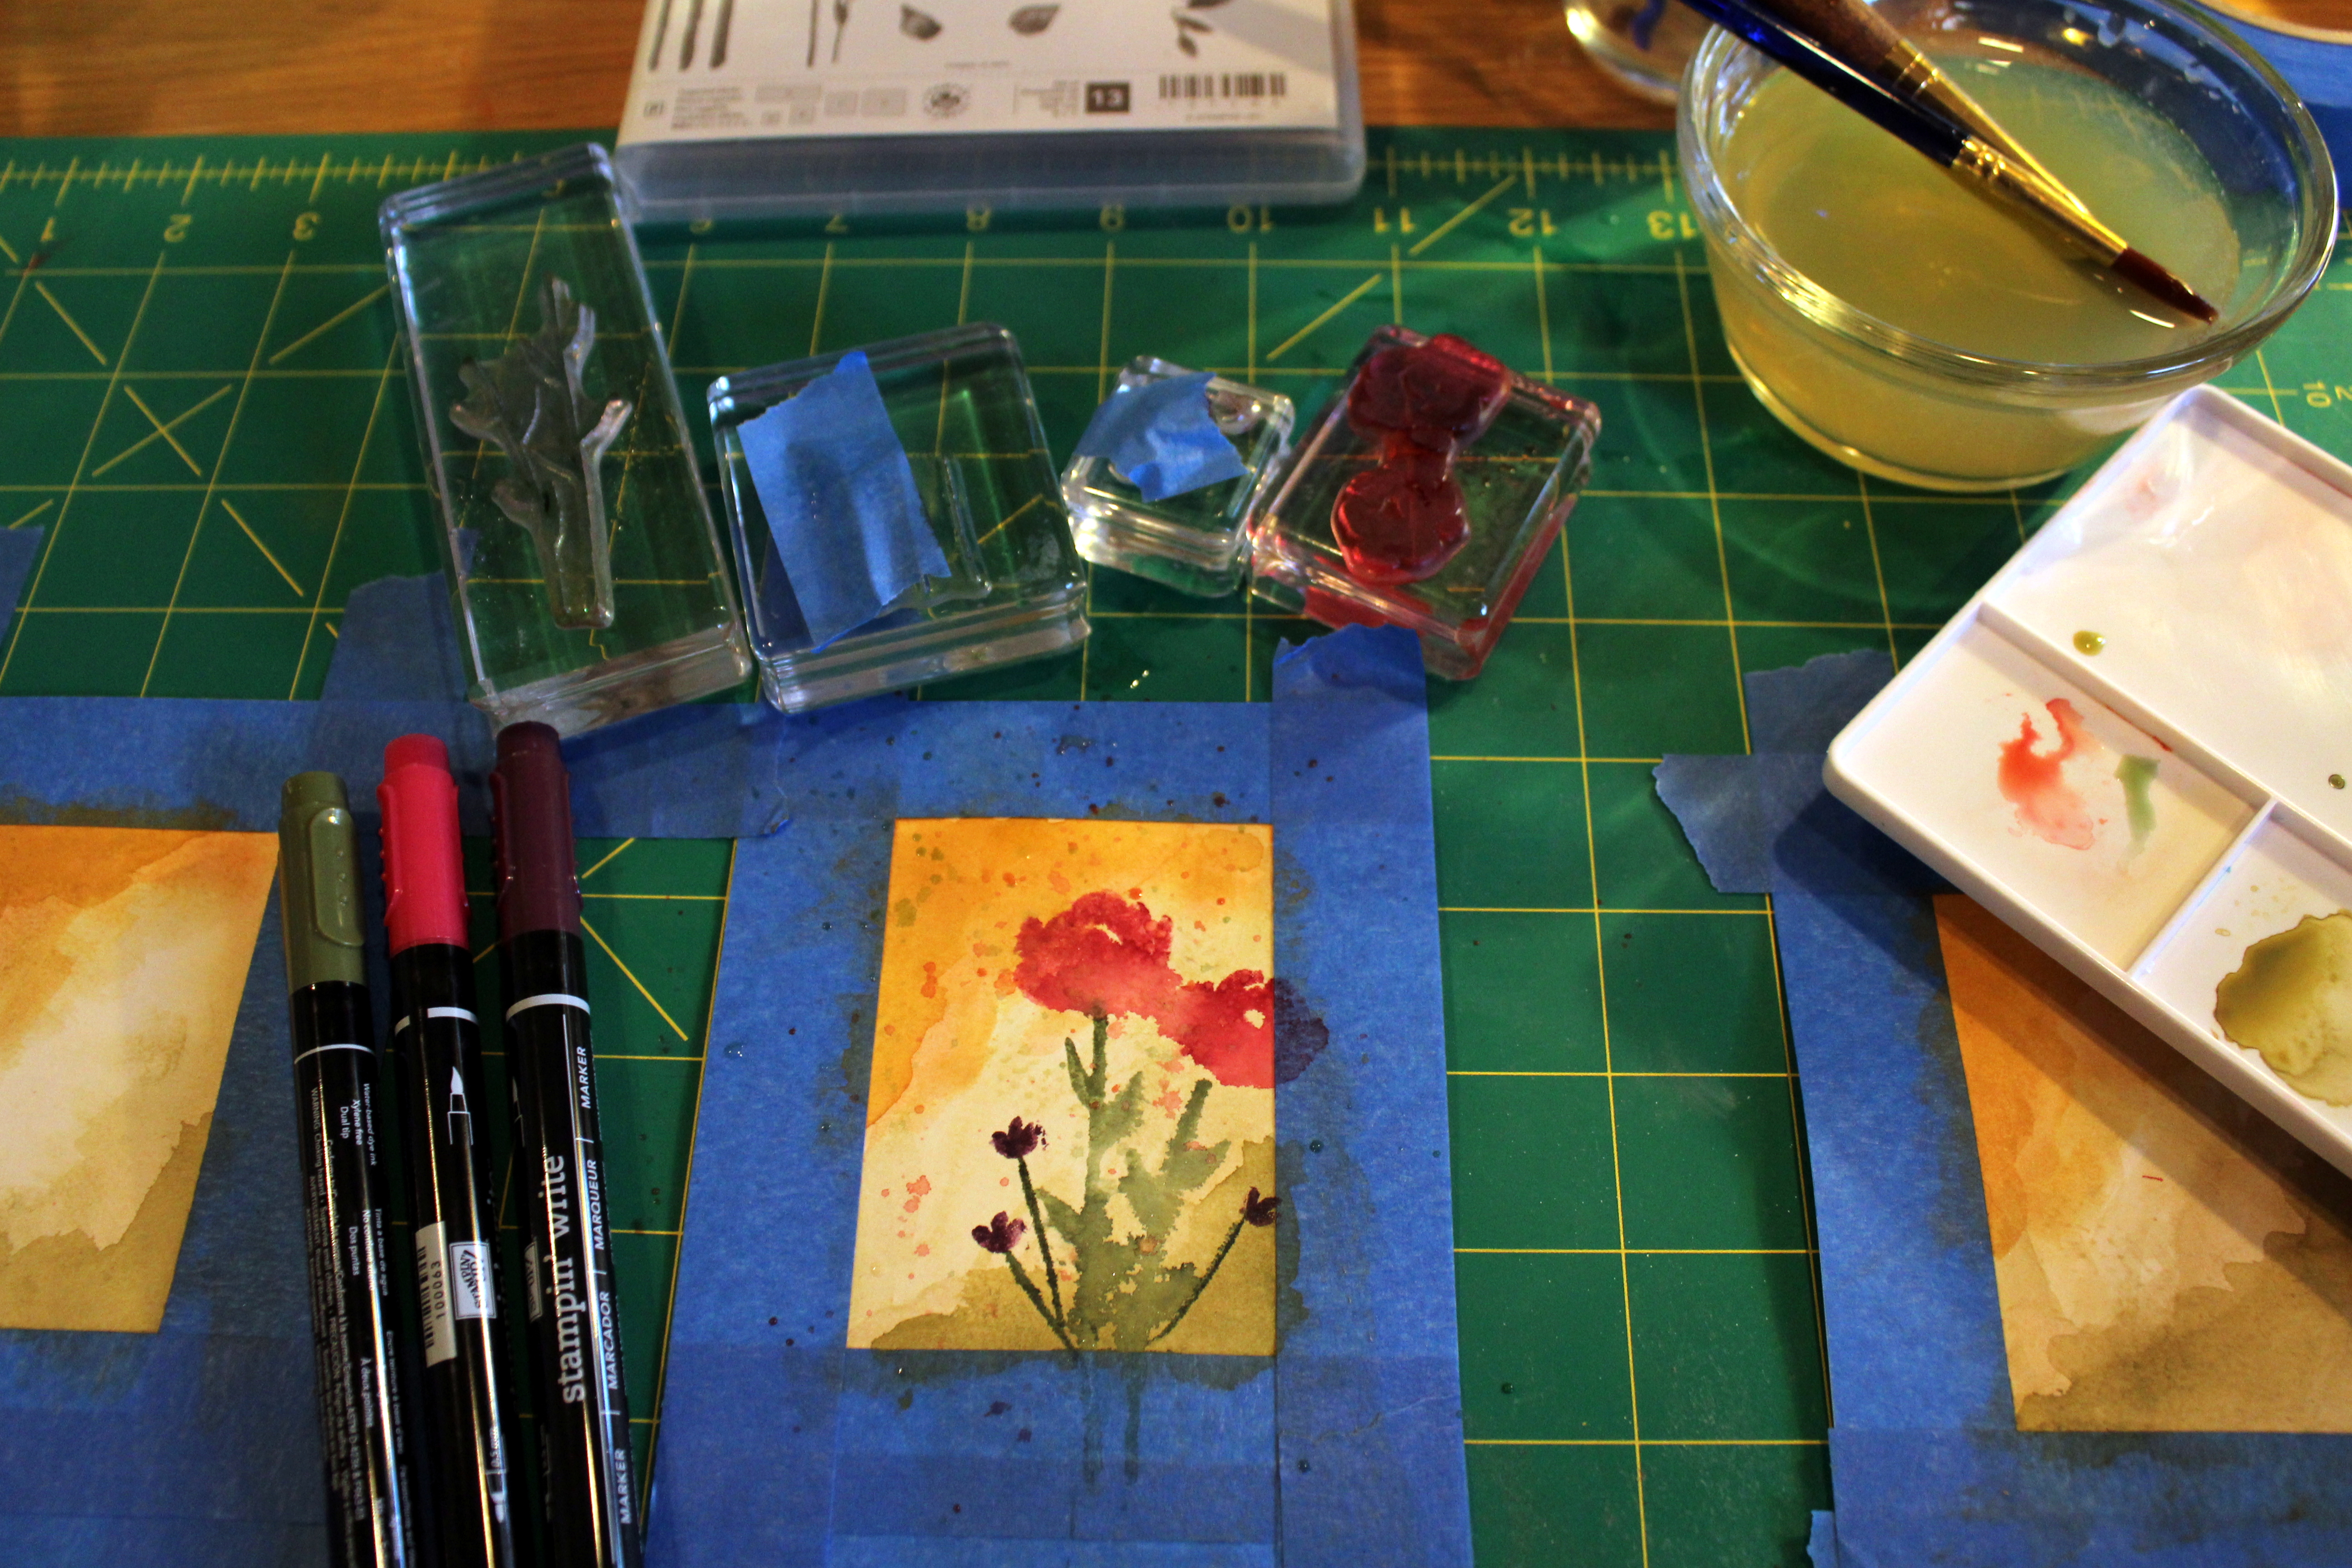
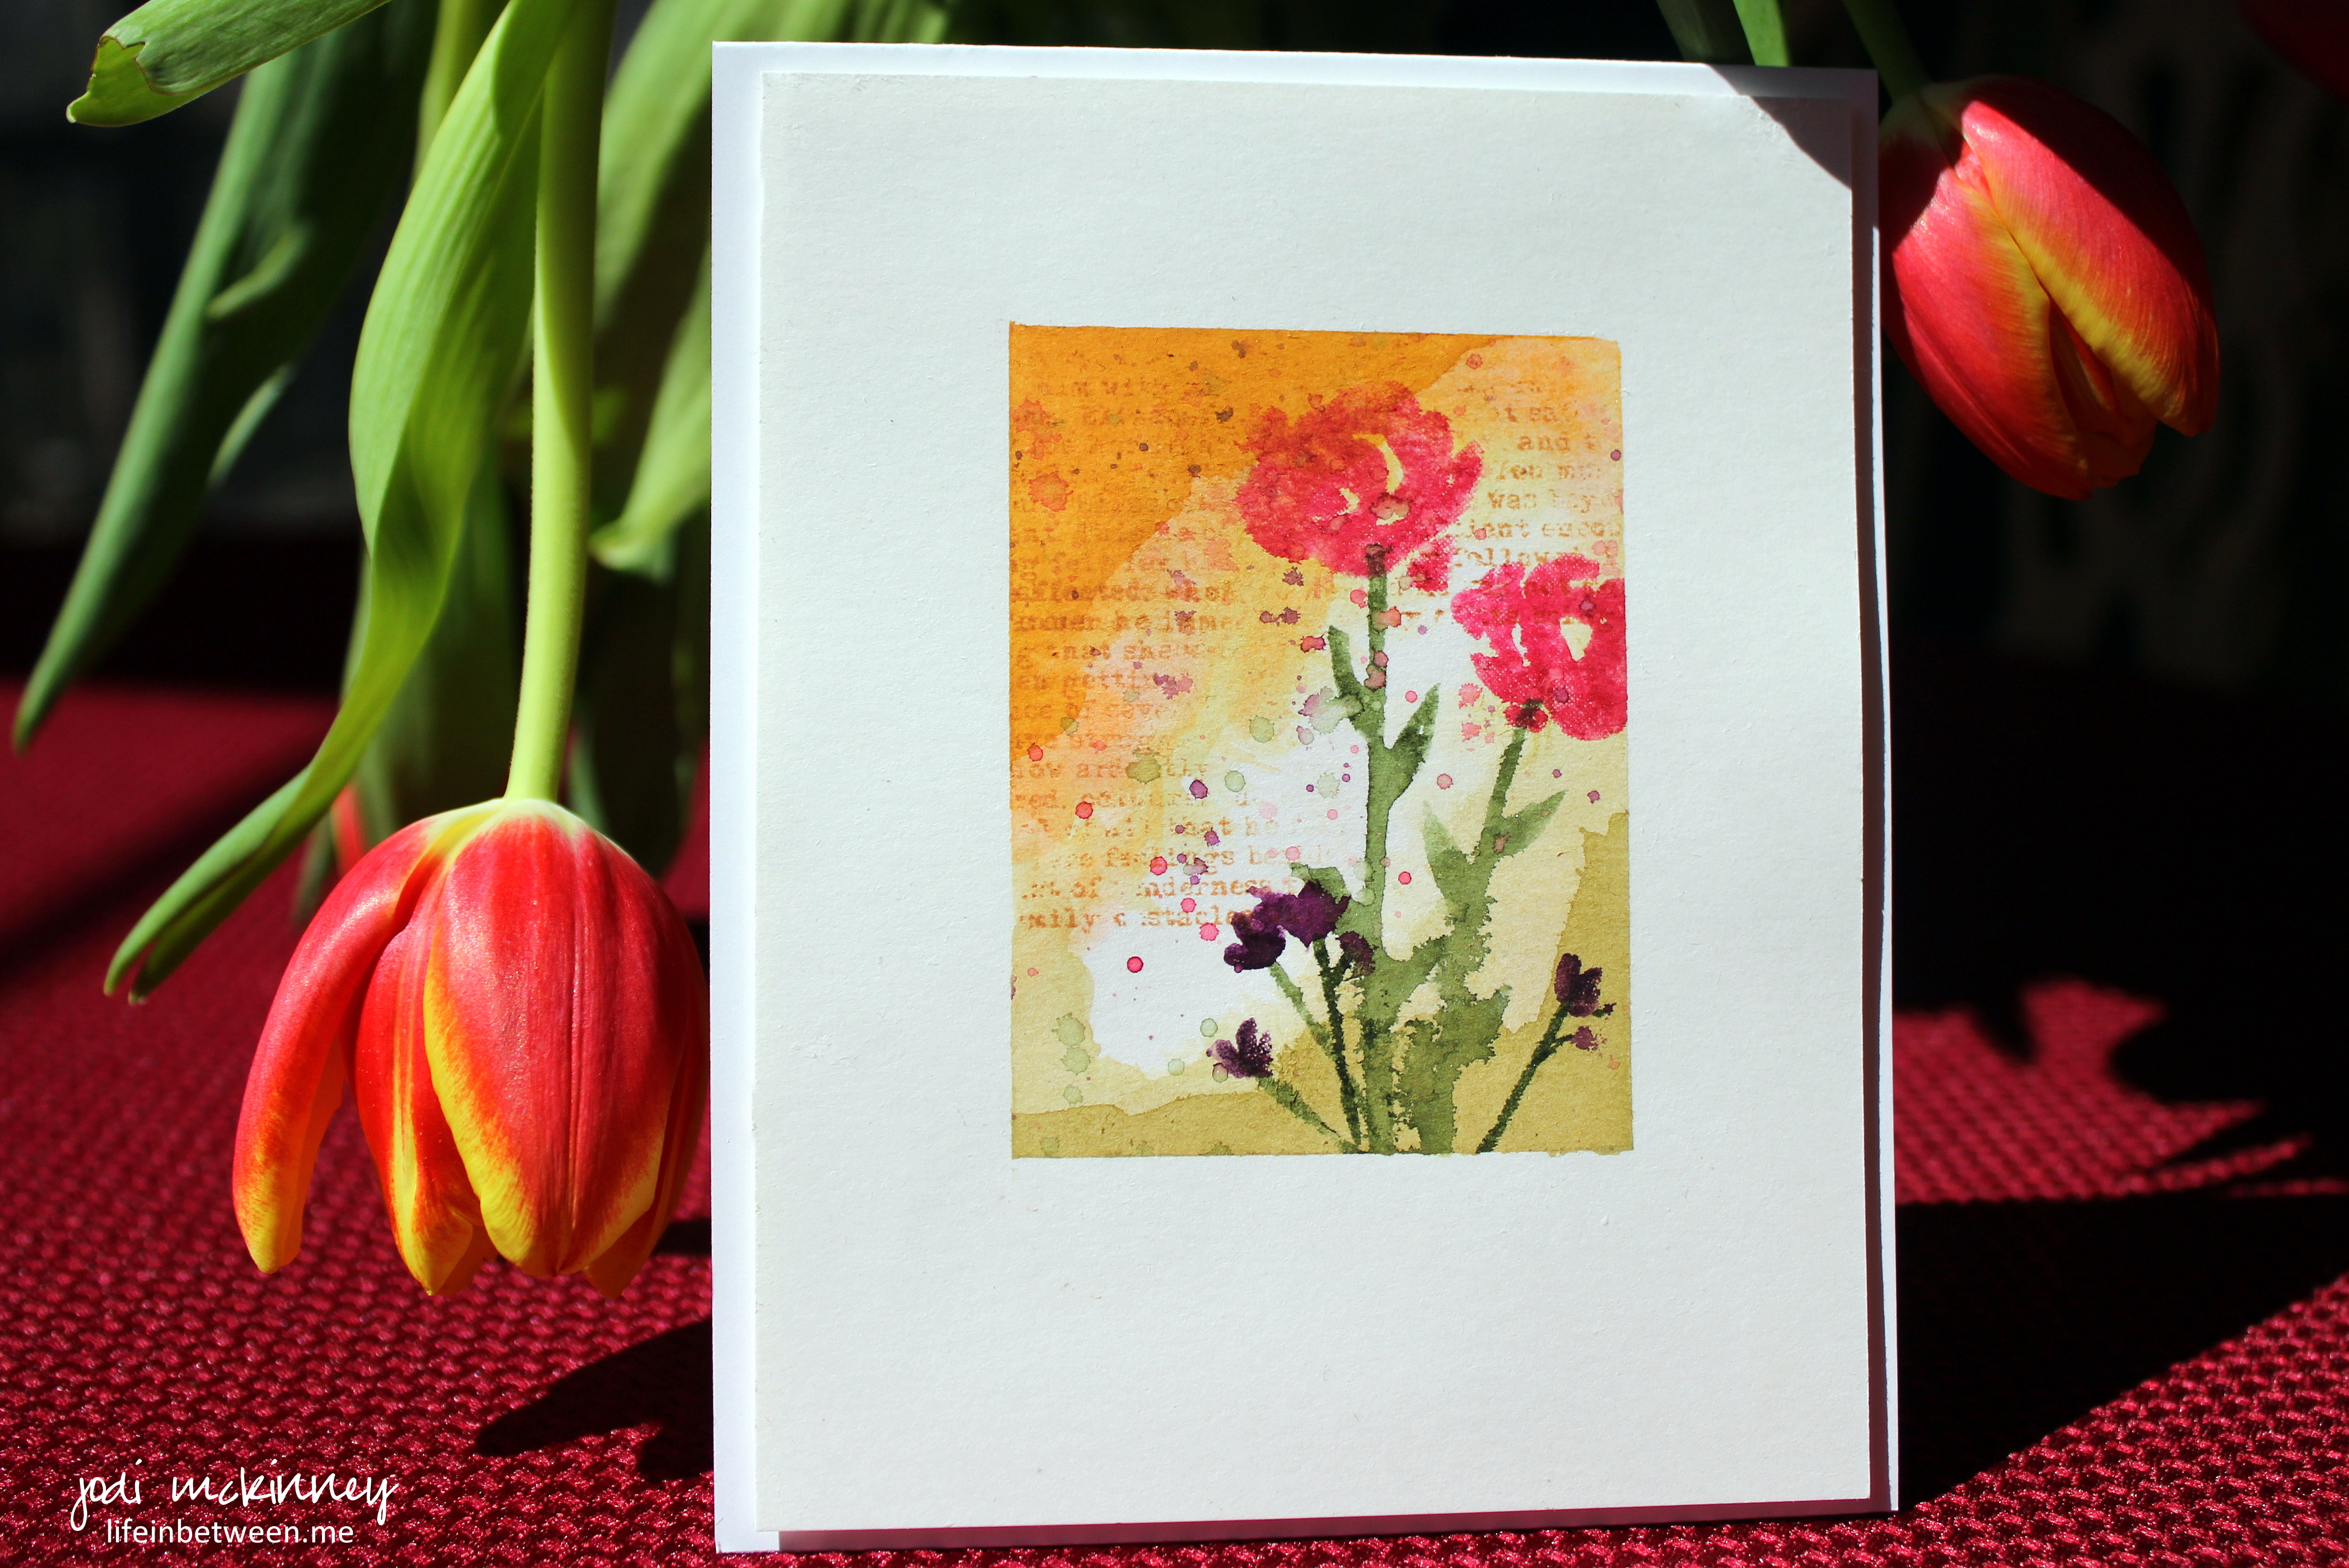
I’m being extremely brave and sharing my very first drawn-from-scratch watercolor project with all of you.

Oh Dear…. Please be gentle!  You don’t know how many times I wanted to redo this and and pretend a retry was my first….

I know this is so very far from being anything worth sharing, but I wanted to post it to hopefully look back on a year from now and see that I have grown and developed.

This blog project has been a way for me to express the things I am discovering and enjoying at “life in between.”  As I started with stamping and card-making, my desire to express my creativity a bit more led to watercolor on cards with stamps (which I still love to do), but I was itching to try a watercolor from scratch – and I have NEVER been good at free-hand drawing!

So, of course I did what we all do now to learn a new skill, I searched for a tutorial on YouTube.

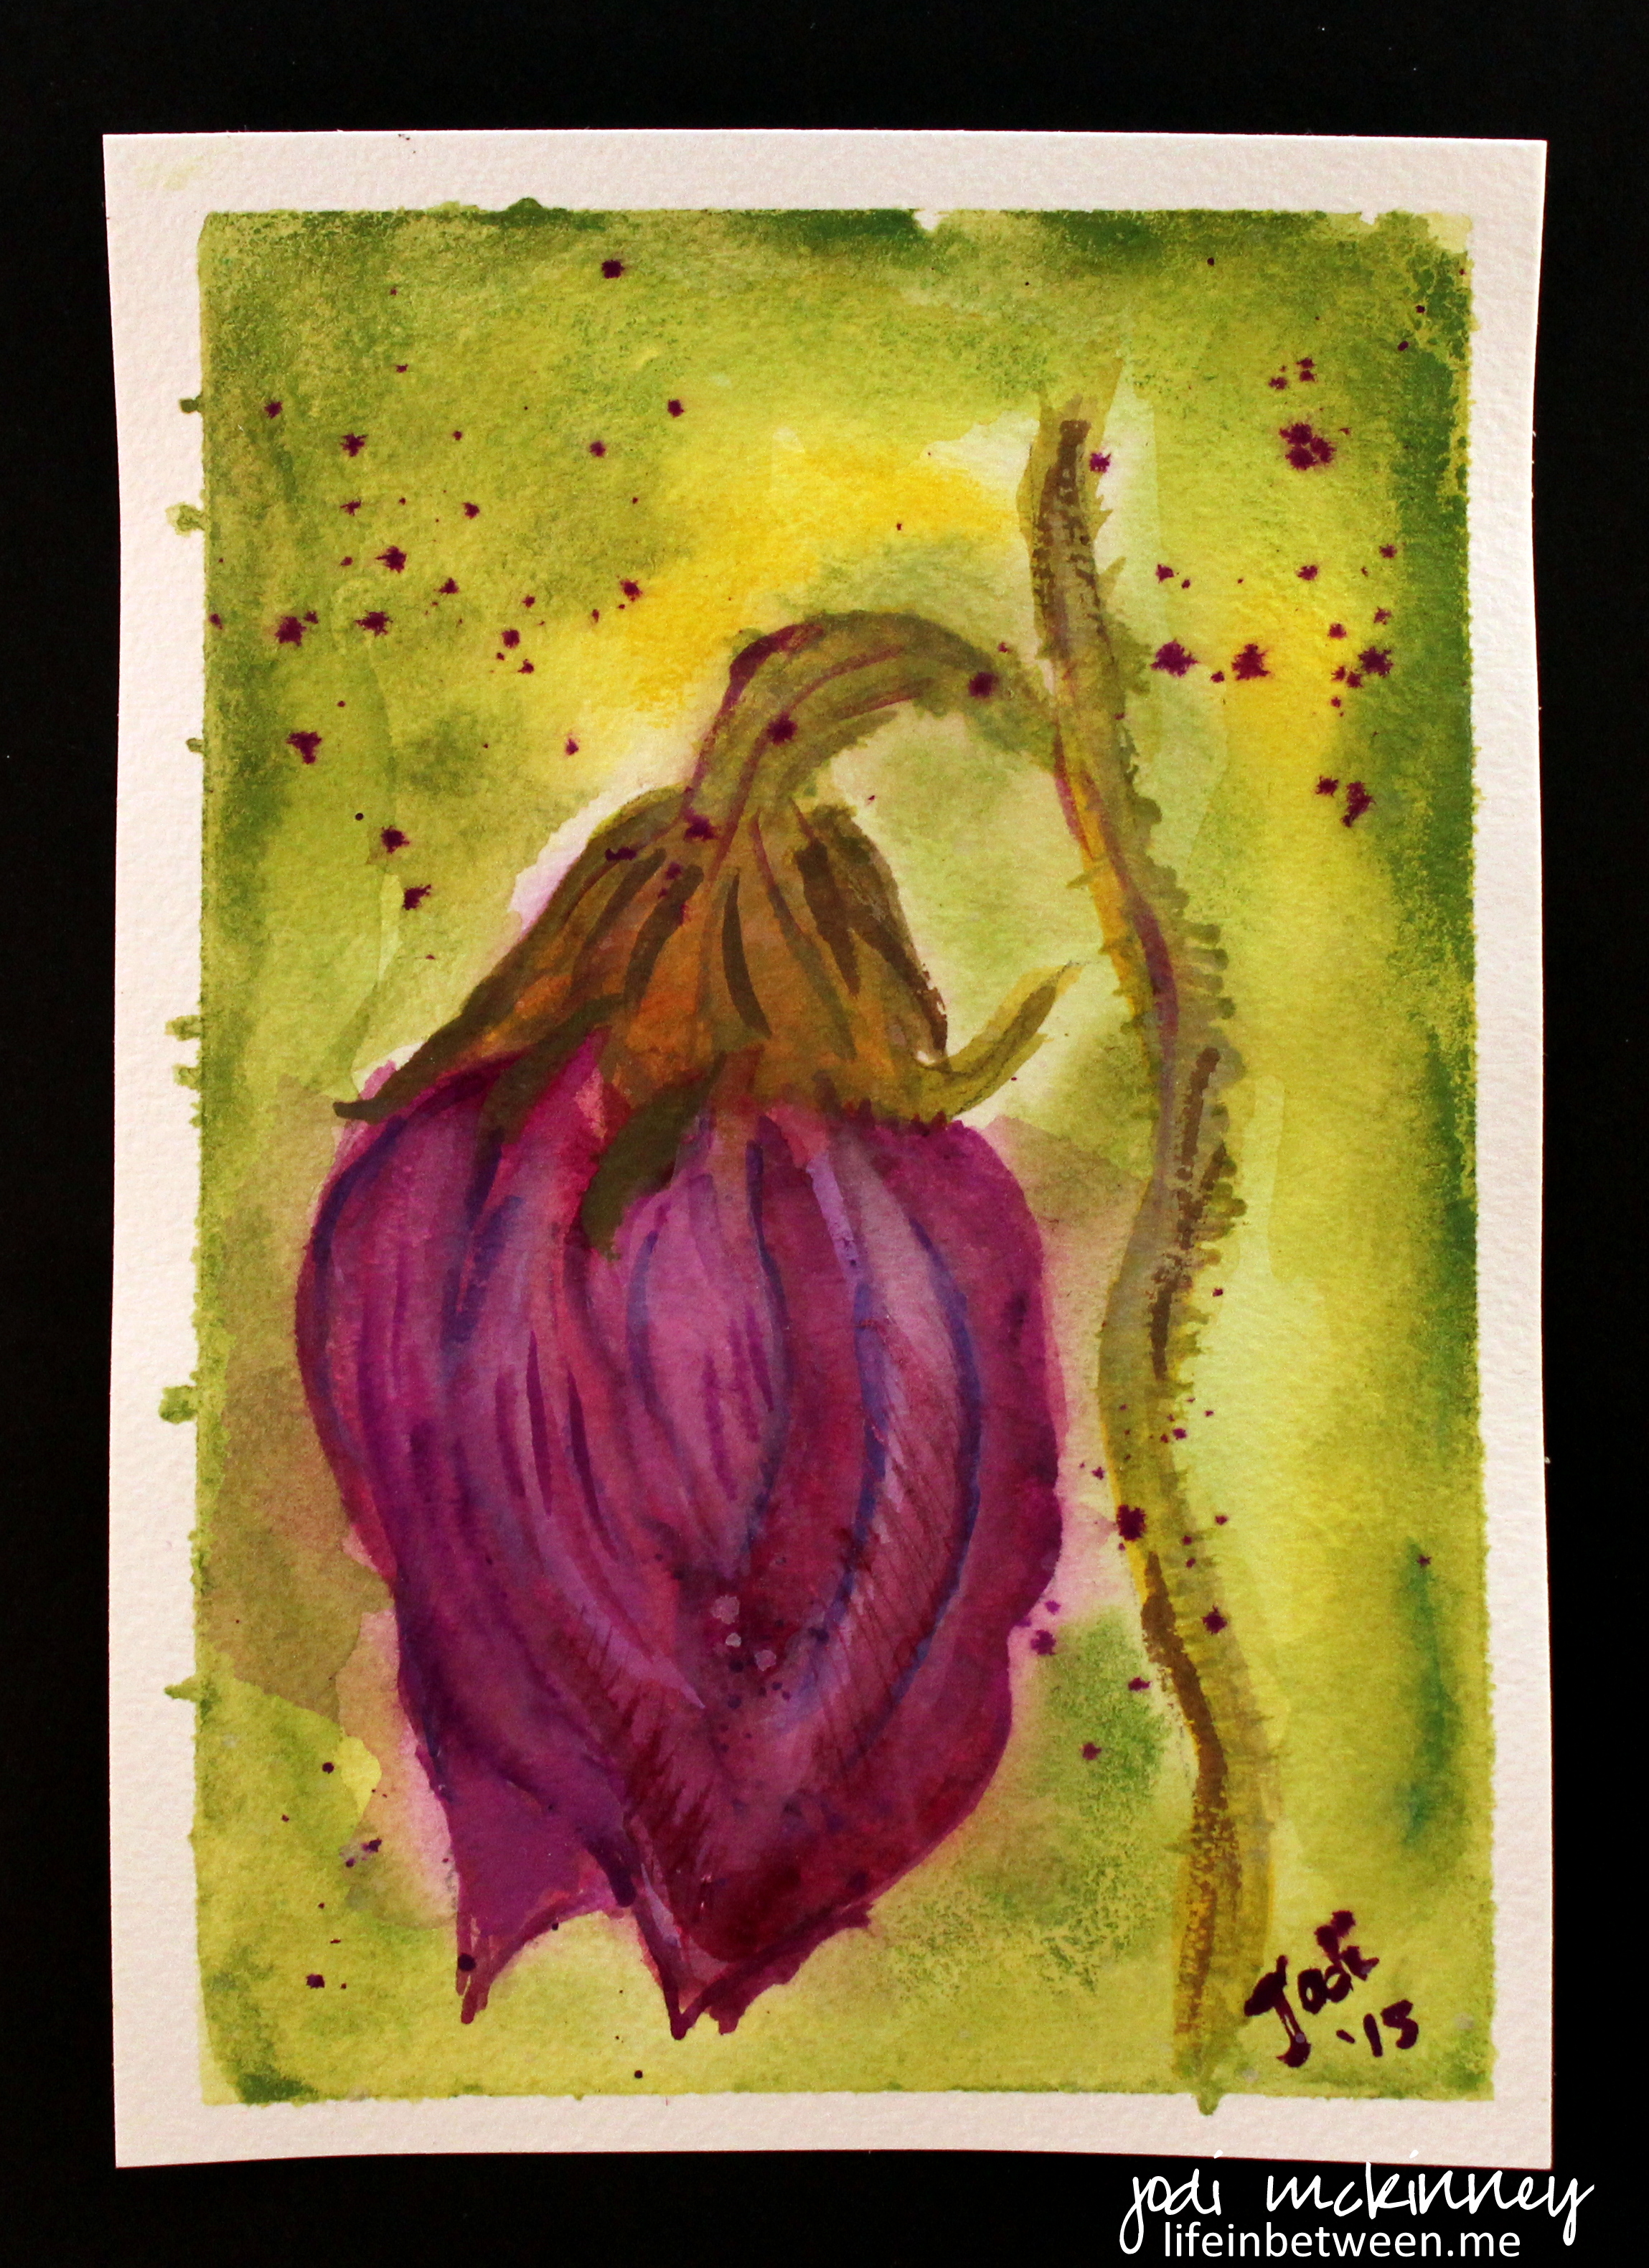
I came across a phenomenal “teacher” via tutorial at TheFrugalCrafter where Lindsay demonstrated how to paint a sweet pea bud.

I know – I know…. you were all thinking this was an eggplant or maybe a wilted purple rose – right?!  🙂

So it didn’t turn out to be a sweet pea bud per se, but hey – it’s a start.

And….

It was FUN!

Thanks for sharing this journey with me!

Cheers & Hugs,

Jodi

My Most Favorite – for 33 years!

33 anniversary card

Today, my hubby, Marty, and I celebrate 33 years of marriage.

Yep – 33 years ago today – a very young and naive 19-year old girl said “I do” for now and forever to a 23-year old boy about as different from her as Eddie and Eva on Green Acres (okay – maybe I wasn’t quite that glamorous and Marty wasn’t quite that Midwest farmer, but we were – and still are – a pretty classic example of opposites attracting.)

And you know what?

He is still my favorite!

Maybe even more so….

I tell people that are going through “stuff” in marriage, there are good days and bad days, good weeks and bad weeks, good months and bad months…

Heck – there are even tough years…

But, you know what?

Life isn’t perfect.

People aren’t perfect.

And marriage and monogamy with that one special someone is a pretty special thing.

And I am so fortunate in so many ways for so many things and so many years and so much love and safety and stability and genuineness and standbyidness….

Yep – Merv (that’s what I call the hubster) – you are STILL my MOST FAVORITE!  (and this is the card I made for him.)

I love ya,
Gert (that’s what he calls me)

I know – we are goofy!  🙂

Cheers & Hugs,
Jodi


Happier than a Bird with a French Fry

Hey There

This card I am sharing today is a quite a diversion from my “usual” (if there even is such a thing), but oh how much fun it was to make!

I needed a birthday card for a special 14-year old boy, so pretty posies and sappy sentiments were not in order.

hey there inside

Remember last week when I shared my watercolor painted petals card and entered it into a new challenge, Can You Case it (CYCI#62)? 

Well…. lucky lucky me – I won!  Woohoo!  Happy dance!  🙂

So I was excited to see what the next challenge is, and this card is an entry for the CYCI#63 challenge.  It’s a sketch challenge, and here here is our sketch:

CYCI63-232x300

I tried to stay pretty true to the sketch.  What do you think?

Hey There

For this  card, I used the following materials:

  • StampinUp’s Just Sayin’ Stamp Set “hey there” stamp
  • StampinUp’s Just Sayin’ Framelit Die Set bubble die
  • StampinUp’s Gorgeous Grunge Stamp Set “ink blot” stamp
  • Jillibean’s You’re Tweet Stamp Set “little bird” stamp & “happier than a french fry” sentiment stamp
  • StampinUp’s Pumpkin Pie Orange Marker (for birdie’s beak)
  • StampinUp’s Adventure Bound Designer Series Paper “brick wall” paper
  • StampinUp’s Very Vanilla and Black Card Stock
  • Inks:  Stazon Black, SU White Craft Ink, Versa Mark, SU Tempting Turquoise
  • White Embossing Powder
  • Wink of Stella Clear Brush

Have a great day – in fact, I hope your day is Happier than a Bird with a French Fry!

By the way – have you ever seen a bird with a french fry??  I can say I have first hand!  A couple of years ago, a friend took me to this very specific “special” french fry place on the boardwalk in Ocean City, Maryland.  We got a batch of fries and were walking along talking, when out of nowhere and in no time at all (I hadn’t even tasted one fry yet), a bird swooped in to grab a fry, startling me to the point of throwing the fries in the air.  When they fell to the ground, about 50 hundred gabillion birds appeared, and the fries disappeared in about 1.5 seconds.  And to top it off……… the stinkin’ bird POOPED on my shoulder in the process.  So after that fiasco, I went to the ladies room to “wash” off my top, and back we headed to buy more fries.  When we arrived at the shop, it had closed for the day…..

I never did get to try those fries.  But the birds sure were happy!  🙂

Cheers & Hugs,
Jodi

PS  Happy Birthday Aaron!  With love from Aunt Jodi ❤

Rubber Ducky Diaper Cake

rubber ducky diaper cake

Looking for a fun baby shower gift?

How about taking a box of disposable diapers and making it into a “cake!”

Yesterday, I shared my Rubber Ducky Watercolor Card.  Here is another part of the gift that goes with it.  A gift bag full of baby hooded towels, and I am ready for the shower.

This is so simple to make.

I re-purposed an aluminum serving tray and hot glued a cardboard paper towel holder to the center.  I then took an 88-count box of Pampers Swaddler Diapers, rolling each diaper and holding it together with a rubber band.

Begin by placing the rolled diapers around the center paper towel tube.  Tie together with string, and then surround with another ring outside that.  Repeat four times for the bottom layer.  Then make the middle layer with two circles and the top layer with just one circle around the paper towel tube.  Cover the string/rubber bands with ribbon and make a decorative bow.  Decorate your cake with various rubber duckies and/or any other “theme” you choose to complete your gift cake.

Those of you that have been “lifeinbetweeners” for a while might remember the Birthday Money Cake I made for my son a few months ago.

Isn’t it fun to find creative ways to bake make cakes?!

What are you baking up today?

Cheers & Hugs,

Jodi

Chicks & Rubber Duckies

rubber duck 1

I’m going to a baby shower this weekend, so I had fun using the same technique I used for my Watercolor & Painted Petals Note Card to make this little bitty Rubber Ducky card.

rubber duck 2

I used the rubber ducky stamp from StampinUp’s Something for Baby stamp set and embellished with a white gel pen and pearl for the eye.

I can’t get enough of this fun technique and know I will be doing more of it.

And speaking of having fun and making cards, I had a few chicks over one night this week.  We ate chicken fajitas and Cadbury mini egg blondies, washed it down with some wine and G&Ts, stamped, and made…

chicks stamping

some CHICKS!  (Easter Chicks that is!)  So here we are… Chicks making Chicks!   Thanks to Head Chick Stacey for leading our “class.

chicks and chicks

Aren’t they cute?!

Easter Chick

Here is a video tutorial on how to make one similar done by Deb Valder.

We made ours a just a little different by adding a little holder for a Cadbury Egg.

Easter Chick side

Happy Friday from this crazy Chick!

Cheers & Hugs,

Jodi

Watercolor & Painted Petals Note Card

mini watercolor painted petals

I really enjoy trying new techniques in creating handmade cards, so when I saw a tutorial done by Jill Foster for Penny Black featuring water coloring combined with stamping to create these mini watercolor creations with a clean and simple white on white background, I couldn’t  wait to make one.

mini watercolor painted petals 1

The technique includes masking off watercolor paper to create the “frame” and then watercoloring the background.  I used some golds and greens from my Sakura Koi Water Color Pocket Field Sketch Box (actually the only watercolors I own right now).  After drying, I stamped the flowers on using StampinUp’s Painted Petals stamp set by coloring them with my Stampin’ Write Markers in Rose Red, Blackberry Bliss and Mossy Meadow and then gently spritzing the stamp with water to loosen the look before stamping.

mini watercolor painted petals 2

I then used those same marker colors and added a little water to them in my watercolor tray to randomly tap splatters all over from a paint brush.  The last step involved using a Penny Black Footnotes stamp with Tim Holtz Distress Ink in “tea dye,” which I smudged for the vintage imperfect look before stamping on the top edge and corner.

mini watercolor painted petals 3

Once dry, I simply removed the masking tape (blue painter’s low-tack tape is easier to remove and less likely to lift the paper too), put some dimensional adhesive tape on the back and adhered to a white card base.

mini watercolor painted petals 4

I loved this technique and plan to try it with other colors and stamps, and I can’t wait to share this card with somebody special.

Wishing you a wonderful day and week.  Spend some time doing things you enjoy with people you love.

Cheers & Hugs,
Jodi

PS  I am submitting this card for a new challenge I just learned about at canyoucaseit.com where this week’s challenge is “Designer’s Choice.”

Designers-Choice-001

I won!  Thanks to the CYCI Designer Team for the great honor!

Winner-001

Hello There in Watercolor Bokeh

hello there bokeh 1

Hello There Friends!  It’s Friday!  Thanks for visiting today.

For this week’s Friday card, I had fun experimenting with an abstract watercolor and bokeh technique Diane Dimich featured recently here. 

For the blues/greens, I mixed some stamp reinkers with water, and I used some watercolor paint for the red/oranges – just to try a couple different ways.  Once I decided on my color palettes, I brushed my watercolor paper with some clear, clean water using a water brush, then began randomly dabbing the colors all over covering the entire surface.

watercolor bokeh 2

Once it dried, I daubed white inked circles in multiple layers overlapping from a template I created using a piece of acetate cut with the Stampinup Circle Framelits to give the bokeh effect I love so much in photography.

watercolor bokeh 3

Once I was pleased with the effect, I mounted it onto cardstock with a white border, stamped the Hello There greeting in black and embellished with a few simple rhinestone gems.

hello there bokeh 1

I haven’t finished the rest of the painted sheets yet.   I think I will save them for when I need a particular card that I can add just the right greeting and message to.

So here’s to Friday, the weekend, creativity, sharing, and all the wonderful things to enjoy at life in between.

Cheers & Hugs,
Jodi

Just Sayin’

Just Sayin Blended Bloom and Crazy about You 3

Just Sayin’…

I’m ready for Spring.

I’m ready for flowers.

I’m ready for sunshine.

So when I saw this week’s Paper Player’s Challenge (PP236) was to make a “Clean and Simple Floral” card, I couldn’t wait to play along!

 My Card Recipe:  I heat embossed the StampinUp Blended Bloom floral image in black onto Whisper White card stock.  Using a sponge dauber, I sponged Crushed Curry ink in the middle, then light to dark shades of “orange” (Crisp Cantaloupe, Tangelo Twist, Tangerine Tango).  For some extra pizazz, which is so hard to capture in the photos, I added a light brush of Wink of Stella on the petals.  I then “fussy” cut the flower out and adhered it to another white layer using an antique brad (to which I stamped the image with Memento Black ink underneath just for some extra dimension).  I used my favorite new Lil’ Inkers Stitched Rectangle Border Die Cuts to create the edge of the white piece and to the front of the Tangerine Tango card stock base.  I adhered the white to the orange using foam tape to add extra dimension.  The final step was to stamp “Just Saying” in Memento Black ink using the Crazy About You Stamp set.

I love this simple stamp and how this card turned out, and I can’t wait to share it with someone.

Just Sayin Blended Bloom and Crazy about You 2

So today, I’m “just sayin'”…

Happy St. Patrick’s Day!

Happy Spring!

Happy Birthday #25 Nick!  Thanks for bringing such joy to my life and making every March 17th one of my favorite days of the year!

Cheers & Hugs,
Jodi

Celebrate Today

Happy Birthday Nick Celebrate Today

Celebrate today!

Celebrate every day!

Hey – it’s Friday…

and it’s a birthday weekend around here!

My “baby” turns 25 in a few days.  How did that happen when I am only like (ahem)….  Hey – I just realized as I am typing this I am the exact reverse number…. 

In my current “clean and simple” (CAS) mode, I made this card using the StampinUP Celebrate Today stamp set.  It is so fun and festive!

After stamping the birthday balloons in Pear Pizazz and Marina Mist, I heat embossed the stars inside the balloons, as well as the birthday greeting, with silver glitter.  A few star sequins and some white baker’s twine for the balloon strings finished off this card.

I am so looking forward to spending time together with my family and celebrating.  I’m not sure how I got so lucky having two wonderful sons, an amazing daughter-in-law and a dear girlfriend, and a hubby that puts up with my shenanigans… but I’ll take it and run with it!

Cheers & Hugs,
Jodi

Eat Something Cute

birthday bakery card

Marty (hubby) came home from work one day last week with a beautiful box of homemade cupcakes from a coworker’s wife.  He asked if I would make a “cupcake” thank you card, because these little gems were seriously worth a homemade thank you card!

I had this old StampinUp Birthday Bakery hostess stamp set that seemed just the ticket.  I love the sentiment, “If you are what you eat, eat something cute!”

cupcakes

And how amazing are these cupcakes?!?!!

cupcakes and birthday bakery card

I was inspired by a very similar card I CASE’d (technical stamping term for “copy and share everything”)  from Splitcoaststampers.

I kept it pretty simple because I felt the sweet bakery treats should be the showcase on this card.

Hey – it’s Sunday!  Eat something CUTE!

Cheers & Hugs,
Jodi