Peanut Butter Marshmallow Fluff Thumbprint Cookies

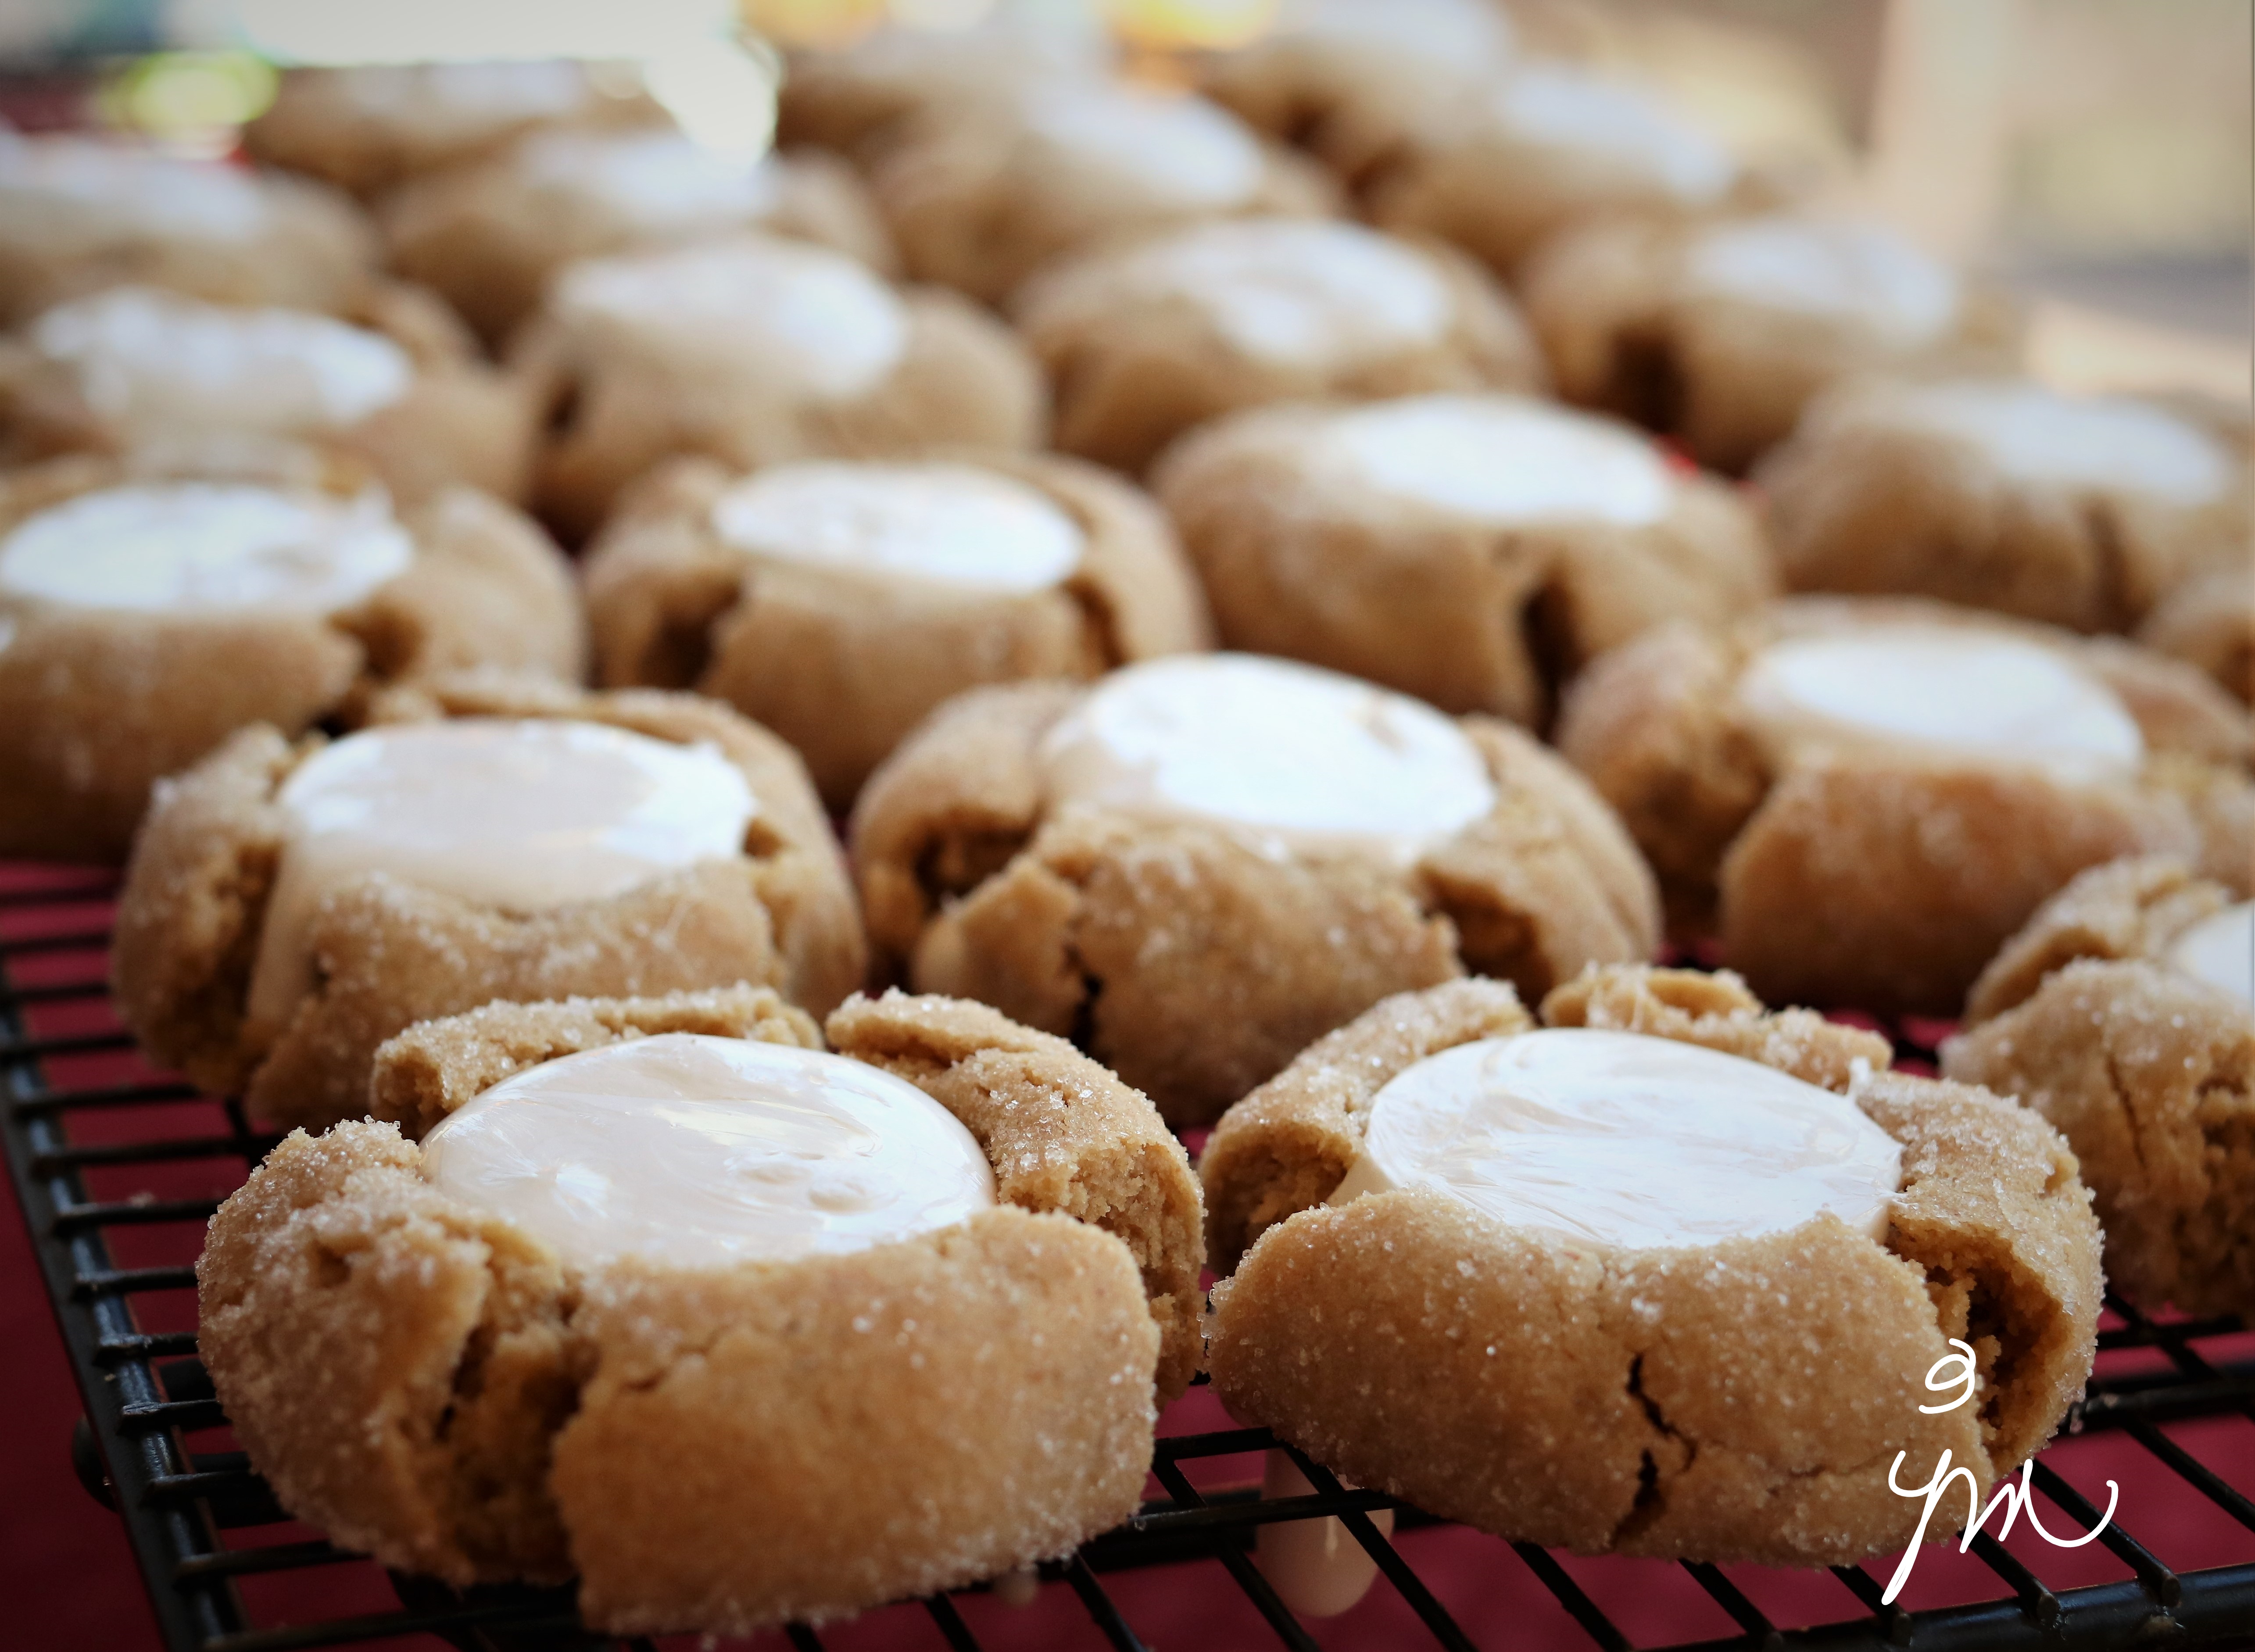
Peanut Butter Marshmallow Fluff Thumbprint Cookies.

These cookies!
Ooooooh these cookies!

Imagine…. a peanut butter crinkle cookie loaded with a scoopful of sweet, heavenly, gooey, magical Marshmallow Fluff so that you taste it in every peanut-buttery bite.

When I saw these cookies featured on Cara Wong’s Instagram feed, I knew I had to make them.

Cara is a sweet lady who lives in McKinney, Texas with her comical, coffee-loving husband and best friend Joseph.  She loves to cook and bake almost as much as she loves her MeeMaw and Joseph.

I’ve become addicted to watching Cara’s daily adventures in search of the best coffee, burgers and meatloaf in town and daily experiments in baking and cooking.   The milkshake-sipping and singing visits with MeeMaw, Cara’s beloved grandma who played such an important role in raising Cara (much like my own Grandma) just warm my heart.  MeeMaw now lives in a memory care facility where Cara visits her regularly brightening both of their days almost as much as they do mine when they sing You are My Sunshine or Amazing Grace.

But I digress.

Back to these cookies…  these glorious nuggets of amazing deliciousness….

These may be my new personal favorite ever.

They are just such a unique combination that I cannot imagine anyone not liking.

Cara took MeeMaw’s old-fashioned peanut butter crinkle recipe and decided to try marshmallow filling.  She used Smuckers Marshmallow Topping (which I had never heard of).  I used a jar of Marshmallow Fluff, which I just happened to have on hand (who knows why?), and they turned out absolutely amazing!

Here is the recipe, shared by Cara, which I adjusted only by subbing Marshmallow Fluff for the Marshmallow topping.  I urge you to try these, and I can’t wait to hear what you think.

Peanut Butter Marshmallow Fluff Thumbprint Cookies

Ingredients:

  • 1/2 cup (1 stick) butter, softened
  • 3/4 cup creamy peanut butter
  • 1/3 cup granulated sugar
  • 1/2 cup brown sugar
  • 1 egg
  • 2 tsp pure vanilla extract
  • 1 tsp baking soda
  • 1/2 tsp salt
  • 1 2/3 cup flour
  • 1/2 cup additional granulated sugar for rolling balls in
  • 1 7.5 oz.  jar Marshmallow Fluff

Directions:

Preheat oven to 375 degrees F.

Cream butter, peanut butter, and sugars until light and fluffy.  Scrape bowl.  Add egg and vanilla extract, baking soda and salt.  Mix until well combined.  Add flour, and stir until well combined.

Roll dough into 1″ balls.  Roll balls in granulated sugar to coat.  Place on baking stone or ungreased cookie sheet about 2 inches apart.  Bake for approximately 9 minutes, until just beginning to brown.  Remove from oven, and use your thumb or a utensil to indent a “crater” for filling.  Allow to cool.

Heat up Marshmallow Fluff 10 seconds at a time just until you can stir.  No more than 20-30 seconds total.  Fill centers with Marshmallow Fluff.

Enjoy!

Cheers & Hugs,
Jodi


Brussels Slaw

Brussels Slaw.

Who is a Brussels Sprouts fan?

Yes?  No?  Not sure?  Maybe not?

I was chatting with a friend at work last week that said she doesn’t like Brussels Sprouts, but said she wondered how they would be raw in a coleslaw like salad.  She commented that she likes cabbage in coleslaw, but not cooked cabbage.

It got me thinking…..  I am a Brussels sprout fan…. adore them roasted….  but I, too, wondered how they would be shredded and served raw in a slaw-type salad.

Then the universe poked me with a nudge, when I saw bags of  Shaved Brussels at my local Whole Foods Market!  

I bought a bag for me and a bag for my friend.

Trying to eat healthier these days, I decided on a vinaigrette slaw.  My friend made a creamy version using Marzetti slaw dressing, and she and her family loved it.


Here is the recipe for how I made mine.  Hope you will give it a try!

Brussels Slaw

Ingredients:

  • 1 12oz bag Shaved Brussels Sprouts (or you can slice/shave your own)
  • 1/4 cup finely minced onion
  • 1/4 – 1/3 cup dried cranberries
  • 1/4 – 1/3 cup sunflower seeds
  • 3 Tbsp. Apple Cider Vinegar
  • 3 Tbsp. Olive Oil
  • 1 tsp. Sugar (or sweetener)
  • Salt and Pepper to taste

Mix all together and let marinade in refrigerator for at least a half hour before serving.

You can change it up by adding sliced almonds or chopped apples or anything else you like.

Enjoy!

Cheers & Hugs,
Jodi


St. Patrick’s Day Pretzel Shamrocks

Pretzel Shamrocks for St. Patrick’s Day.

How FUN are these??!!

When I saw this idea on Pinterest, I knew I had to create some of these.

A few simple ingredients and two minutes in the oven make for a winner of a special holiday treat.

I had a bag of Rolos left over from Christmas, and I knew I could pull some green M&M’s out of the jar I keep full most all the time.  I had some pretzel sticks, but didn’t have mini pretzels, so that is all I had to buy.  The ones I picked up at Fresh Thyme were Gluten Free and made from rice flour, so a bit lighter color, but completely delish!

Here is the super simple “recipe.”  Do you have some friends or loved ones you’d like to share them with?

St. Patrick's Day Pretzel Shamrocks

  • Servings: as many as you like
  • Print

Ingredients:

  • Mini Pretzels
  • Pretzel Sticks
  • Rolo Chocolate Candies
  • Green M&M Candies

Directions:

Preheat oven to 250 degrees F.  Lay pretzels out in the shape of shamrocks on parchment paper lined baking sheet or stone.  Place a Rolo where all three pretzels meet.  Bake for 2 minutes for Rolo to soften.  Remove from oven, and press M&M in center of Rolo.  Cool completely and/or place in freezer to chill.

Enjoy!

Cheers & Hugs,
Jodi

Fresh Beet and Goat Cheese Salad

Fresh Beet and Goat Cheese Salad.

I found another gem at our new Fresh Thyme Farmers Market this week – beautiful fresh golden beets!

I love beets – red or gold – but since these are a little harder to find where I live, I was excited to get them.  Golden beets are slightly sweeter and a little less earthy than red beets.  I actually love the earthiness of red beets, but those that don’t might enjoy these.

I love beets hot or cold, plain or fancy, so I decided to make a bit of a fancier salad for our Sunday supper this past week.  Here is my recipe.  Hope you will give it a try.

Fresh Beet and Goat Cheese Salad

Ingredients:

  • 1 large or 2 small gold or red fresh beets (or a combination of both), cooked* and cut into bite-sized pieces.
  • Small bunch of arugula or mixed greens of your choice
  • ¼ cup pecans or walnuts
  • 1 Tbsp pure maple syrup
  • 2 small clementines or oranges
  • 1/8 cup balsamic vinegar
  • ¼ extra virgin olive oil
  • 2 oz. goat cheese
  • Salt and pepper to taste

Directions:

In a small skillet, heat pecans or walnuts until warm and beginning to toast.  Add maple syrup and cook and stir to coat.  Remove from heat.  Spread out on cutting board or parchment or waxed paper to cool.

Prepare dressing by squeezing juice of clementine or orange into a small bowl.  Drizzle and whisk in vinegar and olive oil.  Season with salt and pepper.  Set aside.

Place a small bunch of arugula or mixed greens on each of two salad plates.  Top each plate with equal portions of the cut-up beets, followed by clementine or orange slices, toasted candied pecans or walnuts, and crumbled goat cheese.  Drizzle with dressing and sprinkle with additional coarse black pepper and salt to taste.

*To cook fresh beets, cut greens off top to about an inch from beet.  Place unpeeled fresh beets in a saucepan of water to cover and bring to a boil.  Boil for 20-40 minutes, depending on size, until beets are fork-tender.  (When you stab with a fork, the beet should slide right back off when done.) Drain under cold water and remove skin with paper towel.  Cool completely for salad.  Cut up after beets have cooled.

Enjoy!

Nothing beats a fresh beet!

Cheers & Hugs,
Jodi

Homemade Cherry Pie

Homemade Cherry Pie.

On a recent visit to an awesome new grocery store that opened up near us called Fresh Thyme, I discovered they carried big 2.5 lb bags of red sour pie cherries.  I was so excited!  This is something hard to find where we live.  You can find dark sweet cherries everywhere, and they are delicious for eating, but to make a good old-fashioned homemade cherry pie, you have to have the sour cherries.

I snagged a couple bags and was excited to get to make a cherry pie for hubby for Valentine’s Day last week.

If you are lucky enough to find sour cherries, here is the simple, old-fashioned recipe I use to make a classic cherry pie.

Bake a little love!

Cherry Pie

Ingredients:

Directions:

Preheat oven to 400 degrees F.

In a large bowl, combine cherries, sugar, tapioca, and almond extract.  Mix well, and let sit while preparing pie crust.

Prepare crust and place bottom layer in pie plate.  Fill with cherry mixture.  Top filling with dabs of butter followed by top crust, being sure to cut slits or a shape to allow bubbling and steam to escape.  Spread a small amount of milk or water on top crust, and sprinkle with an additional tablespoon of sugar if desired.

Place pie in oven.  Cover loosely with foil to prevent over browning.  Bake approximately one hour.  Remove foil and continue baking until filling bubbles out of top and crust is beautifully browned.

Allow to cool completely to set.  Serve with scoop of vanilla ice cream.

Enjoy!

Cheers & Hugs,
Jodi


Homemade Sweet Potato Chips

Homemade Sweet Potato Chips.

I’ve been trying to eat a bit healthier and make better food choices.

It’s hard.

While some people crave chocolate and sweets, I am a salty, savory girl.  I will take a crunchy pretzel or chip any day over a Hershey’s Kiss or cookie.

So when I heard about making homemade sweet potato chips, I had to try.

And HOORAY!  They totally satisfied my salty, crunchy chip-loving craving.

These are so easy to make, so delicious to eat, and healthy enough to not feel guilty!

The only tricky part is baking them long enough to get crispy without burning them.

This recipe is what works in my oven in my area.  I have an electric convection oven.  Your baking time may vary.  Just keep watching – and tasting – until you achieve your best results.

The batch pictured here is ONE sweet potato!

Here is how I made them:

Homemade Sweet Potato Chips

Ingredients

  • 1 large sweet potato
  • 1-2 Tbsp. Olive Oil
  • 1 tsp. coarse sea salt
  • 1 tsp. chili powder or dry rub or your favorite seasoning (optional)

Directions:

Preheat oven to 400 degrees F.

Thinly slice sweet potato with a mandoline slicer and layer on a baking stone or cookie sheet.  Drizzle with olive oil and combine to coat well.  Sprinkle with salt and seasoning.  Re-spread evenly on the baking sheet.

Bake 20 minutes.  Toss and flip slices.  Continue baking for 10 minutes.  Toss and flip slices.  Bake 10 more minutes or until edges are browned and chips become crisp.  Remove to paper towels to dry and drain off any excess oil.   Serve immediately and enjoy!

TIP:  Some type of mandoline slicer is really a must as well to get super thin, even slices.

Hope you enjoy!

Cheers & Hugs,
Jodi

P.S.  Do you see a familiar furry, four-legged friend in the first photo who also loves these sweet potato chips?  (Charlie says “Hi” and wants you to know how good these are!)

Homemade Apple Fritters

Homemade Apple Fritters.

Last Sunday, Hubby had to get up very early – really the middle of the night – to work during a winter weather event in our area.

Missing Sunday breakfast, I wanted to make him a special treat for when he returned home.

With some wonderful Misfits Market apples in the crisper, I thought I’d try my hand at homemade apple fritters.

Who can resist a fresh apple fritter??!!

A couple tips from a first-time apple fritter maker:

  • Don’t heat the oil too hot.  Be patient and use a medium heat.  Better to fry them a little longer and get a golden brown than to overcook the outside and undercook the inside with high heat.  (Which, by the way, is what I did with the first batch of three, resulting in us only having three total!)
  • Spread them a little flatter than I did so you get more icing in each bite as the dough itself only contains a small amount of sugar. (This was hubby’s suggestion!)
  • Use a sweeter, less firm apple for best results.  I would not recommend Granny Smith.  The recipe calls for 3 medium apples, but you could really add another apple, which I will do next time.

Let me know if you try and/or if you have made and have any of your own tips.  We sure enjoyed these on a cold, snowy, comfort food, stay-in kind of day.

Here is the recipe I very slightly adapted from I am Baker‘s blog.

Homemade Apple Fritters

Ingredients:

  • 3 medium apples, peeled, cored, and diced
  • Juice of half a lemon
  • 2 Tbsp. sugar
  • 2 eggs
  • 1 cup all-purpose flour
  • 2 tsp. baking soda
  • 1 tsp. cinnamon
  • 1/2 tsp. salt
  • 1/4 cup milk
  • Canola or Vegetable Oil  for frying
  • Glaze
    • 1 1/2 cups powdered sugar
    • 1/2 tsp. vanilla
    • 4 tsp. water (or enough for best consistency)

Directions:

In a small bowl, drizzle lemon juice over diced apples.  Stir to coat.  Set aside.

In electric mixer, beat sugar and eggs on medium-high speed until combined.  Reduce speed to low, and add flour, baking powder, cinnamon, and salt.  Mix until combined.  Add milk, and mix until incorporated.  Fold in apples with spatula.

Fill a frying pan halfway full with oil.  Heat over medium heat to 375 degrees F.

Drop three 1/4-1/3 cup portions of batter into the oil.  Let fry for a few minutes until golden brown.  Flip and fry until other side is golden brown.  Test for doneness by inserting a small knife in center.  If uncooked batter remains, fry longer.

Remove fritters from oil with slotted spoon to wire rack layered with paper towels or napkins to drain.  Allow to cool.

Repeat with remaining three portions of batter.

Prepare glaze by combining powdered sugar, vanilla, and water.  Drizzle over cooled fritters on cooling rack.  When glaze has set, turn to coat other side with glaze that dripped through, if desired.

Enjoy!

Cheers & Hugs,
Jodi

Easy Dill Pickle Focaccia Bread

Easy Dill Pickle Focaccia Bread.

Calling all bread lovers!

Calling all dill pickle lovers!

Calling all lovers of easy recipes that rock!

My cousin, who I affectionately refer to as “Oh Rob,” recently shared this recipe he made for his pickle-loving grandson.  Oh Rob loves to bake bread, and he loves his grandson even more!  This recipe was a match made in heaven for these two.

The idea really intrigued me and sounded so good. I knew I had to try it.

We are a dill pickle lovin’ family too.

And who doesn’t love bread?!

So I ever so slightly adapted the recipe and made it this past Sunday for dinner to serve along with spaghetti.  We loved it!

Give it a try, and let me know what you think.  Here is how I made it.

Easy Dill Pickle Focaccia Bread

Ingredients:

  • 3/4 cup warm water (105-110°F)
  • 1/4 cup pickle juice, warmed (105-110°F)
  • 2 tsp. granulated sugar
  • 1 (1/4-oz.) envelope active dry yeast
  • 2 3/4 cups all-purpose flour
  • 1 tsp. dried dill weed or 1 Tbsp. chopped fresh dill
  • 1 tsp. salt
  • 1 tsp. coarsely ground black pepper
  • 3 Tbsp. olive oil, divided
  • 1/2 cup Cheddar cheese, grated
  • 2 large dill pickles, sliced or chopped
  • Optional: 1 Tbsp. Maldon Sea Salt Flakes
Directions:

Combine warm water, warm pickle juice, sugar, and yeast in a medium bowl or measuring cup. Let stand 10 minutes.

Whisk together flour, dill, salt, and pepper in a medium bowl. Add pickle juice mixture and 2 tablespoons of the oil; stir until combined and dough begins to pull away from sides of bowl. Turn dough out onto a lightly floured surface, and knead until smooth and stretchy.

Drizzle 1 teaspoon of the oil in the bowl to coat; add dough, and turn to coat. Cover with towel, and let stand in a warm place until dough has doubled in size.

Preheat oven to 425°F.  Punch down dough. Place on a lightly oiled 18- x 13-inch rimmed baking stone sheet. Press and stretch dough to edges of baking sheet. Cover with towel, and let stand in a warm place 15 minutes.

Using the end of a wooden spoon, make indentions evenly over dough. Top evenly with cheese and pickles.  Bake until lightly golden and cooked through,  approximately 20 minutes.

Sprinkle top with sea salt flakes, if desired. 

Enjoy!

Cheers & Hugs,
Jodi

PS  I will be taking a holiday blogging break until after Christmas and the New Year.  Wishing you all the joy of this festive season!

Fancy Sprinkles

Fancy Sprinkles.

I’ve mentioned before...  I kinda have a “thing” for sprinkles.

Well… what a SWEET surprise I came home to yesterday after an especially long day at the office to find a glittery, sparkly package in the mail pile with a sweet note from my bestie!

She has a knack for always knowing the right timing and just the right thing!

I’ve recently had a couple cookie fails in my attempts to try “something new” for Christmas cookies.

UGH!

Yep – happens to all of us I guess.

One was with a “best ever” sugar cookie recipe a baking blogger claimed to have refined after many attempts to create the absolute best.

Well…. NOT!  At least for me.  I knew when I made the dough, it wasn’t right….

Take it from someone who bakes cookies almost every week.  You get a “feel” for it.

I told hubby the dough felt dry, and I didn’t think they were going to turn out.

I baked a batch, and yep…. DRY!  (Though hubby didn’t seem to mind spreading jam on them like biscuits and enjoying them.

For some reason, I just can’t seem to make sugar cut-out cookies.  Anybody else have a “best ever” recipe I should try?

So even though it was late, I just couldn’t resist whipping up a batch of Sprinkle Cookies from a recipe I knew was yummy with these special Fancy Sprinkles.

I made one batch with the beautiful blue and white “Frostbite” sprinkles that had  hearts and stars and pearls and blue metallic balls and another batch with the adorable red, brown, and white “Peppermint Hot Chocolate” sprinkles – complete with tiny gingerbread men and mini marshmallows!

And, ironically, earlier in the day, a coworker and I laughed about the love her 6-year old son has for sprinkles and how he chose the “sprinkliest” cake he could find for his “second” birthday cake this year.

If you’d like my recipe for Sprinkle Cookies, just click here.  They are fun and festive and delicious!  I added just a smidge less flour to this batch and flattened the dough balls just a bit before baking to make this batch a little chewier.   I like how they turned out.  You can always adjust the amount of flour a bit to make your cookies flatter or thicker.

Thanks for sprinkling me with your friendship and love, Jill!

Happy holiday baking friends!

Cheers & Hugs,
Jodi

Pecan Pie Thumbprint Cookies

Pecan Pie Thumbprint Cookies.

It’s December, and that means time to start Christmas cookie baking!

These cookies are a wonderful version of pecan pie in a cookie!

They are similar to Pecan Tassies, but a lot easier.

The cookie is buttery and shortbread-like, while the filling is nutty and sticky and sweet and AMAZING!

I had a little bit of extra filling left that I just couldn’t throw away, so I spread it on a sheet of crescent roll dough, rolled it up, and sliced it into 8 easier-than-pie pecan “sticky buns!”

So
worth
it!

Hope you will give these yummy cookies a try for something new on your Christmas cookie baking list.  I do believe these will become a regular in our home!

Here is the recipe I found at  Crazy for Crust, which I only slightly altered.  Thanks for a great recipe, Dorothy!

Pecan Pie Thumbprint Cookies

Ingredients:

Cookie Batter:

  • 2 cups brown sugar
  • 1 1/2 cups butter, softened
  • 2 eggs
  • 2 tsp. vanilla
  • 4 cups flour
  • 2 tsp. baking powder
  • 1/2 tsp. salt

Pecan Pie Filling:

  • 2 cups pecans, chopped
  • 1/2 tsp. coarse or flaked salt
  • 1 cup brown sugar
  • 4-5 Tbsp. Half and Half or Heavy Cream
  • 2 tsp. vanilla

Optional:  Powdered sugar for sprinkling on top of cooled cookies.

Preheat oven to 350 degrees F.

Beat brown sugar, butter, egg, and vanilla in electric mixer until creamy.   Add in baking powder, salt, and flour, and mix on low speed until well combined.

Shape dough, two tablespoons at a time, into balls, and place the balls two inches apart on a baking stone or cookie sheet.  Indent a hole in center with your thumb.

Prepare filling by stirring pecans, salt, brown sugar, and vanilla with cream until it forms a thick mixture.  Spoon approximately one teaspoonful into thumb indentation of each cookie.

Bake for 10-12 minutes.  Cool for 5 minutes on stone or cookie sheet before removing to rack to cool completely.

Sprinkle with powdered sugar if desired.

Cookies freeze well for up to a month.

Enjoy!

Cheers & Hugs,
Jodi