Easy Dill Pickle Focaccia Bread

Easy Dill Pickle Focaccia Bread.

Calling all bread lovers!

Calling all dill pickle lovers!

Calling all lovers of easy recipes that rock!

My cousin, who I affectionately refer to as “Oh Rob,” recently shared this recipe he made for his pickle-loving grandson.  Oh Rob loves to bake bread, and he loves his grandson even more!  This recipe was a match made in heaven for these two.

The idea really intrigued me and sounded so good. I knew I had to try it.

We are a dill pickle lovin’ family too.

And who doesn’t love bread?!

So I ever so slightly adapted the recipe and made it this past Sunday for dinner to serve along with spaghetti.  We loved it!

Give it a try, and let me know what you think.  Here is how I made it.

Easy Dill Pickle Focaccia Bread

Ingredients:

  • 3/4 cup warm water (105-110°F)
  • 1/4 cup pickle juice, warmed (105-110°F)
  • 2 tsp. granulated sugar
  • 1 (1/4-oz.) envelope active dry yeast
  • 2 3/4 cups all-purpose flour
  • 1 tsp. dried dill weed or 1 Tbsp. chopped fresh dill
  • 1 tsp. salt
  • 1 tsp. coarsely ground black pepper
  • 3 Tbsp. olive oil, divided
  • 1/2 cup Cheddar cheese, grated
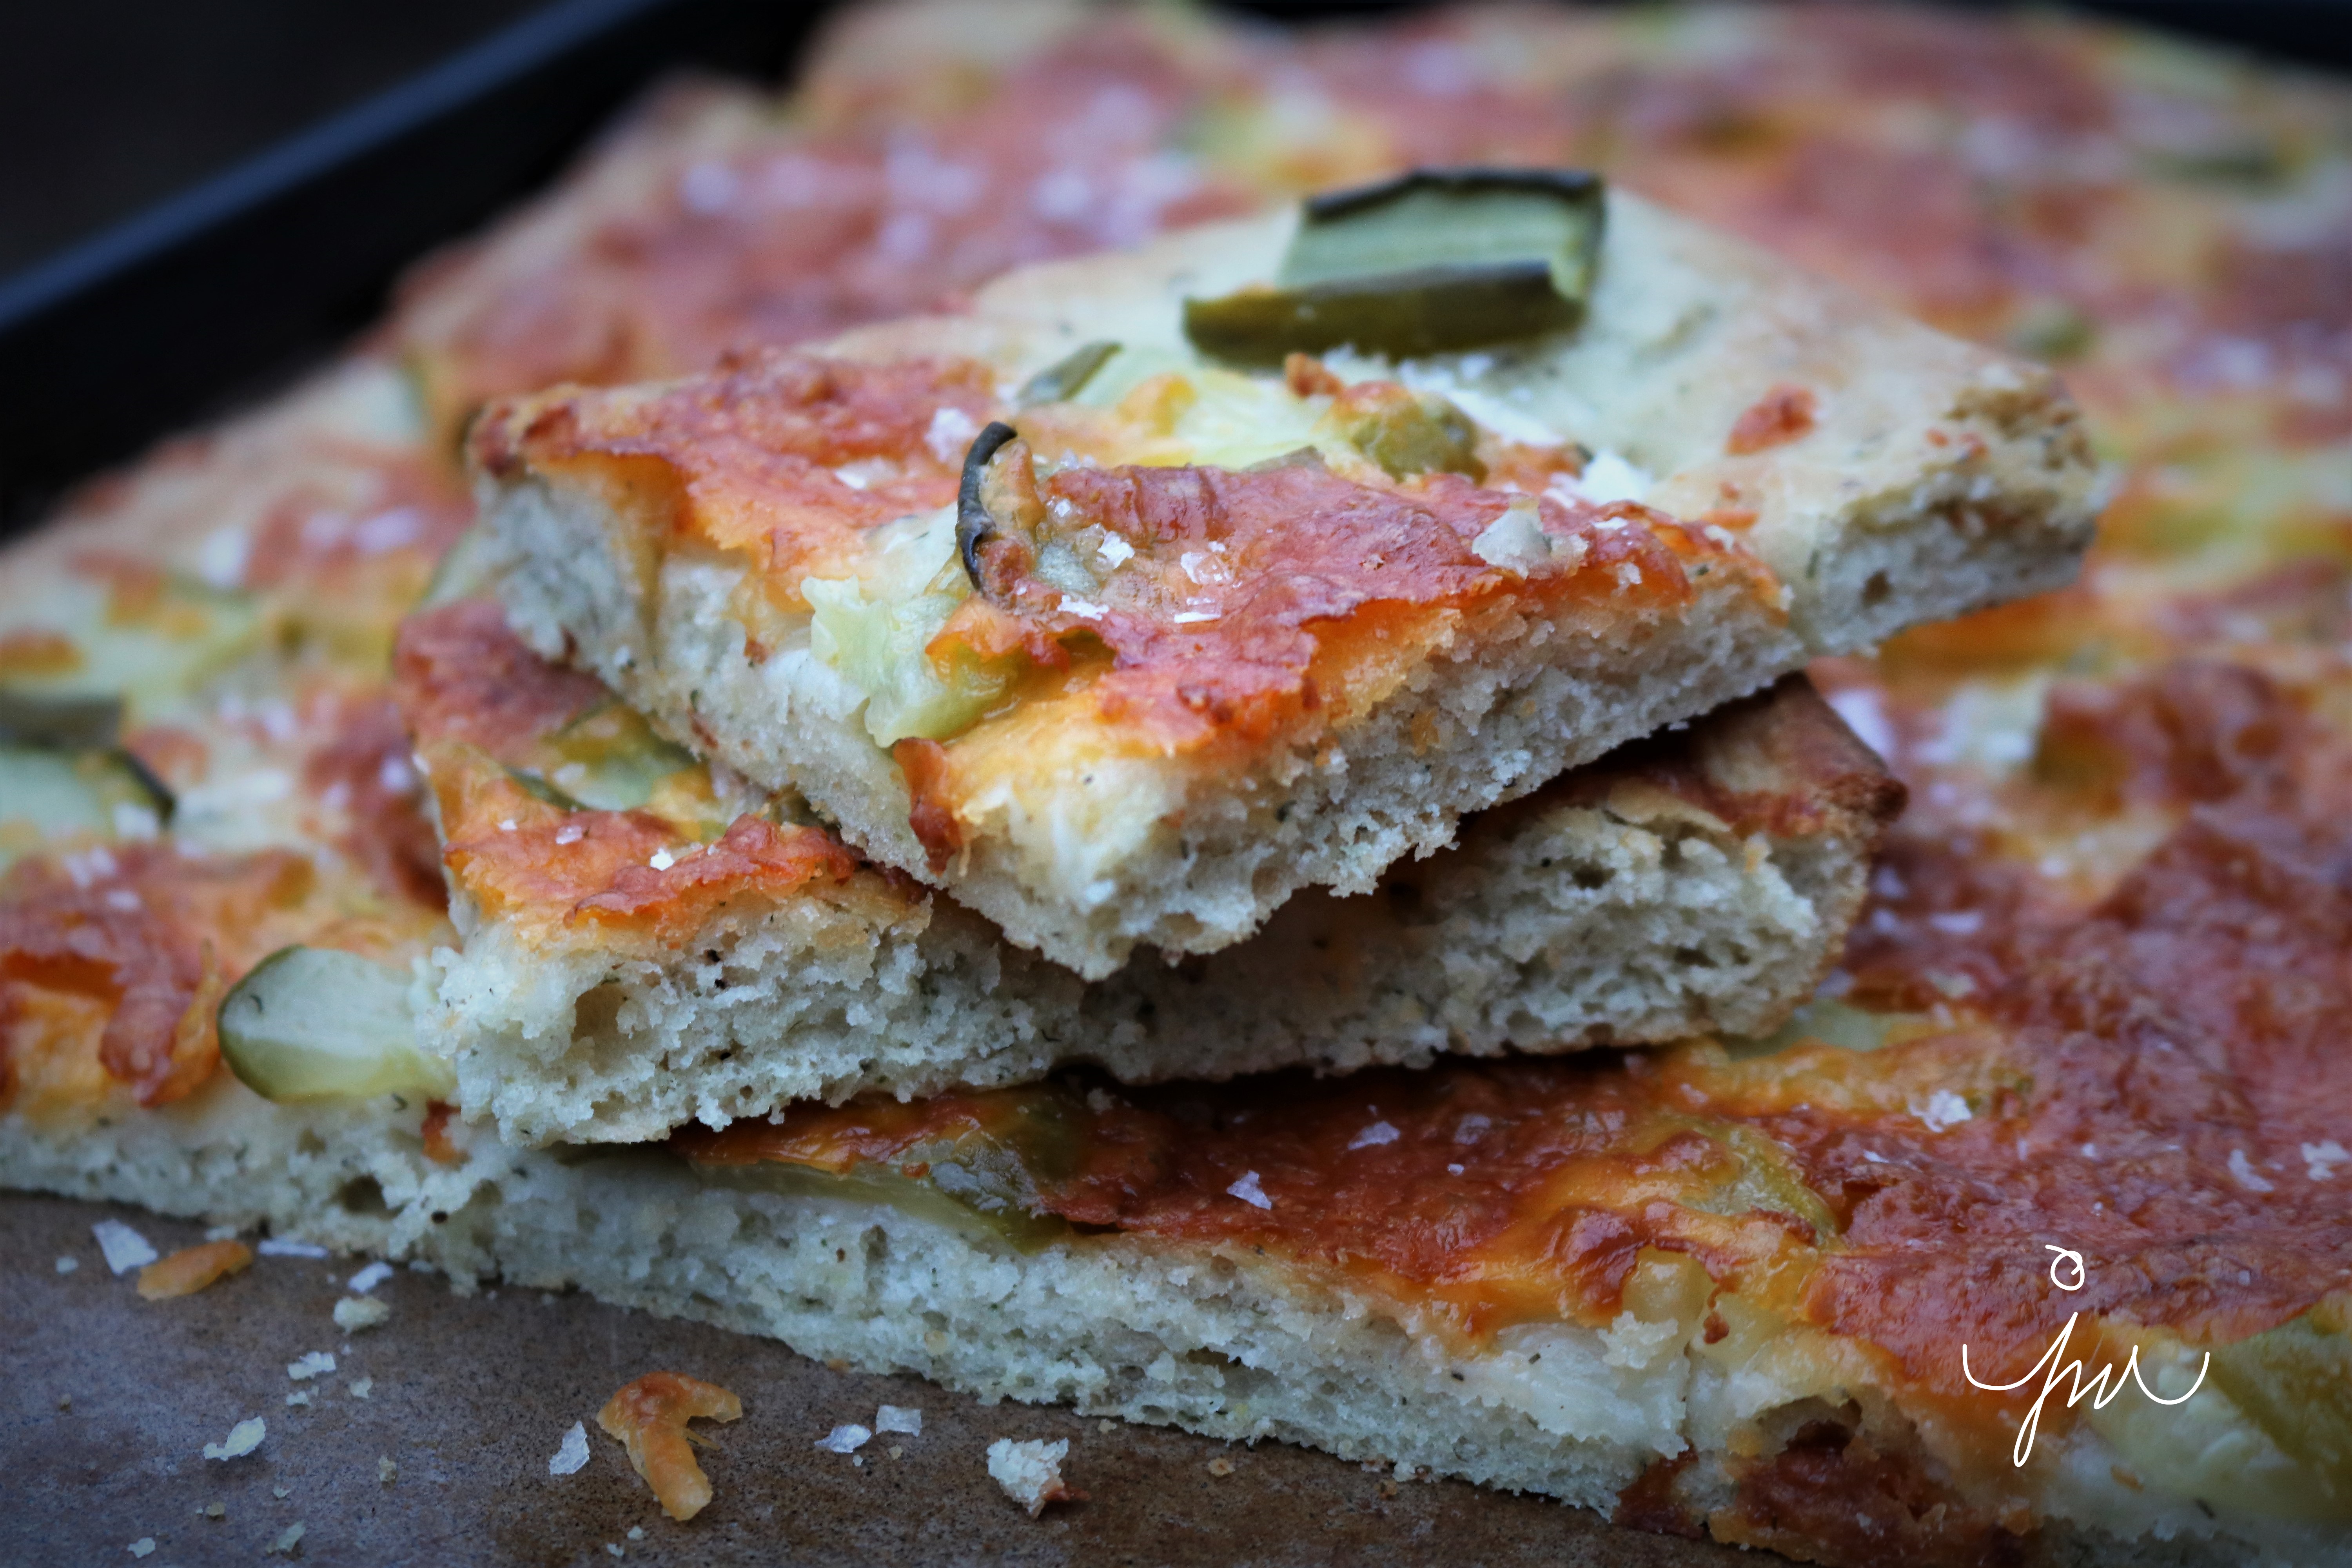
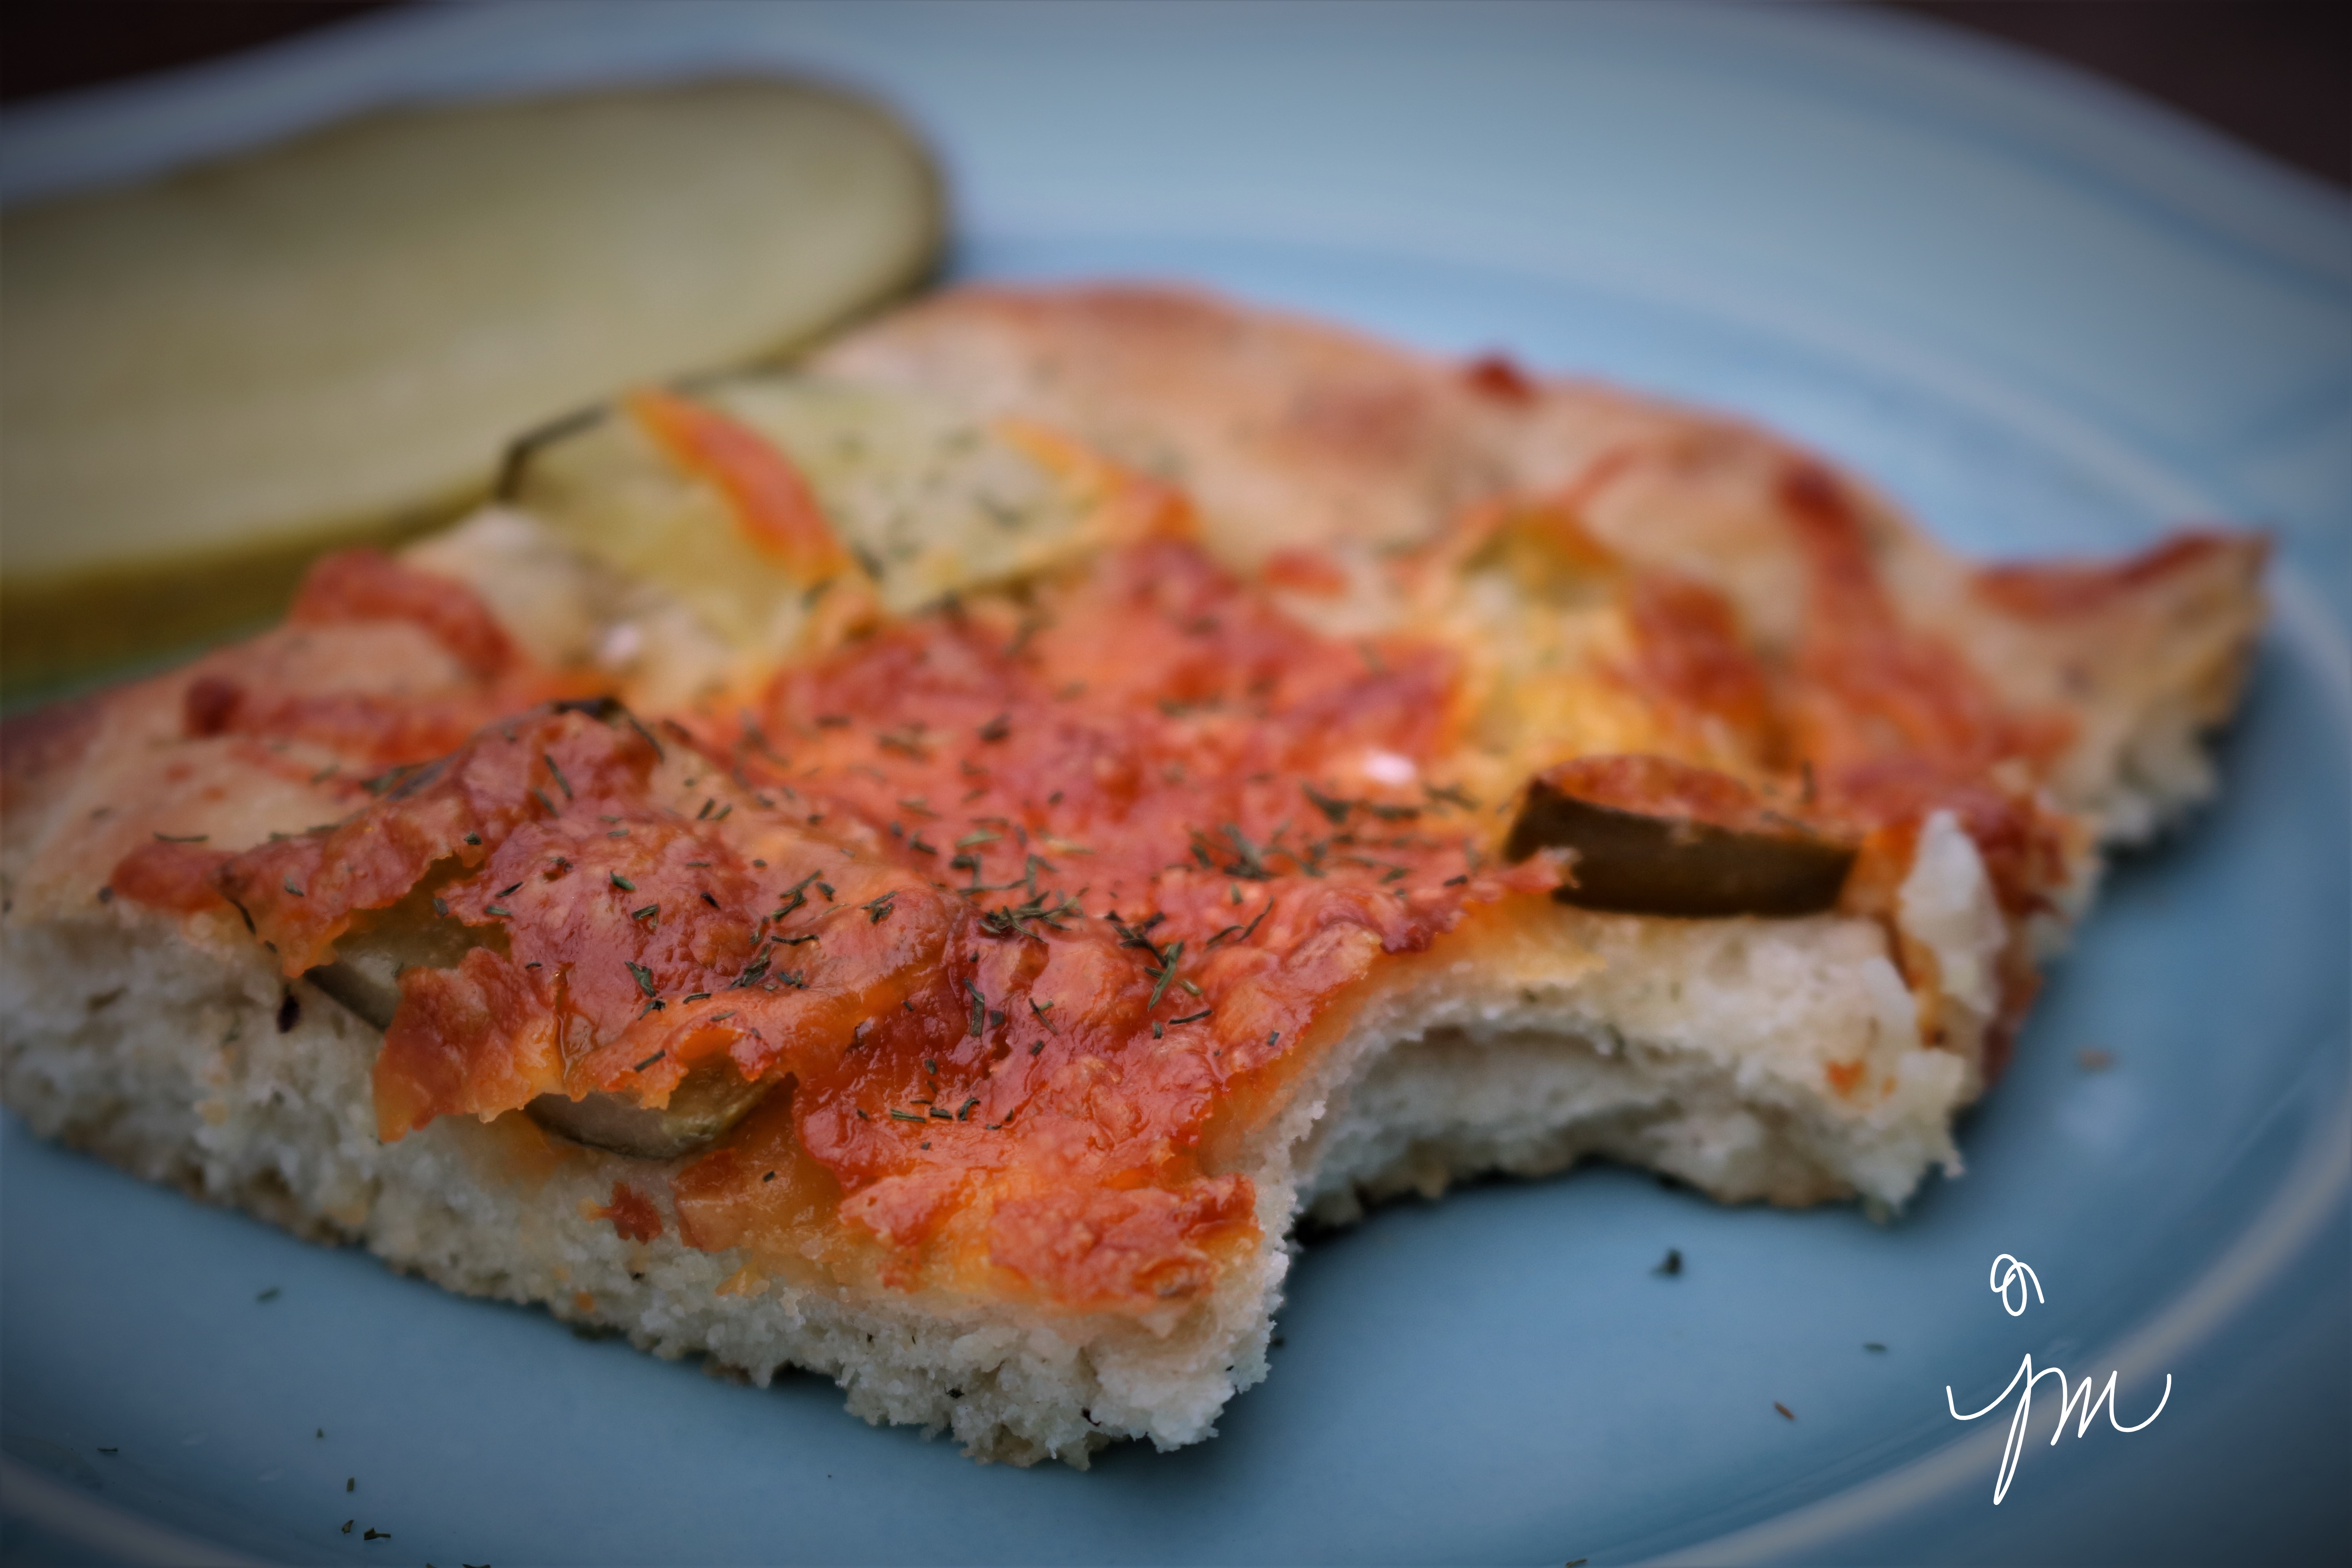
  • 2 large dill pickles, sliced or chopped
  • Optional: 1 Tbsp. Maldon Sea Salt Flakes
Directions:

Combine warm water, warm pickle juice, sugar, and yeast in a medium bowl or measuring cup. Let stand 10 minutes.

Whisk together flour, dill, salt, and pepper in a medium bowl. Add pickle juice mixture and 2 tablespoons of the oil; stir until combined and dough begins to pull away from sides of bowl. Turn dough out onto a lightly floured surface, and knead until smooth and stretchy.

Drizzle 1 teaspoon of the oil in the bowl to coat; add dough, and turn to coat. Cover with towel, and let stand in a warm place until dough has doubled in size.

Preheat oven to 425°F.  Punch down dough. Place on a lightly oiled 18- x 13-inch rimmed baking stone sheet. Press and stretch dough to edges of baking sheet. Cover with towel, and let stand in a warm place 15 minutes.

Using the end of a wooden spoon, make indentions evenly over dough. Top evenly with cheese and pickles.  Bake until lightly golden and cooked through,  approximately 20 minutes.

Sprinkle top with sea salt flakes, if desired. 

Enjoy!

Cheers & Hugs,
Jodi

PS  I will be taking a holiday blogging break until after Christmas and the New Year.  Wishing you all the joy of this festive season!

Gluten-Free (Flourless) Banana Oatmeal Bread

Gluten-Free (Flourless) Banana Oatmeal Bread.

When you have a bunch of bananas that ripen before you eat them – and you know nobody will eat them – they are perfect for baking.

I have a really yummy banana bread recipe, but it is not the “healthiest.”  I decided I wanted to make something with less (or no) sugar, and maybe no flour either.

I was excited when I found this super-easy and oh so yummy recipe at The Baker Mama.

It’s been very hot here, so I baked this early on a Sunday morning.  I made one loaf for my youngest son and his wife (my son loves banana bread and my daughter-in-law likes to eat healthy and gluten-free if possible) and one loaf for hubby and me.

My son mentioned that if I added some protein powder to the recipe, it would be the perfect breakfast.  I will have to try that next time.

But how simple is this recipe with five healthy, wholesome ingredients?!

Hope you will give it a try.

Gluten Free Banana Oatmeal Bread

Ingredients:

3 ripe bananas
2 cups old-fashioned rolled oats
2  eggs
¼ cup pure maple syrup
1 tsp baking soda

Directions:

Preheat oven to 350°F. Lightly grease 9×5-inch loaf pan with non-stick cooking spray.

Combine all ingredients in a food processor or blender and blend until smooth and well combined. Pour into prepared loaf pan.
Garnish the top of the batter with thinly sliced bananas or pecans or walnuts, if desired).

Bake for 25-30 minutes or until a toothpick inserted in the center comes out clean.  Do not overbake or bread will be dry tasting.

Let loaf cool completely in pan. Store in a Ziploc bag in the refrigerator,

Enjoy!

Cheers & Hugs,
Jodi

Lemon Lavender Loaf

Lemon Lavender Loaf.

Fresh, bright, tart lemon zest and juice mixed with sweet, flowery, fragrant dried lavender buds in a beautifully glazed loaf.

I couldn’t decide if this should be considered a bread or a cake, so I am simply calling it loaf.     Plus I love the alliteration of a name where all the words start with the same Lovely Letter!

A dear friend gifted me a bag of dried lavender recently, and I have been dying to use it.  I finally found some time early Sunday morning to bake this beautiful loaf to enjoy on a beautiful Spring day.

It is light and soft and such a perfect Springtime treat.

Here is how I made it.

Lemon Lavender Loaf*

Ingredients:

  • 1 cup (2 sticks) salted butter, softened
  • 2 cups white sugar
  • 3 cups all purpose flour
  • 4 large eggs
  • 1 cup buttermilk (or use 1 cup milk with 1 Tbsp white vinegar let set 5 min)
  • 1/2 tsp salt
  • 1 tsp baking soda
  • 1 large lemon, zested and juiced
  • 1 Tbsp dried lavender buds
  • Glaze:
    • 1 cup powdered sugar
    • 1 Tbsp milk
    • 1 large lemon, zested and juiced
    • 1/2 tsp dried lavender buds

Directions:

Prepare two loaf pans with shortening and flour.  Preheat oven to 325 degrees F.

Cream butter and sugar in electric mixer until light and fluffy.  Add eggs one at a time, and continue mixing until mixture looks like buttercream frosting.

Gently mix in salt and baking soda.

Add lemon zest and juice to buttermilk, and set aside.

To batter, alternate adding flour and lemon buttermilk in three additions, and mix just until incorporated.  Stir in lavender.

Pour into prepared pans and bake approximately 45 minutes until toothpick inserted in center comes out clean.  Cool loaves 10 minutes in pans.  Remove and cool completely.

Once cool, prepare glaze by mixing powdered sugar, milk, lemon zest and juice, and lavender.  Pour over loaves.

Enjoy!

Cheers & Hugs,
Jodi

*Original recipe slightly adapted from FudgeRipple

Peanut Butter Banana Bread with Chocolate Chips

peanut-butter-banana-bread-with-chocolate-chips

Peanut Butter Banana Bread with Chocolate Chips.

I had a few bananas hanging out that were getting very ripe, so I decided to make a loaf of banana bread yesterday morning.

Instead of making my usual, I wanted to try something different.  Knowing how yummy peanut butter toast is with sliced bananas (right??!!), I thought peanut butter would be a wonderful addition to banana bread.  And while I was at it, why not throw in a few chocolate chips?!

peanut-butter-banana-bread-with-chocolate-chips-2

Thinking I was a genius for coming up with this idea, I searched online just in case.  Well of course others had tried this combo!  (Where have I been?!) I found a few different versions, so I took what I liked from them and adapted to come up with this one below.  It was delish!  The peanut butter is subtle, but adds a wonderful new twist.  This bread is SUPER moist and really wonderful warm out of the oven.

Hope you’ll give this twist on banana bread a try!

Peanut Butter Banana Bread with Chocolate Chips

Ingredientspeanut-butter-banana-bread-with-chocolate-chips

  • 4 medium ripe bananas, mashed
  • 1/2 cup creamy peanut butter
  • 1/2 cup sugar
  • 1/2 cup brown sugar
  • 1/3 cup buttermilk (I make by mixing milk and a dash of vinegar)
  • 1/4 cup vegetable oil
  • 2 eggs
  • 2 tsp vanilla extract
  • 1 tsp baking soda
  • 1/4 tsp salt
  • 2 1/4 cups all-purpose flour
  • 1 cup semi-sweet chocolate chips or chunks

Directions:

Preheat oven to 350 degrees F.  Grease or spray a large bread loaf pan (of course I use a stoneware bread pan), then line with parchment paper allowing it to hang over the edges for easier removal.

In a large bowl, combine first 8 ingredients.  Mix well.  Add baking soda, salt, and flour.  Mix until combined.  Gently fold in chocolate chips reserving a handful to sprinkle on top. of batter.

Pour batter into prepared pan.  Bake approximately one hour or until toothpick inserted in center comes out clean.   If the bread starts getting too brown, place a tent of foil over top at around 45 minutes.

Cool in pan for 10 minutes, then lift out by grabbing parchment paper.  Cool on wire rack.  

Enjoy!

Cheers & Hugs,
Jodi

Five-Minute Homemade Rustic Artisan Bread

bread-5-minute-rustic-artisan-bread

Five-Minute Homemade Rustic Artisan Bread.

Aren’t these loaves beautiful?!  I recently found this recipe that makes homemade bread so easy!

bread-5-minute-rustic-artisan-bread-2

You can mix this dough together in five minutes.  Then it just needs to rest for two hours while you go about doing something… anything else.  After that, throw it in the fridge – for up to 14 days!  Whenever you want a fresh loaf of bread, grab a hunk of dough, and bake it.  Super simple, super delicious!

bread-5-minute-rustic-artisan-bread-3

So… disclaimer… you obviously can’t make it from start to finish in five minutes, but that really is all the longer the dough takes to mix together, and there is no kneading, so it really is a simple way to make warm, fresh, delicious homemade bread quickly and easily with just a few simple staple ingredients!

Five-Minute Homemade Rustic Artisan Bread

  • Servings: 4 1 lb loaves
  • Print

Ingredients:bread-5-minute-rustic-artisan-bread

  • 3 cups lukewarm water (approx. 100 degrees F)
  • 1 Tbsp active dry yeast
  • 1 1/2 Tbsp coarse salt (I love using Maldon Sea Salt Flakes)
  • 6 1/2 cups flour

Directions:

Pour water in large bowl.  Sprinkle with yeast and salt, and mix until dissolved.  Add flour all at once, and mix until completely incorporated.  That’s it!  Five minutes.  No kneading.

Place a clean kitchen towel over the bowl and let it sit for two hours.

After two hours, cover bowl with saran wrap (but not too tight as it needs a little vent for gases to escape), and throw it in the fridge.

Your dough is ready to use at anytime in the next 14 days.

When you are ready to bake a loaf, preheat oven to 450 degrees F.  Grab a hunk of dough with floured hands.  Do not punch it down, and do not knead or overwork it.  Gently shape as desired into a ball, loaf, rolls – whatever you like.  Place on a baking stone. (I bake absolutely EVERYthing on baking stones – cookies, bread, roasted vegetables, meatloaf, french fries – they are all I use in the oven – and the results are awesome!) You can let it rest for 30-40 minutes or bake right away – depending on the density you desire.  Dust top of dough with flour (and salt if desired).  Slash a few cuts in the dough with a serrated knife.

Place an empty metal broiler pan on bottom rack of oven and fill with warm water right before placing dough in oven.

Bake for 20-30 minutes until the crust is a rich brown color and firm to the touch.  Remove from oven and cool on wire rack.

Enjoy!

Cheers & Hugs,
Jodi

*original recipe found at Leite’s Culinara

Grandma’s Old-Fashioned Apricot Nut Bread

grandmas-apricot-nut-bread-2

For those of you that have been following my blog for a while, you may recall this recipe.

It is worth repeating – at least for me.

Let me share what I wrote in my post two years ago when I first shared this recipe that is one of my ALL-TIME favorites.

grandmas-apricot-nut-bread-1

December 15, 2014:

One of my favorite things to bake (and eat) for the holidays is my Grandma’s Old-Fashioned Apricot Nut Bread.

For me, it is like spending a little time with Grandma – even though she’s been gone for 20 years now.  The smells that fill the house… using her recipe card – complete with stains from baking episodes past… using her old tin measuring cup, snipping apricots, chopping nuts…  To me, the holidays aren’t truly here until I make Grandma’s Apricot Nut Bread and spend a little time with her through this ritual.

When I was young, I spent Christmas vacations (and every other moment I could) with Grandma.  We spent a lot of our time together in the kitchen.  While we were cooking or baking, Grandma would tell me stories about her childhood.  It was sadly a pretty short one, because she had to become Mama to her baby brothers at only 9 years old when her mom died at a devastatingly early age.  We would talk about her early married life with outhouses, coal furnaces, and washboards.  And some of my favorite stories, especially when I was young, were the ones she would tell about me when I was a baby and how she danced in the hospital hallway with the doctor after I was born and how she fed me her homemade chicken soup on my first day home.

We laughed while we worked, and I never felt so loved.

One of the things Grandma made every year was Apricot Nut Bread.  Growing up, it really wasn’t my favorite.  I much preferred the lady locks or nut horns or nut roll – even the chocolate chip cookies.  This bread is not overly sweet.  It is not overly moist.  But as an adult, it has become my absolute favorite.  A slice with a swirl of creamy salted butter or a schmear of rich cream cheese and a cup of coffee might just be my favorite way to start the day.

This weekend, I once again made my annual batch of Grandma’s Old-Fashioned Apricot Nut Bread.  I can  only hope for cherished times like this to share with my granddaughter some day.

grandmas-apricot-nut-bread-loaves

Here’s the recipe if you’d like to try.  May it bring you as much joy as it does me.

Grandma’s Old-Fashioned Apricot Nut Bread

  • Servings: 2 medium or 1 large and 1 small loaf
  • Print

Ingredients:

  • 1 cup dried apricots, chopped
  • 1 cup boiling water
  • 2 eggs
  • 1 cup sugar
  • 2-3/4 c. flour
  • 3 tsp baking powder
  • 1 tsp salt
  • 1/2 tsp baking soda
  • 1 cup chopped walnuts

Mix together 1 cup chopped apricots and 1 cup boiling water.  Let stand until the rest of the ingredients are ready.

In larger mixer bowl, beat two eggs and gradually add 1 cup of sugar.

In a third large bowl, stir together flour, baking powder salt and baking soda.

Add the first two mixtures to the dry ingredients – alternating as you incorporate.  Fold in chopped nuts.

Bake one large loaf at 375 degrees F for approximately 40 minutes, then 350 degrees F for 20 additional minutes, or until toothpick inserted comes out clean.

For smaller loaves, bake at 350 degrees for 40-50 minutes.

P.S. I typically quadruple the recipe, and I get 8 mini loaves and 1 large loaf.  We eat the large loaf (right away!) and I give away the mini loaves.

Cheers & Holiday Baking Hugs,
Jodi

Pumpkin Banana Chocolate Chip Bread

pumpkin-banana-chocolate-chip-bread-1

What do you do when you have over-ripe bananas and a half of a can of leftover pumpkin puree (from making Chewy Pumpkin Cinnamon Chip Cookies – which Hubby has officially declared his current all-time favorite cookie!)?

pumpkin-banana-chocolate-chip-bread-2

Well – you make wonderfully sweet and delightful Pumpkin Banana Chocolate Chip Bread of course!

Have you ever thought of combining pumpkin and bananas in a yummy sweet bread?

Wowza!  Pure blissful deliciousness!

pumpkin-banana-chocolate-chip-bread-3

If you are looking for a lovely Autumn sweet bread to enjoy with your morning coffee, afternoon tea, or to curb your after-dinner sweet tooth, look no further.  And how fun is it to make four mini loaves instead of one big loaf so you can keep one (or two) and share the others as sweet surprises for friends or loved ones!  To me, that is more than half the joy in baking…. creating something I can share to make someone smile and brighten their day and tantalize their tummy.

Make this bread to share as a Thanksgiving hostess gift or guest’s sweet surprise.  Or just make it to enjoy!  I’m betting you will!  Warm from the oven, a slice with some melting salty butter is just about heavenly!

Pumpkin Banana Chocolate Chip Bread

  • Servings: 4 mini loaves
  • Print

Ingredients:pumpkin-banana-chocolate-chip-bread-1

  • 3/4 cup softened butter
  • 1 1/2 cups firmly packed brown sugar
  • 3 eggs
  • 1 1/4 cups pumpkin puree
  • 3 mashed ripe bananas
  • 2 tsp baking soda
  • 1/2 tsp baking powder
  • 1 1/2 tsp cinnamon
  • 1/2 tsp salt
  • 3 cups all purpose flour
  • 1 1/4 cups chocolate chips

Directions:

Preheat oven to 350 degrees F.

Cream butter and brown sugar with electric mixer on high approximately 2 minutes.  Add eggs and continue mixing until light and fluffy – 1-2 more minutes.  Add pumpkin and mashed bananas.  Mix well.

Add dry ingredients:  baking soda and powder, cinnamon, salt, and flour, and beat just until blended.   Remove from mixer.

Stir in 1 cup of chocolate chips with wooden spoon or spatula.

Pour into 4 greased mini loaf pans.  Sprinkle tops with remaining 1/4 cup chocolate chips.

Bake for 40 mins or until toothpick inserted comes out clean.

Cool 10 minutes in pans and then remove loaves to cooling rack to completely cool.

Cheers & Hugs,
Jodi

Jewish Apple Cake (Bread)

jewish-apple-cake-3

What better smell is there in Autumn than cinnamon and apples baking up in yummy cakes and pies and breads?

This recipe for Jewish Apple Cake is one I got from my BFF Jill, who doesn’t necessarily love to bake or cook, but when she does, she has some amazing recipes.  This is one of them.  The first time I tasted it, I had to have the recipe, and now I make it more than her.

In fact, she texted me yesterday morning, and I said, “Guess what I just took out of the oven?”  She mentioned she hasn’t made it in “forever.”  (That might be why she is thin, and I’m – well  – Not!)

jewish-apple-cake-1

I’m not sure why this is called “Jewish” Apple Cake, so I did a little Wiki research (and I’m going to look forward to hearing what my BFF Bubby has to say.)

Per Wikipedia:  Jewish apple cake is a kind of dense cake made with apples and sold mostly in Pennsylvania in the United States. It has limited known connections to Jewish cuisine. It is thought that this cake is actually a Pennsylvania Dutch culinary item that was erroneously attributed to Jews because it seemed “old world.”  It may also be considered Jewish because it contains no dairy, and it may therefore be eaten with meals containing meat, in accordance with Jewish laws of kashrut.

jewish-apple-cake-2

Seems most people make this in a bundt cake or springform cake pan, but Jill always made it in loaves of bread, so that is the way I do too!

Besides… when you do, you can keep one, and give two away… which is exactly what I plan on doing.

jewish-apple-cake-4

This cake/bread tastes delicious with coffee or tea for breakfast or a snack or dessert.  It is not too sweet, but cinnamony, and apply, and nutty enough to rock your world!

Hope you’ll give it a try.  Let me know if you do.

Jewish Apple Cake (Bread)

Ingredients:jewish-apple-cake-3

  • 4-5 pared apples, sliced thin (I used Honeycrisps)
  • 1 cup chopped walnuts
  • 2 1/2 cup sugar
  • 2 tsp. cinnamon
  • 4 eggs, beaten
  • 2 1/2 tsp vanilla
  • 1/2 cup orange juice
  • 1 cup oil
  • 3 cups flour
  • 2 tsp baking powder

Directions:

Preheat oven to 350 degrees F.  Grease and flour 3 bread loaf pans (approx. 8″x4″).

Mix together, apples, walnuts, 1/2 cup sugar, and cinnamon.  Set aside for sugar and cinnamon to soak into the apples and nuts.

Whisk together 2 cups sugar, eggs, vanilla, orange juice, and oil.  Add baking powder and flour, and stir just until batter is incorporated.

Alternate layering:  batter, apples, batter, apples, batter.

Bake 45 minutes or until toothpick inserted comes out clean.  Cool  in pan 10-15 mins.  Remove from pans and cool on wire rack.

Sprinkle with powdered sugar if desired.  Store in airtight bag.  Freezes well.

Enjoy!

Cheers & Hugs,
Jodi

Fresh Red Raspberry Chocolate Chunk Bread

Fresh Red Raspberry Chocolate Chunk Bread

I obviously cannot get enough of the red raspberry and semi-sweet chocolate combination as evidenced by today’s AMAZING recipe – Fresh Red Raspberry & Chocolate Chunk Bread.

You may recall my “almost-famous” Fresh Red Raspberry and Chocolate Chunk Cookies.  If you haven’t tried these – you seriously do not know what you are missing.

I’ve also shared my recipe for Chocolate Chunk and Fresh Red Raspberry Muffins – TO DIE FOR!  And the outrageously extraordinary Chocolate and Raspberry Custard in a Jar that I copy-catted from Firebird’s Wood Fired Grill Restaurant for my son, Nick’s birthday recently.

But I must say – this bread is rocking my world right now.  I could not believe how awesome it turned out.  It is pretty much just like the cookies, but in the form of bread (which means you can more easily justify eating it for breakfast – if not any other time of the day!)

Fresh Red Raspberry Chocolate Chunk Bread 2

I sliced the end off for the photo thinking I would take a little taste to make sure it is edible and then just toss that tough old crusty end to avoid the calories – but…  I just couldn’t do it.  Even the crusty end was delicious beyond words!

Fresh Red Raspberry Chocolate Chunk Bread 3

I’m telling you friends – you really want to try this one!

For yourself – for the people you love – and for those that you want to love you!

I can’t wait to hear what you think.

Get baking!

Fresh Red Raspberry Chocolate Chunk Bread

Ingredients:Fresh Red Raspberry Chocolate Chunk Bread

2 cups plus 2 tablespoons all-purpose flour
3/4 cup light brown sugar, packed
1/4 cup granulated sugar
1 teaspoon baking soda
pinch of salt (6 shakes!)
1/4 cup butter, melted
1 large egg
3/4 cup buttermilk (to make easy buttermilk – mix 1 Tbsp vinegar with 1 cup milk and let set 5 min)
1/4 cup canola or vegetable oil
2 teaspoons vanilla extract
2 cups fresh red raspberries
2 tablespoons all-purpose flour
3/4 cup semi-sweet chocolate chunks or chips (I used Nestle Chunks)

Directions:

Preheat oven to 350F. Spray one 9×5-inch loaf pan with floured cooking spray, or grease and flour the pan; set aside.

In a large bowl, add flour, sugars, baking soda, salt, and whisk to combine; set aside.

In a medium microwave-safe bowl, melt butter about 45 seconds on high power. To the butter, add the egg, buttermilk, oil, vanilla, and whisk to combine.

Pour wet ingredients into dry and stir until just combined.  Do not over mix or dough will be “tough.” It is ok if batter is lumpy.

In a medium bowl, add the raspberries and 2 tablespoons flour.  Toss lightly to combine Coating the berries in flour helps to reduce their sinking while baking.

Add the raspberries to the batter and fold very lightly to combine.  Gently fold in chocolate chunks.

Pour batter into prepared pan and bake for approximately 1 hour.  You may want to cover halfway through with tented foil to prevent top from becoming too brown.  I did.

Allow bread to cool in pan for about 15 minutes before turning out on a wire rack to cool completely before slicing and serving.

*Original Recipe Found and Slightly Adapted from Averie Cooks

Enjoy!

Cheers & Hugs,
Jodi

Fresh Orange Date Walnut Bread

Orange Date Walnut Bread 3

I was looking for something new to try baking early yesterday morning before I settled into work for the day.

It was a cool, rainy day after a wonderful stretch of warmth and sunshine.  I was in the mood for a nut bread, but after traveling most of the week, I didn’t have a lot of fresh ingredients on hand.

Orange Date Walnut Bread 1

I found a bag of dates, but I wanted to “Springify” a date and nut bread recipe up a bit, so I thought fresh orange flavor might just do the trick.  Adding a bit of freshly squeezed orange juice and fresh orange zest was just the ticket to brighten up this lovely bread.

Orange Date Walnut Bread 2

It’s nice to have something like this on hand for a quick breakfast with coffee, a nice little treat for a guest or a late night or after dinner urge for something just a bit sweet, but not too.

I’m sure this would freeze well and be great to pull out when needed.

Hope you enjoy your weekend!

May it be bright and fresh and Springy, but a little nutty too!

Fresh Orange Date Walnut Bread

Ingredients:Orange Date Walnut Bread 3

3/4 cup sugar
1/2 cup butter, softened
1/2 cup sour cream
1/3 cup fresh orange juice
1 Tbsp freshly grated orange zest
2 eggs
1  3/4 cups all-purpose flour
3/4 tsp baking powder
 3/4 tsp baking soda
1 cup chopped dates
1 cup chopped walnuts


Directions:

Preheat oven to 350°F. Grease bottom only of 9×5-inch loaf pan. Set aside.

Beat sugar and butter at medium speed with mixer, scraping bowl often, until creamy. Add sour cream, orange juice, orange zest and eggs; continue beating until well mixed. Add flour, baking powder and baking soda; beat at low speed until well mixed. Gently stir in dates and walnuts.

Pour into prepared pan. Bake 45 minutes or until toothpick inserted in center comes out clean. Let stand 10 minutes; remove from pan. Cool completely.

*Adapted from LandoLakes Recipe

Cheers & Hugs,
Jodi