Limes Smile.
Did you know if you rearrange the letters in “limes,” you get “smile?”
Hope this watercolor painting of limes brings you smiles!
Happy #WorldWatercolorMonth!
Cheers & Hugs,
Jodi
Limes Smile.
Did you know if you rearrange the letters in “limes,” you get “smile?”
Hope this watercolor painting of limes brings you smiles!
Happy #WorldWatercolorMonth!
Cheers & Hugs,
Jodi

Berry Fruit Salad with Honey Lime Dressing.
Want to really make a statement and add a kick to your next fruit salad?
Mix strawberries, blueberries, blackberries and red raspberries in a bowl.
Add the zest and juice of one ripe lime and drizzle with 2-3 Tbsp of honey.
Stir berry gently, and enjoy!
Cheers & Hugs,
Jodi

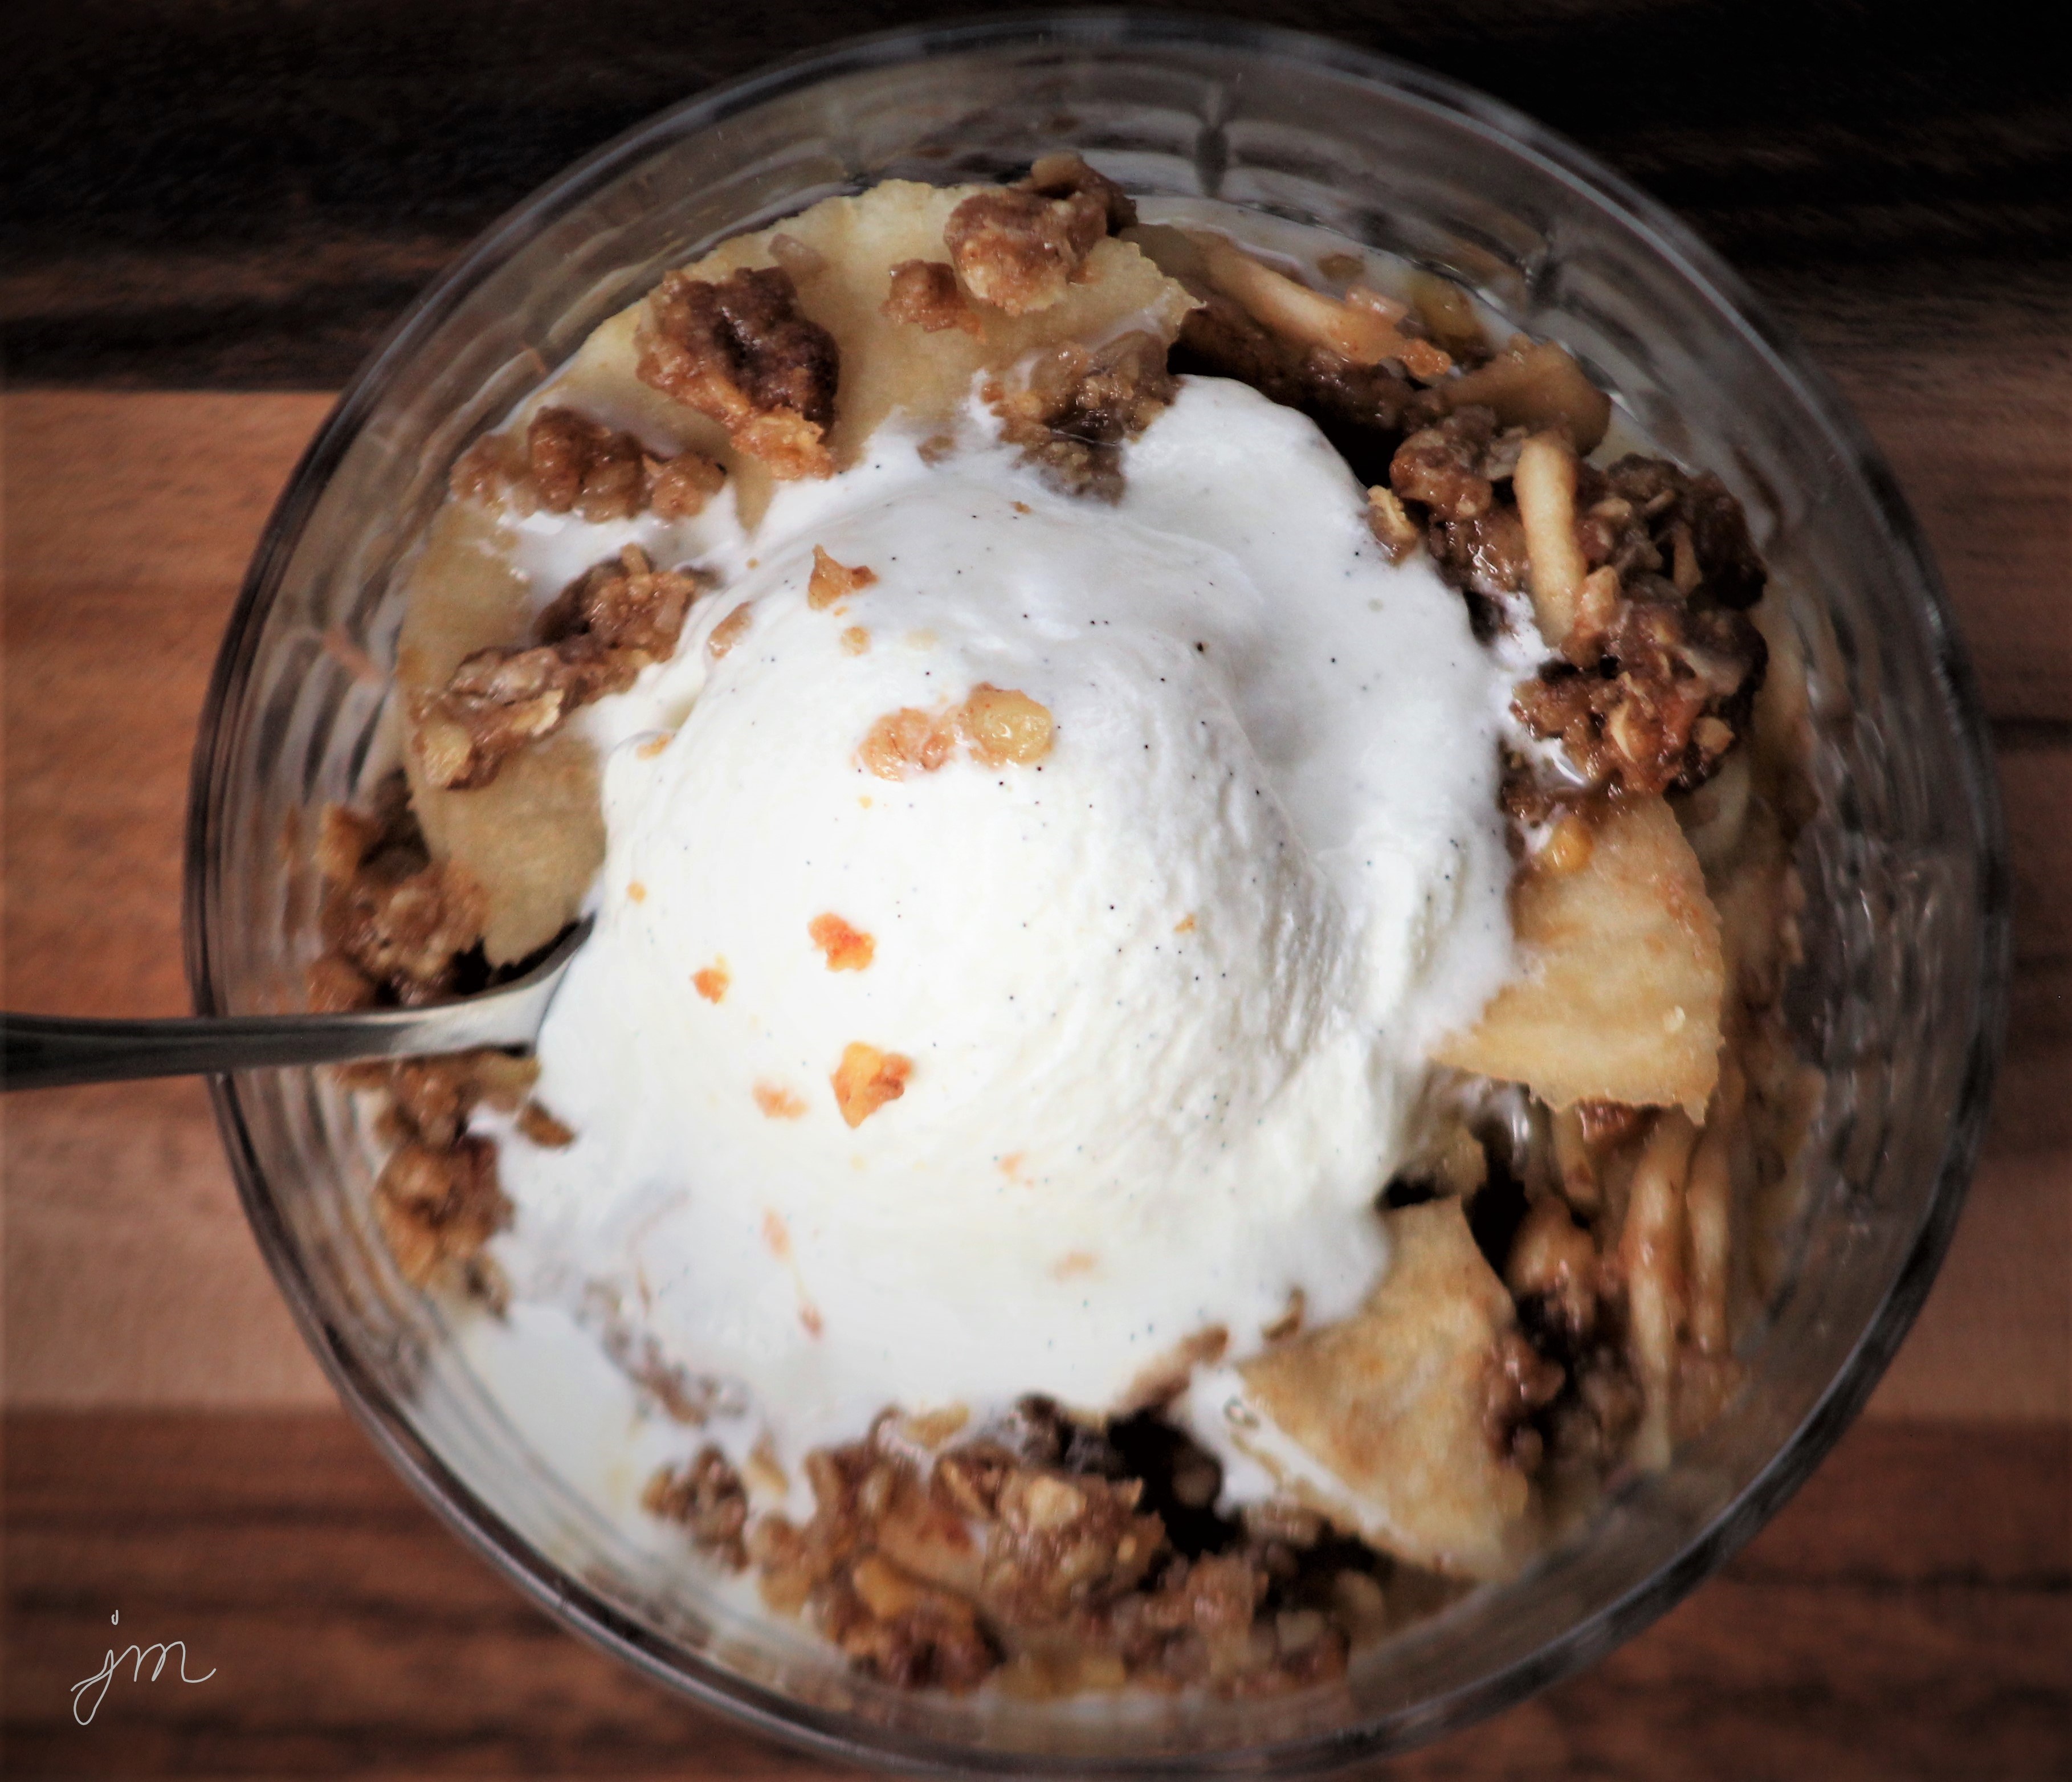
Double Crumble Apple Crisp.
Nothing says Autumn like the taste of sweet, tender baked apples layered with cinnamony, nutty, crunchy oat crumble in a divine Apple Crisp.
Right?!
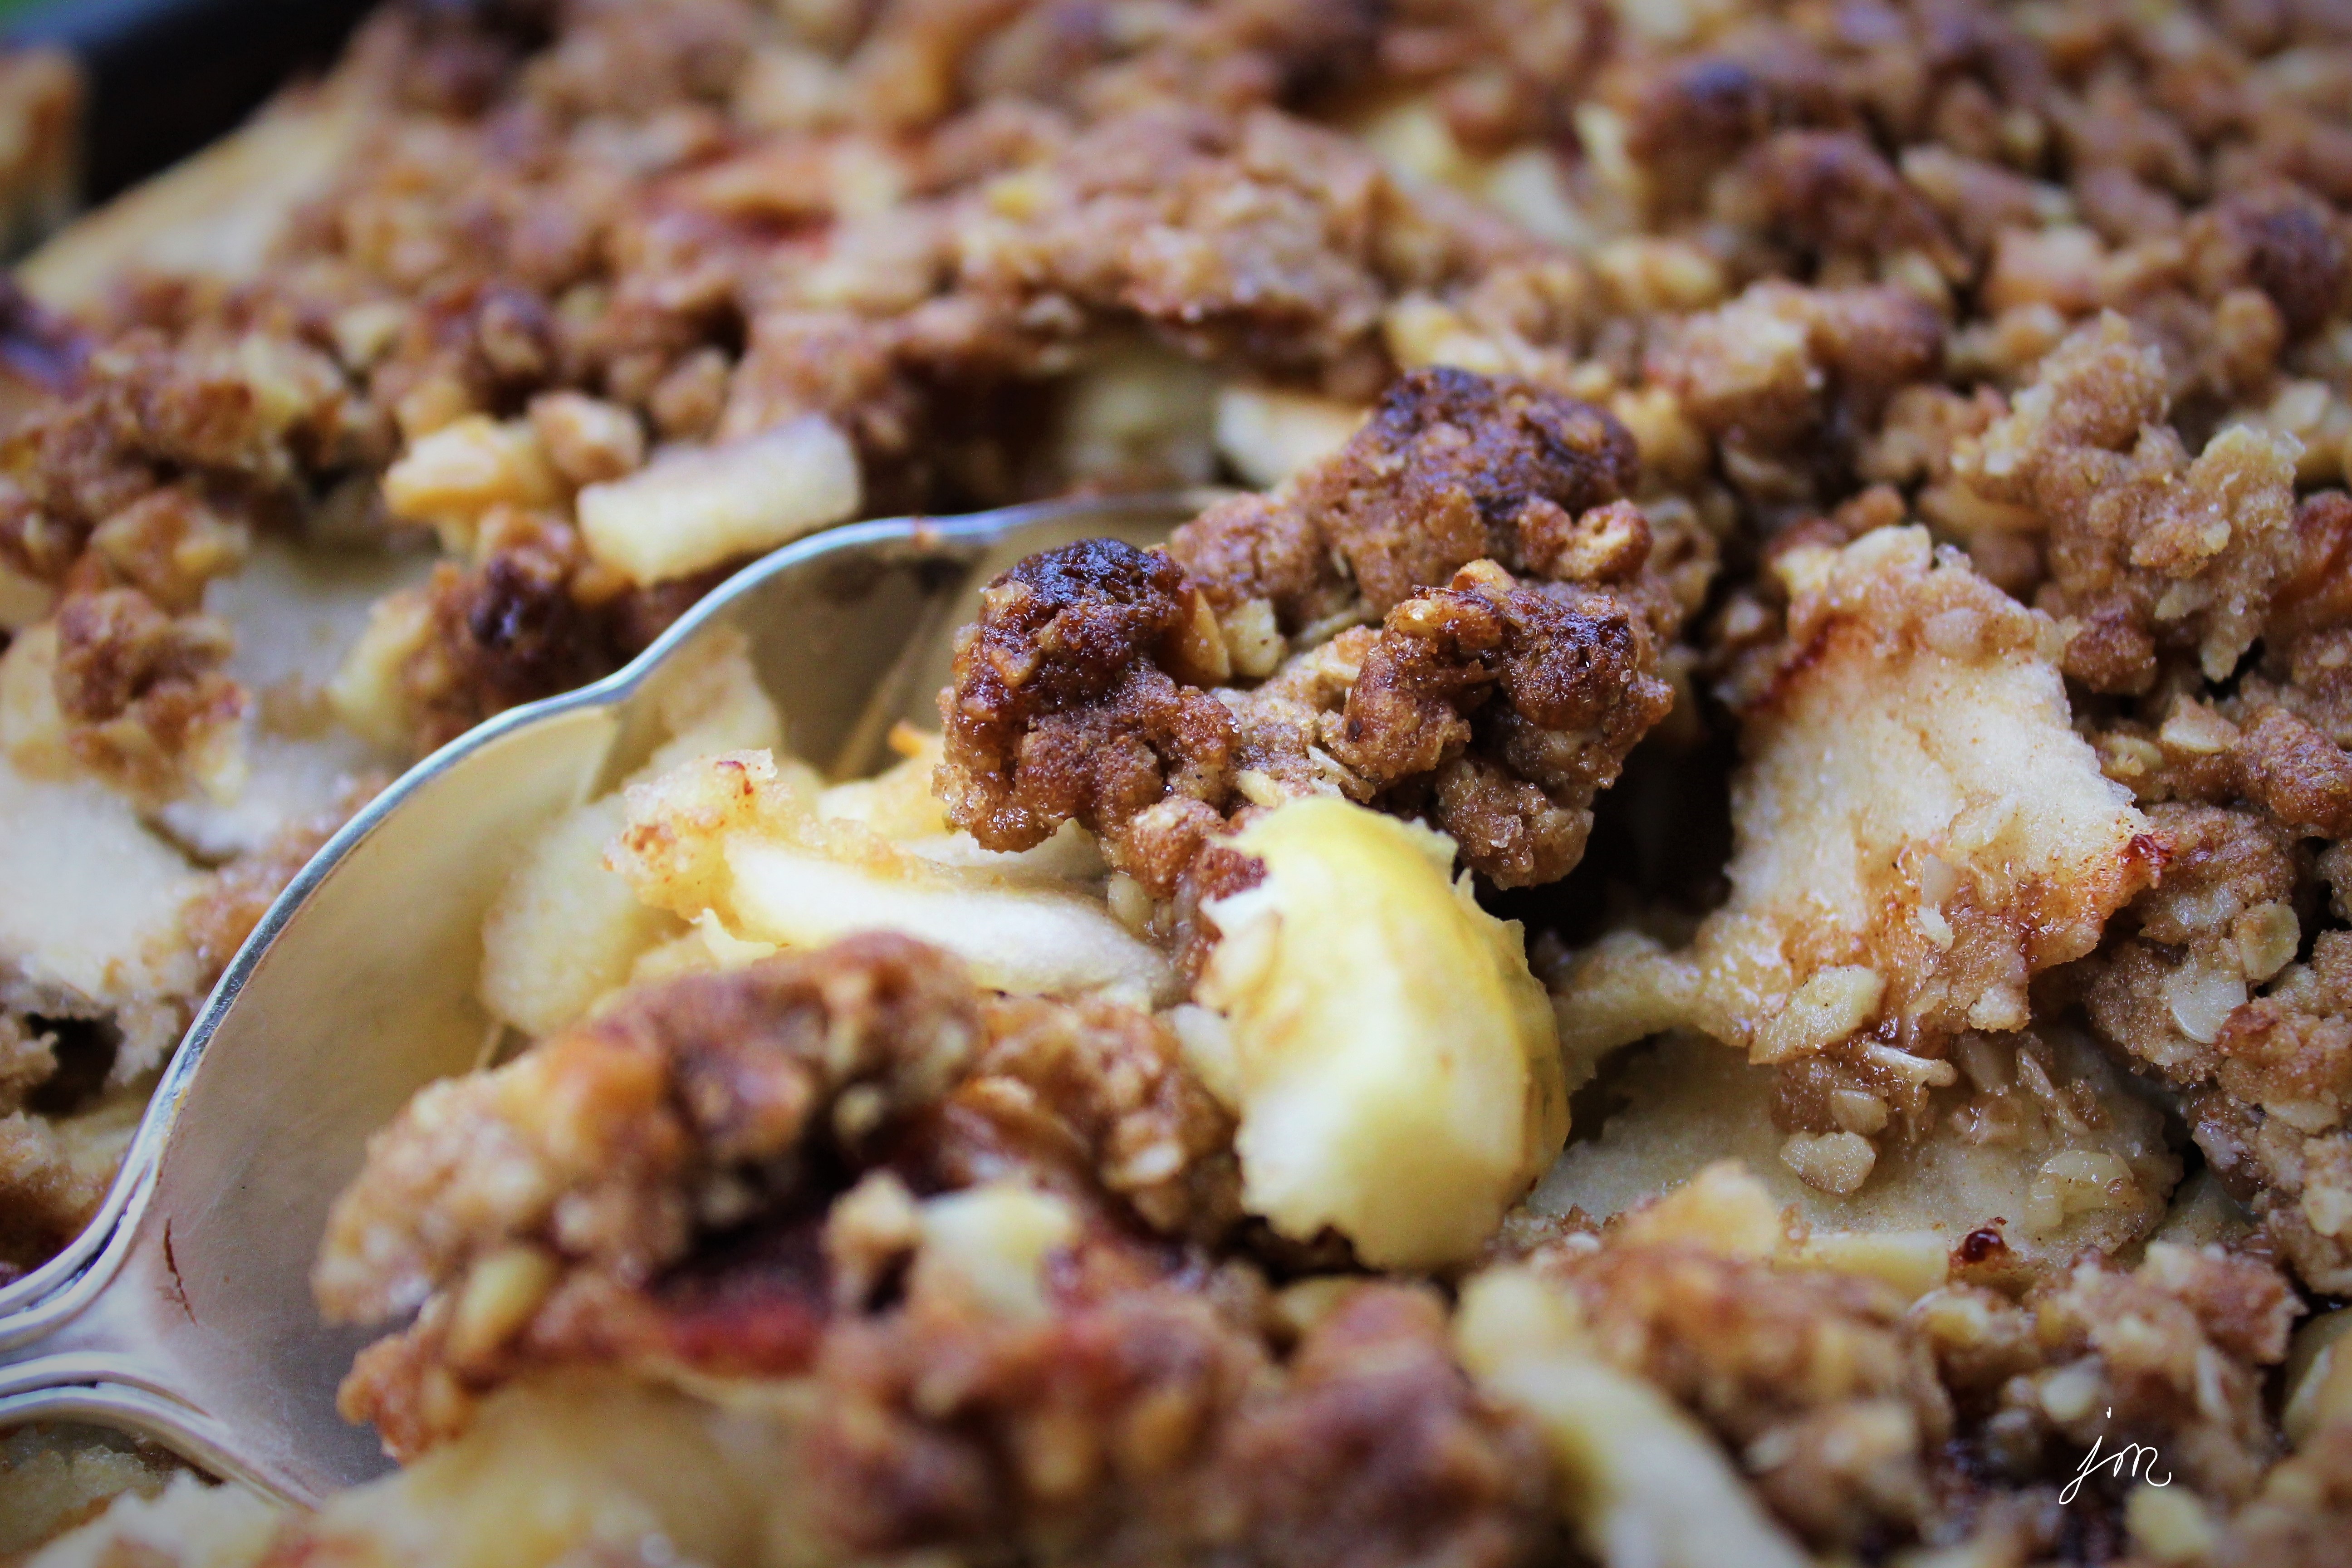
So of course I had to bake one with a bunch of apples I was gifted with from a local farm market.
Hubby likes his warm with creamy vanilla bean ice cream melting on it for dessert.
I like mine refrigerator cold for breakfast with steaming coffee flavored with Italian Sweet Cream.
However you like it, this is a classic worth making at least once each Autumn – just because!
Here is the recipe I like best, which is slightly tweaked from a recipe found at Creations by Kara.
Ingredients:
Directions:
Combine oats, brown sugar, flour 1 Tbsp cinnamon, salt, and butter to crumble consistently. Add chopped nuts and combine.
Press 1/3 of the mixture into the bottom of a round or square baking dish (9-11″). Spread peeled, sliced apples on top. Sprinkle with 1/4 cup sugar and 1/2 tsp cinnamon. Top with remaining crumble mixture.
Bake at 350 degrees F for 45-50 minutes until apples are tender and crumble is browned.
Serve warm with ice cream or cool whip or cold for breakfast (wink!) – however you prefer!
Enjoy
Cheers & Hugs,
Jodi
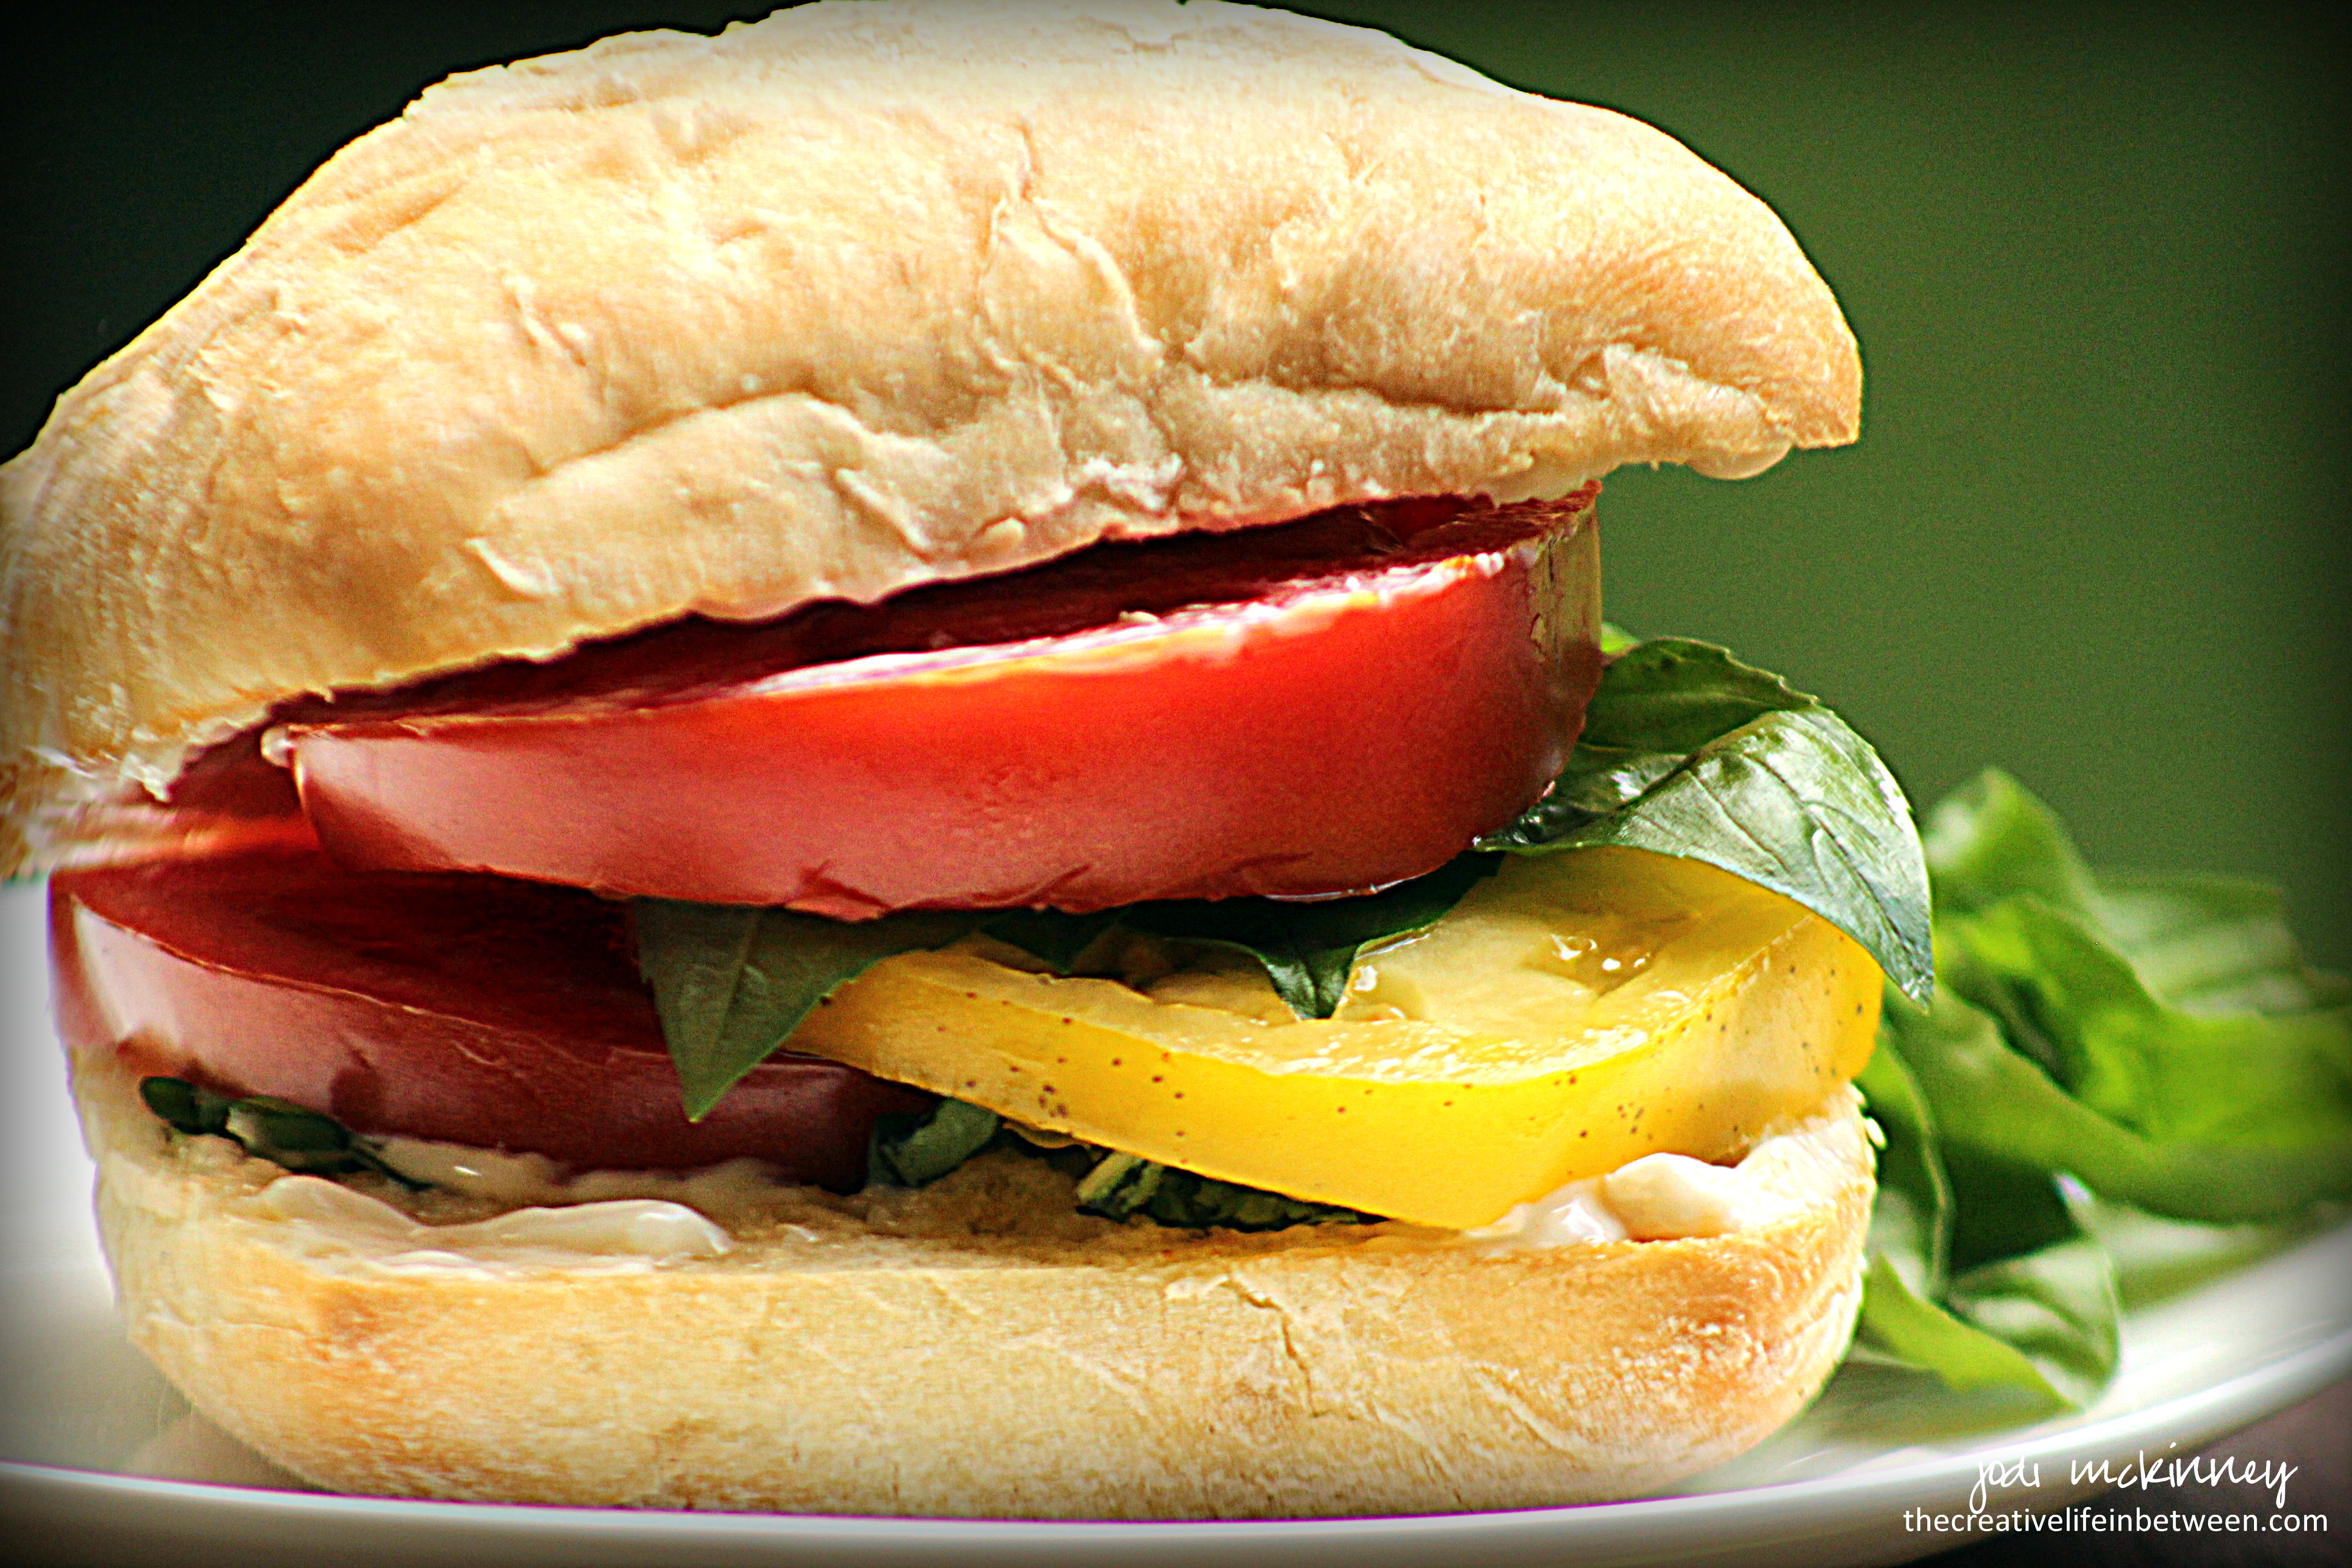
Fresh Tomato and Basil Sandwich – Best Summer Sammie
The BEST Summer Sammie.
My tomatoes
are FINALLY
ripening!
We planted
a bit late
this year.
But
it was well worth
the wait.
I can now
eat my FAVORITE
summer sammie…
For breakfast,
lunch,
or dinner!
Fresh tomato slices,
fresh sweet basil,
and toasted ciabatta slathered with mayo.
Who needs a burger?
Who needs a dog?
When these rubies and golds have finally arrived!
Cheers & Hugs,
Jodi
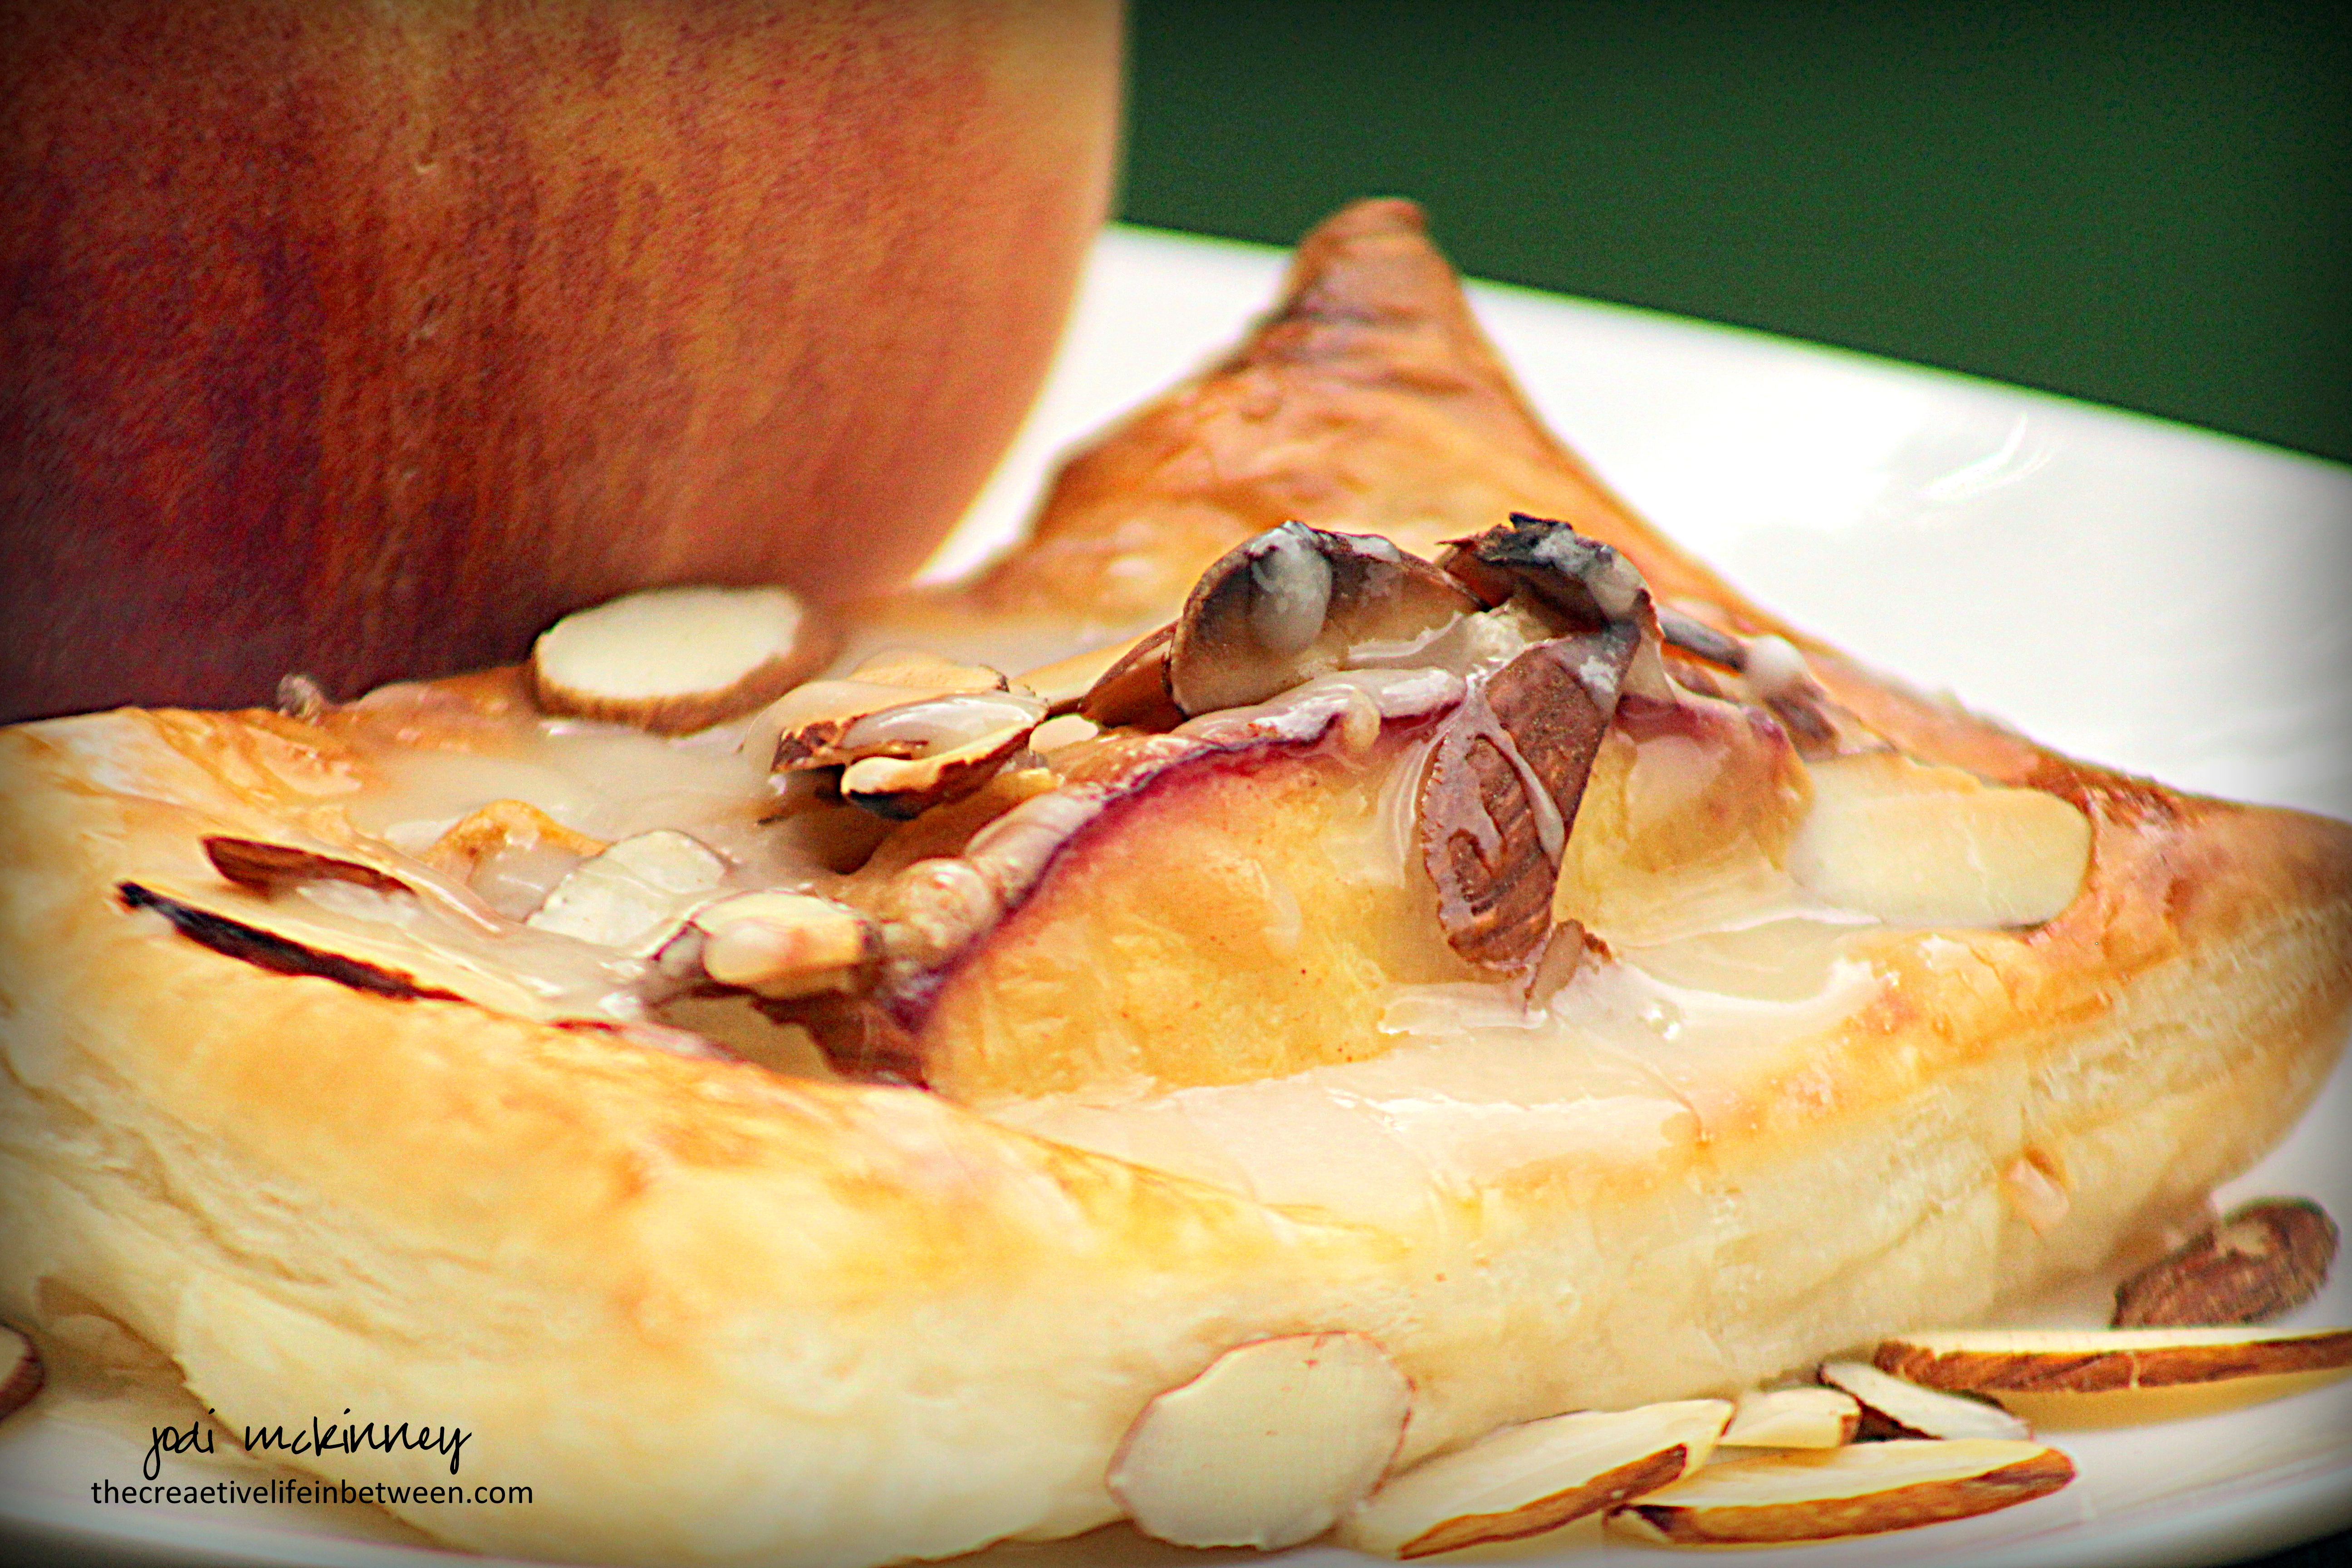
Quick and Easy Peach Puff Pastry Tartlets.
This Sunday, we had the family over for dinner. Hubby made the most amazing BBQ spare ribs, which we served with grilled sweet corn on the cob, cowboy baked beans and a caprese salad. A fresh peach dessert seemed the perfect ending for this BBQ, but I didn’t feel like fussing much.

Knowing I had a package of puff pastry in the freezer, I quickly googled “peaches and puff pastry” and found this wonderful recipe at Natasha’s Kitchen.
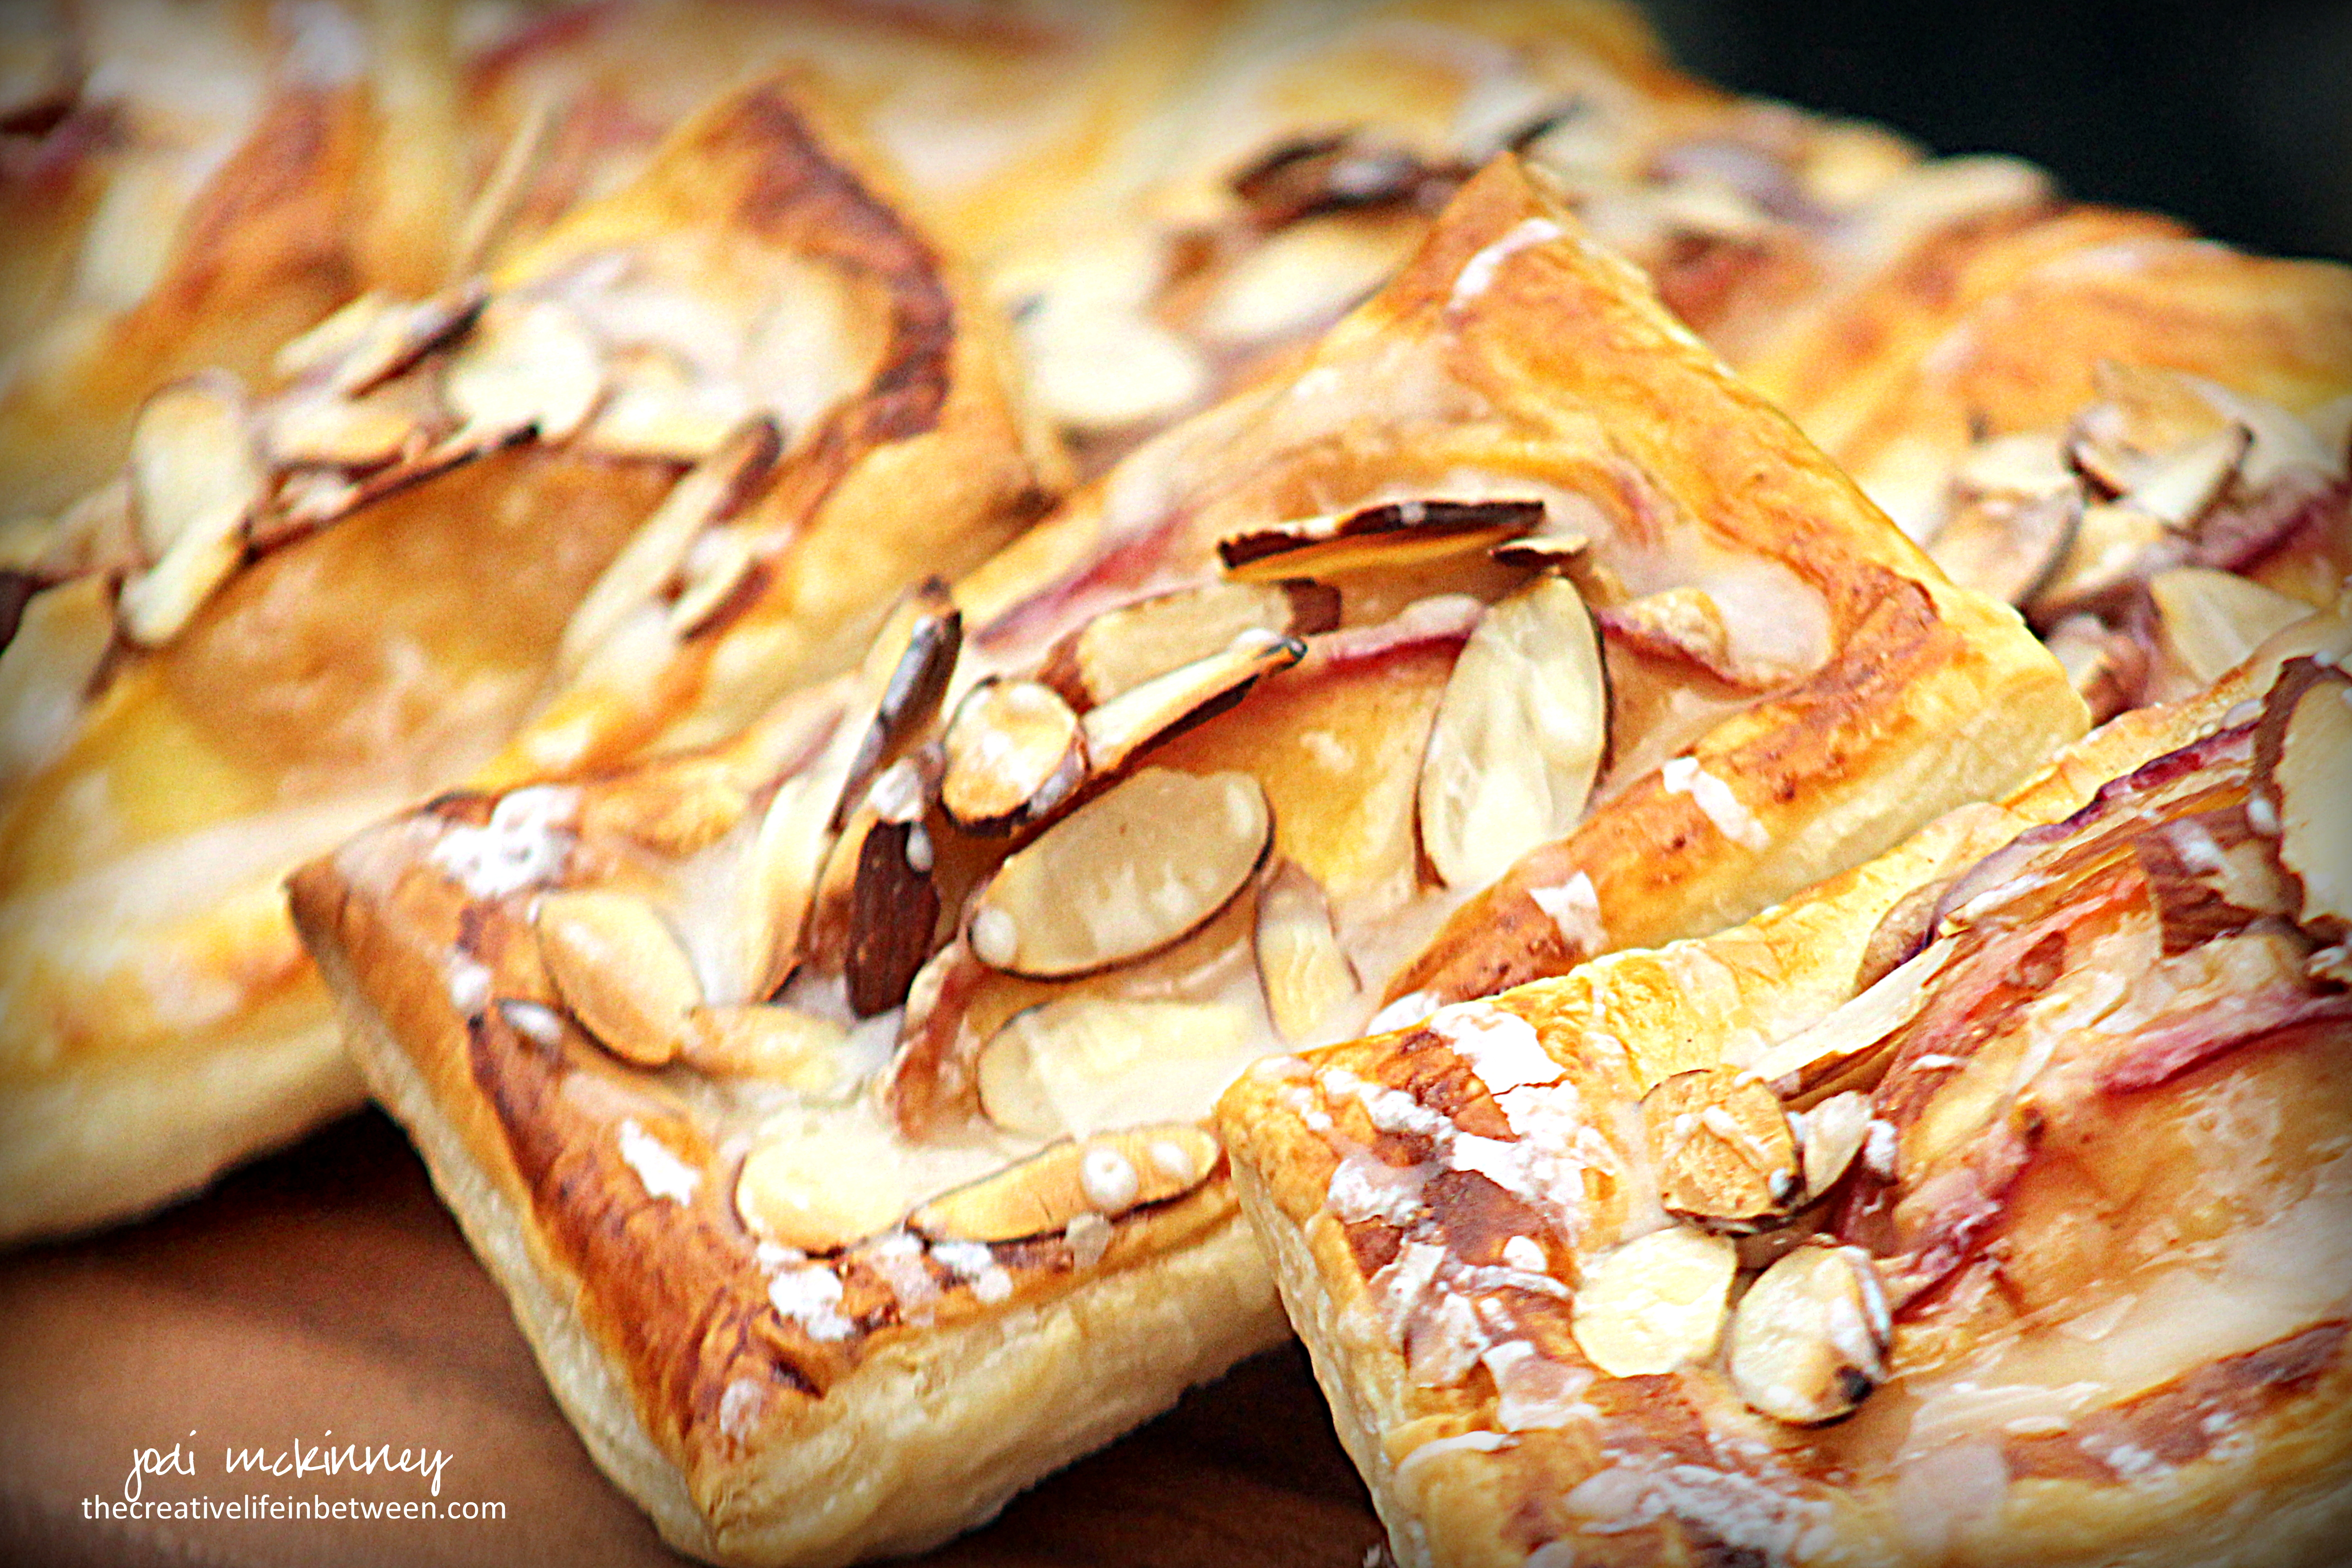
These only took about 10 minutes to throw together and 15 minutes to bake for a beautiful and super delicious dessert.
Well – at least that is what I hear…. You’ll have to take my family’s word for how delish they were as I didn’t get to try one. They’re gone (which is always a good sign).
When your sons ask for a second (or a third), you happily feed them and drink a glass of wine instead <wink>! I can make these anytime I want again, but feeding my guys and daughter-in-laws and granddaughter and a bestie – – – seeing smiles, hearing yums, and getting hugs – – – well – that’s all this momma needs.
I’m pretty sure I’ll be making these again! I’m betting sliced apples and walnuts would be a wonderful Autumn version as well as loads of other fruit and nut combinations.
Here’s Natasha’s recipe as I made it.
Ingredients: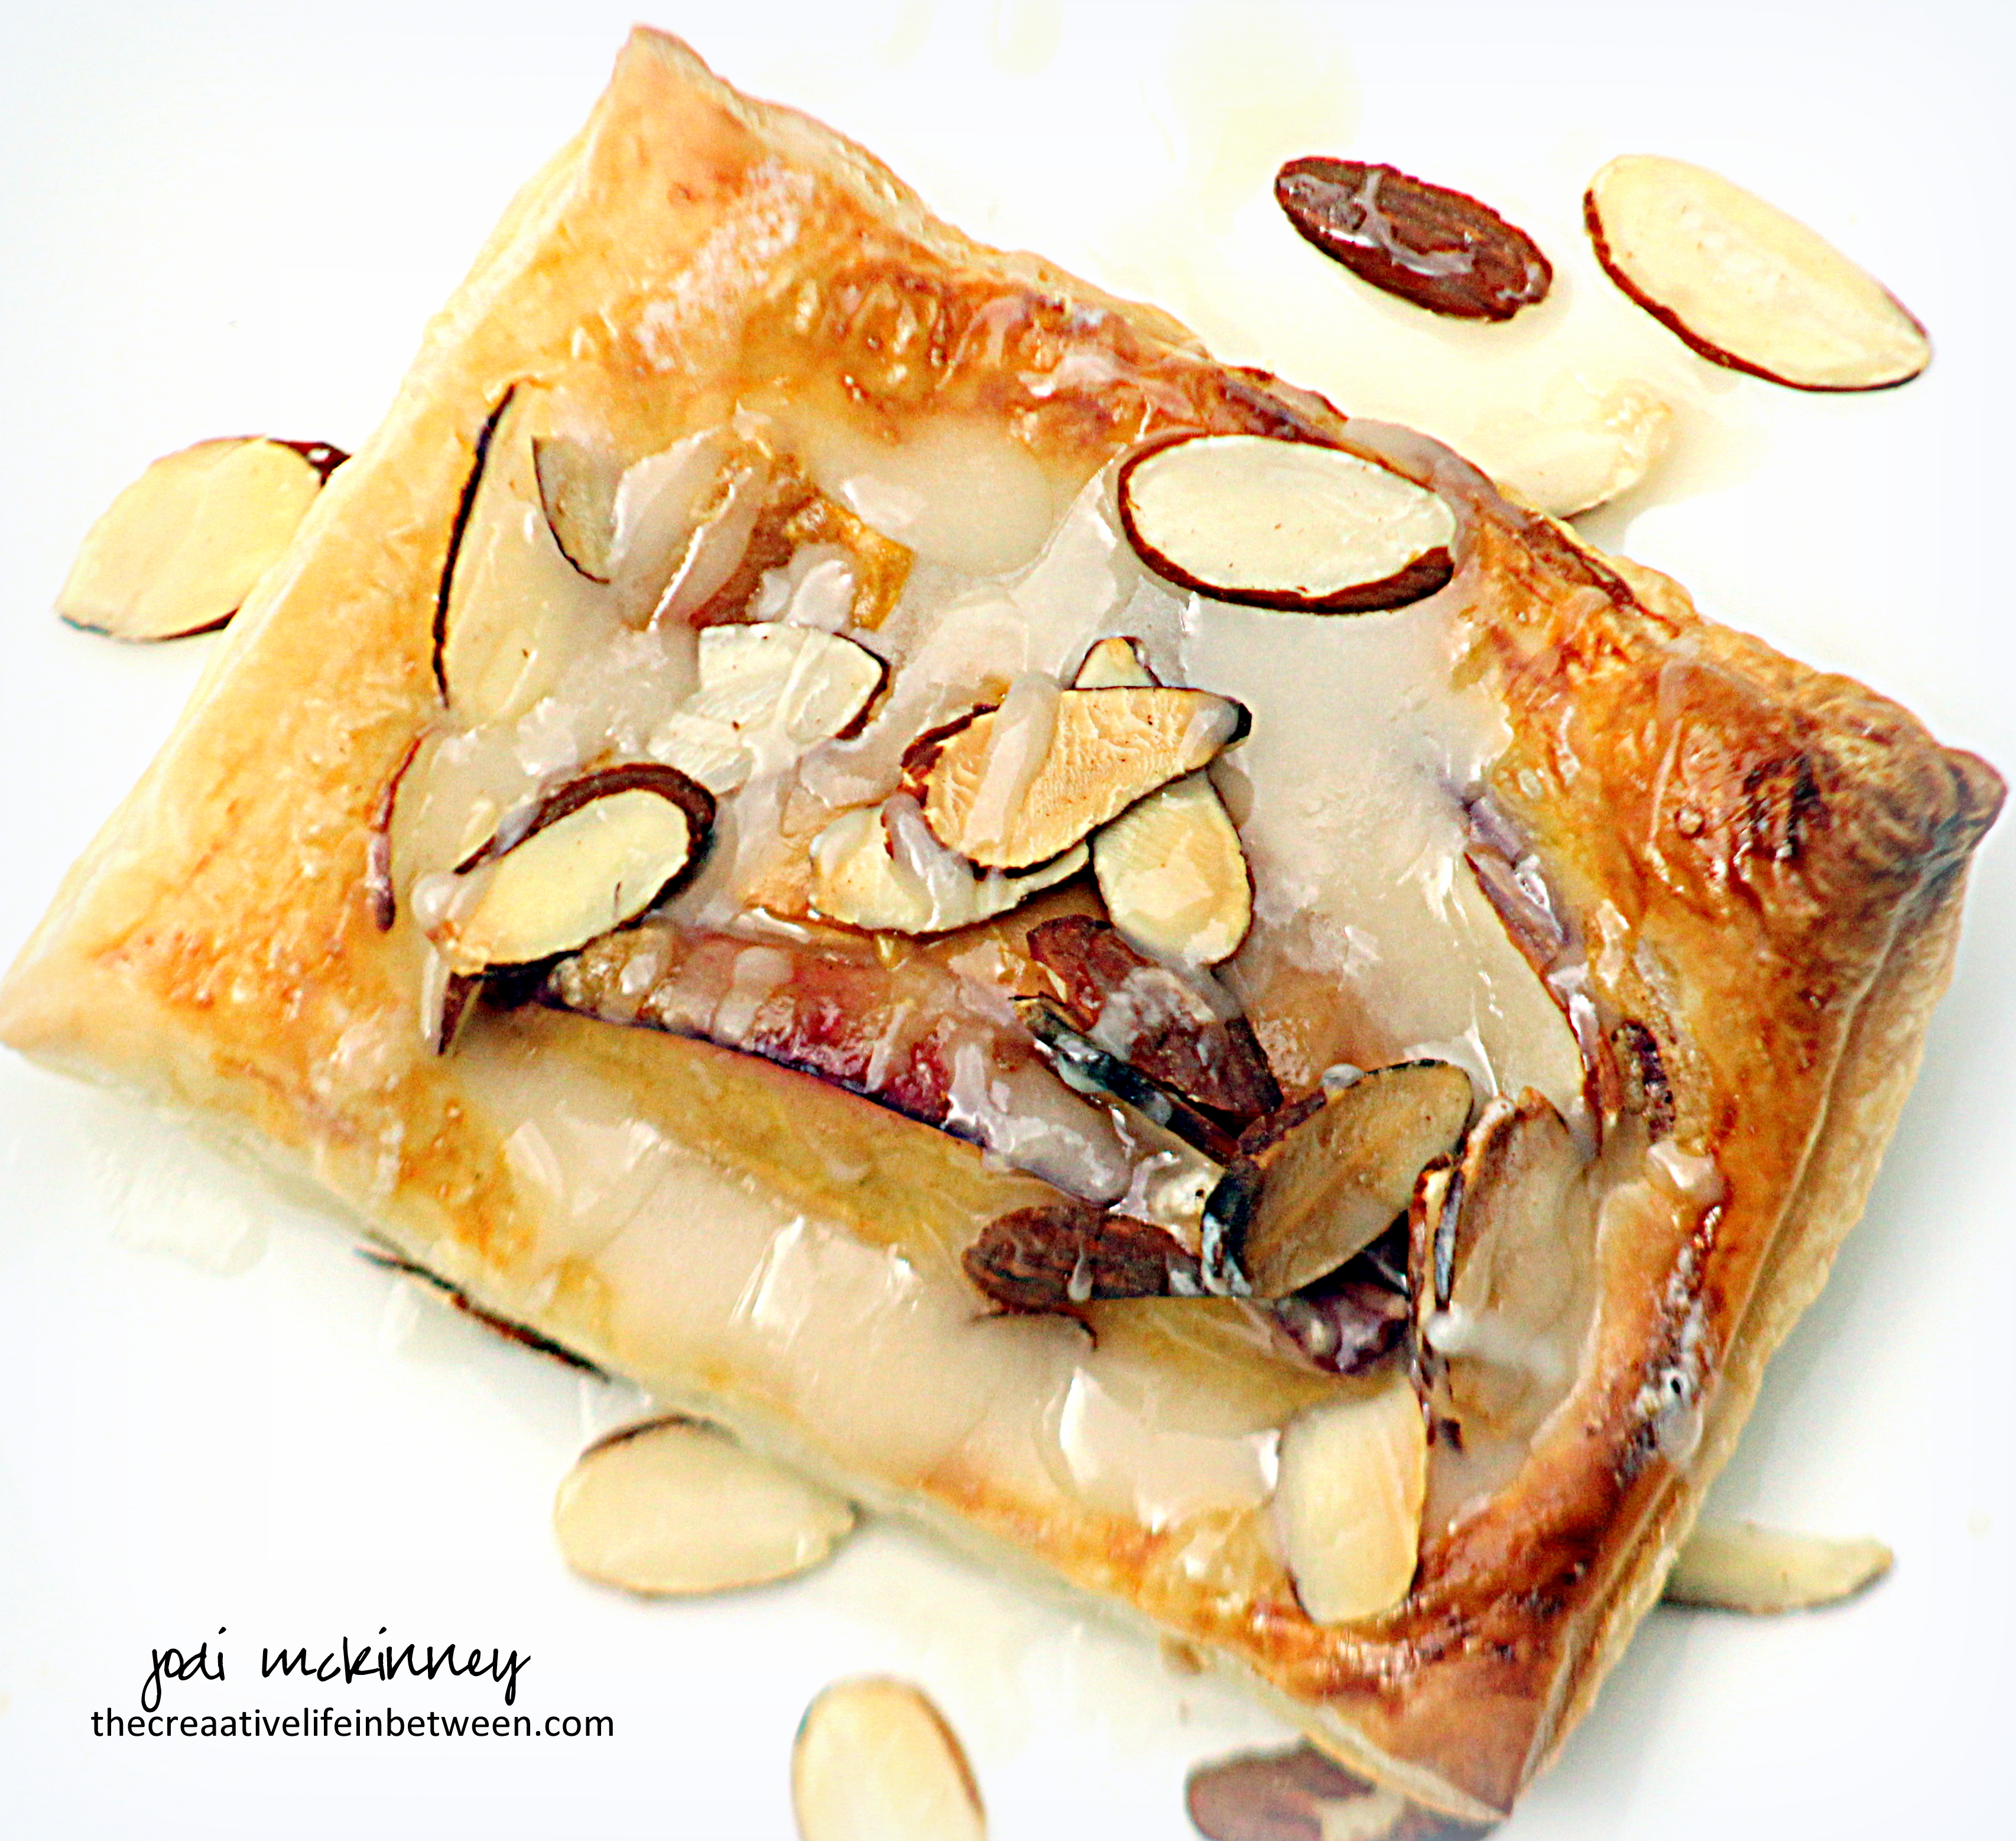
Directions:
Preheat oven to 400˚F.
Cut thawed puff pastry into 9 equal sized squares and place on parchment lined baking sheet or baking stone.
Beat egg in a small bowl and set aside.
Slice peaches and place in a medium mixing bowl. Sprinkle with sugar, flour, cinnamon, and vanilla. Gently fold together.
Place 3 -4 peach slices in the center of each pastry square. Avoid getting peach juice on pastry edges. Brush edges generously with beaten egg. Sprinkle sliced almonds over pastry and peaches.
Bake at 400˚F for 15-18 minutes or until puffed and golden on the edges. Remove from oven and let cool on baking sheet for 10 minutes.
While cooling, make the glaze by stirring together powdered sugar, vanilla and milk in a small bowl or measuring cup. Add more milk if needed to reach desired consistency. Drizzle over cooled tartlets.
Enjoy!
Cheers & Hugs,
Jodi
#Natashaskitchen

Cantaloupe Margaritas.
Summer is coming to an end, but there is still plenty of time for celebrating!
And what is more summery than melons…. and margaritas?
Combined…….. they create heaven in a glass!
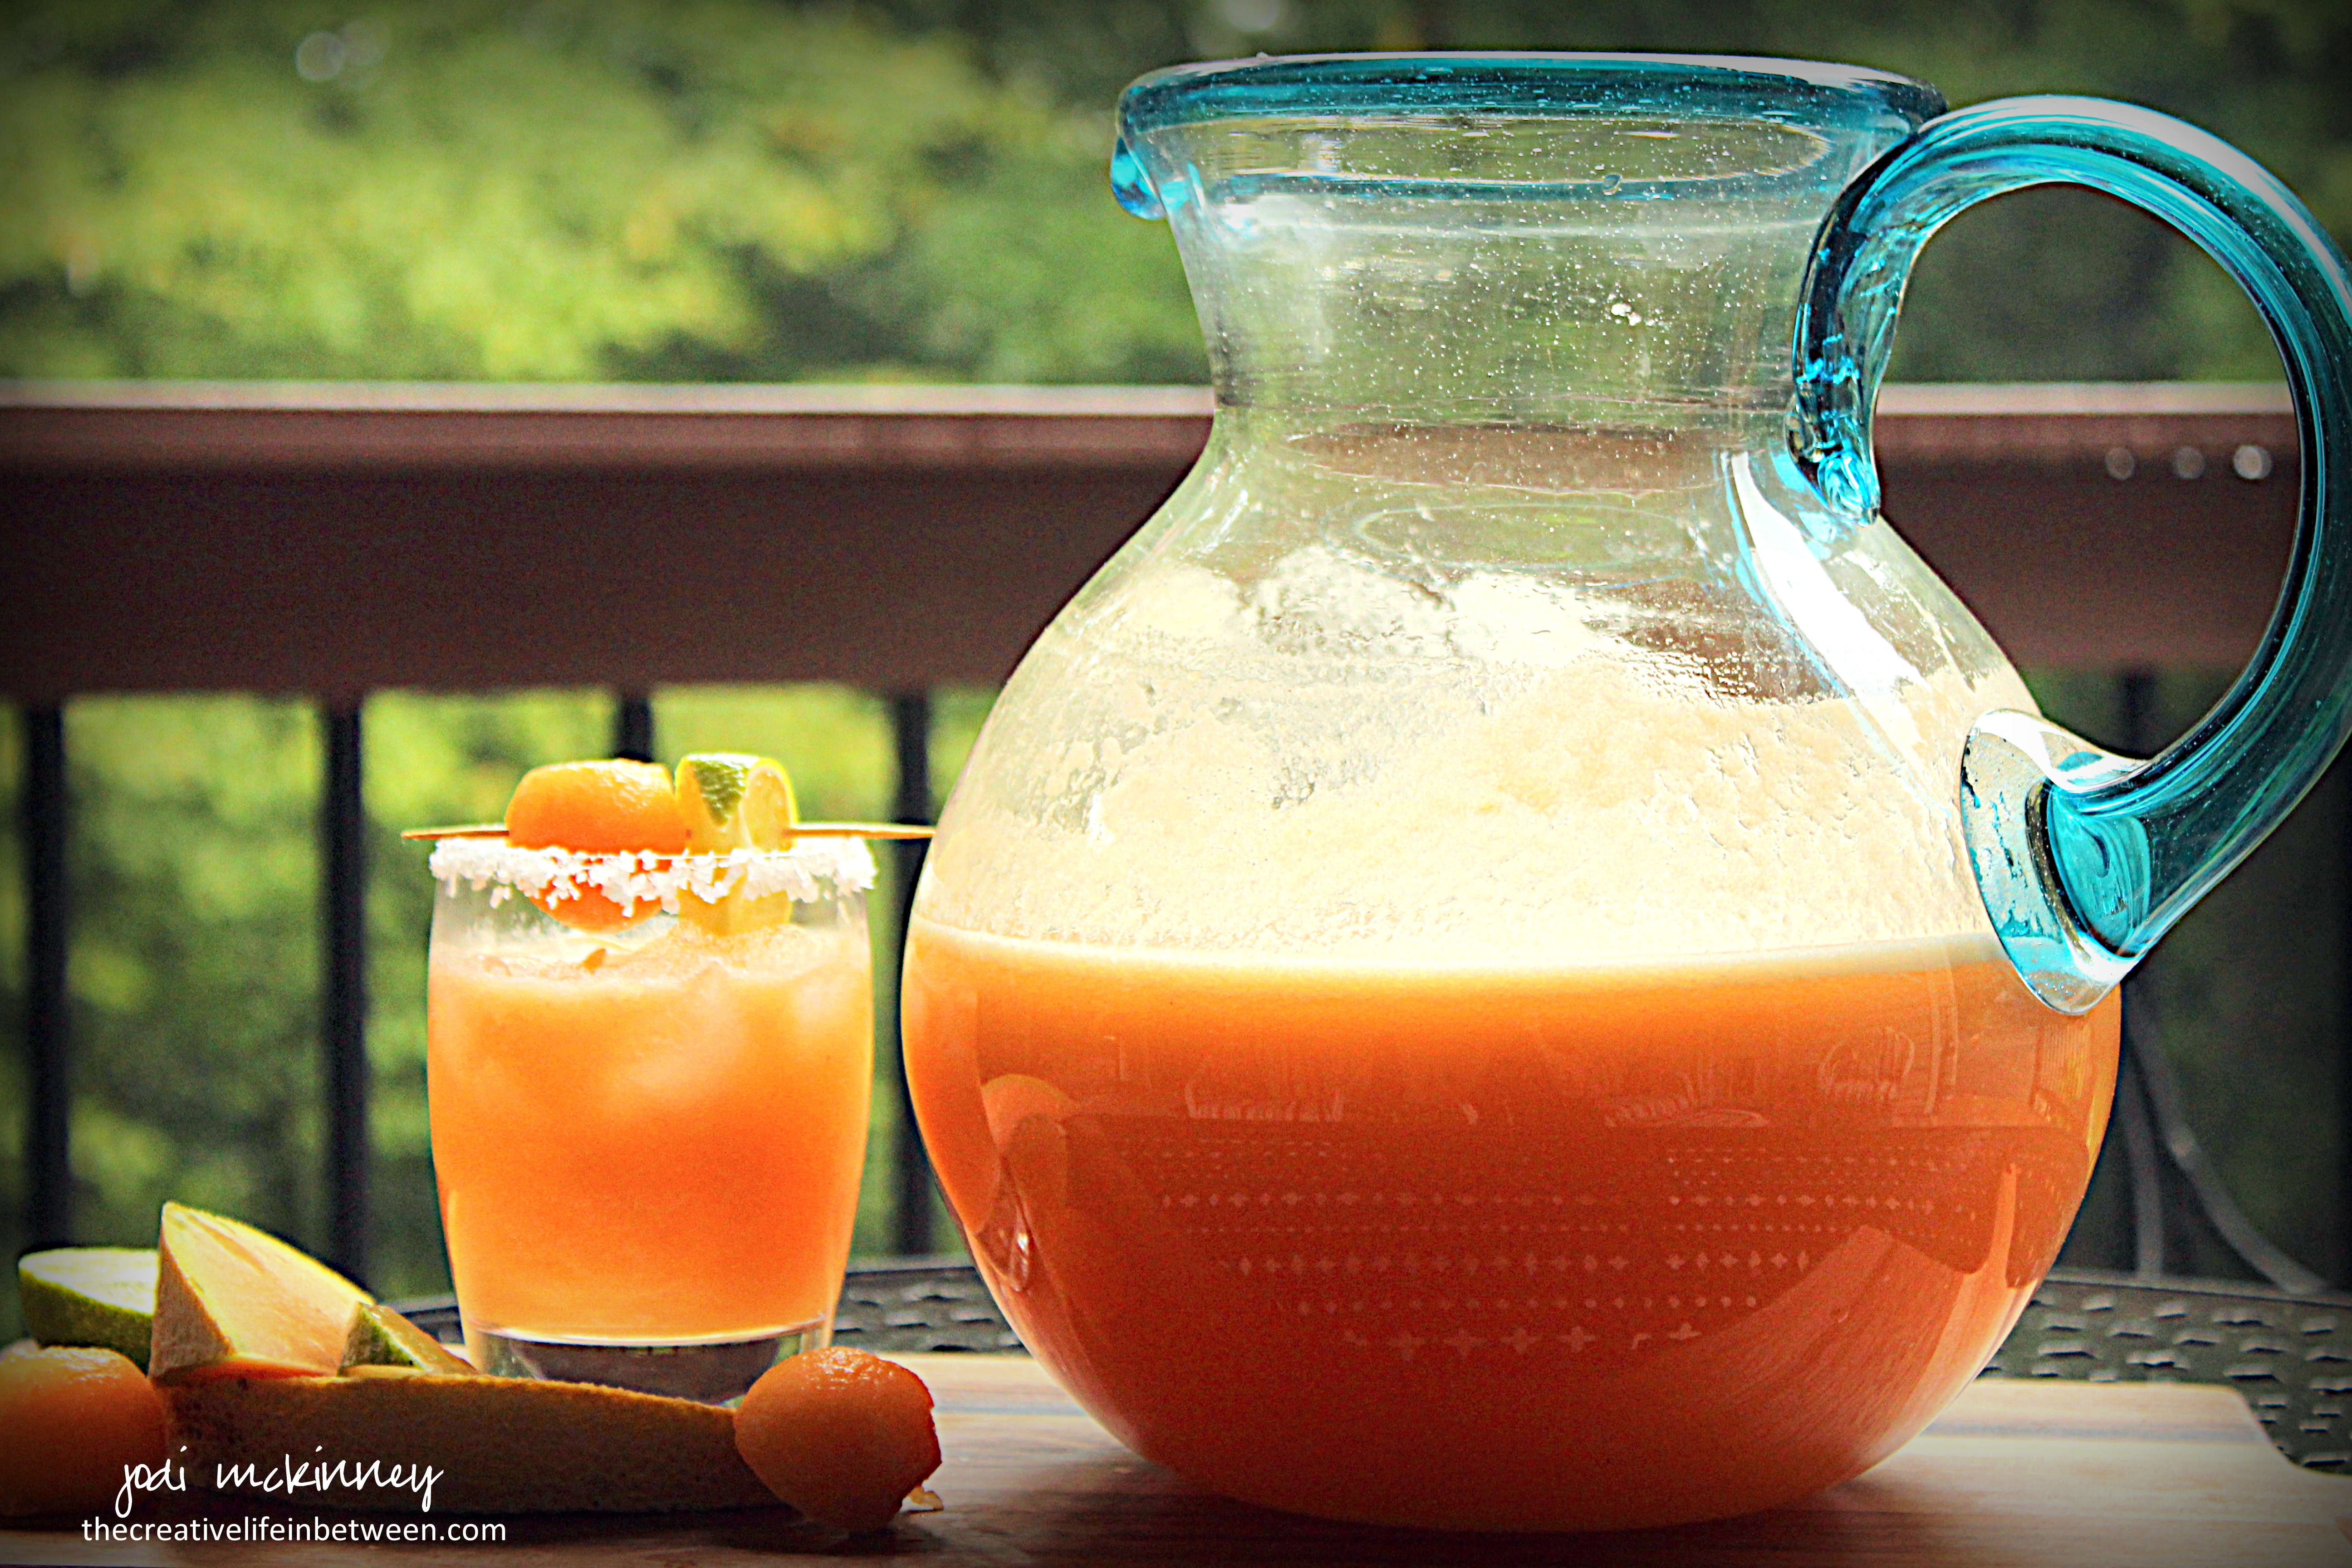
We were invited to friends’ house for dinner one evening this week, and I was asked to bring wine.
Well – I love my wine (and took a bottle with us), but I thought something a little more creative was in order for our little get-together, so I decided to make a pitcher of this amazingness!
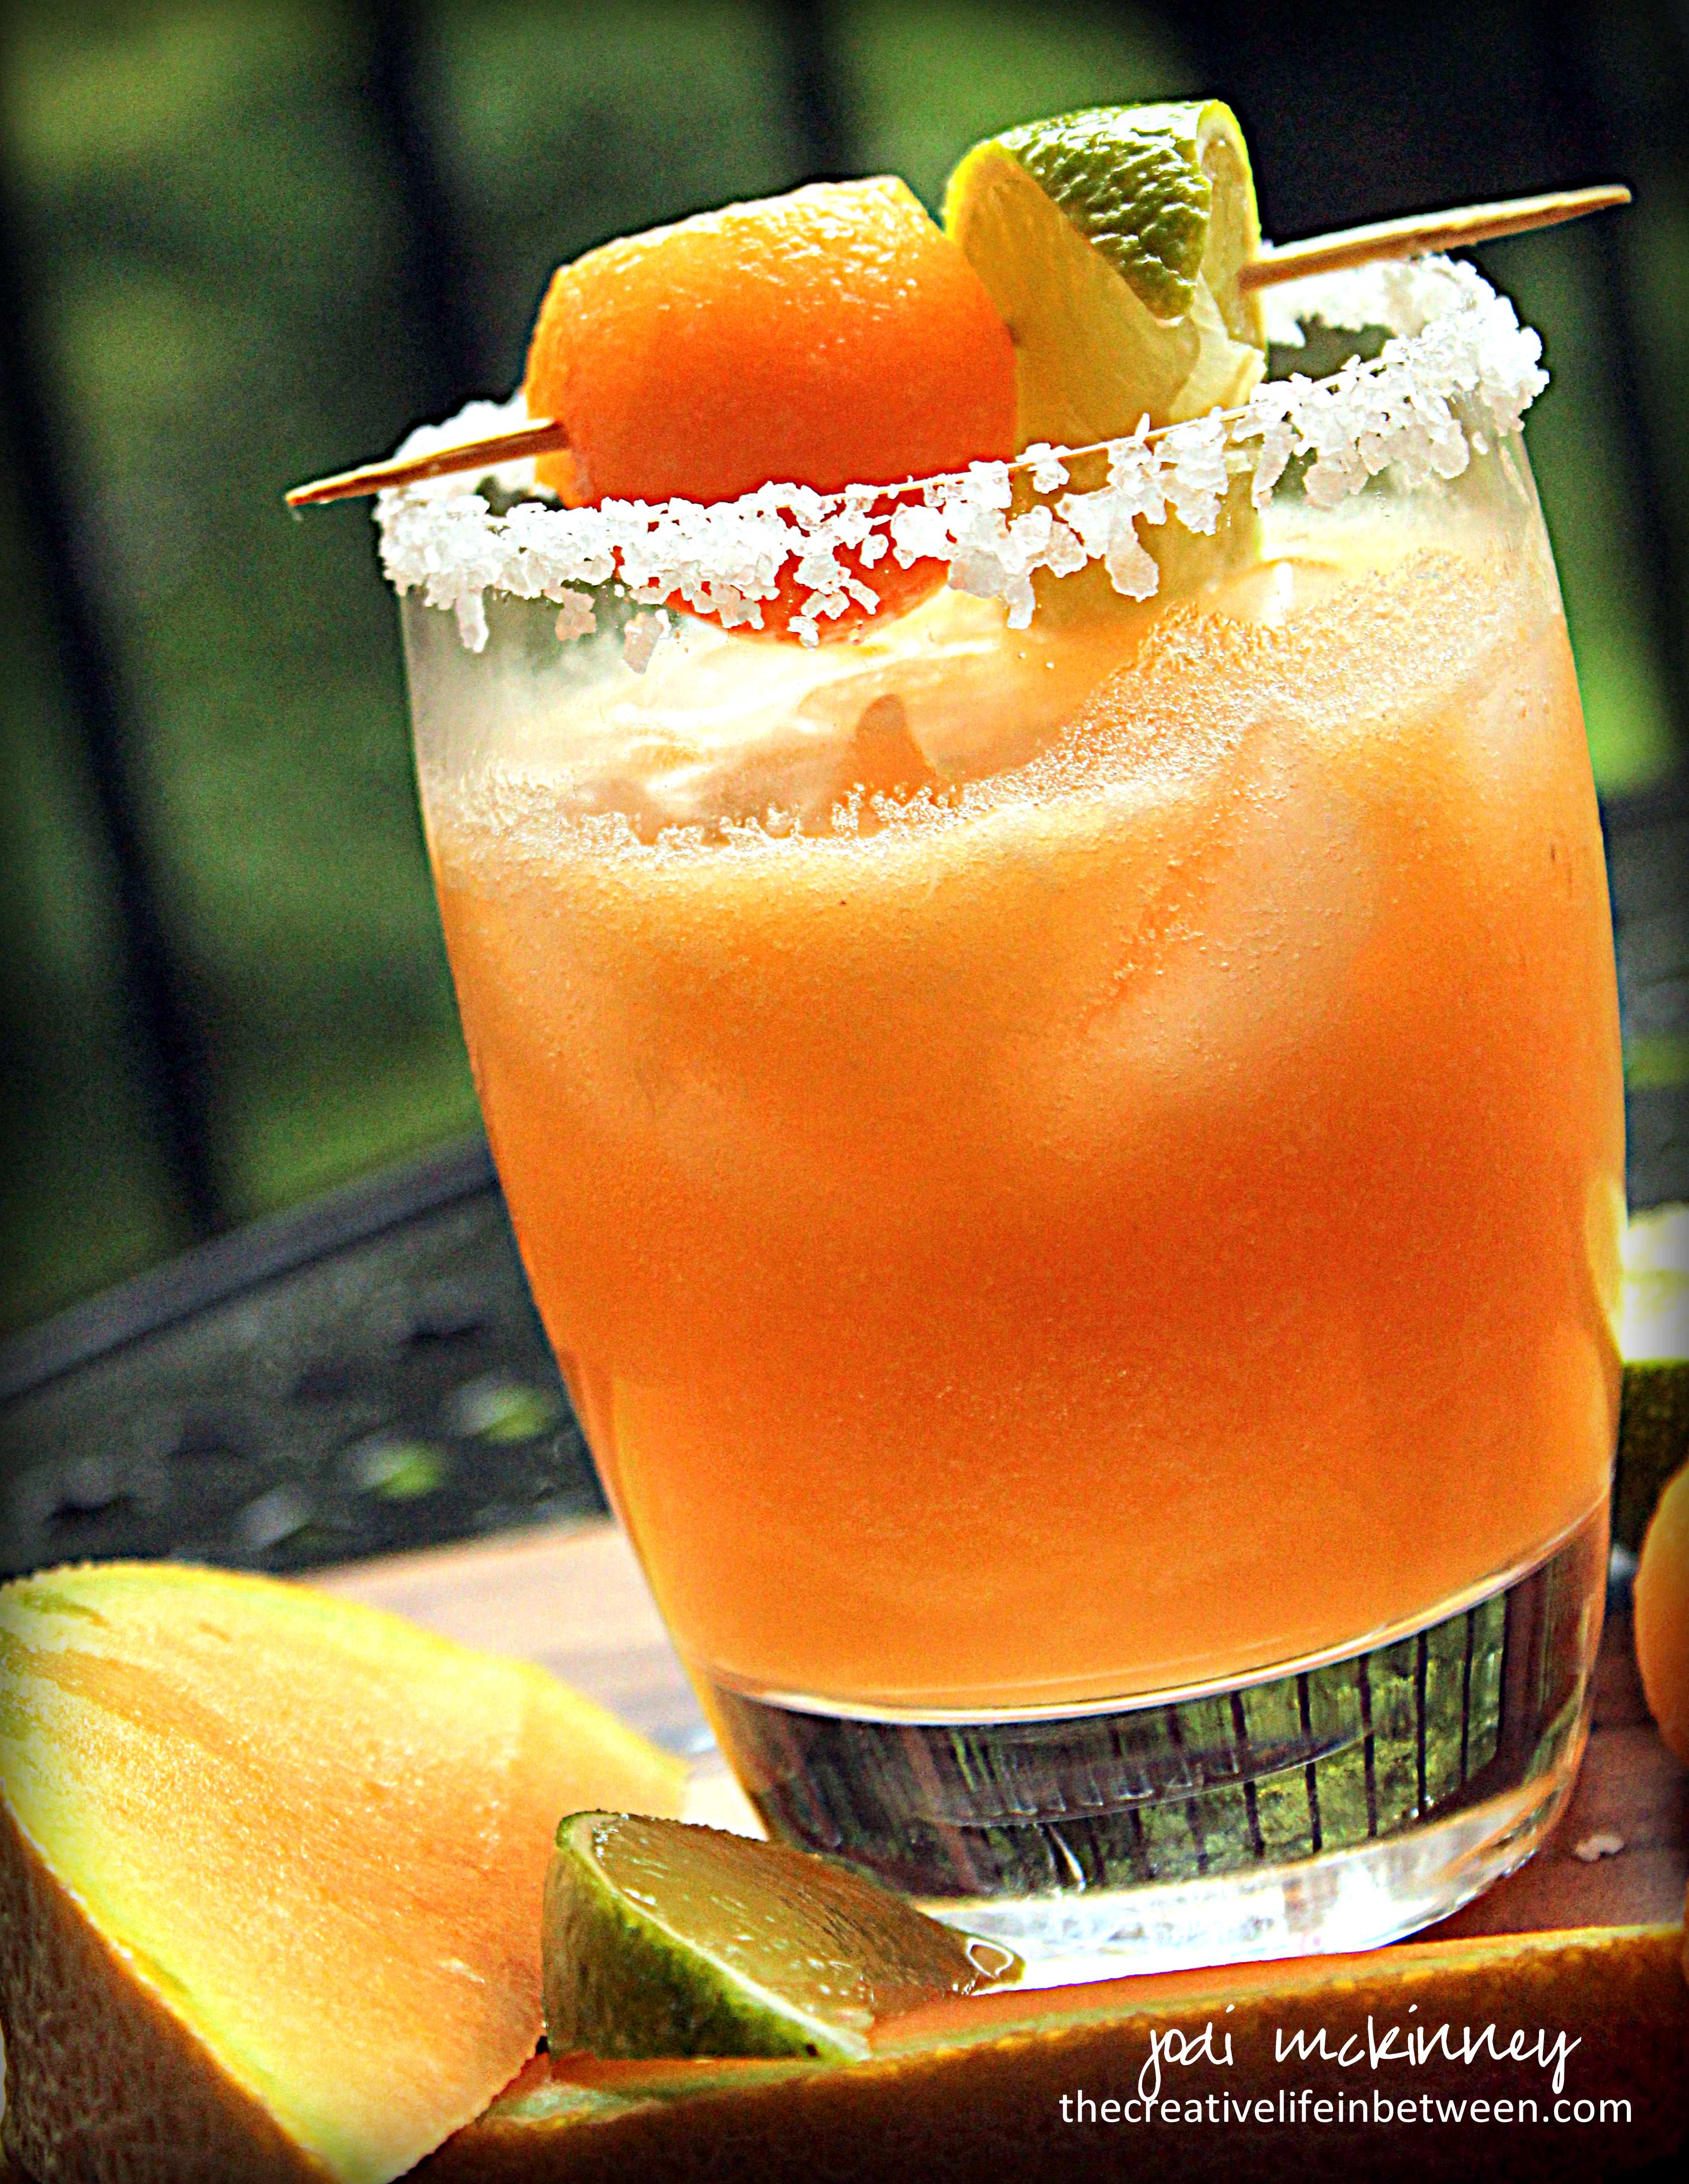
We LOVED them! (and can I admit I actually doubled the recipe provided below… which is already doubled from the original I found?)
Sooooo worth it! Even if you don’t think so the next morning! <wink>
Create this beautiful sunshine in a glass before summer is over. You will be the hit of the party!
Ingredients:
Directions:
In a small saucepan over medium heat, bring water and sugar to a boil. Stir until clear to create a simple syrup. Remove from heat and add the lime juice. Set aside to cool.
In a blender (or food processor), blend cantaloupe chunks into a fine pulp. (You may need to do in small batches.) Pour pulp into a fine mesh strainer set over a large measuring cup or small bowl and strain, lightly pressing the solids until you get 2 cups of liquid.
Combine syrup and lime juice with cantaloupe in pitcher. Add triple sec and tequila and stir. Chill.
Pour over crushed or cubed ice into glasses rimmed with salt or sugar. Garnish with melon ball and lime slice if desired.
Enjoy!
Cheers & Hugs,
Jodi
*Recipe Source: The Brewer & the Baker
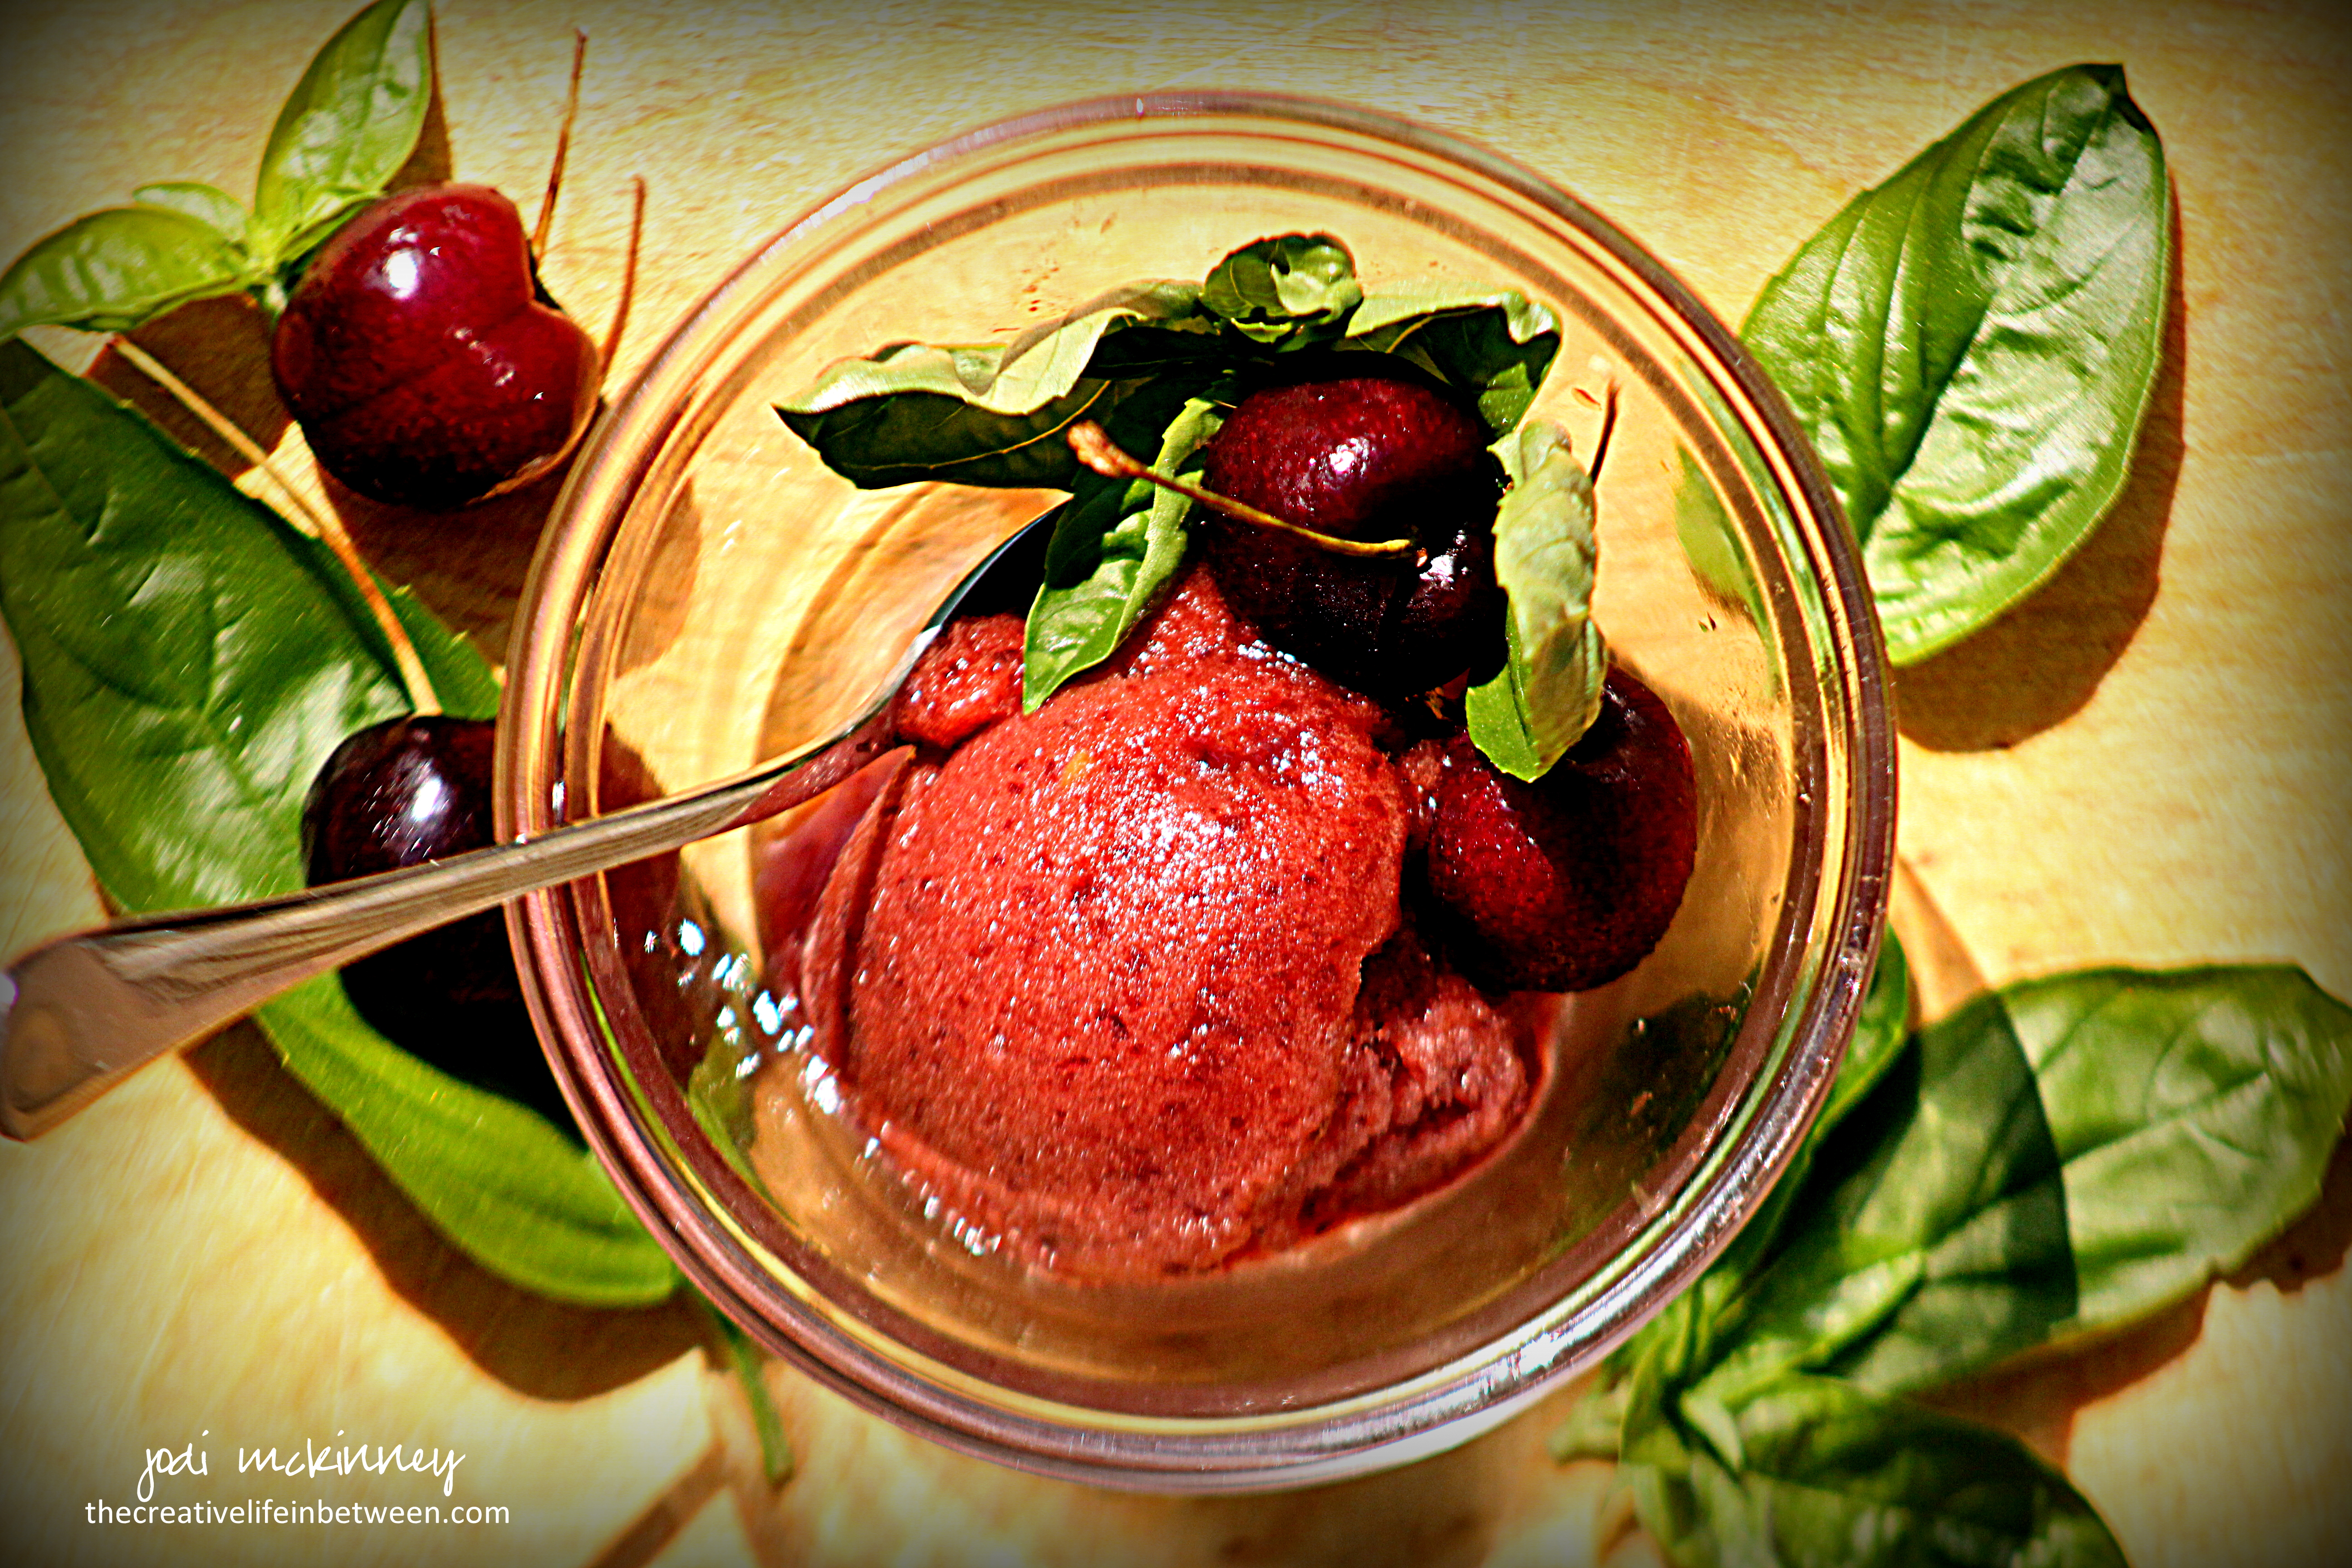
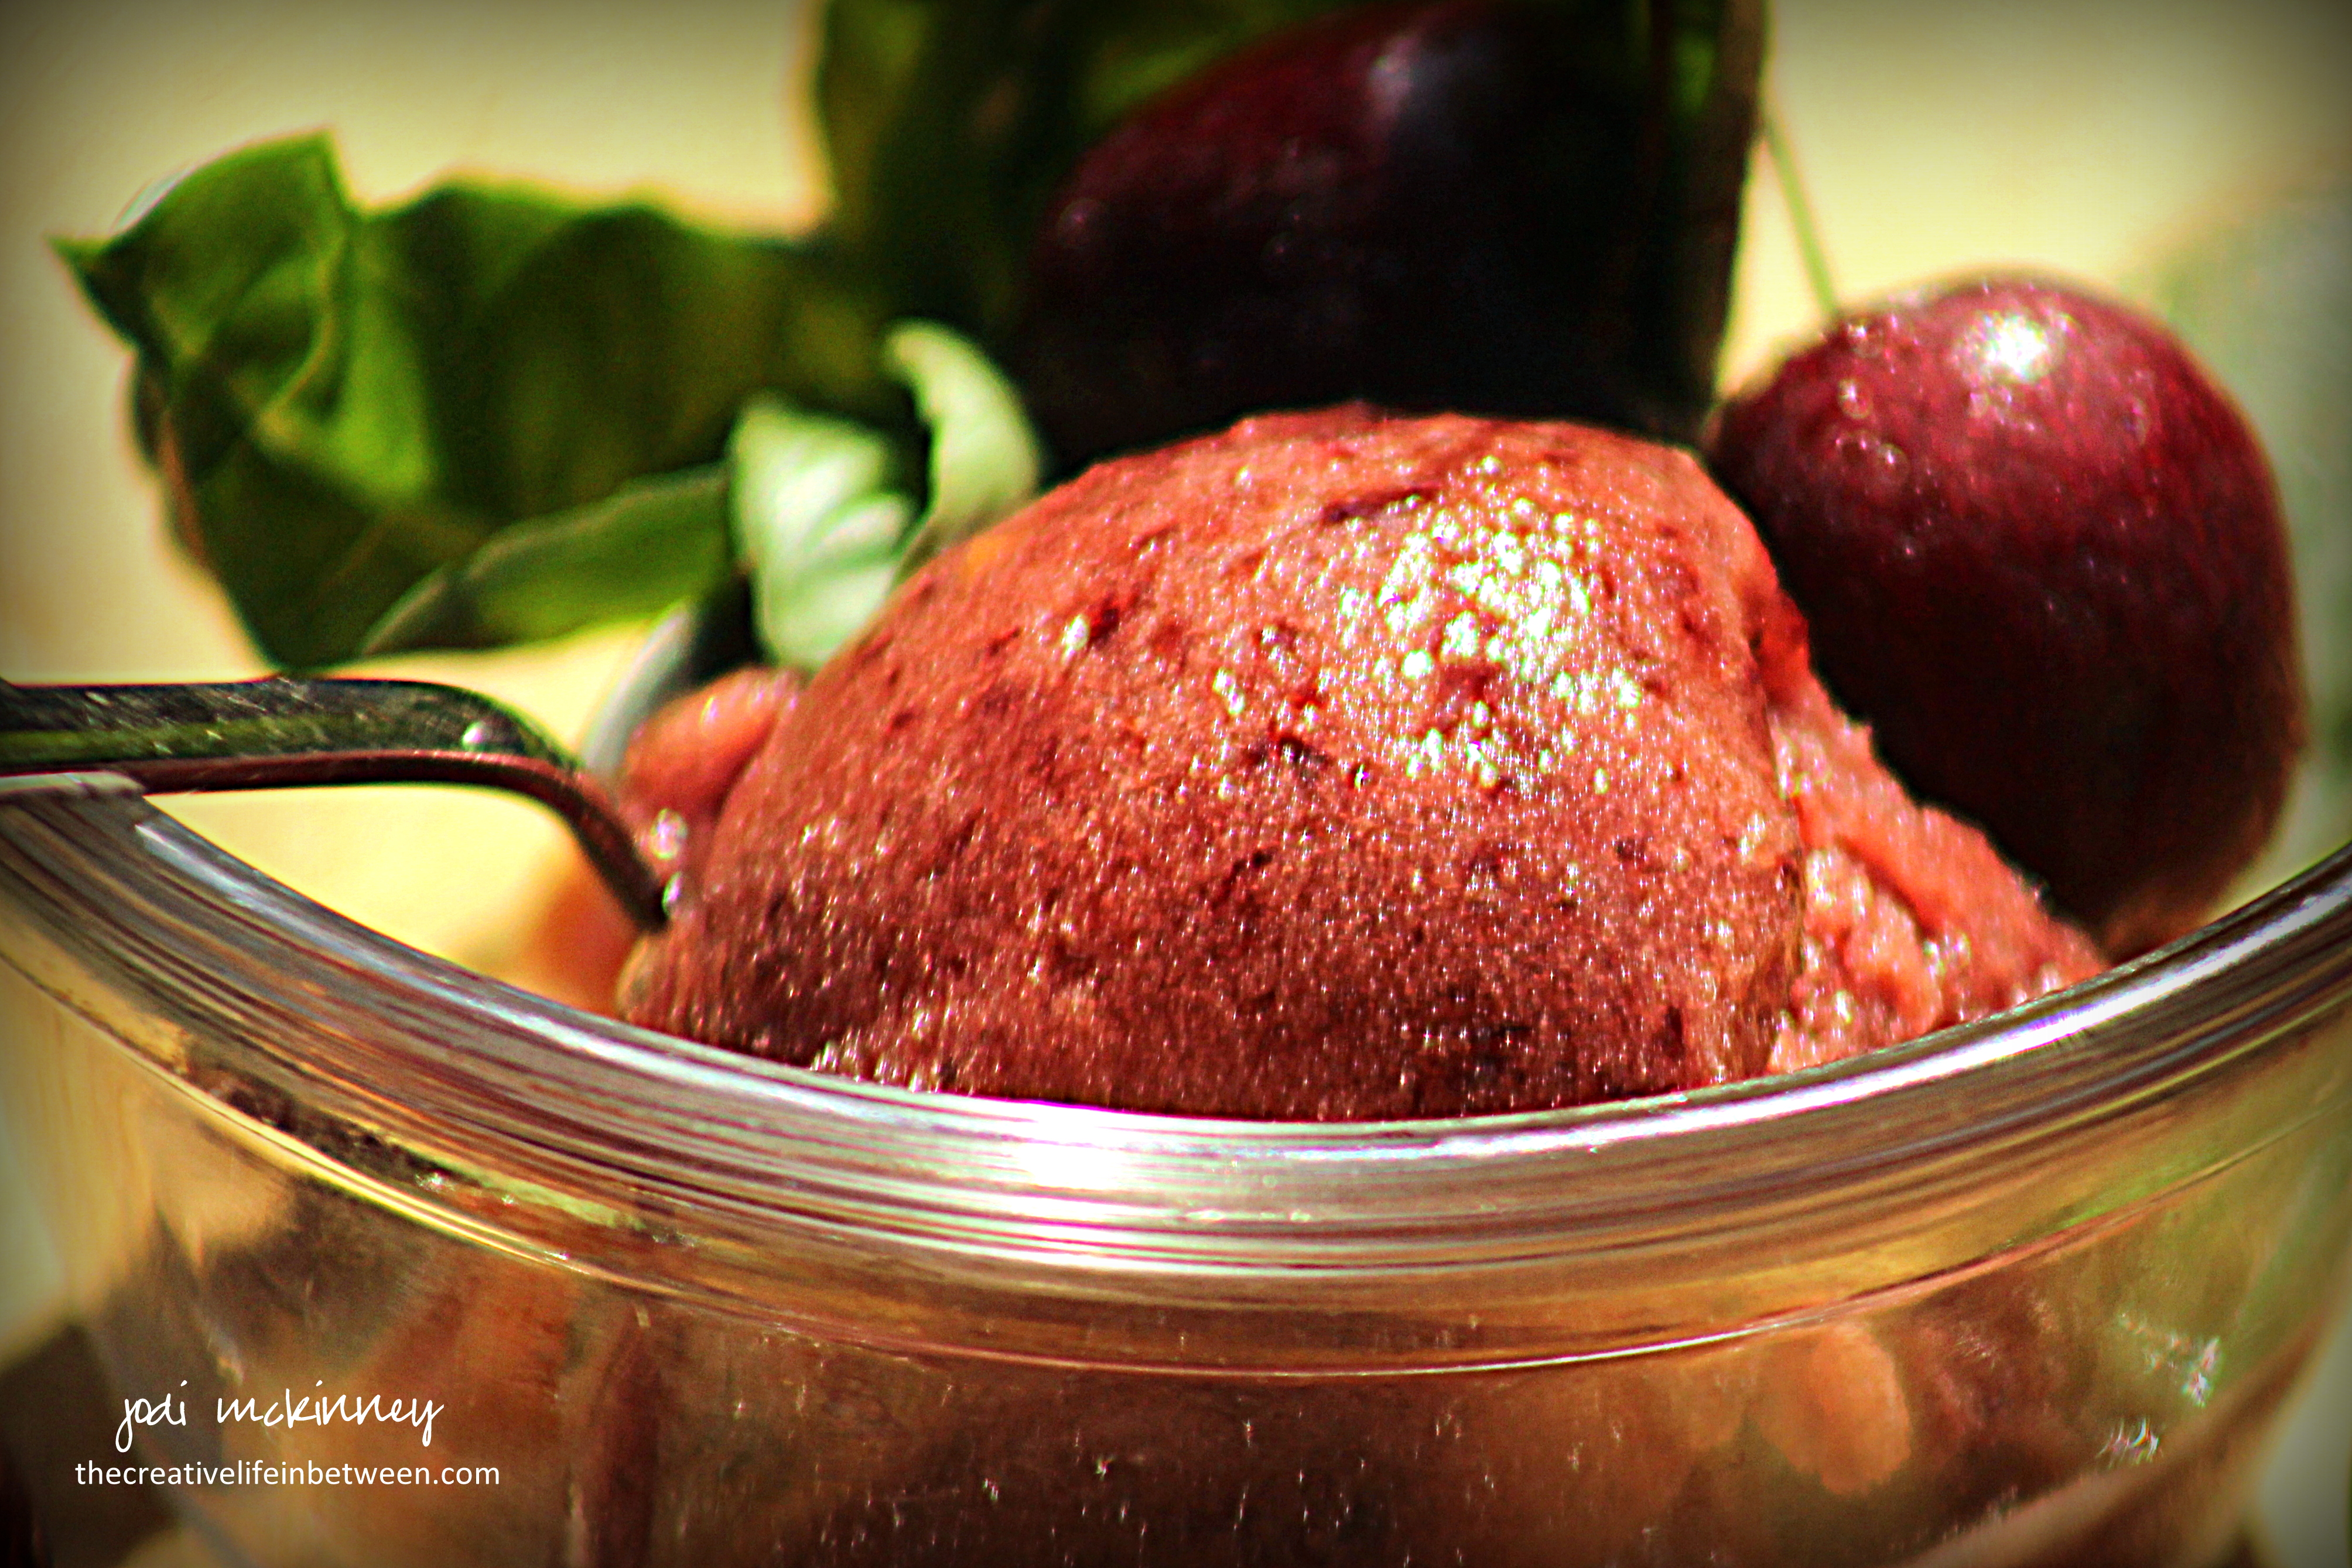
Homemade Dark Sweet Cherry and Basil Sorbet.
What could be more refreshing on a hot August day than deliciously creamy sorbet?!
And who knew how easy it is to make?
No special equipment needed.
Simple ingredients.
Gourmet flavor!
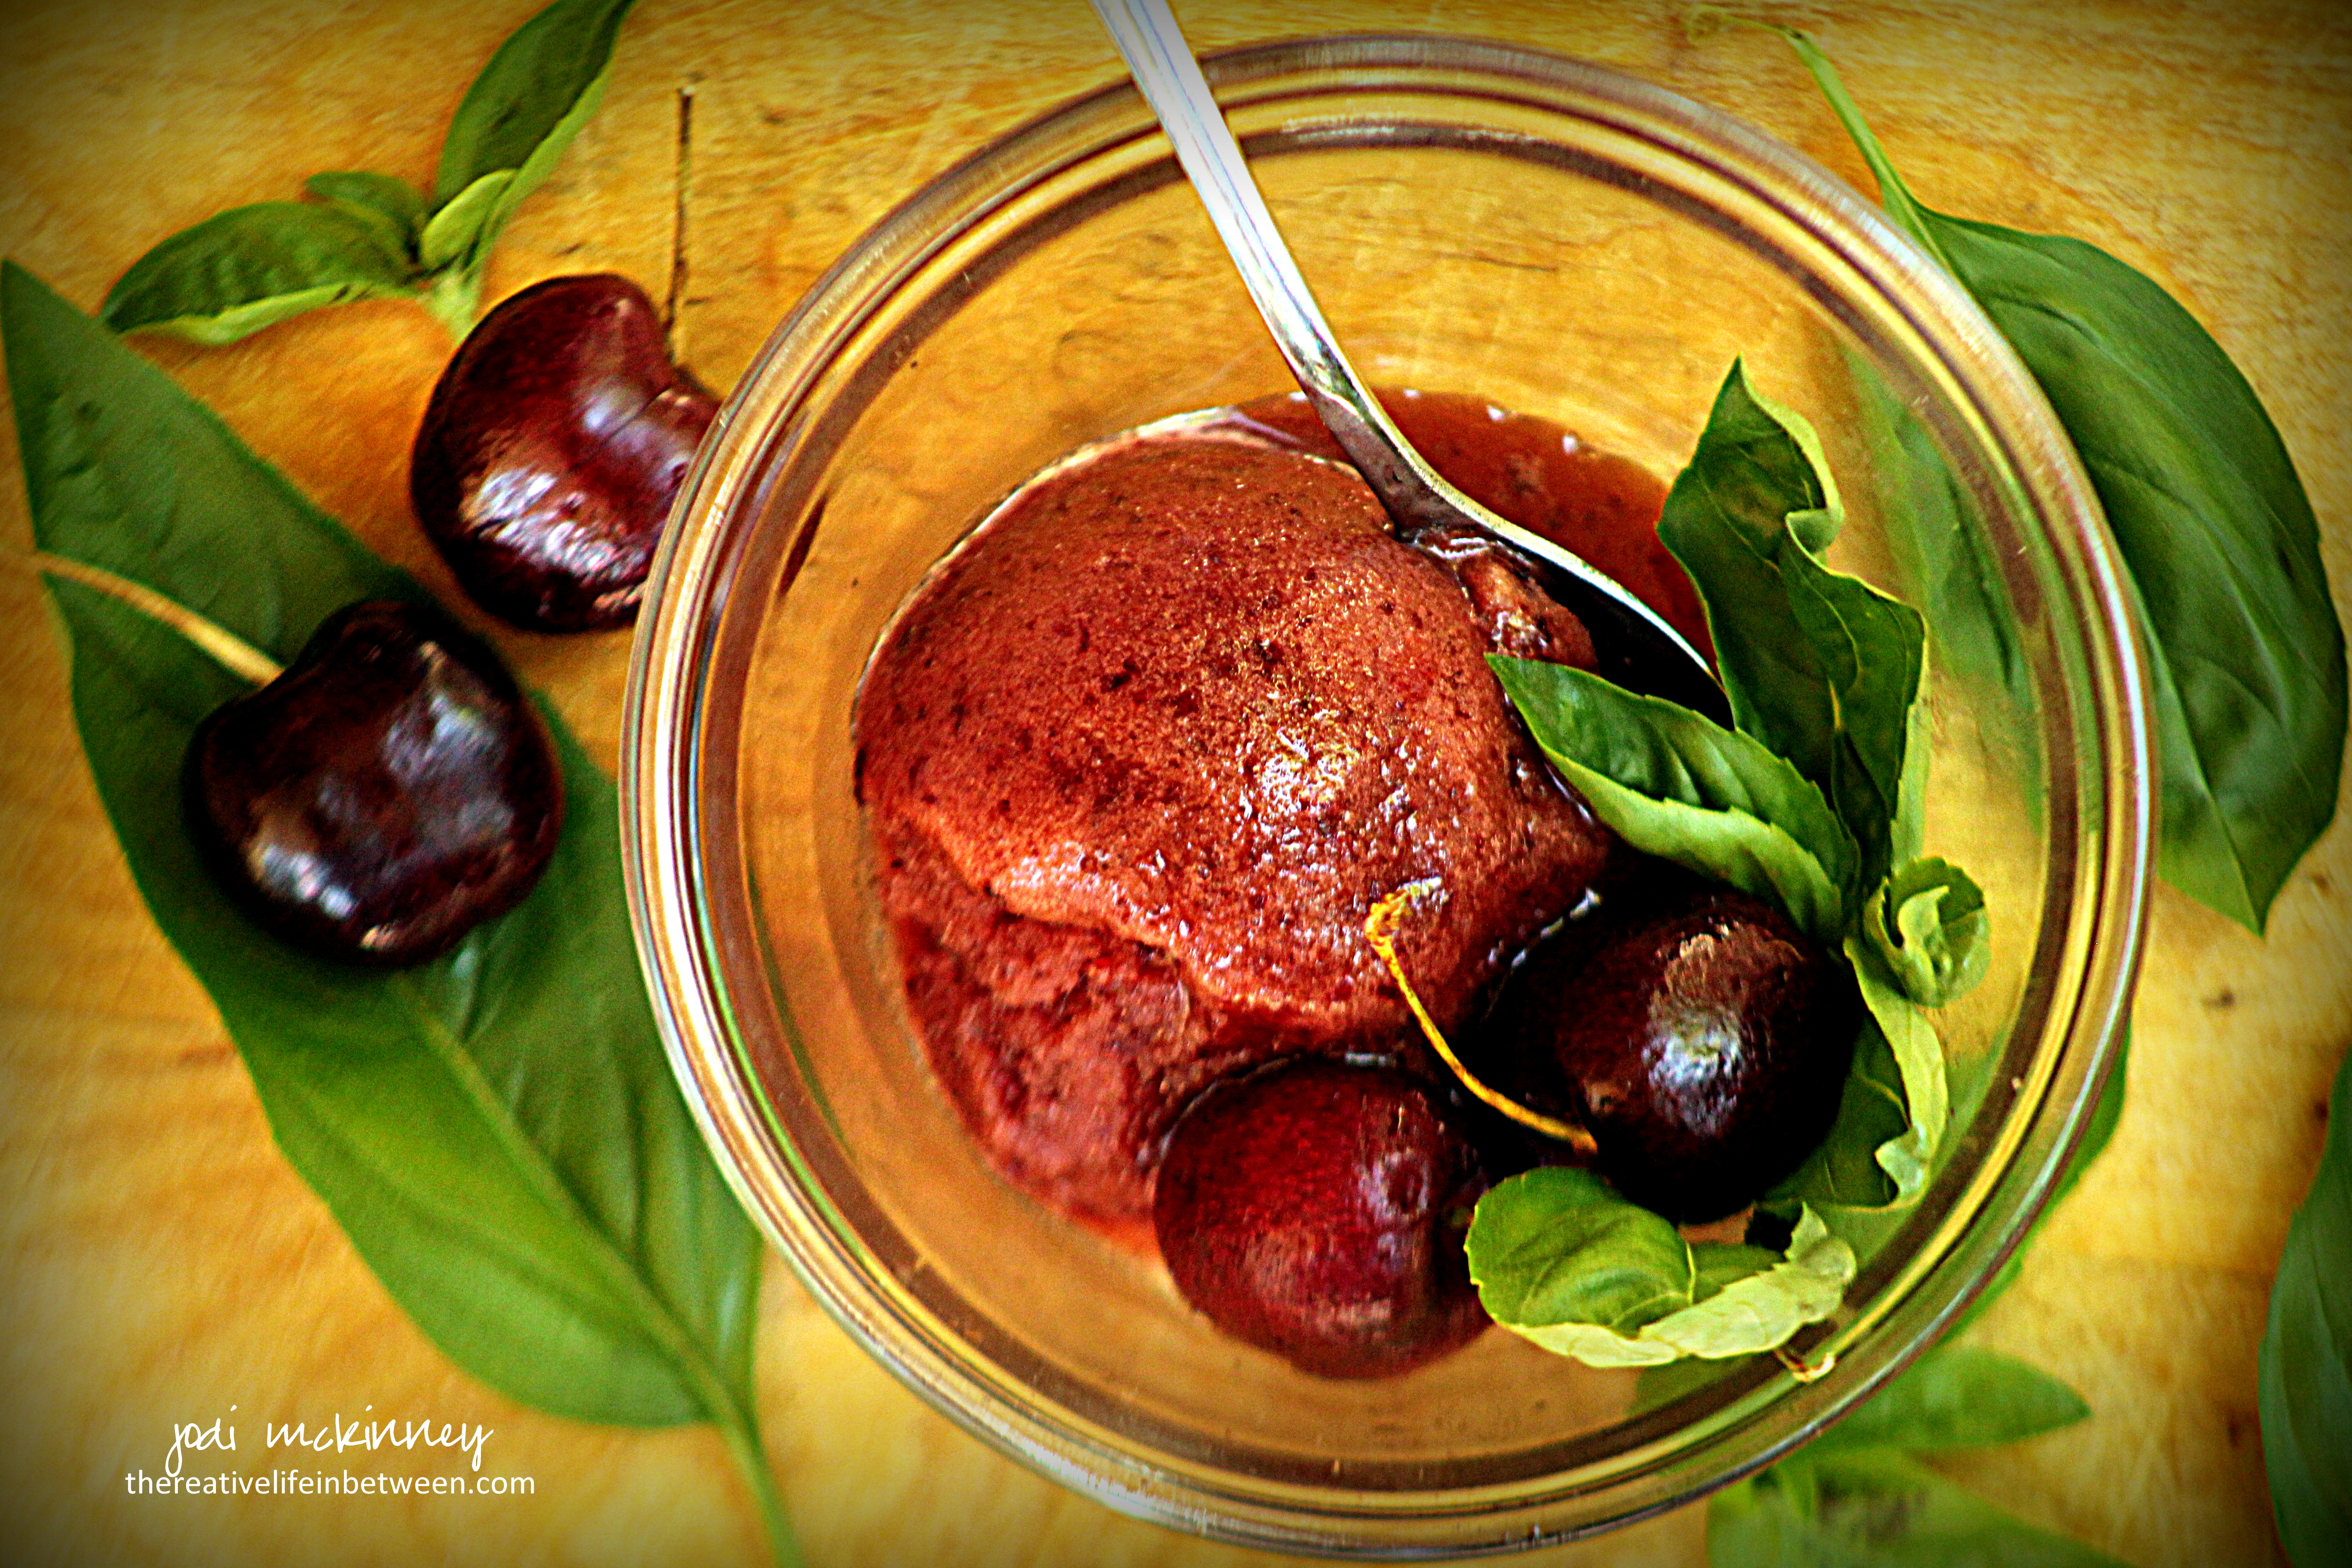
You simply make a simple syrup from water and sugar and blend with fresh fruit (and herbs if you like).
I made mine yesterday with fresh sweet dark cherries and a hint of fresh basil, but imagine all the possibilities! Cantaloupe, Raspberry, Blackberry, Blueberry, Pear, Watermelon, Honeydew, Pineapple, Kiwi, Mango……. Maybe a leaf or two of mint instead of basil. Maybe a sprig of rosemary. Maybe no herbs. A dash of fresh lemon or lime juice would add a lovely kick.
Here is the recipe for this simple, refreshing, indulgence.
Ingredients:
Directions:
Make simple syrup by boiling water and sugar for 2-3 minutes in small saucepan until sugar is dissolved. Remove from heat, and add basil leaves. Pour syrup into a small glass bowl or measuring cup and refrigerate approximately 1 hour until cooled. Remove and discard basil leaves.
Place cherries in a blender. Pour simple syrup over cherries. Blend on high until cherries are fully blended into syrup and no chunks remain. Pour into glass 9×13 dish and place in freezer. After one hour, stir with spoon from outside edges to center and mash together. Repeat after two hours.
Remove from freezer and place sorbet in blender again. Blend on high until consistency is creamy. Pour back into glass dish and place in freezer for another 2 hours or until ready to serve. Scoop out with ice cream scoop or spoon.
Enjoy!
Cheers & Hugs,
Jodi

Fresh Blueberry, Pistachio, & Edamame Salad with Goat Cheese.
Summer is such a glorious time of fresh bounty.

Salads become meals made from fresh fruits and vegetables. Like this yummy salad I made for lunch one day with some plump sweet and tart blueberries, crunchy pistachios, protein and fiber-rich edamame, and creamy crumbled goat cheese piled on a bed of greens.
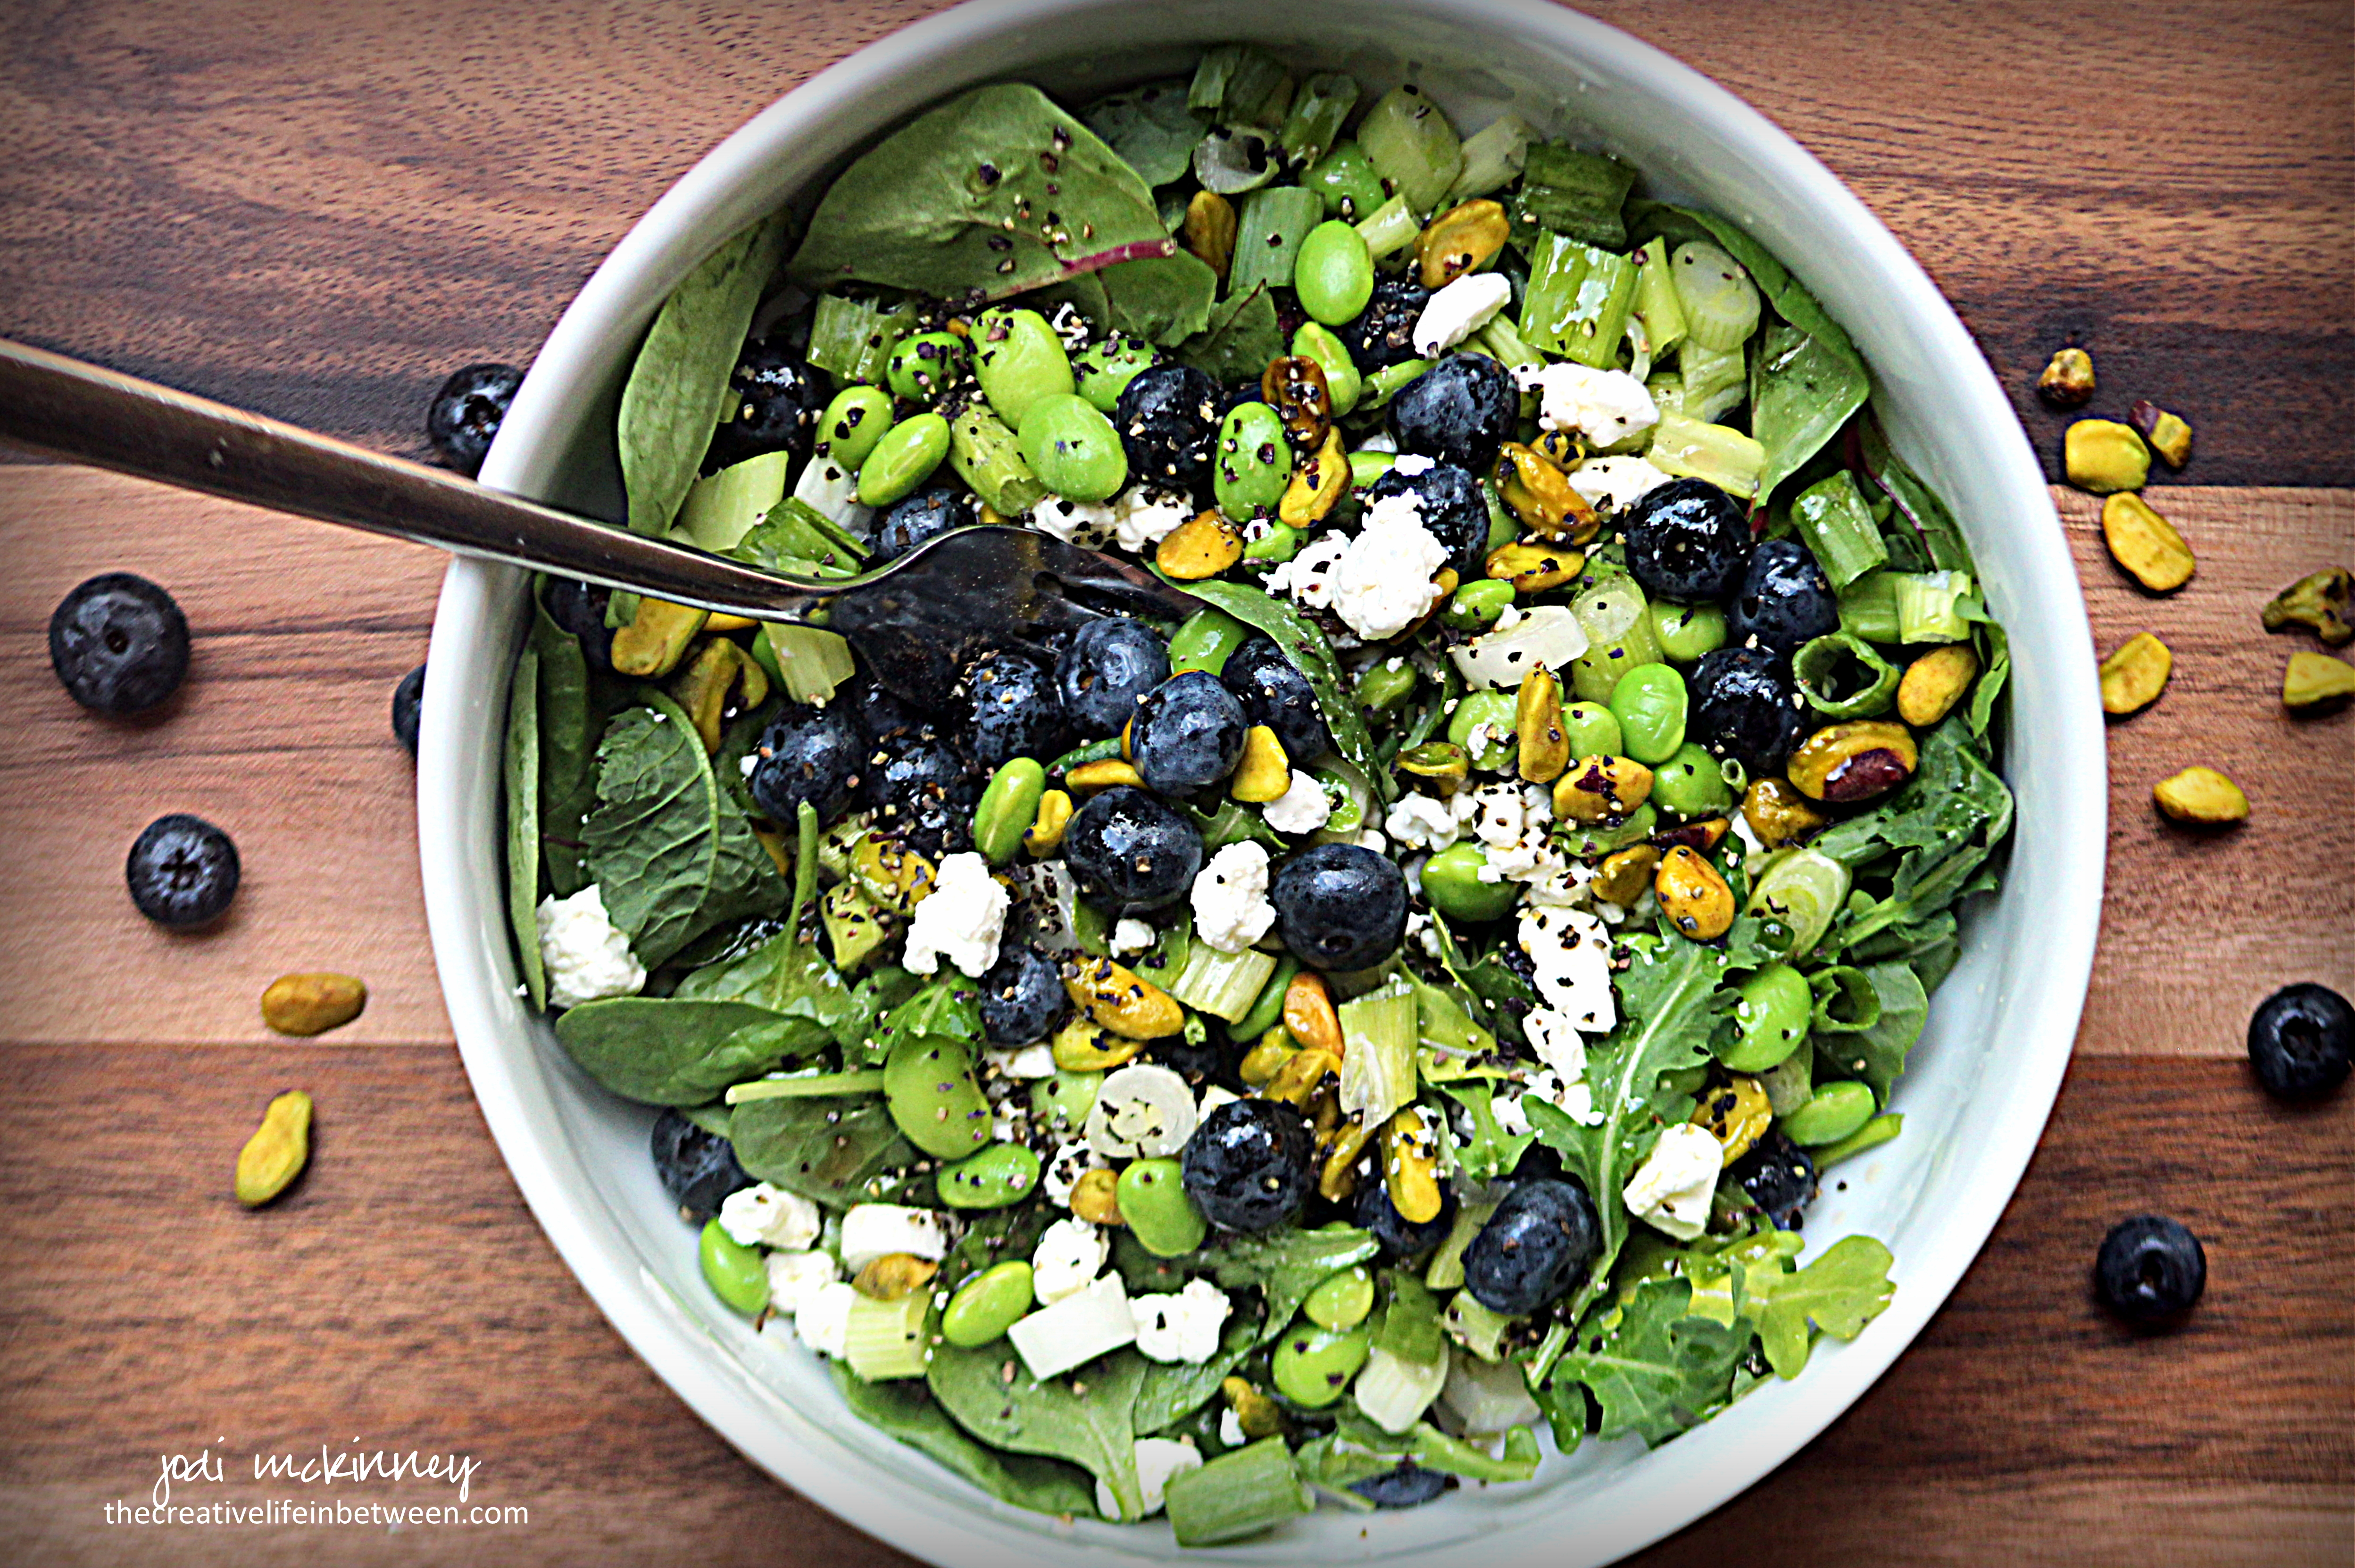
All of this drizzled with a honey red wine vinaigrette is heaven in a bowl!
What is your favorite summer salad? There are so many wonderful combinations and possibilities!
Ingredients:
Directions:
In a bowl, place a handful of mixed greens. Top with fresh blueberries, pistachios, edamame, goat cheese, and green onions (if desired). Drizzle with Red Wine Vinaigrette Dressing.
Enjoy!
Cheers & Hugs,
Jodi

Fresh Red Raspberry & Blueberry Pie.
Are you looking for an amazing fruit pie that is tart and sweet and bursting full of fresh fruits of the season?
I haven’t baked a pie in a while, so I thought it was high time I treated hubby to something he would love being that it is Father’s Day weekend and all.
He would choose pie over cake or cookies approximately 99.5 times out of 100 – conservatively speaking.

I had some fresh red raspberries and some fresh blueberries in the fridge, but not enough of either to make a whole pie, so I decided to try combining the two into one pie.
I researched some recipes and then decided to combine things I liked about different ones into my own creation – including using tapioca instead of cornstarch as the thickening agent for this pie. Grandma always used tapioca in her berry pies, so there is no other way in my book!

This pie turned out perfectly thickened and so full of fresh berry flavors. It was a complete hit with Hubby – especially when topped with a melting scoop of vanilla bean ice cream.
If you are looking for a new twist on berry pie, I hope you’ll give this recipe a try!
Ingredients:
Directions:
Preheat oven to 400 degrees F.
Line a 9 inch pie plate with bottom pastry.
In a bowl, combine berries, 1 cup sugar, tapioca, flour, lemon peel, vanilla, and cinnamon. Gently stir, and pour into pastry lined pie plate.
Top with remaining pie crust cut and wove into lattice.
Brush with milk or water, and sprinkle with remaining 1 Tbsp. sugar.
Bake at 400 degrees F for 45-50 minutes or until crust is golden brown and filling is bubbly.
Enjoy!
Cheers & Hugs,
Jodi

I thought it would be nice to make a sweet treat this past weekend for the guys since I had been away for awhile. I didn’t have enough blueberries to make a pie, but I had a nice amount to make this yummy blueberry shortbread tart.

What could be bad about a shortbread crust, some jam and blueberries, fresh lemon juice and zest, and a crumbly topping?!?!

It went together easily, only took 30 minutes to make, and was a hit! (Hubby said it reminded him of a toasted blueberry Pop-Tart (and that was meant as a compliment – lol!)
I can’t recall the last time I bought Pop-Tarts, but this is a tart, and it is filled with fruit, and it is baked, so I guess that pretty well qualifies it to taste a bit like it. I can imagine this would also be great with many other fruit fillings (aka Pop-Tart flavors) – Cherry, Raspberry, Blackberry, Peach, Apple & Cinnamon, Strawberry, or Peach – to name a few.
My guys topped theirs with a scoop of vanilla ice cream, because, well…. just because!
It was a great dessert to end a hot summer day and meal of grilled sausage sandwiches with onions and peppers on hard rolls, fresh sweet corn on the cob rolled in butter and sprinkled with Old Bay Seasoning, and a cucumber and tomato salad fresh from the garden drizzled with tangy red wine vinegar, salt and pepper.
Hungry yet?!
Preheat the oven to 350 degrees F.
Grease 9-inch tart pan.
Beat butter, sugars, lemon juice and zest with electric mixer approx. 3 mins until well incorporated. Add flour and salt, and mix until well blended and forming clumps.
Press 2/3 of the mixture evenly into the prepared pan and going up sides.
Spread with the blueberry preserves or jam evenly over the dough, leaving a ¼-inch border. Sprinkle with blueberries.
Crumble the remaining dough into large crumbs and sprinkle evenly over filling.
Bake 30 – 40 mins. until lightly browned.
Cheers & Hugs,
Jodi
*recipe slightly adapted from Erren’s Kitchen
