Pan Seared Lemon and Garlic Mahi Mahi

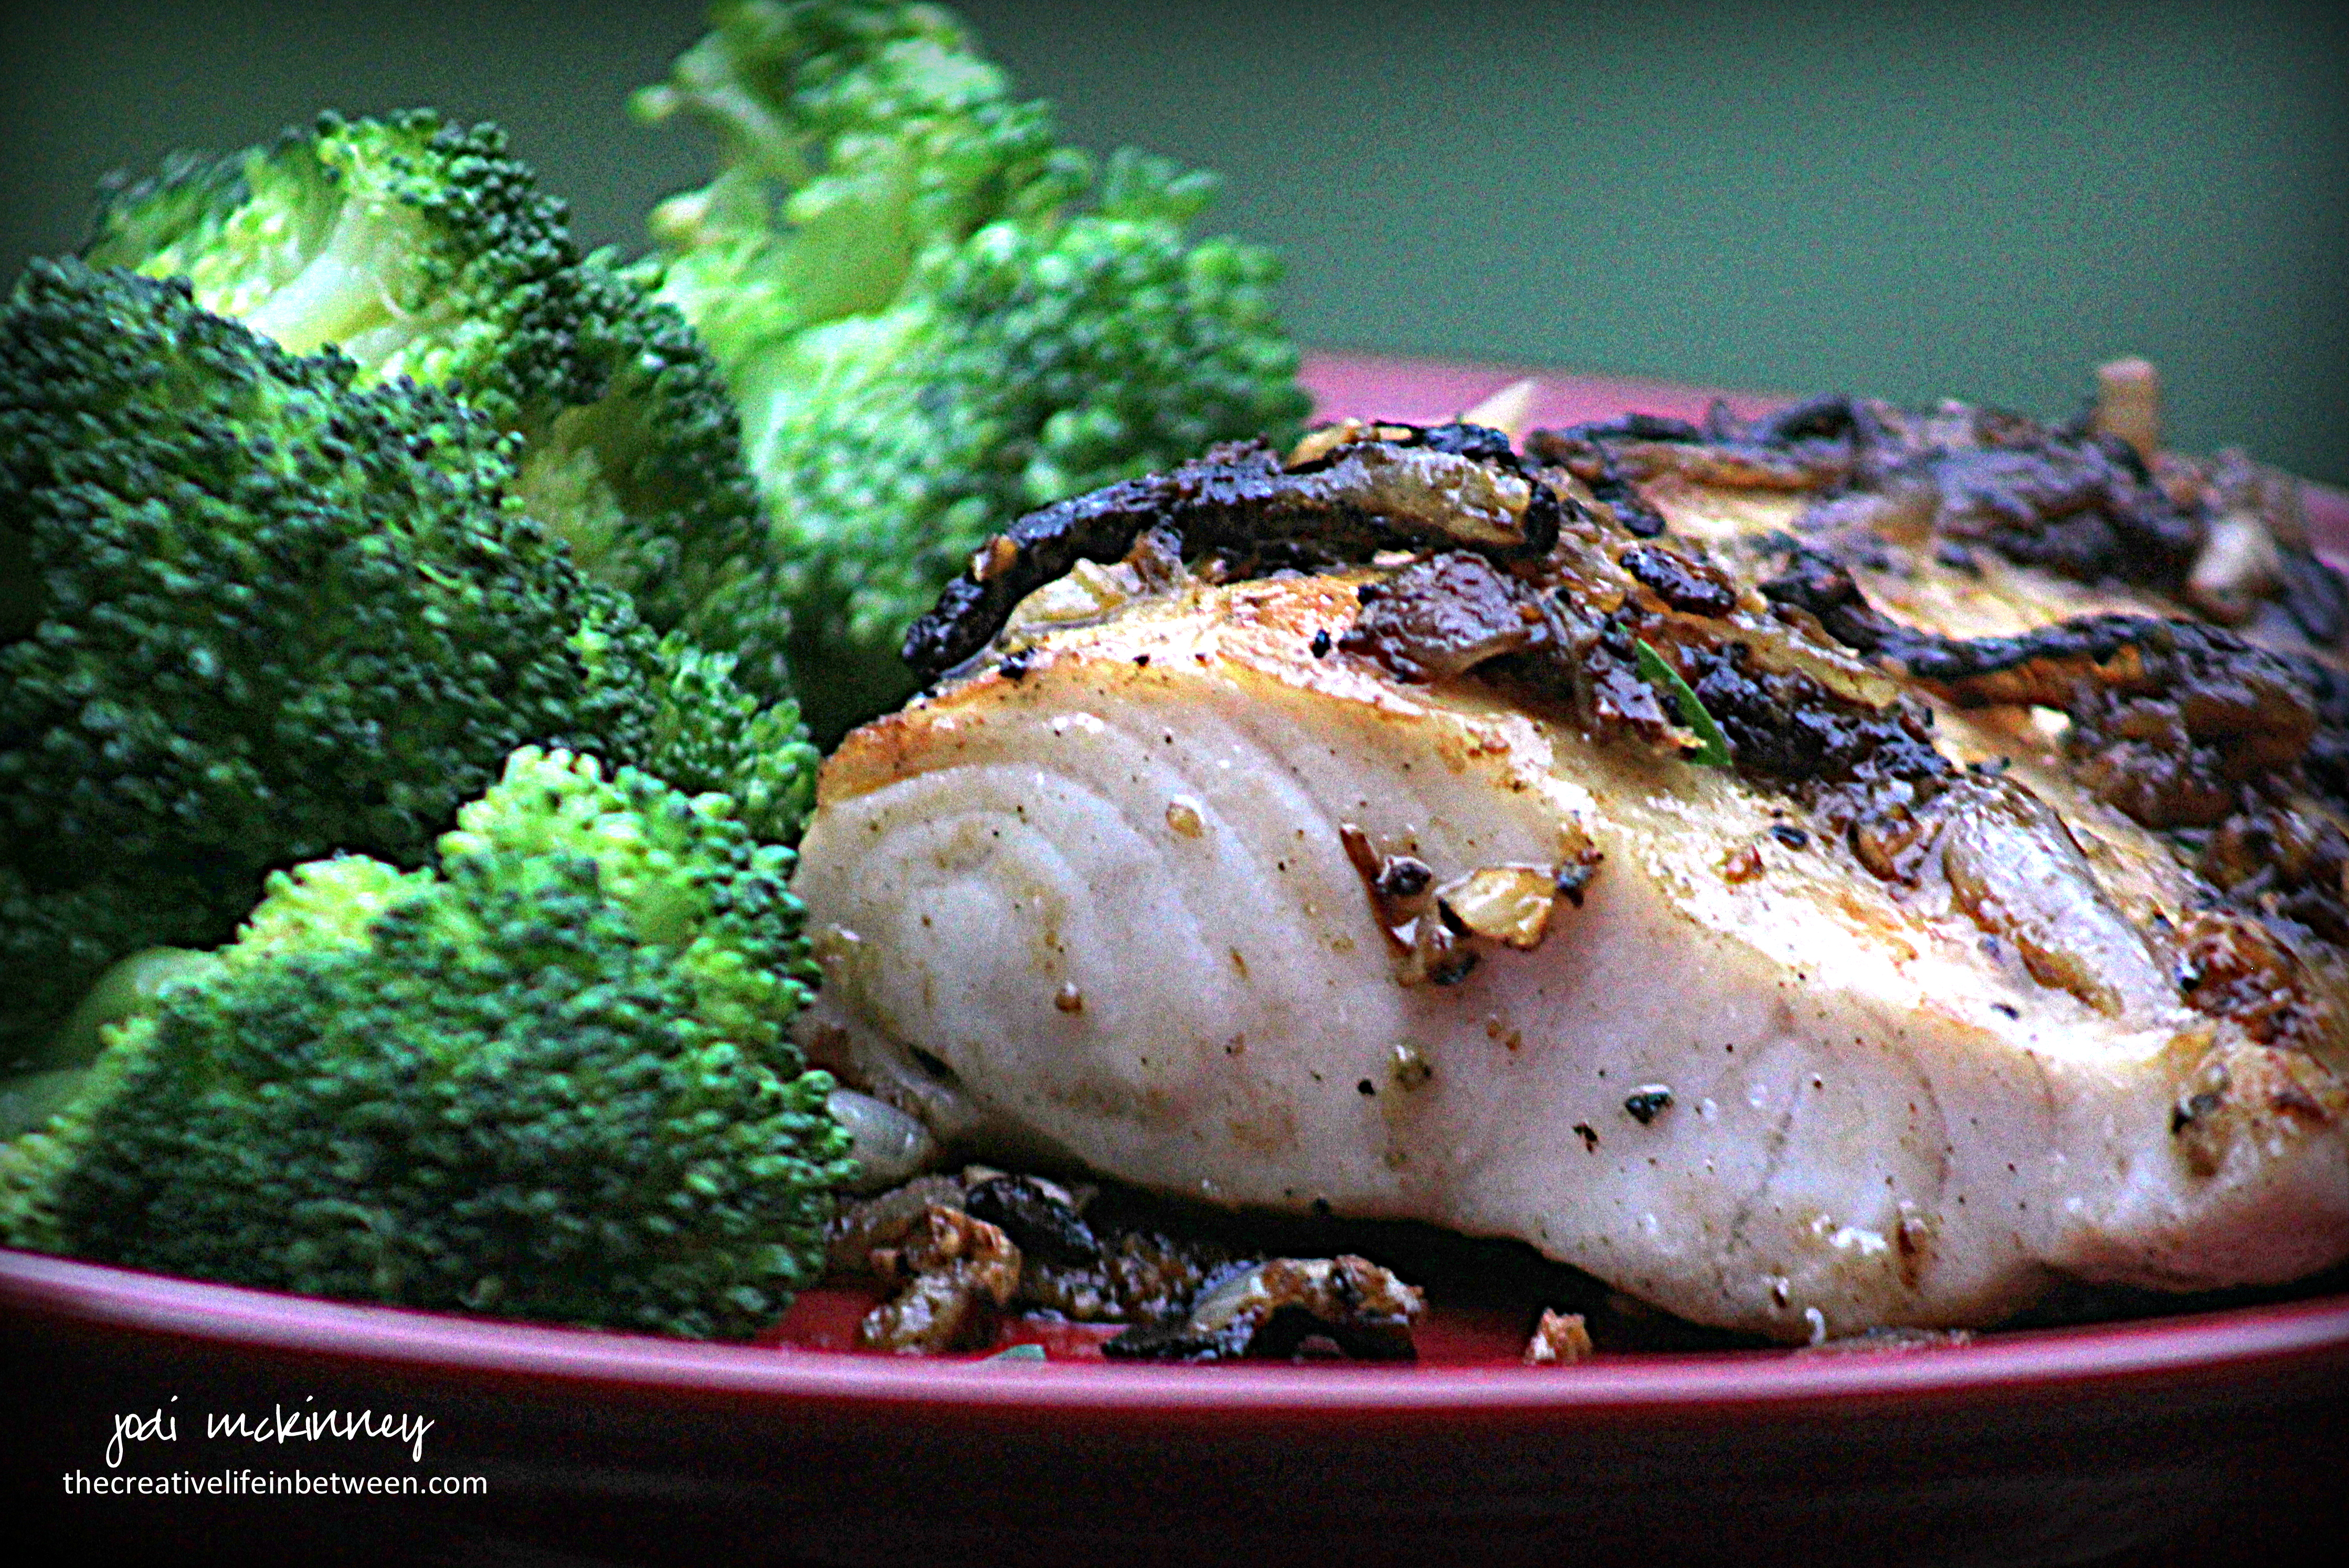
Pan Seared Lemon and Garlic Mahi Mahi.

I adooooore seafood!

When eating out, I will likely order seafood 80% of the time.

Chilean Sea Bass… Salmon…Lobster… Shrimp… Scallops…  Tuna…  Fish Sandwiches…  Fish and Chips… Fish Tacos!

And then there is Mahi Mahi!  Ohhhh  the light, mild, delicate flavor of heavenly deliciousness…..  no wonder you have to say it TWICE!

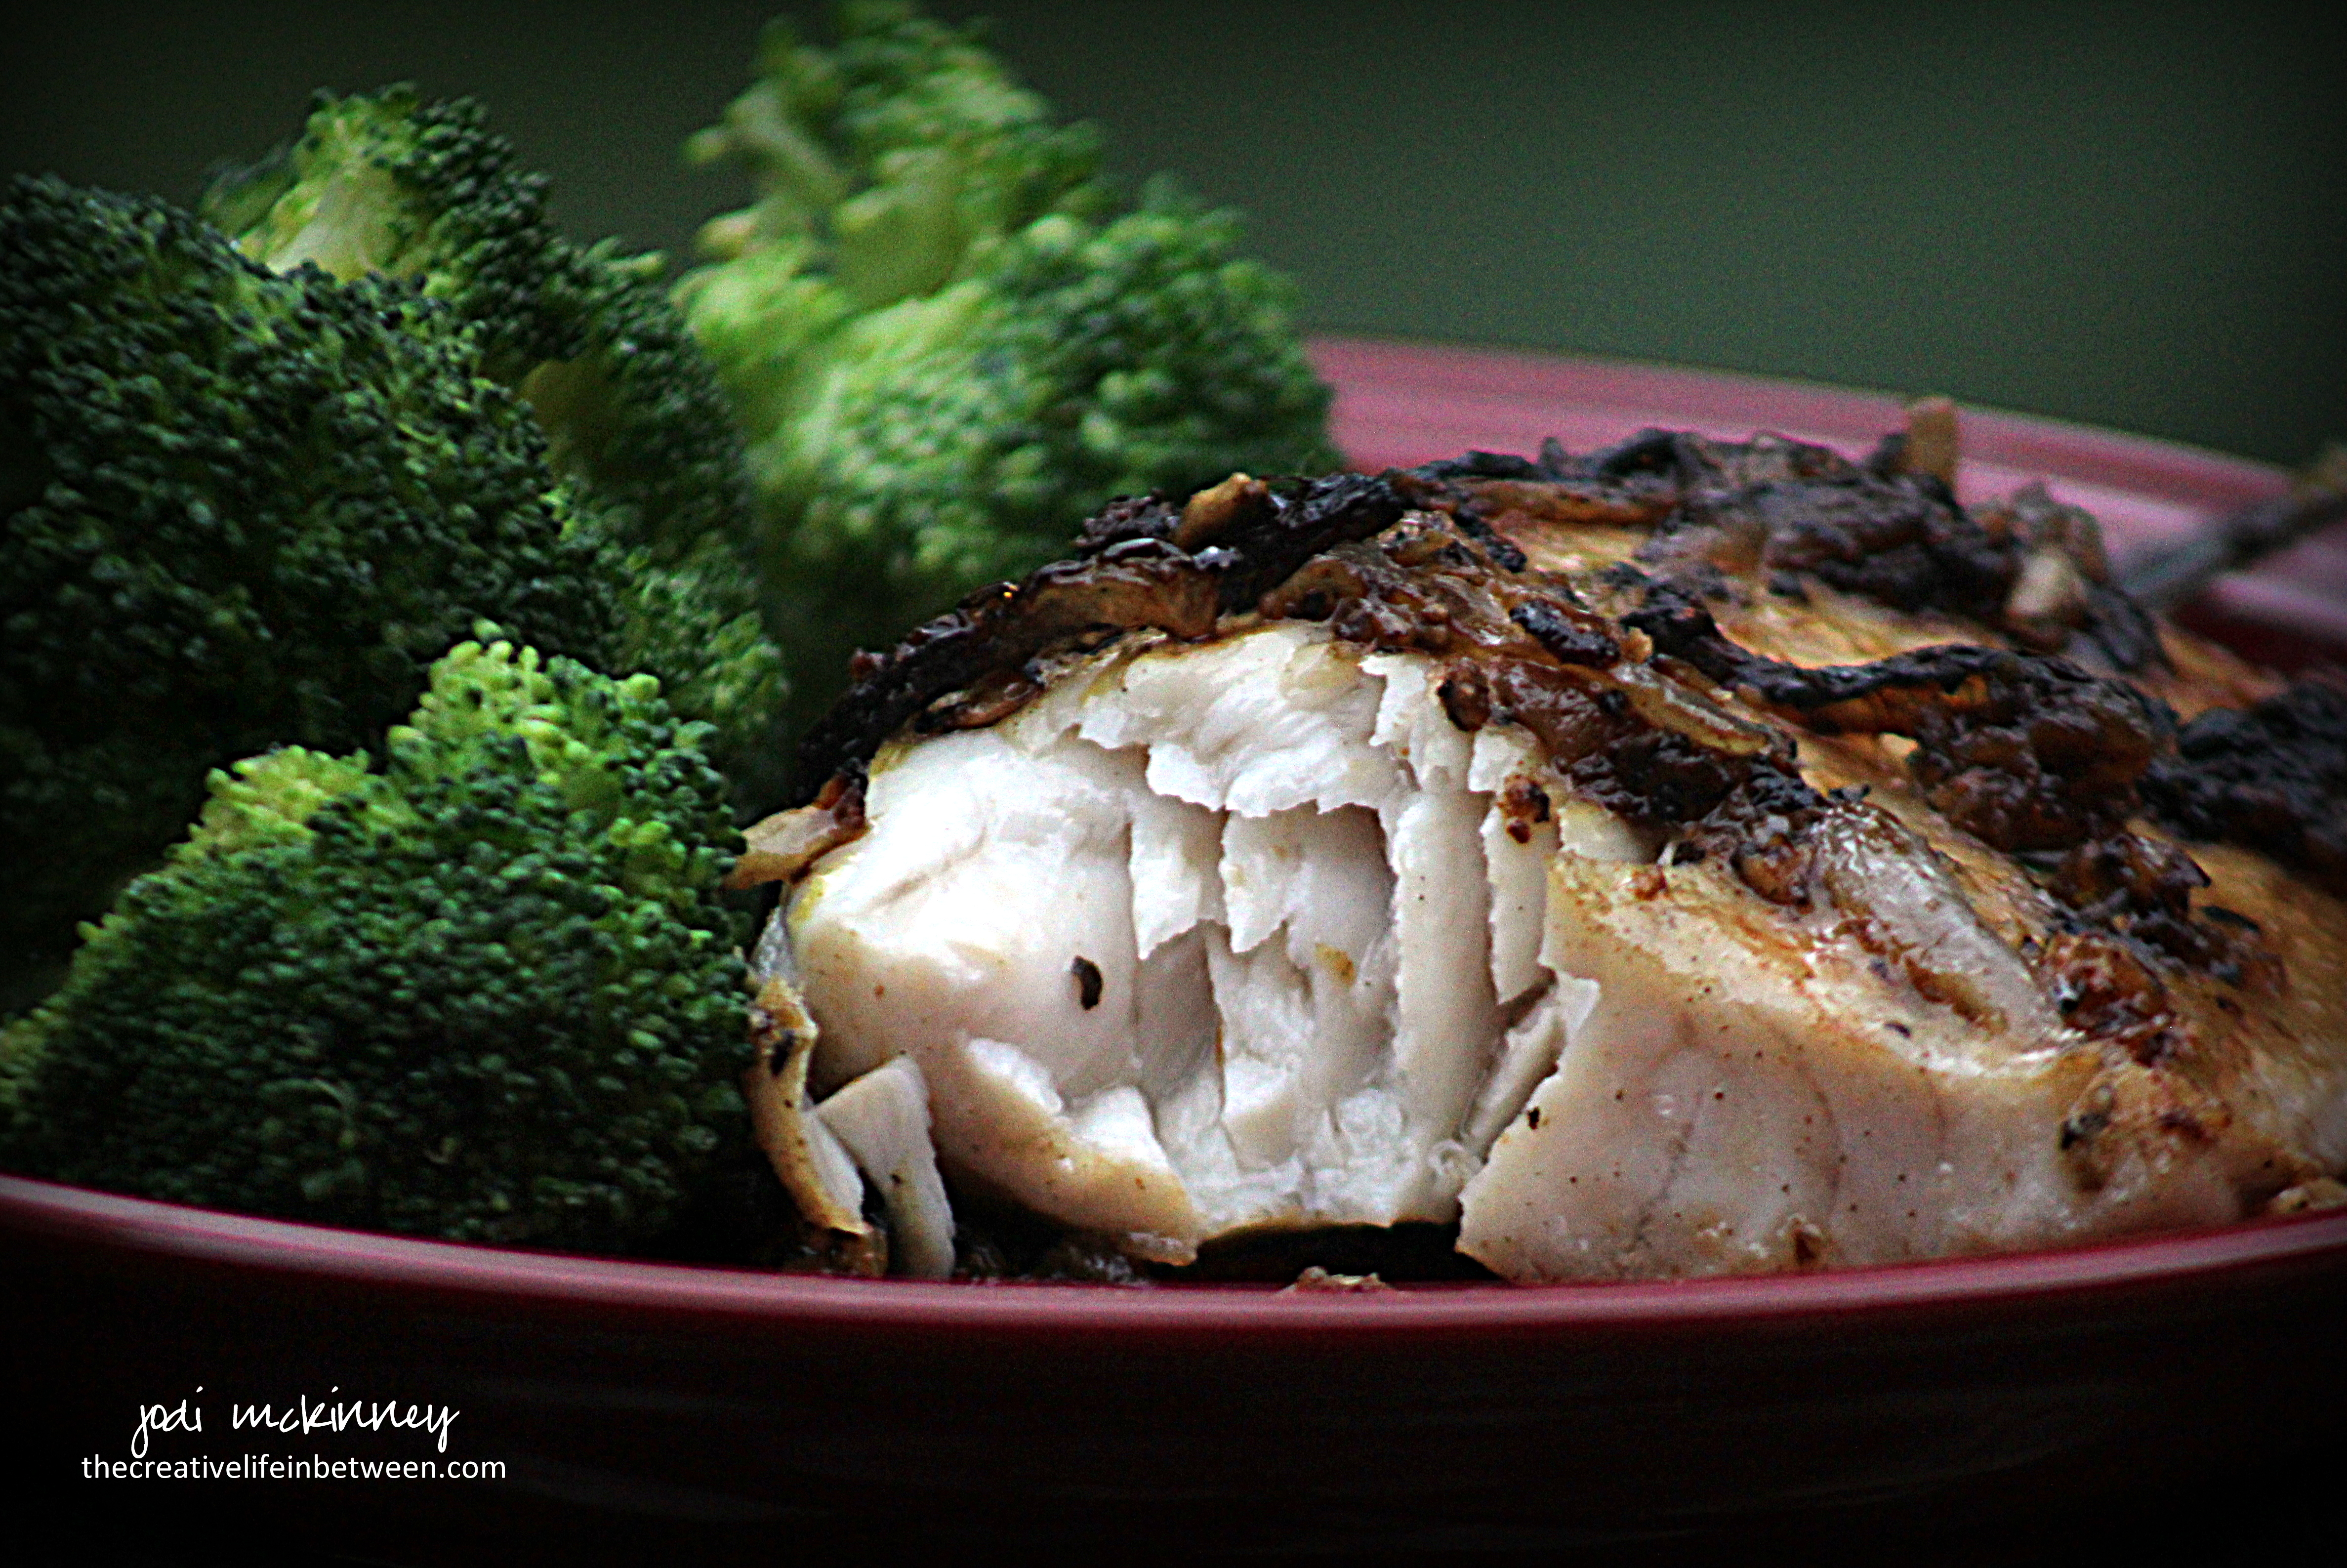
I don’t often cook seafood at home as Hubby is not nearly the fan that I am, but I snuck this yumminess in last night for dinner.  A couple of wonderful wild caught Mahi Mahi fillets pan seared with onions, garlic, thyme and lemon zest – this recipe is quick as a wink, healthy as all get out (did you know a 3-4 ounce serving of Mahi Mahi has 20 grams of protein, contains all the amino acides you need to survive, and is under 100 calories?!), and melts in your mouth better than butter!

Here is how I made it thanks to the inspiration from ChicFitChef:

Pan Seared Lemon and Garlic Mahi Mahi

Ingredients:

  • 2 3-4oz Mahi Mahi fillets, patted dry
  • 2 lemons, zested and juice reserved
  • 1 tsp dried thyme or 1 Tbsp. freshly minced thyme (fresh is always preferred if possible)
  • salt and pepper to taste
  • 1/2 large sweet onion, sliced
  • 3 cloves garlic, minced
  • Olive oil

Directions:

Heat olive oil in skillet until searing hot!

Meanwhile, combine lemon zest, thyme, salt and pepper.   Coat patted-dry fish fillets on both sides with this seasoning.

Add onion slices to hot skillet.  Once onions are golden brown (about 2-3 minutes), add fish to sear for 3-4 minutes (without moving).

Turn fish fillets over with a spatula, and let sear for another 3-4 minutes on other side.

Lower heat, and add minced garlic and lemon juice.  Cover pan, and cook fish another 3-4 minutes.

Remove from heat and serve.

Enjoy!

Cheers & Hugs,
Jodi

Avocado Toast

Avocado Toast with Spicy Pico de Gallo

Avocado Toast with Spicy Pico de Gallo

Avocado Toast.

My latest obsession.

Skip the butter.
Skip the jam.

A perfectly ripe,
creamy avocado half
spread on toast.

Topped with a spoonful
of fresh pico de gallo
with a slight kick
and a dash of salt.

O M Geee!

When only using a half of an avocado, I’ve found a way to keep the other half fresh until the next day.  Leave the pit in and cover tightly with plastic wrap to keep out any bit of air that could touch it and turn it brown, then refrigerate.  I don’t refrigerate avocado before they are cut, but if you only eat half, I think it best to refrigerate the cut one.

Leaving the pit in is key too.  A friend whose son works in a restaurant that makes fresh guacamole shared this life-changing tip with me recently.  When making fresh guacamole, throw one of the pits in.  It keeps the guac from turning brown.  It really works!

How do you like your avocado toast?

Cheers & Hugs,
Jodi

Fresh Blueberry, Pistachio, & Edamame Salad with Goat Cheese

Fresh Blueberry, Pistachio, & Edamame Salad with Goat Cheese.

Summer is such a glorious time of fresh bounty.

Salads become meals made from fresh fruits and vegetables.  Like this yummy salad I made for lunch one day with some plump sweet and tart blueberries, crunchy pistachios, protein and fiber-rich edamame, and creamy crumbled goat cheese piled on a bed of greens.

All of this drizzled with a honey red wine vinaigrette is heaven in a bowl!

What is your favorite summer salad?  There are so many wonderful combinations and possibilities!

Fresh Blueberry, Pistachio, & Edamame Salad with Goat Cheese

Ingredients:

  • Mixed Greens (Kale, Arugula, Spinach Swiss Chard – any of your faves)
  • Fresh Blueberries
  • Pistachio Nuts, shelled
  • Edamame, shelled
  • Goat Cheese, crumbled
  • Green Onions, chopped (optional)
  • Red Wine Vinaigrette Dressing (homemade or your fave – this is how I make mine – it will make more than you need for one salad) 
    • 1/4 cup Red Wine Vinegar
    • 1/2 cup Olive Oil
    •  Tbsp Honey
    • Salt & Pepper

Directions:

In a bowl, place a handful of mixed greens.  Top with fresh blueberries, pistachios, edamame, goat cheese, and green onions (if desired).  Drizzle with Red Wine Vinaigrette Dressing.

Enjoy!

Cheers & Hugs,
Jodi

Honey Garlic Roasted Carrots

Honey Garlic Roasted Carrots.

Are you looking for a quick, easy, beautiful, AND delicious vegetable to prepare for an any-night dinner that is fit for company too?

These beautiful, colorful carrots are just the ticket.  They are as delicious and nutritious as they are beautiful.

Grab a bag of carrots and roast them up.

I hope you love them as much as we did!

Honey Garlic Roasted Carrots

Ingredients:

Directions:

Preheat oven to 400 degrees F.

Peel and cut carrots.  Place in shallow baking stone or pan.  Drizzle with olive oil.  Sprinkle with salt and pepper.  Drizzle with honey.  Top with rosemary and garlic.

Toss gently and roast for 20-30 minutes, stirring every 10 minutes.

Enjoy!

Cheers & Hugs,
Jodi

Easy Grilled Sweet Corn on the Cob

Easy Grilled Sweet Corn on the Cob.

It is Fresh Sweet Corn on the Cob Season in our part of the world!

Corn is a vegetable we rarely eat – except in the heat of summer when it is fresh and sweet and bought the same day it was picked from a local farm stand.

After being in Arizona for a week recently, where it seemed everything we ordered had grilled or roasted corn in it (even a delicious deconstructed Caesar Salad), I had corn on the brain.

We had always boiled our sweet corn on the cob, but I fell in love with the magically charred kernels we experienced on our Southwest trip, so we decided to grill it this time.

O.M.G!  We LOVED it!  Oh how easy!  Keep the heat outside by using the grill.  And save clean up time with no pots of boiling hot water.

When I buy corn on the cob, even though is only the two of us now, I buy a full dozen.  We usually only eat about half of it, so we cut the rest off the cob and either freeze it in Ziploc bags for a fresh corn treat in the winter or save it for using in other recipes or reheating another day that week.

Here is how we did it.  Quick, easy, and oh so delicious!

By the way – I think the mistake many people make with corn on the cob is OVERcooking it.  Sweet corn on the cob truly tastes its best when you just cook it long enough to heat, but retain its wonderful sweetness, crunch and flavor.  Also, don’t look for the biggest ears of corn.  They could likely be tough.  Look for smaller, young, tender ears, and buy them from the farm or farm market – not the grocery store, where it could be several days old.  There is nothing like eating corn the day it is picked!

Roll it in some butter and sprinkle with salt and pepper for even more yumminess, but when you get fresh, sweet, seasonal corn, it barely needs anything else!

Here is how we made it.

Easy Grilled Sweet Corn on the Cob

Ingredients:

  • 1 dozen fresh ears of corn on the cob

Directions:

Heat grill to approximately 450 degrees F.

Husk corn, and clean of the silks as best you can.  Rinse under cold water.

Place cleaned ears of corn directly on grill for 5 minutes.  Turn and grill for another 5 minutes.

Serve immediately with sweet butter, salt, and pepper.

Enjoy!

Cheers & Hugs,
Jodi


Roasted Vegetables

Roasted Vegetables.

You know those times when you get to the end of what you bought for the week and before you get to the grocery store and only have a handful of this and a chunk of that and a sliver of this in the fridge?

One day last week, I wanted to make a vegetable, but only had a bit of this and that.  I had a quarter of a small head of purple cabbage, a bulb of fennel, a half a bag of carrots, a small bag of golden fingerling potatoes.

So I tossed these together with a sliced onion and a few bulbs of garlic, drizzled it with some wonderful olive oil our son and daughter-in-law brought us back from their honeymoon in Greece.  I sprinkled it with salt and pepper and some chopped fresh rosemary.  I roasted it in a 400 degree F oven for about a half hour, and it turned out amazing!

You could throw in any vegetables you have left in your vegetable crisper at the end of the week.  Roasting vegetables makes them taste so amazingly delicious!  They become caramelized and tender and mellow.

I tried fennel raw chopped up on a salad, and have to say it was a bit too strong for my taste.  Maybe I added too much.  But when I roast it, I seriously cannot get enough of it!  It transforms and mellows the flavor into something absolutely divine!

What combination of vegetables do you like best to roast?

Cheers & Hugs,
Jodi

Red Quinoa Salad with Avocado, Black Beans & Corn

Red Quinoa Salad with Avocado, Black Beans, and Corn.

I love legumes, and I am really growing to love quinoa.  I recently tried this new salad for dinner that was so so delicious, filling, and healthy.

A one-cup serving of quinoa is packed with 9g proteins, 5g fiber, and 20g carbohydrate. Red quinoa is also rich in magnesium, manganese, copper, iron and phosphorous. It contains high quantities of lysine, an essential amino acid.

Legumes like black beans and edamame are also high in protein and fiber, and avocado is extremely nutrient dense.

To eat something that is so easy, so healthy, so pretty, and so delicious is a win-win in my book!

Are you a legume lover?  Quinoa connoisseur?  I’d love to hear your favorite ways to enjoy!

Red Quinoa Salad with Avocado, Black Beans & Corn

Ingredients:

  • 1 cup Red Quinoa, cooked in broth and cooled
  • 1 avocado, sliced
  • 1 15-oz can black beans, rinsed and drained
  • 1 cup corn, frozen, roasted, or fresh off cob
  • 1/4 cup Sweet Vidalia or Green Onion, chopped
  • 1/2 cup edamame (optional)
  • 1 lime, juiced
  • Cilantro, fresh chopped, to taste
  • 1 tsp. Red Wine Vinegar
  • 1 Tbsp. Olive Oil
  • Salt & Pepper
  • Cherry tomato (optional) for garnish

Directions

Cook quinoa, and set aside to cool.

Toss vegetables together gently.  Drizzle with lime juice, vinegar and oil.  Season with salt, pepper and cilantro.  Gently toss.

Spoon quinoa onto plate.  Top with a generous scoop of vegetable salad.  Garnish, as desired, with quartered cherry tomato.

Enjoy!

Cheers & Hugs,
Jodi


Roasted Brussels Sprouts & Chicken Salad

Roasted Brussels Sprouts & Chicken Salad.

On warm Summer days, salads are so great for dinner!

And there are so many fresh ingredients available to mix and match.

I had some fresh Brussels Sprouts and thought they might work great in a dinner salad.

They are so delicious roasted simply with olive oil, garlic powder, salt and pepper.

Then all you have to do is add your favorite greens to a bowl and top with some yummy, healthy additions of fruit and nuts and cheese and protein and more veggies.

The grand finale topping is the roasted Brussels sprouts and a drizzle of balsamic vinaigrette.  It is a full meal deal covering all the  bases!

Here’s the recipe for the way I made it, but feel free to mix and match and tweak it up to how you like.   Roasted Brussels sprouts are a great addition to any salad!

Roasted Brussels Sprouts & Chicken Salad

Ingredients:

  • 1 lb. Brussels sprouts
  • 2 Tbsp. olive oil
  • 1 tsp garlic powder
  • Salt & Pepper to taste
  • Chopped Romaine lettuce or your favorite mixed greens
  • 1/4 cup chopped carrots
  • 1/4 cup chopped walnuts (or almonds or pecans)
  • 1/4 cup golden raisins (or dried cranberries or cherries)
  • 1/4 cup shredded Parmesan cheese (or your favorite)
  • 1 grilled chicken breast, sliced
  • Balsamic Vinaigrette Dressing (or your favorite)

Directions:

Preheat oven to 400 degrees F.

Cut stems off Brussels sprouts, then cut into quarters.  In mixing bowl, combine Brussels sprouts, olive oil, garlic powder, salt, and pepper.  Pour into baking pan and roast approximately 25 minutes, stirring occasionally.

In a bowl, add lettuce.  On top of lettuce, add carrots, nuts, raisins, cheese, and chicken.  Top with a half cup of Roasted Brussels sprouts (or as many as you like – leftovers are always delish too!)

Pour dressing on top, then mix.

Enjoy!

Cheers & Hugs,
Jodi2

Creamy Avocado Pasta

Creamy Avocado Pasta.

One day this week, I was in the mood for a creamy pasta with grilled chicken and broccoli.

At first I grabbed a jar of Alfredo sauce from the pantry – thinking hubby would enjoy that – and then I thought…. “Wait!  Isn’t there a healthier way to make a creamy pasta sauce?”

I had a few avocados on hand and wondered how they might work to make a creamy sauce.  After doing a little research on the web, I found this is kind of a “thing,” and I couldn’t wait to try.

I created this recipe by researching and combining ideas from several versions of recipes I found, and I have to admit- it was seriously flippin’ amazing!

Pasta covered in a creamy, dreamy, full flavored but HEALTHY sauce!!  What could be better?!

Goodbye Alfredo sauce.

Goodbye Mac’n Cheese.

Hello amazingly divine Creamy Avocado Pasta Sauce!

I steamed some fresh broccoli, and we grilled some marinated chicken breasts.  Putting these on top of a cup of Creamy Avocado Pasta made for a full and satisfying dinner.

You’ve got to try this!  Here’s my recipe.

Creamy Avocado Pasta

Ingredients:

  • 1 lb pasta of your choice
  • 2 ripe avocados
  • 2 cloves garlic, minced
  • 1/4 cup chopped fresh basil
  • 1/4 cup chopped fresh cilantro
  • 1 large or 2 small limes, juiced
  • 1/4 cup olive oil
  • 1/2 cup Greek yogurt or light sour cream
  • 1/2 tsp salt
  • 1 tsp freshly ground pepper

Directions:

Cook pasta in boiling salted water to al dente.  Reserve 1 cup pasta water, then drain and set pasta aside.

Cut avocados in half, remove the pit, and scoop out out the green flesh from the skin with a spoon.  Discard skin.  Put avocado in blender or food processor.  Add minced garlic, chopped fresh basil and cilantro, lime juice, olive oil, Greek yogurt or light sour cream, olive oil, salt and pepper, and 1/2 cup pasta water.  Blend/puree into a creamy sauce.  Add more pasta water as needed for desired consistency.

Toss with warm pasta, and serve immediately.

You can top with vegetables of your choice like cherry tomatoes and sweet corn, peas, asparagus, broccoli, green onions, pine nuts, or whatever you like.  You can also add a protein if you like – chicken, shrimp, crab meat, lobster, pork.  Sprinkle with a bit of freshly grated Parmesan for a bit of salty, nutty zip.  Or – you can just enjoy as is.  

Can’t wait to hear from those who try and what you think of it!  I’m a total fan!

Cheers & Hugs,
Jodi


Easy Skinny Zucchini Pasta Caprese

Easy Skinny Zucchini Pasta Caprese.

I bought a few zucchini recently itching to use my Spiralizer again, and I created this super easy, wicked fast, uber healthy, gloriously delicious lunch that came together in 10 minutes.   Seriously!

I spiralized two small/medium zucchini to create the “pasta” and tossed them in a skilled with some minced garlic and a dash of red pepper flakes sizzling in olive oil.  After just a few minutes. I tossed in some chopped fresh basil, chopped campari tomatoes, and some grated Parmesan cheese.

After I poured it from the skillet to my bowl, I sprinkled it with some fresh black pepper and flaked sea salt.    That’s it!

And it was absolutely amazing!  You will seriously question if you are eating fresh pasta!   I can’t wait to make it again and again this summer when I am able to pick the fresh produce right from my yard.

Here’s the simple recipe I came up with:

Easy Skinny Zucchini Pasta Caprese

  • Servings: 1 as main course, 2 as side dish
  • Print

Ingredients:

  • 2 small/medium zucchini, spriral sliced
  • 1 Tbsp. olive oil
  • 2 cloves garlic, minced
  • Dash red pepper flakes
  • 3-4 Campari tomatoes, chopped
  • 1/3 cup chopped fresh basil
  • 1/3 cup freshly grated Parmesan cheese
  • Salt & Pepper to taste

Directions:

Spiralize zucchini.

Heat olive oil in stir fry skillet.  Add minced garlic and red pepper flakes.  After about a minute when oil begins to sizzle around garlic, add zucchini.  Cook for 3-4 minutes, tossing every minute or so.  Add chopped tomatoes, basil, and Parmesan.  Cook and toss for about 2 more minutes.

Pour into bowl or on plate.  Sprinkle with salt and pepper to taste.  Serve immediately.

Enjoy!

Cheers & Hugs,
Jodi