Kicked Up Scalloped Potatoes (with Roasted Tomatoes, Peppers, & Onions)


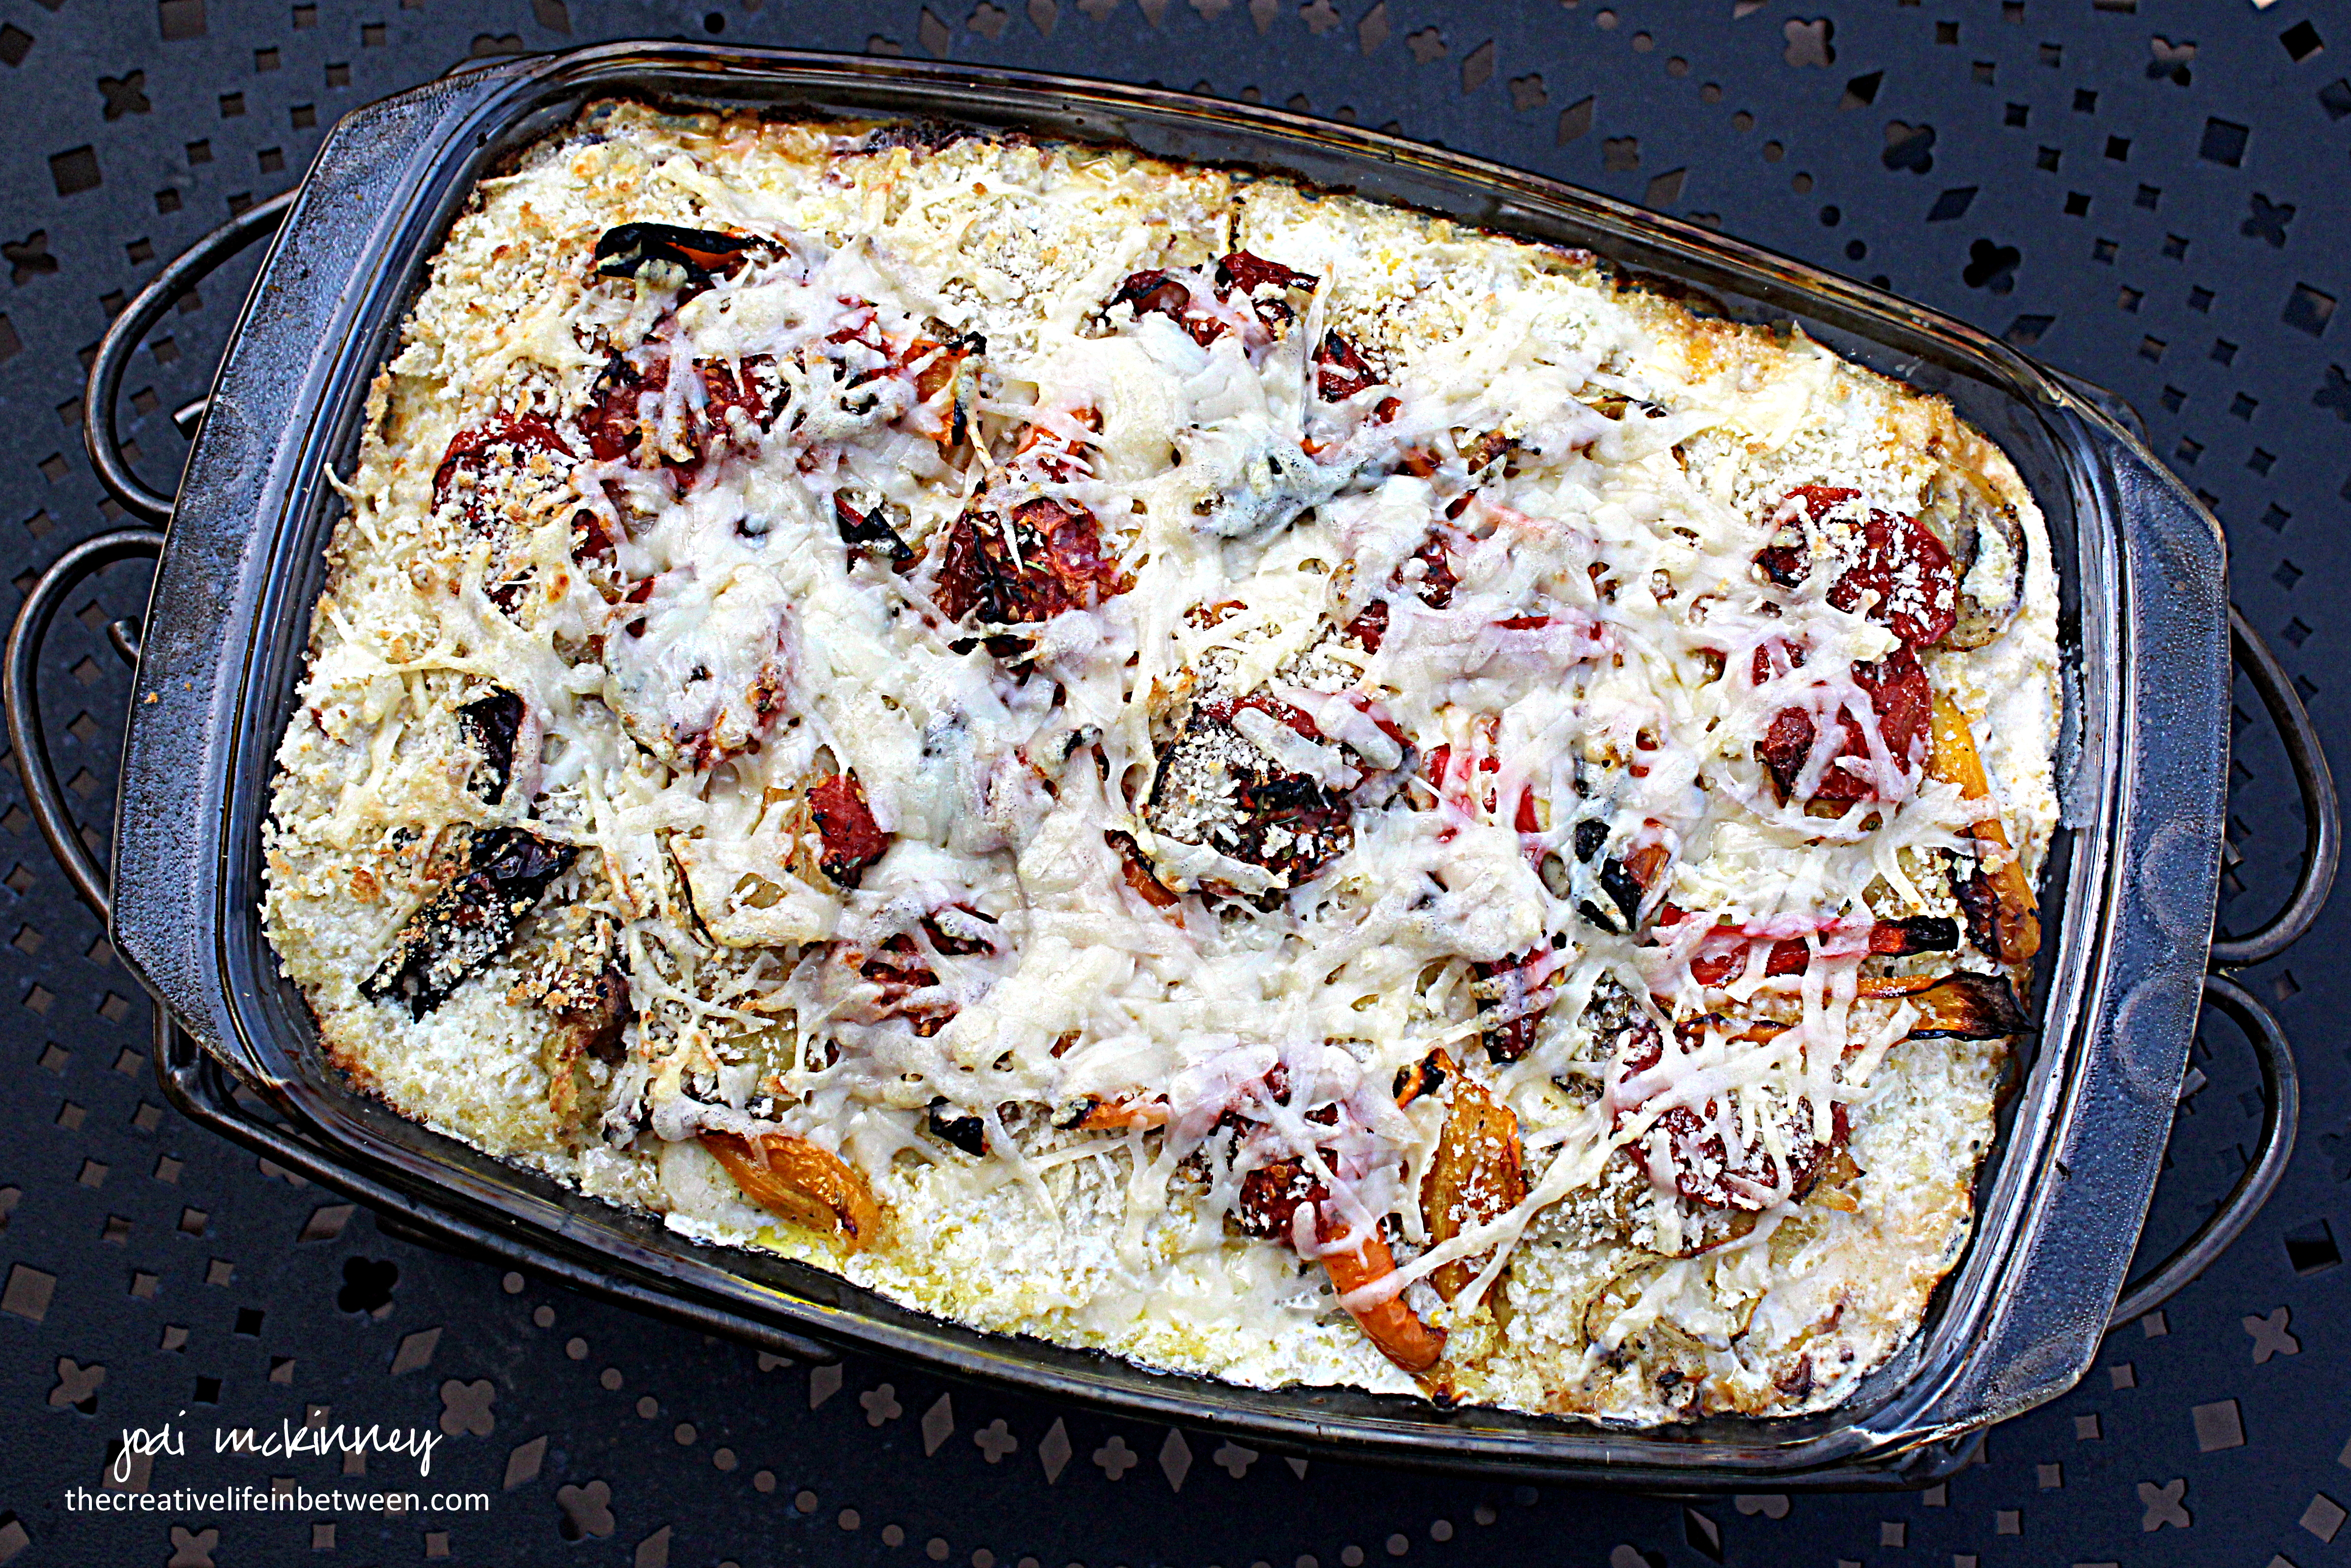
Kicked Up Scalloped Potatoes (with Roasted Tomatoes, Peppers, & Onions).

Our family celebrated Easter a week early this year by getting together yesterday.  With the traditional ham, I made a kicked up version of scalloped potatoes.

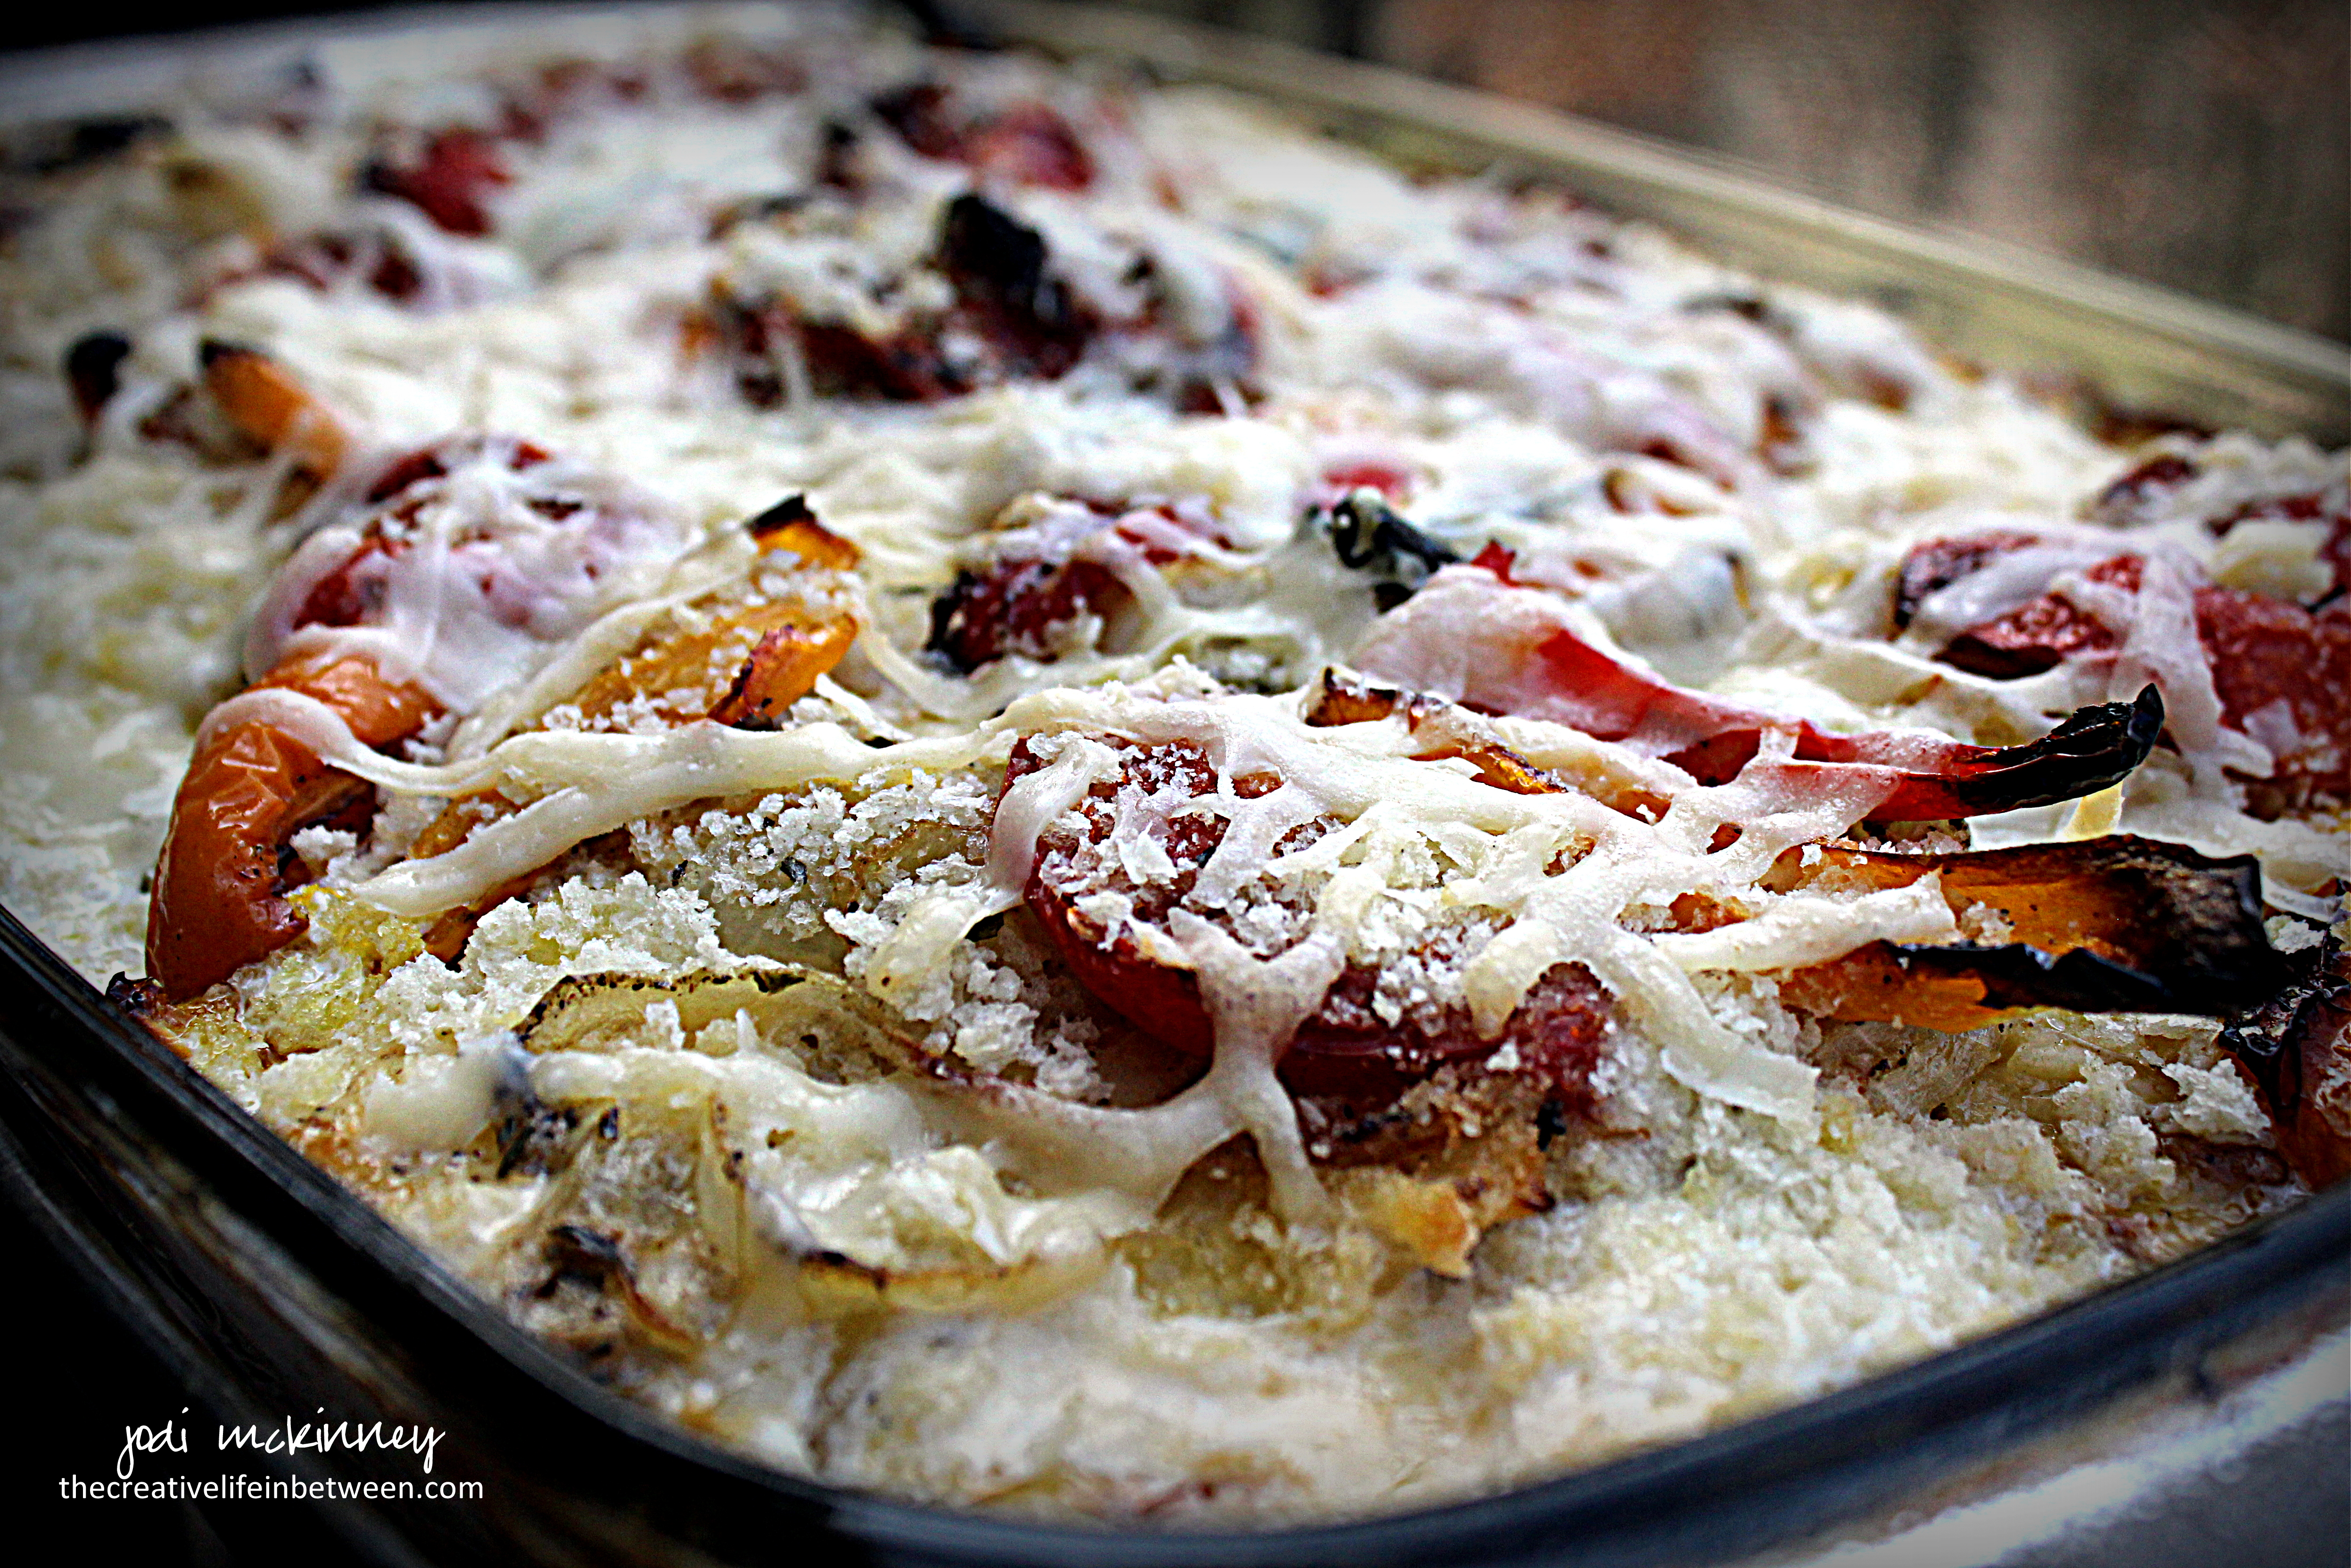
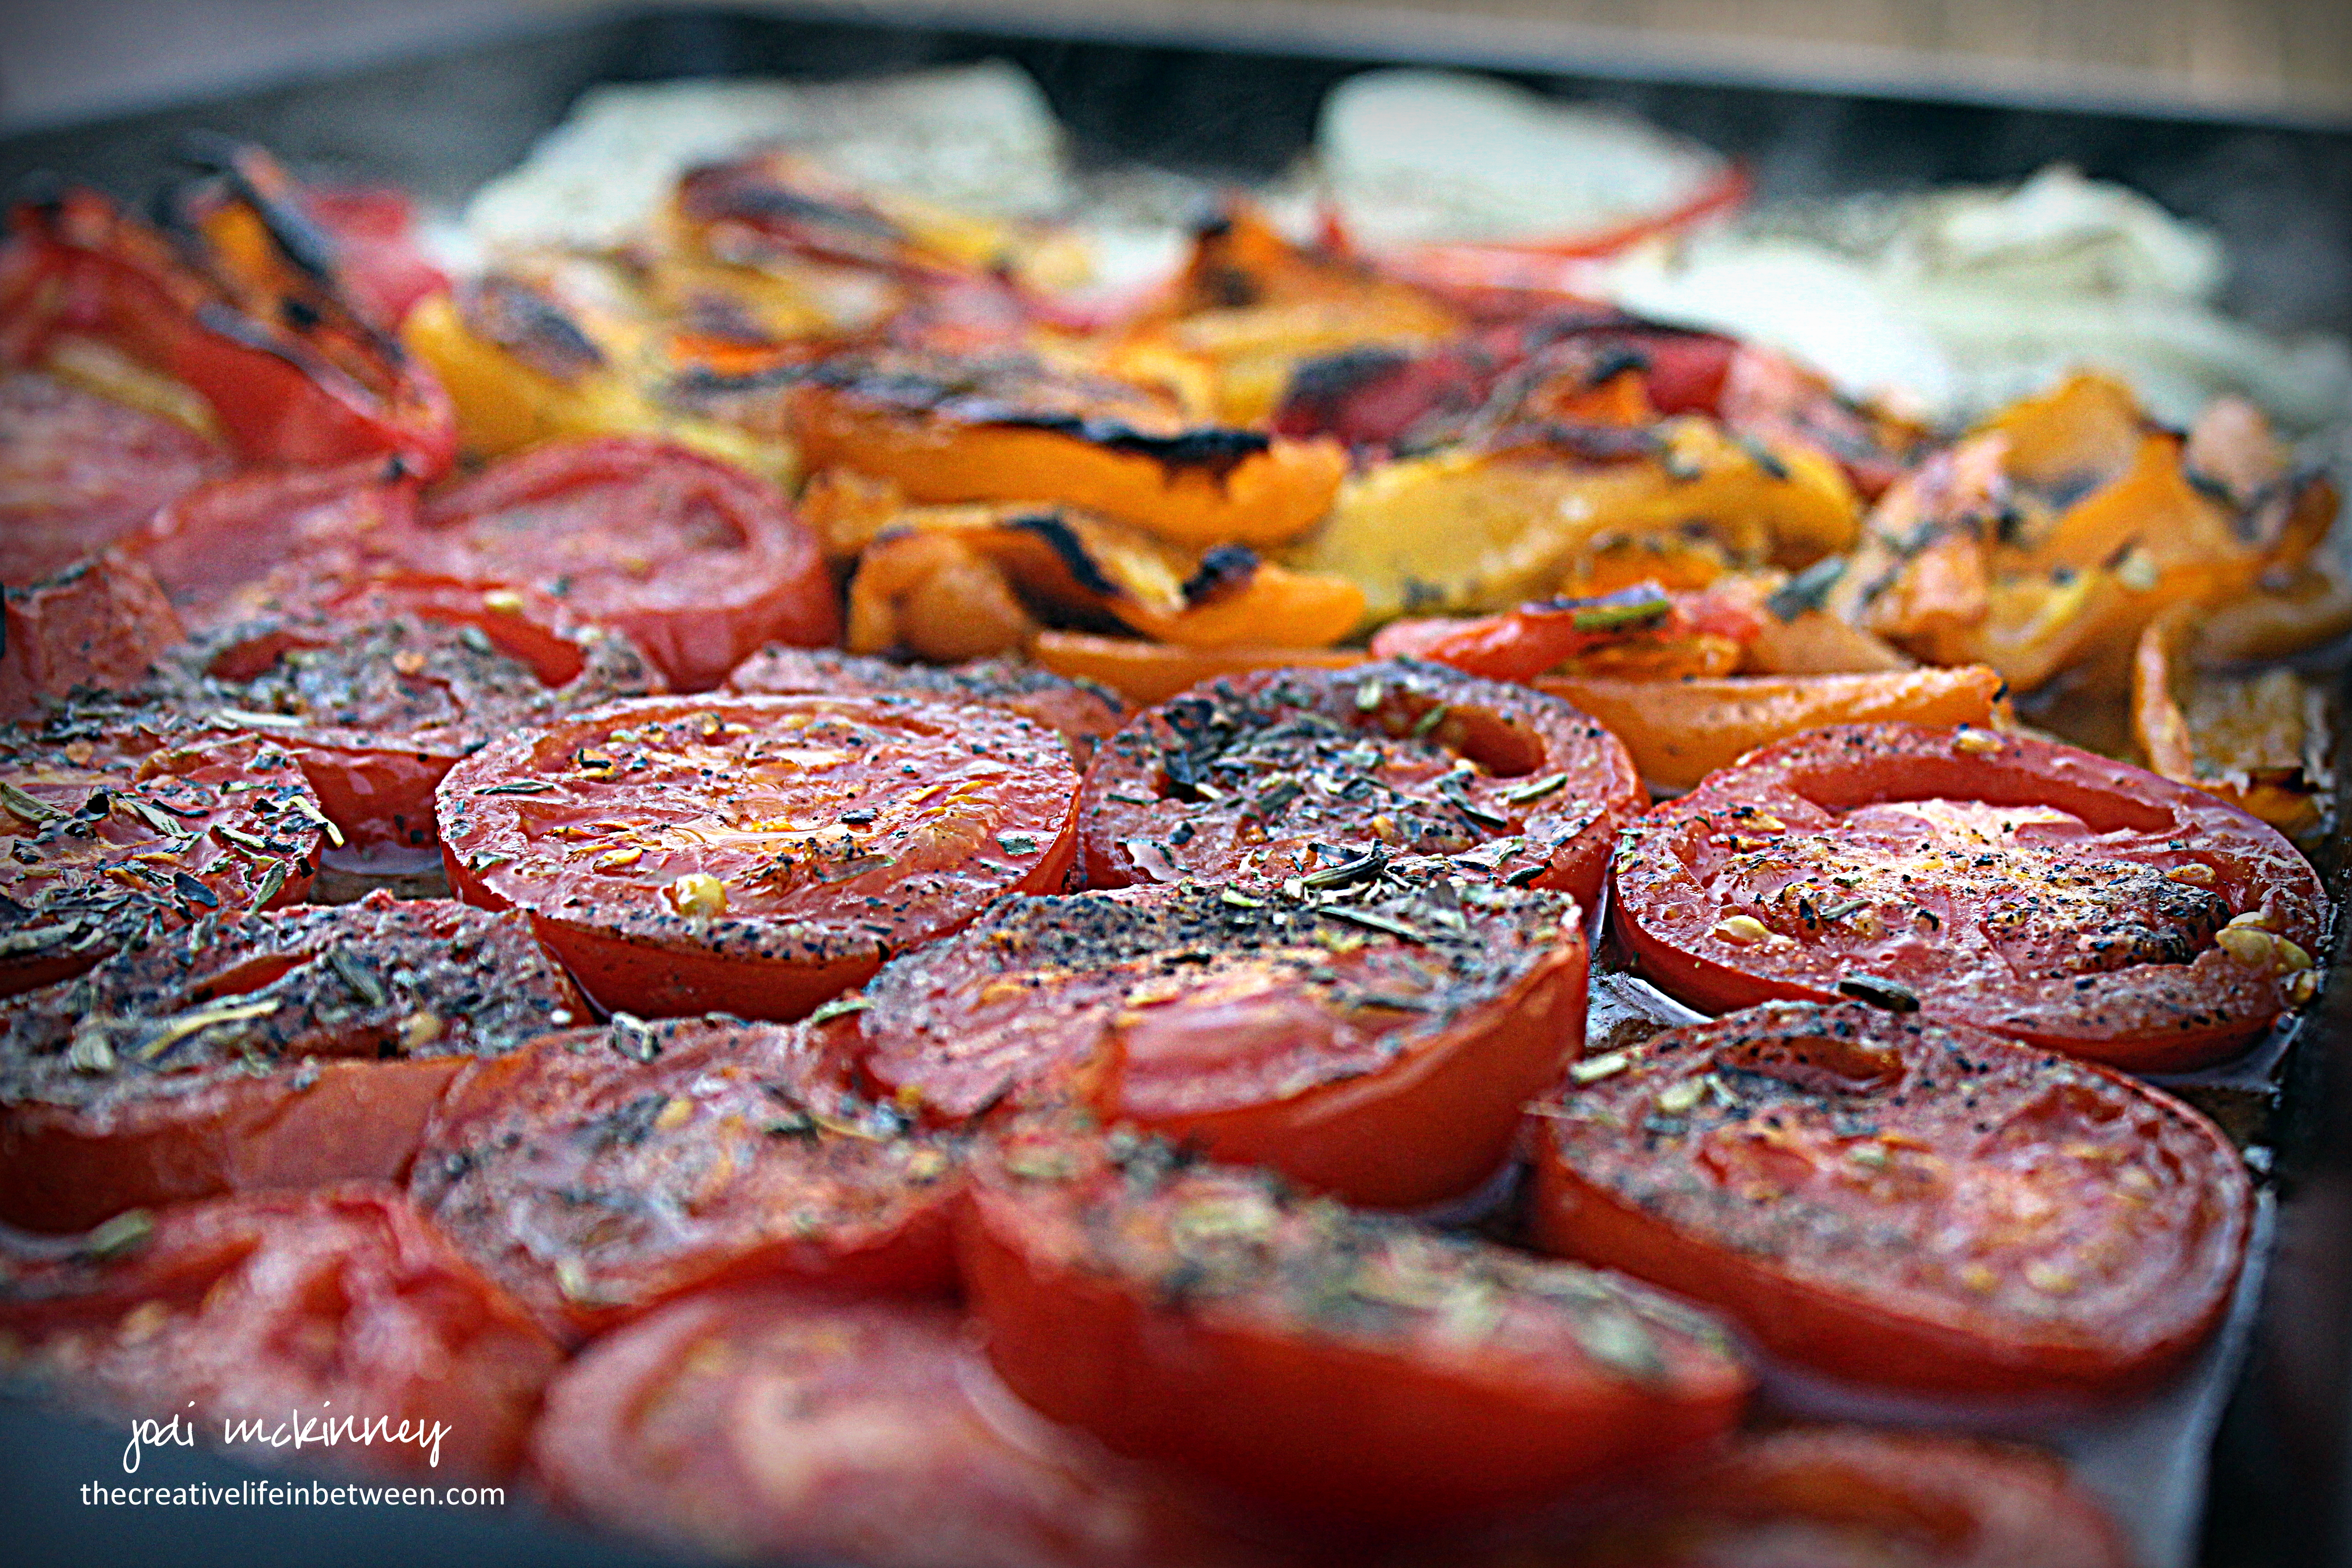
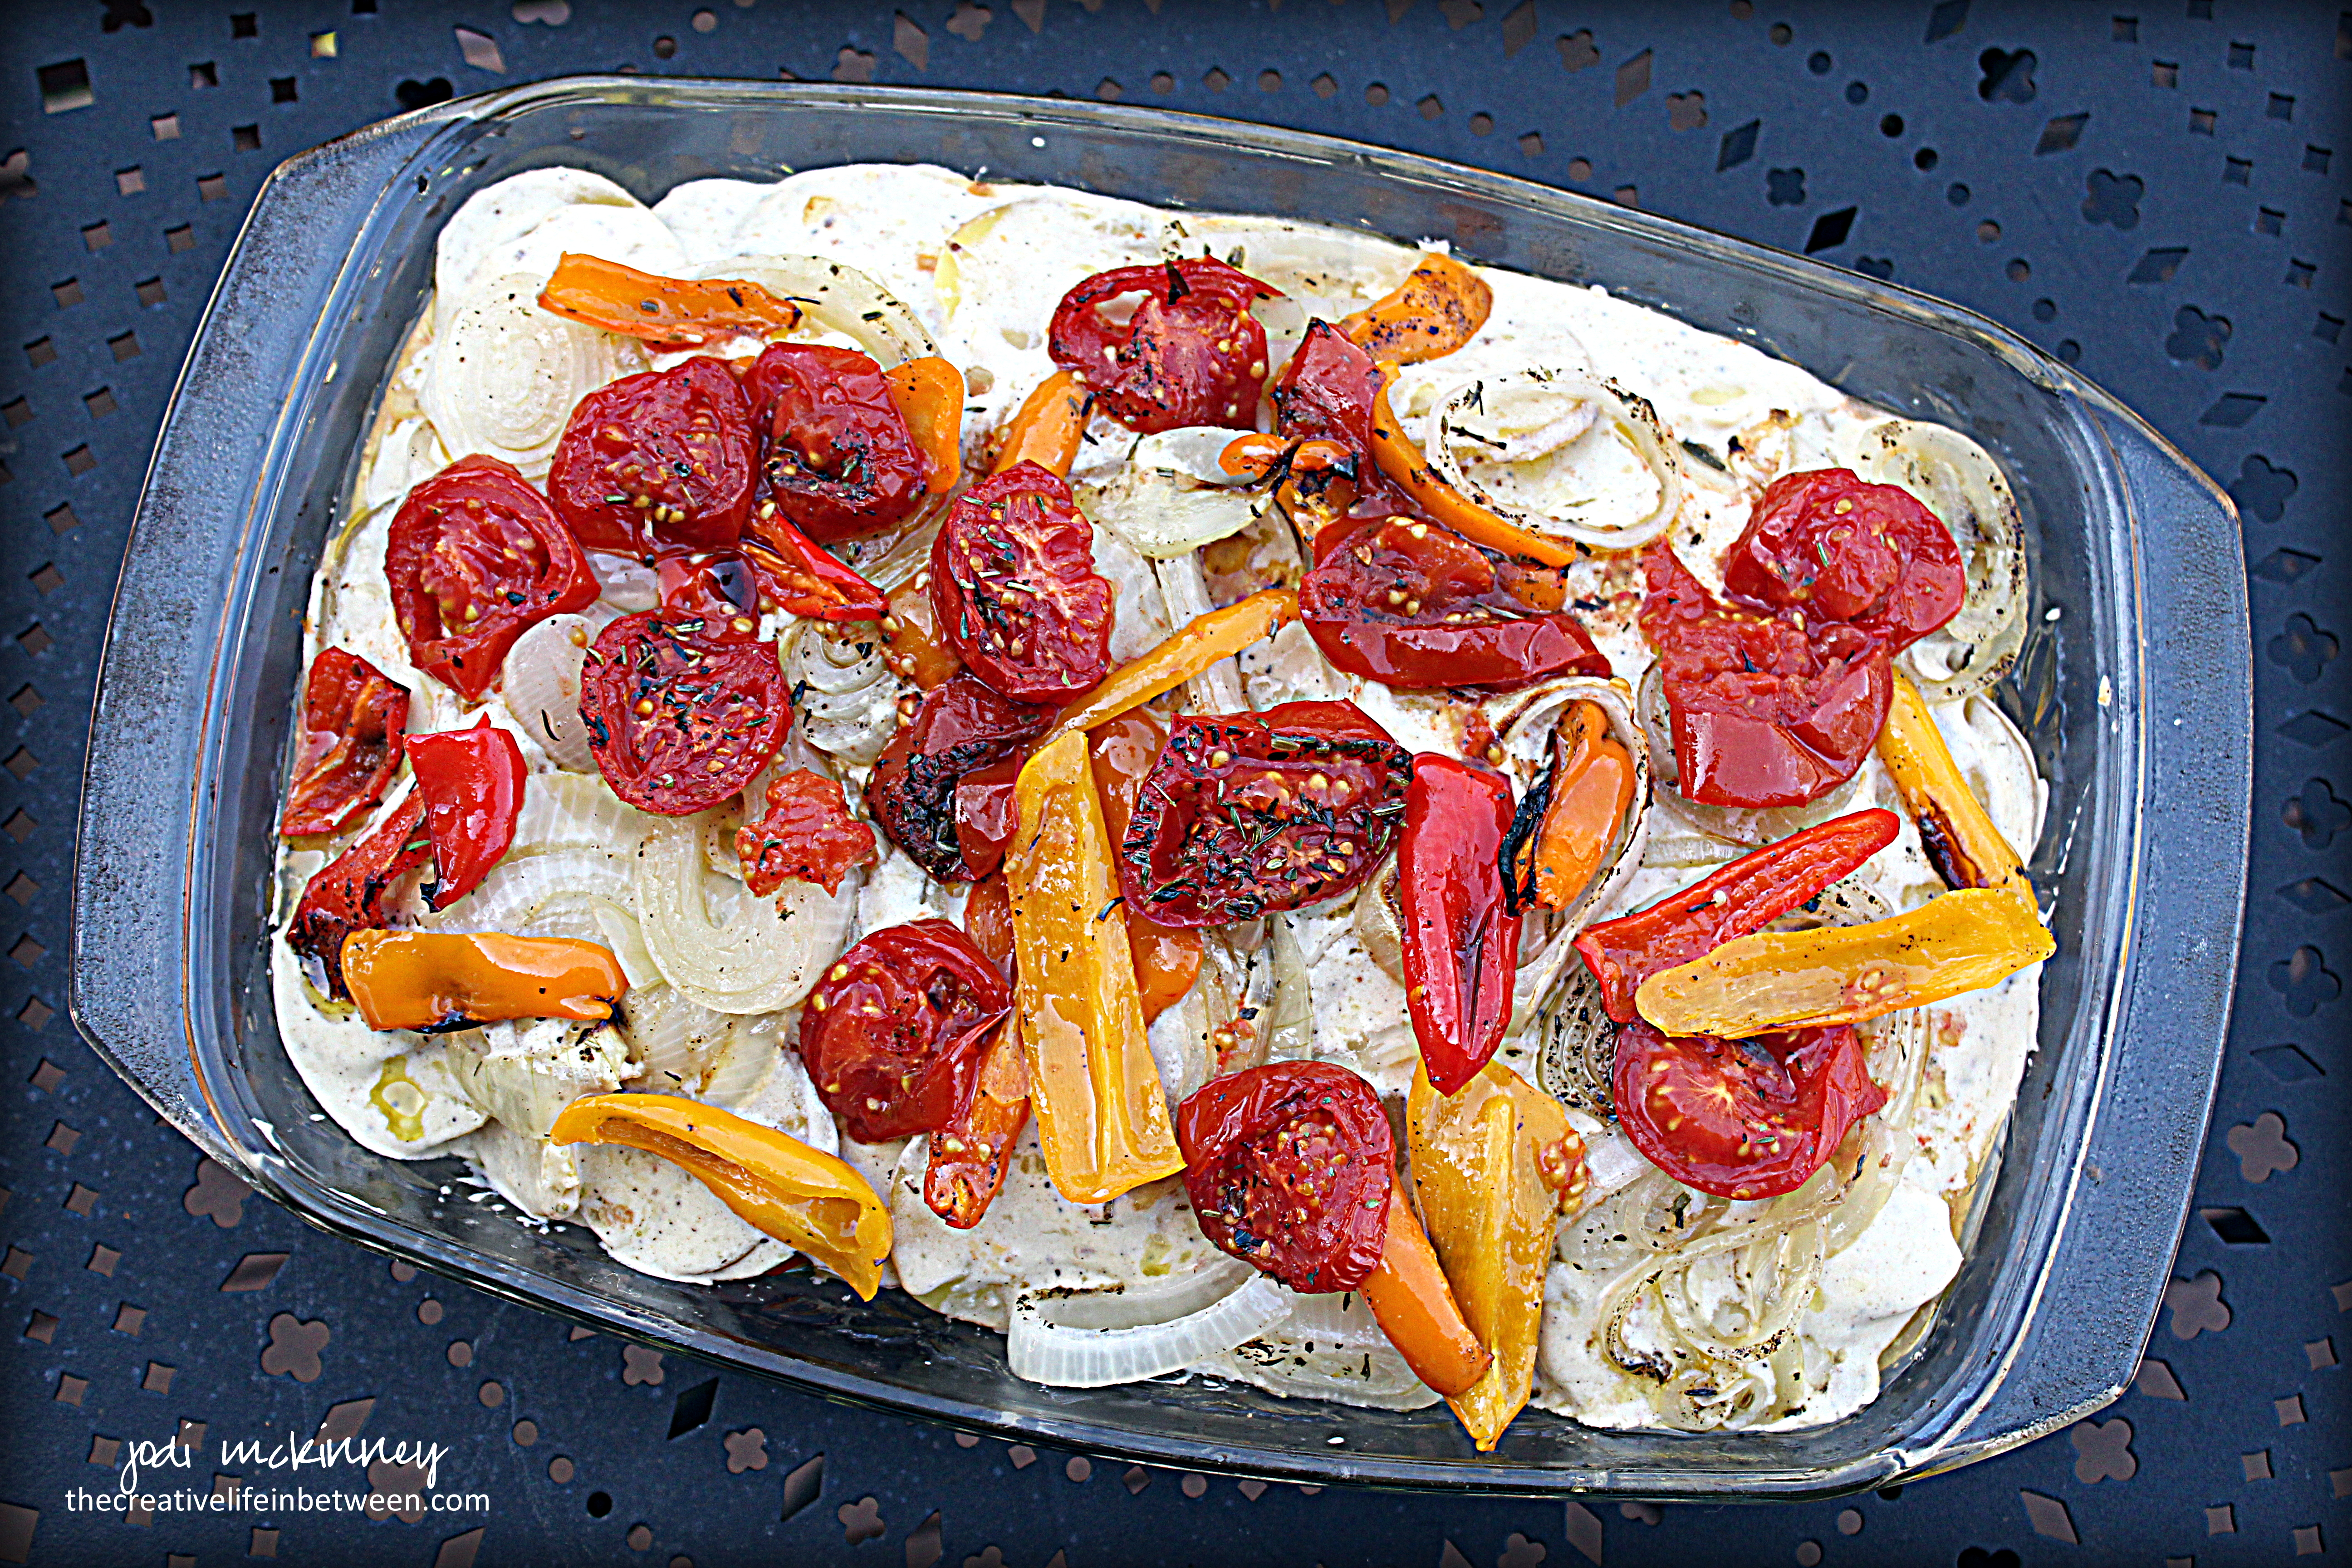
Roasted tomatoes, sweet yellow, orange, and red peppers, and sweet onions….

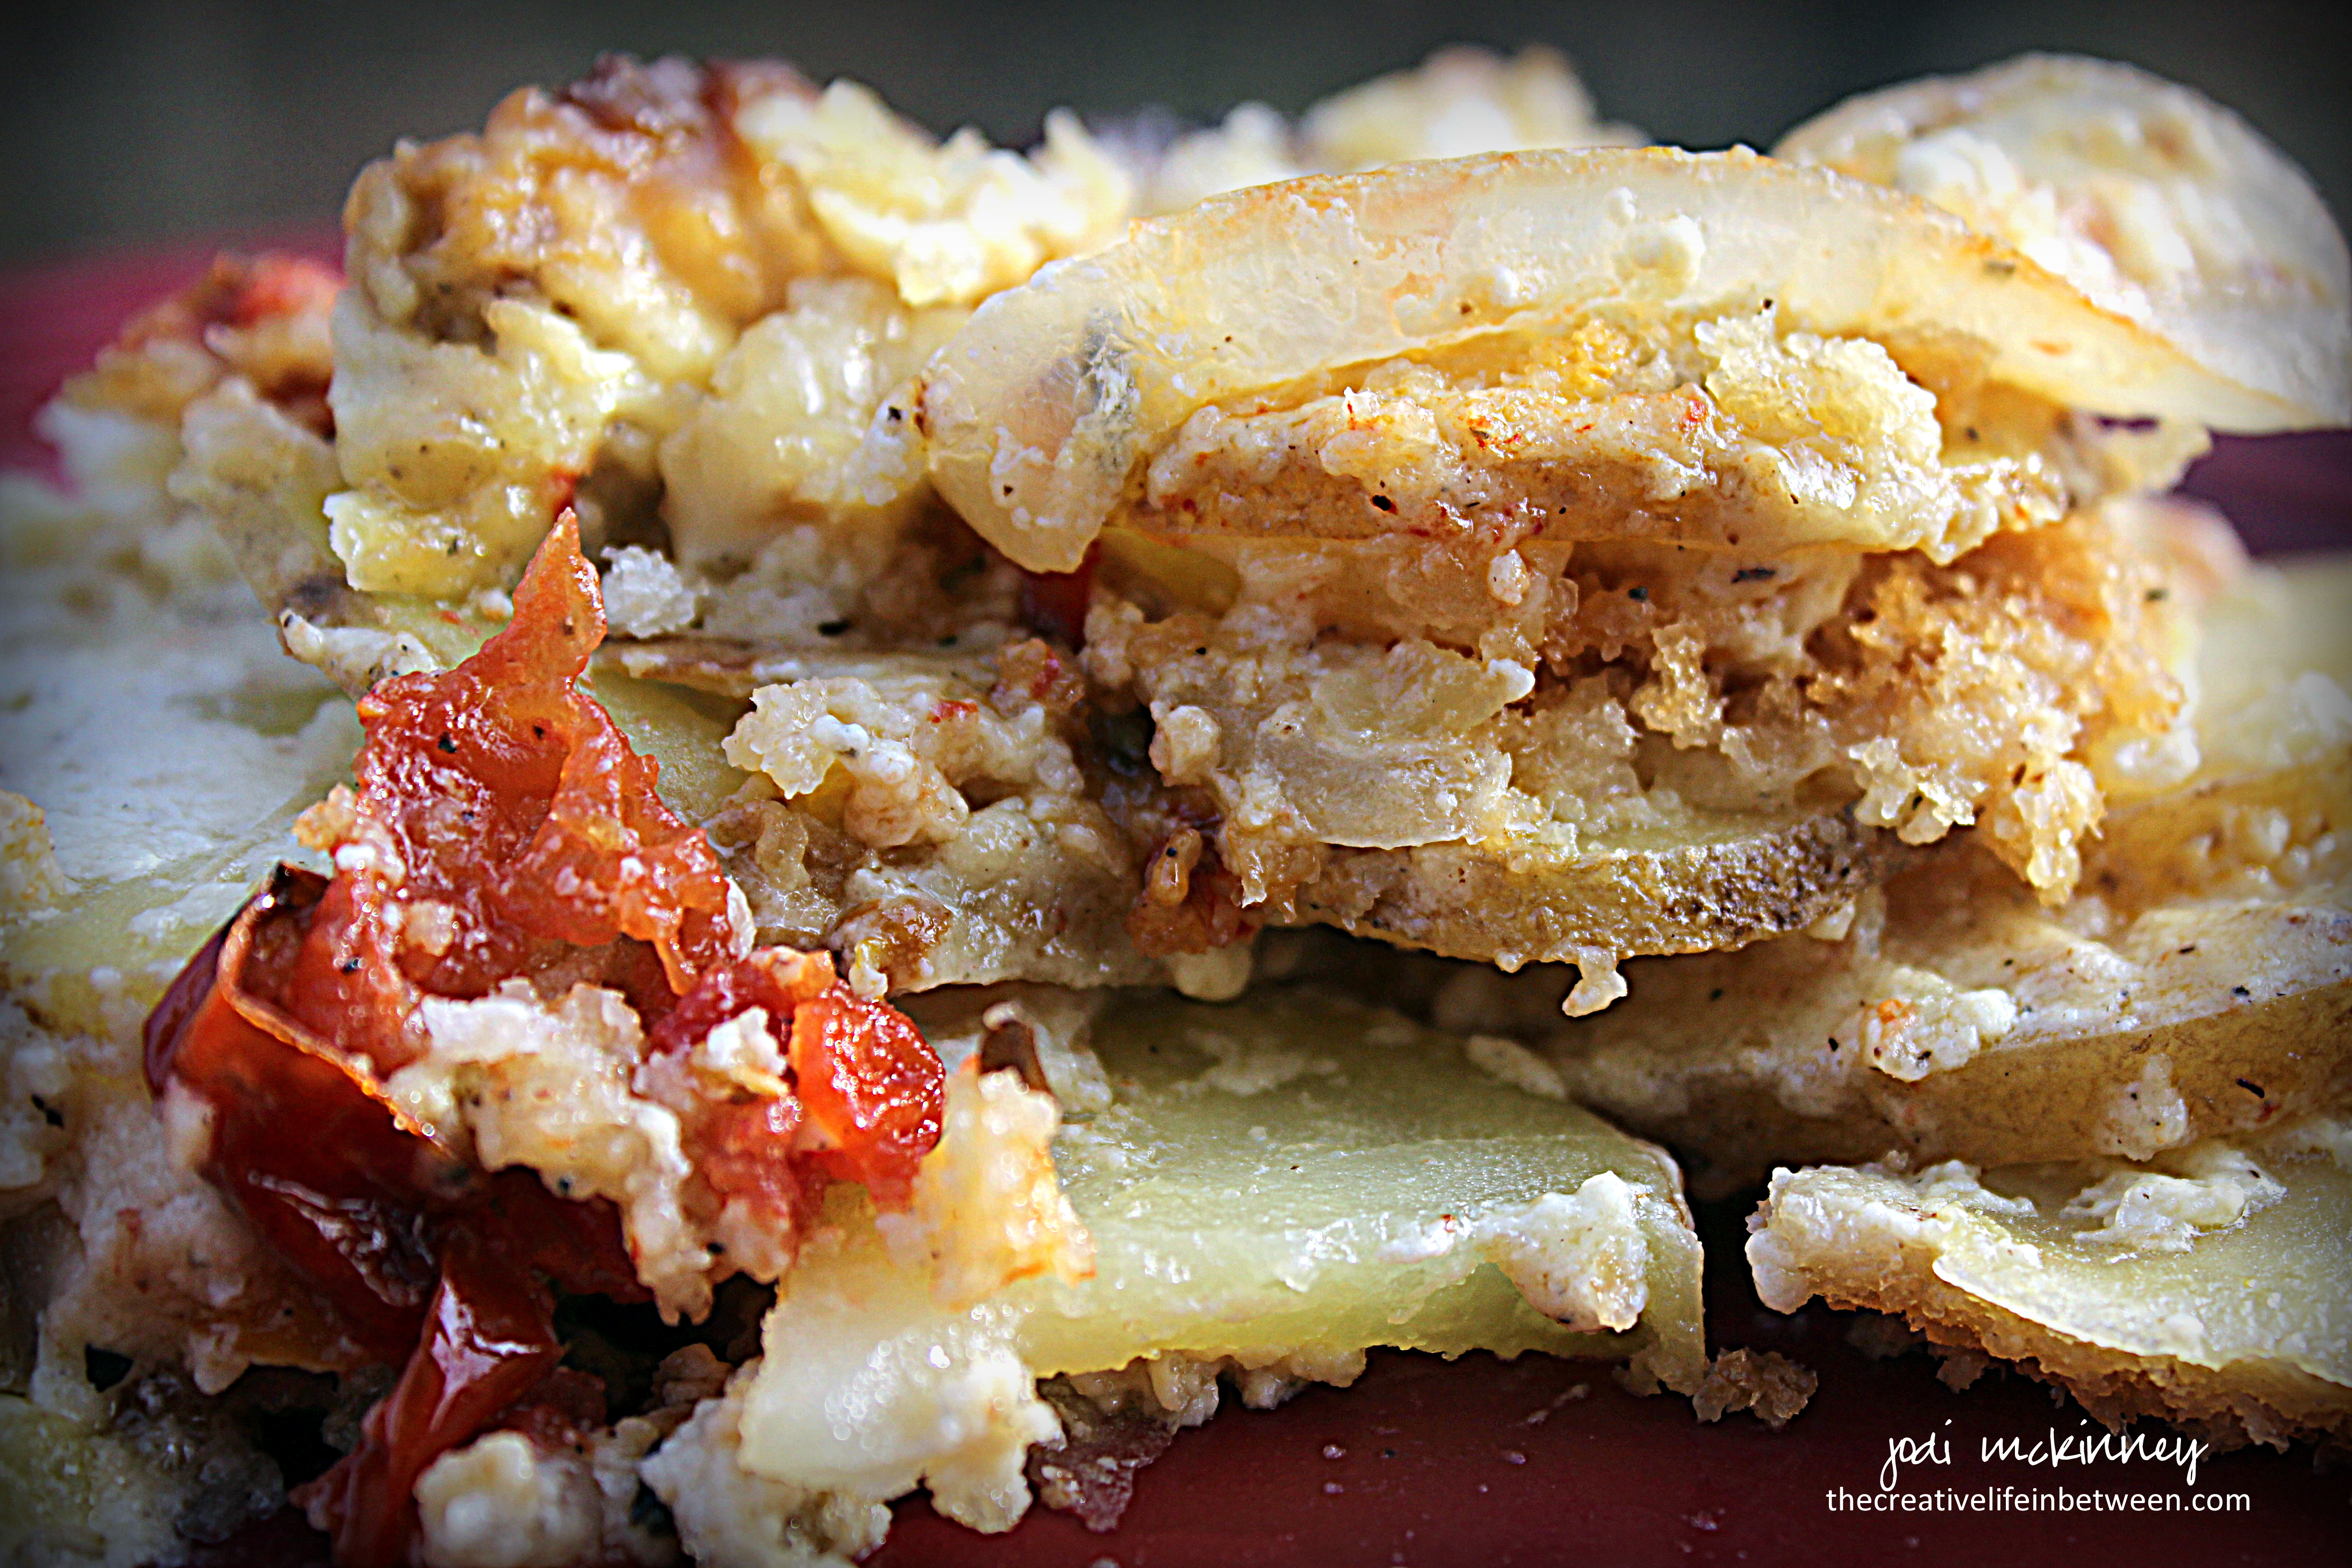
layered in with creamy, cheesy potatoes

made for an amazing potato casserole!

To add a bit more “zip,” I kicked it up even more by using jalepeno havarti cheese instead of plain gruyere or havarti.

We loved it!

If you are looking for a new way with potatoes to go with your Easter ham or with roast beef or pork or chicken or even by itself for any other special occasion (like Monday night dinner), this scalloped potato recipe is worth the little bit of extra effort.

Hope you’ll give it a try.

Kicked Up Scalloped Potatoes with Roasted Tomatoes, Peppers, & Onions*

Ingredients:

  • 4 large egg yolks
  • 3 cups half & half
  • 1 tsp freshly ground nutmeg
  • 1 tsp salt
  • 1 tsp pepper
  • 5 cloves minced garlic
  • 4 bay leaves
  • 2 lbs. yukon gold potatoes (or your favorite) sliced thinly
  • 2 cups jalepeno havarti cheese (or your favorite), grated
  • 8 campari tomatoes, sliced 1/2″ thick
  • 2 sweet bell peppers (red, yellow, or orange or combination), cut into strips
  • 1 large sweet onion, cut in half and sliced 1/2″ thick
  • 2 Tbsp. olive oil
  • 3 Tsp. herbes de Provence (sweet French herbs and flowery lavender with Italian herbs and fennel that includes: rosemary, cracked fennel, thyme, savory, basil, French tarragon, dill weed, Turkish oregano, lavender, chervil and marjoram.
  • 1 cup Panko bread crumbs
  • 1/2 cup Parmesan cheese, grated

Directions:

Whisk egg yolks and 1 cup half and half in small bowl.  Set aside.  In large pot, combine 1 1/2 cups half and half, nutmeg, salt, pepper, garlic and bay leaves.  Bring to a boil.  Reduce heat to medium-low, add the sliced potatoes.  Simmer until halfway cooked, about 8 minutes.  Remove from heat.  Stir in egg-milk mixture and cheese.  Cover and keep warm.

Preheat oven to 425 degrees F.  Put the sliced tomatoes, peppers and onions on a baking sheet in separate piles.  Drizzle with olive oi and sprinkle with salt, pepper and herbes de Provence.  Bake 10-15 minutes until tender and charred around edges.

Reduce oven to 375 degrees F.  Spray 9×13 baking dish with Pam cooking spray.  Sprinkle half the panko bread crumbs in bottom of the baking dish.  Spoon half of the potato mixture into the dish.  Top with half of the roasted vegetables.  Layer the remaining half of potatoes then remaining roasted vegetables.

Bake until potatoes are tender – 50-60 minutes.

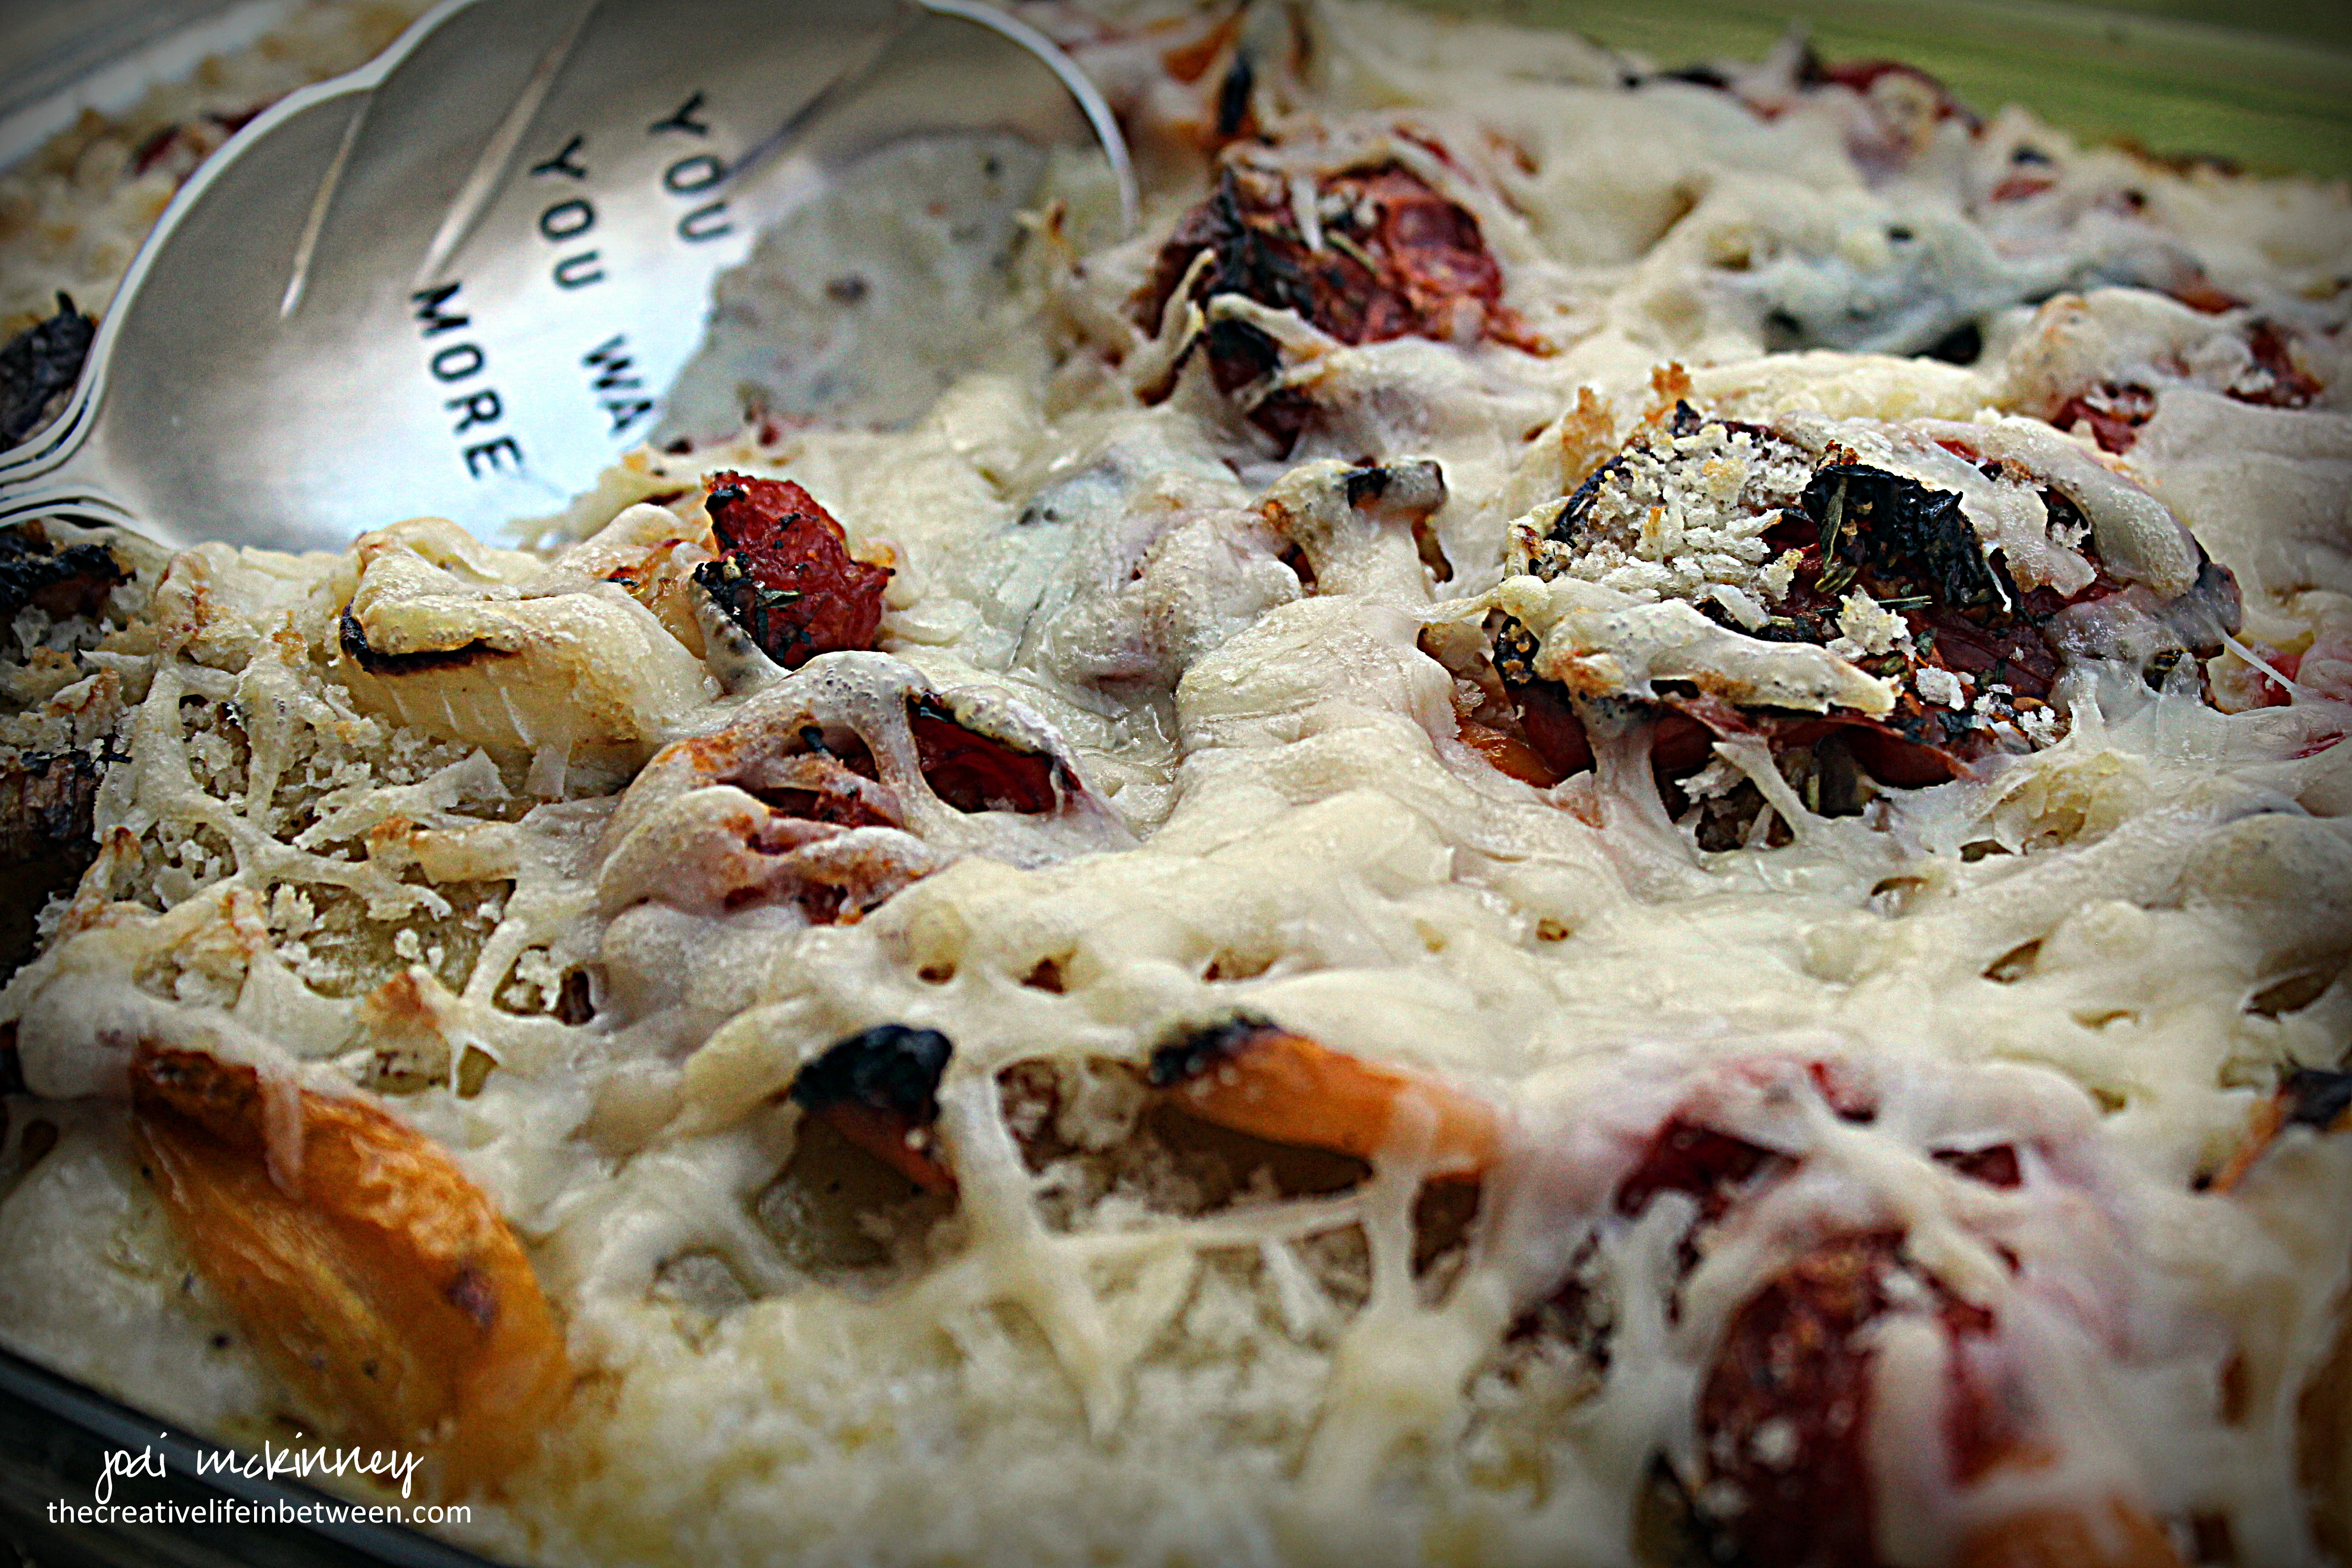
Remove from oven and drizzle with remaining 1/2 cup half and half.  Sprinkle with remaining panko bread crumbs and 1/2 cup freshly grated Parmesan cheese.  Return to oven and bake for an additional 5 minutes or until cheese melts.  Let rest for 10-15 minutes before serving.

Enjoy!

Cheers & Hugs,
Jodi

*slightly adapted from Food Network

Pecan Sandies Shortbread Cookies

Pecan Sandies Shortbread Cookies.

Wedding Cookie Table baking continues as we approach the last few weeks until the wedding!

I couldn’t resist trying a Pecan Sandie Shortbread Cookie to add to the selection given that I overbought pecans for the Pecan Tassie recipe.

And Oh How Gloriously Buttery, Nutty Deliciouso these turned out!  Be still my nut-loving shortbread heart!  (Oh Rob – you are going to LOVE these!)

Anyone who loves Keebler’s Pecan Sandies, you are in for SUCH a TREAT with this recipe!  Can I get an Hallelujah?  Can I get an Amen!

Hope you will give this simple, yet extraordinary recipe a try!

Pecan Sandies Shortbread Cookies

  • Servings: approx. 6 doz.
  • Print

Ingredients:

  • 1 cup butter, softened
  • 1 cup vegetable oil
  • 1 cup confectioner’s sugar
  • 1/2 cup white sugar
  • 1/2 cup brown sugar
  • 2 eggs
  • 2 tsp. vanilla extract
  • 1 tsp cream of tartar
  • 1 tsp baking soda
  • 1 tsp salt
  • 4 1/4 cups all purpose flour
  • 3 1/2 cups toasted pecans (Coarsely chop 3 cups and reserve 1/2 cup whole)

Directions:

In a large electric mixer bowl, combine softened butter, vegetable oil, and sugars until creamy.  Beat in eggs, one at a time, then add vanilla.  Continue beating at high speed until light and fluffy.

Add cream of tartar, baking soda and salt until combined.  Add four one cup at a time and slowly combine.  Remove from mixer, and fold in 3 cups chopped toasted pecans.

Place dough in Ziploc bag in refrigerator and chill for several hours or overnight.

When ready to bake, preheat oven to 375 degrees F.

Roll dough into 1 inch balls.  Roll top half of ball with sugar, flatten slightly, and add a pecan half to center.

Place on baking stone or cookie sheet lined with parchment paper, and bake for 8-10 minutes until lightly golden brown.  Do not overbake.  Remove to cooling rack to cool.  

Enjoy!

Cheers & Hugs,
Jodi


Un Stuffed Pepper Casserole

Un-Stuffed Pepper Casserole.  It’s what’s for dinner…

I love stuffed peppers, but for some reason, I don’t make them very often.  Not sure why.  But on a recent visit to our local John’s Bar, the dinner special was stuffed pepper casserole.  I nabbed the last one – much to some of our friends at the bar’s dismay.

I really enjoyed it and thought it must be simple to make.  And it occurred to me that we usually end up chopping up our stuffed peppers on our plate to eat, so why not deconstruct them in a casserole?!

I did a bit of googling, and I took some ideas from some recipes I found, combined them with my stuffed pepper recipe and thoughts of what I would like, and I came up with this yummy quick and easy skillet supper.

It was windy and rainy off and  on yesterday, so it was a perfect evening for a comfort-type dish.  I served ours over mashed potatoes (mainly because that’s how we like to eat our stuffed peppers too), but it is totally not necessary.  You can sprinkle some shredded cheese on top – or not – again – up to you.  You can tweak it up even healthier if you like by using ground turkey instead of ground beef and brown rice or even quinoa or your favorite grain instead of the rice.

If you’ve been hanging around here for any amount of time, you know I’m the queen of improvising on recipes.  I rarely measure, and I love experimenting.  If it calls for “this,” why not try “that.”  And cooking is really not brain surgery or rocket science, so if you add a smidge instead of a dash – who cares!  The palm of my hand is my measuring spoon.  Sometimes it works good – sometimes it’s just so-so, but as long as I am having fun creating – whether it’s food or photography or art – it’s all good.

Yep – that’s what it’s about here – being creative “in between” the times when we have to do the routine.

Hope you’ll give this yummy dish a try.  Do it my way – or do it your way.  Just have fun creating it!.

Un-Stuffed Pepper Casserole

Ingredients:

  • I Tbsp. olive oil
  • 1 large sweet onion, chopped
  • 3 bell peppers, chopped (I used one red, one orange, and one yellow)
  • 1 1/2 – 2 lbs. ground beef (my package had 1 3/4 lb. in it)
  • 2 tsp. smoked paprika (oh how I adore the SMOKED paprika!)
  • 1 tsp. garlic powder
  • Salt and Black Pepper to taste ( I used about 1 tsp of each)
  • 1 cup cooked rice (I used Jasmine – I love Uncle Ben’s Ready Rice – it’s NO FAIL and so easily ready in 90 seconds)
  • 1  10 3/4 oz. can condensed tomato soup & 1 can water
  • 1 14.5 oz can diced tomatoes
  • 1 cup shredded cheddar cheese, optional
  • 1/4 cup chopped green onions for garnish, optional

Directions:

In a large skillet over high heat, heat the olive oil.  Add chopped onions and peppers and salt to taste.  Once limp and onions are translucent after a few minutes, add ground beef and brown until no longer pink.  Add smoked paprika, garlic powder, salt and pepper.  Stir in cooked rice, soup, water, and diced tomatoes.  Cook for additional 10-15 minutes.

Sprinkle with cheese (if desired) and garnish with chopped green onions.  

Enjoy!

Cheers & Hugs,
Jodi

Pecan Tassies: Wedding Cookies

Pecan Tassies:  Wedding Cookies

If I were standing at a wedding cookie table and was told I could only choose ONE cookie from all the varieties on the table…

every single time…. I would choose a Pecan Tassie.

That’s just me.  Now I know my friend Mary would pick the Hershey Kiss Brownie Bite.  Nick would pick the Chocolate Chip.  My friend Wayne would go for the Carrot Cake Thumbprint.  Jake would likely take the Peanut Butter Cup Cookie.  Hubby – he always goes for the Apricot Kolache….  Always – anything apricot.

So this week, as I continue to bake cookies for the wedding cookie table, I made my faves, and I happily continue to bake.

If you could only pick one cookie from the cookie table, which would yours be?

Pecan Tassie Cookies

Ingredients:

  • Cookie Crust
    • 1 cup butter, softened
    • 6 oz. cream cheese, softened
    • 2 cups flour
  • Pecan Filling
    • 1 1/2 cups brown sugar
    • 2 tsp. vanilla
    • 2 eggs
    • 1 1/2 cups chopped pecans

Directions:

Prepare cookie crust by blending cream cheese and butter.  Stir in flour and work with your hands to form a ball of dough.   Wrap tightly with plastic wrap and refrigerate for several hours or overnight.

When ready to bake, preheat oven to 325 degrees F.

Divide dough into 48 balls and place into mini muffin pans.  Press balls in with Mini Tart Shaper (the most genius baking invention ever!) to form shell for filling.

Combine brown sugar, eggs, vanilla and chopped nuts.  Scoop into mini tarts filling 1/2 to 3/4 full.

Bake 12-18 minutes – depending on your oven – until lightly browned.

Cool and gently remove from pans.

Enjoy!

Cheers & Hugs,
Jodi

Peanut Butter Cup Cookies

Peanut Butter Cup Cookies.

The wedding cookie table baking continues with another classic.

Most everyone loves a little cookie cup with a Reese’s Peanut Butter Cup in it – right?

So many wonderful little treats you can bake in mini muffin pans!

Peanut Butter Cup Cookies

Ingredients:

  • 1 cup butter, softened
  • 1 cup white sugar
  • 1 cup brown sugar
  • 1 cup peanut butter
  • 2 eggs
  • 2 tsp. vanilla extract
  • 4 Tbsp. milk or half & half
  • 1 tsp. salt
  • 2 tsp. baking soda
  • 3 1/2 cups all-purpose flour
  • 70-80 miniature Reese’s Peanut Butter Cups

Directions:

Preheat oven to 375 degrees F.

Cream together butter, sugars, and peanut butter until light and fluffy.  Beat in eggs, vanilla, and milk.  Mix in salt and baking soda, and finally flour just until incorporated.

Roll dough into 1 inch balls and place in ungreased nonstick mini muffin pan.  Bake 7-8 minutes.

Remove from oven, and immediately press a miniature Reese’s peanut butter cup into each ball.  Cool  and carefully remove from pan.

Enjoy!

Cheers & Hugs,
Jodi

Carrot Cake Thumbprint Cookies

Carrot Cake Thumbprint Cookies.

I tried a new cookie recipe this weekend to add to the wedding cookie table.

And OMG – if you ever dreamed you could have your cake and eat it in a cookie too – well – your dream has come true with this recipe.  Seriously… carrot cake delightfulness in a cookie!

The frosting filling alone…… well…. all I can say is it makes me think of what a cloud might taste like in heaven….  sweet creamy, buttery, cream cheesey delight with a swirl of apricot.  Can you even imagine?!

A nutty, crunchy, shortbread-like cookie with a delightful apricot cream cheese filling.  If you are looking for a beautiful, sweet treat for a special occasion like perhaps – a wedding cookie table – these lovely little morsels are just the ticket!

Carrot Cake Thumbprint Cookies

Ingredients:

  • 4 sticks butter, melted, plus 2 sticks, room temperature, for frosting
  • 1 1/3 cup packed light brown sugar
  • 1 1/3 cup sugar
  • 4 large egg yolks
  • 4 cups all purpose flour
  • 2 tsp ground ginger
  • 2 tsp ground cinnamon
  • 2 tsp salt
  • 3 cups old-fashioned rolled oats
  • 3 cups finely grated carrots
  • 1 cup chopped dried apricots or golden raisins
  • 2 cups chopped walnuts or pecans
  • 1 cup confectioner’s sugar
  • 8 oz cream cheese, softened to room temperature
  • 6 tsp. apricot jam

Directions:

Preheat oven to 350 degrees F.

In a large mixing bowl, beat melted butter, sugars, and egg yolks until light and creamy.  Blend in ginger, cinnamon, and salt.  gradually beat in flour.  Mix in oats, carrots, and chopped apricots or raisins.  Cover and refrigerate for at least 30 minutes.

Roll dough into 1 1/2 inch balls.  Roll into chopped nuts.  Place on baking stone or cookie sheet, and bake for 8 minutes.  Remove from oven, and quickly press an indentation into center of each cookie ball.  Return to oven and bake for 8 more minutes until lightly golden brown.

Transfer to a cooking rack and cool completely.

In a mixing bowl, beat remaining 2 sticks of softened butter and confectioner’s sugar until light and fluffy.  Beat in cream cheese.  Gently swirl in apricot jam.

Place frosting in large Ziploc bag.  Snip corner and pipe into each cooled cookie.

Enjoy!

Cheers & Hugs,
Jodi

*Adapted from Martha Stewart


Jodi’s Best Ever Chocolate Chip Cookies

Jodi’s Best Ever Chocolate Chip Cookies.

Wedding cookie baking continues; and I think if my son Nick had his way, the wedding cookie table would be completely covered with chocolate chip cookies.

I often vary this basic chocolate chip cookie recipe up by substituting a portion of the chocolate chips with dried tart cherries (Nick’s current fave) or half the chocolate chips with peanut butter chips, or making them with white chocolate chips and dried blueberries, or half chocolate chips and half chopped Girl Scout Thin Mint cookies, but this is my classic, stand-by best ever chocolate chip cookie recipe, and I made three batches for the upcoming wedding.

A couple tips for those that ask how I make these: always refrigerate the dough for at least a few hours before baking, roll dough into large balls, bake on baking stones (no greater investment for baking!), electric convection ovens are the best for baking cookies.

Best Ever Chocolate Chip Cookies

Ingredients:

4 sticks (1 lb.) butter, softened
1 1/2 cups packed brown sugar
1 1/2 cups white granulated sugar
2 tsp vanilla
4 eggs
2 tsp baking soda
2 tsp salt
5 cups all purpose flour
2 12-oz bags Nestle Chocolate Chunk Morsels (or your favorite)

Directions:

With electric mixer, beat butter and sugar together until completely incorporated. Add vanilla and eggs, and beat until light and fluffy. Add baking soda and salt, and mix another minute. Gradually add flour and beat until well incorporated, but do not overbeat.

Fold in chocolate chunk morsels.  Refrigerate dough for at least 2 hours or up to 2 days.

When ready to bake, preheat oven to 375 degrees F. With your hands, form a cookie dough ball about 1-1/2 inches in diameter.  Place on baking stone. Bake for 8-10 minutes. Do not overbake. Allow to cool on baking stone for 5-6 minutes, then remove to cooling rack to cool completely.

Happy Baking!

Cheers & Hugs,
Jodi

Hershey’s Kiss Brownie Bites

Hershey’s Kiss Brownie Bites
might just be the ultimate  little treat
for the inner chocoholic in
all of us (well – 99.999999% of us… Hard as it is to believe – there is an itsy bitsy, teeny tiny  population of people on this earth who do not like chocolate!)

But for the rest of us….
Imagine a bite-sized scoop of Ghiradelli Double Chocolate Brownie mix
baked to perfection of fudgy center with slightly hardened and cracked outside
in a mini muffin baking pan (be sure to line) and topped off with a smooth, creamy milk chocolate Hershey’s Kiss.

Not only are they sheer decadent delight, they are about as easy to make as desserts come.

I have started baking for my son’s wedding next month.  We have a unique tradition in our little part of the world that requires an overflowing cookie table at weddings.  The cookies are eaten for appetizers, dessert (along with wedding cake), and supplied to take home in to-go boxes.  I’m happily in charge of the cookie table for the wedding, so a baking I will go.

I started with these little brownie bites and will be stocking the freezer with chocolate chips and apricot kolaches and lots more in the coming weeks!

Wedding cookie table or not, you are going to want to try these.  Your friends and family will thank you, and you won’t be sorry!

Hershey's Kiss Brownie Bites

Ingredients:

Directions:

Preheat oven to 325 degrees F.

Line mini-muffin baking pan with foil mini-muffin liners.

Prepare brownie mix according to package directions by combining mix, water, oil, and egg.  Scoop batter into foil liners to 3/4 full.

Bake for approximately 12 minutes.  While brownie bites are baking, unwrap Hershey’s kisses.  Remove from oven and immediately insert a Hershey’s kiss into the center of each brownie bite.  Press gently.  Allow to cool.  The kisses take a while to set, so be careful.

Enjoy!

Cheers & Chocolate Kisses,
Jodi

Lemon Garlic Herb Marinated Pork Tenderloin

Lemon Garlic Herb Marinated Pork Tenderloin.

It’s what’s for dinner!

If you are a pork fan, like I am fast becoming, this marinated tenderloin is a MUST try!

It turns out tender and juicy with a fresh citrusy herb flavor that pairs great with potatoes and fresh vegetables for a delicious, easy weeknight dinner.

Prepare and marinade the meat the night before, then all you have to do is throw it on the grill for 10-15 minutes for dinner.

Leftovers are great sliced thinly for sandwiches or tossed in a stir-fry.  Such a bonus to get a couple completely different meals from one easy recipe.

Hope you will give it a try, and hope you enjoy as much as we did.

Lemon Garlic Herb Marinated Pork Tenderloin

Ingredients:

  • 4 Fresh Ripe Lemons, Juiced and Zest from one
  • 1/2 cup Olive Oil
  • 6 cloves Garlic, minced
  • 2 Tbsp chopped fresh Rosemary
  • 1  Tbsp chopped fresh Thyme (or 1 tsp dried)
  • 2 Tbsp Dijon Mustard
  • 1 tsp Salt
  • 1 tsp ground Black Pepper
  • 2 Pork Tenderloins (approx. 1 lb each)

Directions:

Make marinade by whisking together first 8 ingredients.  Pour into large Ziploc bag.  Add the pork tenderloins and coat.  Marinade overnight in refrigerator or at least 8 hours.

Preheat grill to 400 degrees F.   Place tenderloins on grill.  Discard excess marinade.  Grill 10-15 minutes or until meat reaches 135 degrees F.  Allow to rest 5-10 minutes.  Cut into thin slices to serve.

Enjoy with roasted new potatoes and steamed broccoli or your favorite vegetable.

Cheers & Hugs,
Jodi


*Recipe slightly adapted from Ina Garten’s Herb Marinated Pork Tenderloin

Cake Pops! Tips for Beginners


chocolate-dipped-german-chocolate-cake-pops

Cake Pops!  Tips for Beginners.

I adore cake pops!

Because… really…  what could be better than a bite-sized morsel of cake dunked in chocolate?  And then maybe adorned with sprinkles?!

They are delicious and pretty and cute; but until this past weekend, I had never tried to make them.

I wanted to practice for an upcoming event or two, so I read and researched and asked around and gave them a whirl this past weekend.

white-and-gold-elegant-cookie-pops

They are really not that difficult, but there are a few tricks to success.  I thought I would provide a few tips that helped make mine turn out delicious and beautiful!  At least that is the consensus I got from the party I took them to as “practice” pops.

cake-pops-german-chocolate-before-dipping

To make cake pops, bake a cake mix – whatever you favorite flavor is.  Then follow these tips for success.

  • Freeze cake – even if overnight.  It allows you to plan ahead and also adds to the moisture of the cake.  Simply place baked  cake – crumbled, broken pieces, or all in one piece – in a large Ziploc bag in the freezer.
  • 1 boxed cake mix  makes approximately 3 dozen cake balls.
  • When ready to assemble, defrost the cake and crumble to fine crumbs with your hands in the bag.
  • Add only enough frosting (ready made works perfect) to add a bit of “glue” for forming and holding balls together.  I used 1 heaping tablespoon – that is it!  This allows your cake balls to truly taste like cake.
  • Scoop crumb mixture with a small scoop to form uniformly-sized 1 inch balls.  Then roll with your hands to round ball.
  • Melt chocolate candy melts in microwave in a deep cup that is not too wide to allow for ease of dipping.  It only takes 1 1/2 – 2 minutes.
  • Dip tips of sticks into candy melts and insert into cake balls.
  • Refrigerate or freeze for at least a half hour or several hours.
  • Remelt chocolate at 30 second intervals until desired consistency.
  • Dip cake balls on sticks into chocolate candy melts.  Allow excess to drain.
  • Place on parchment paper if using with stick up, and sprinkle with jimmies or edible glitter.
  • Stick into styrofoam if using cake ball up and decorate as desired.
  • Make ahead up to 3-5 days if needed – no more than 7 days.  (there are horror stories of moldy cake balls made too far ahead of time)
  • I found this site – Heavenly Cake Pops – to be extremely informative.

Have fun and enjoy!

Cheers & Hugs,
Jodi