In honor of this special day, I wanted to share a watercolor painting I created.
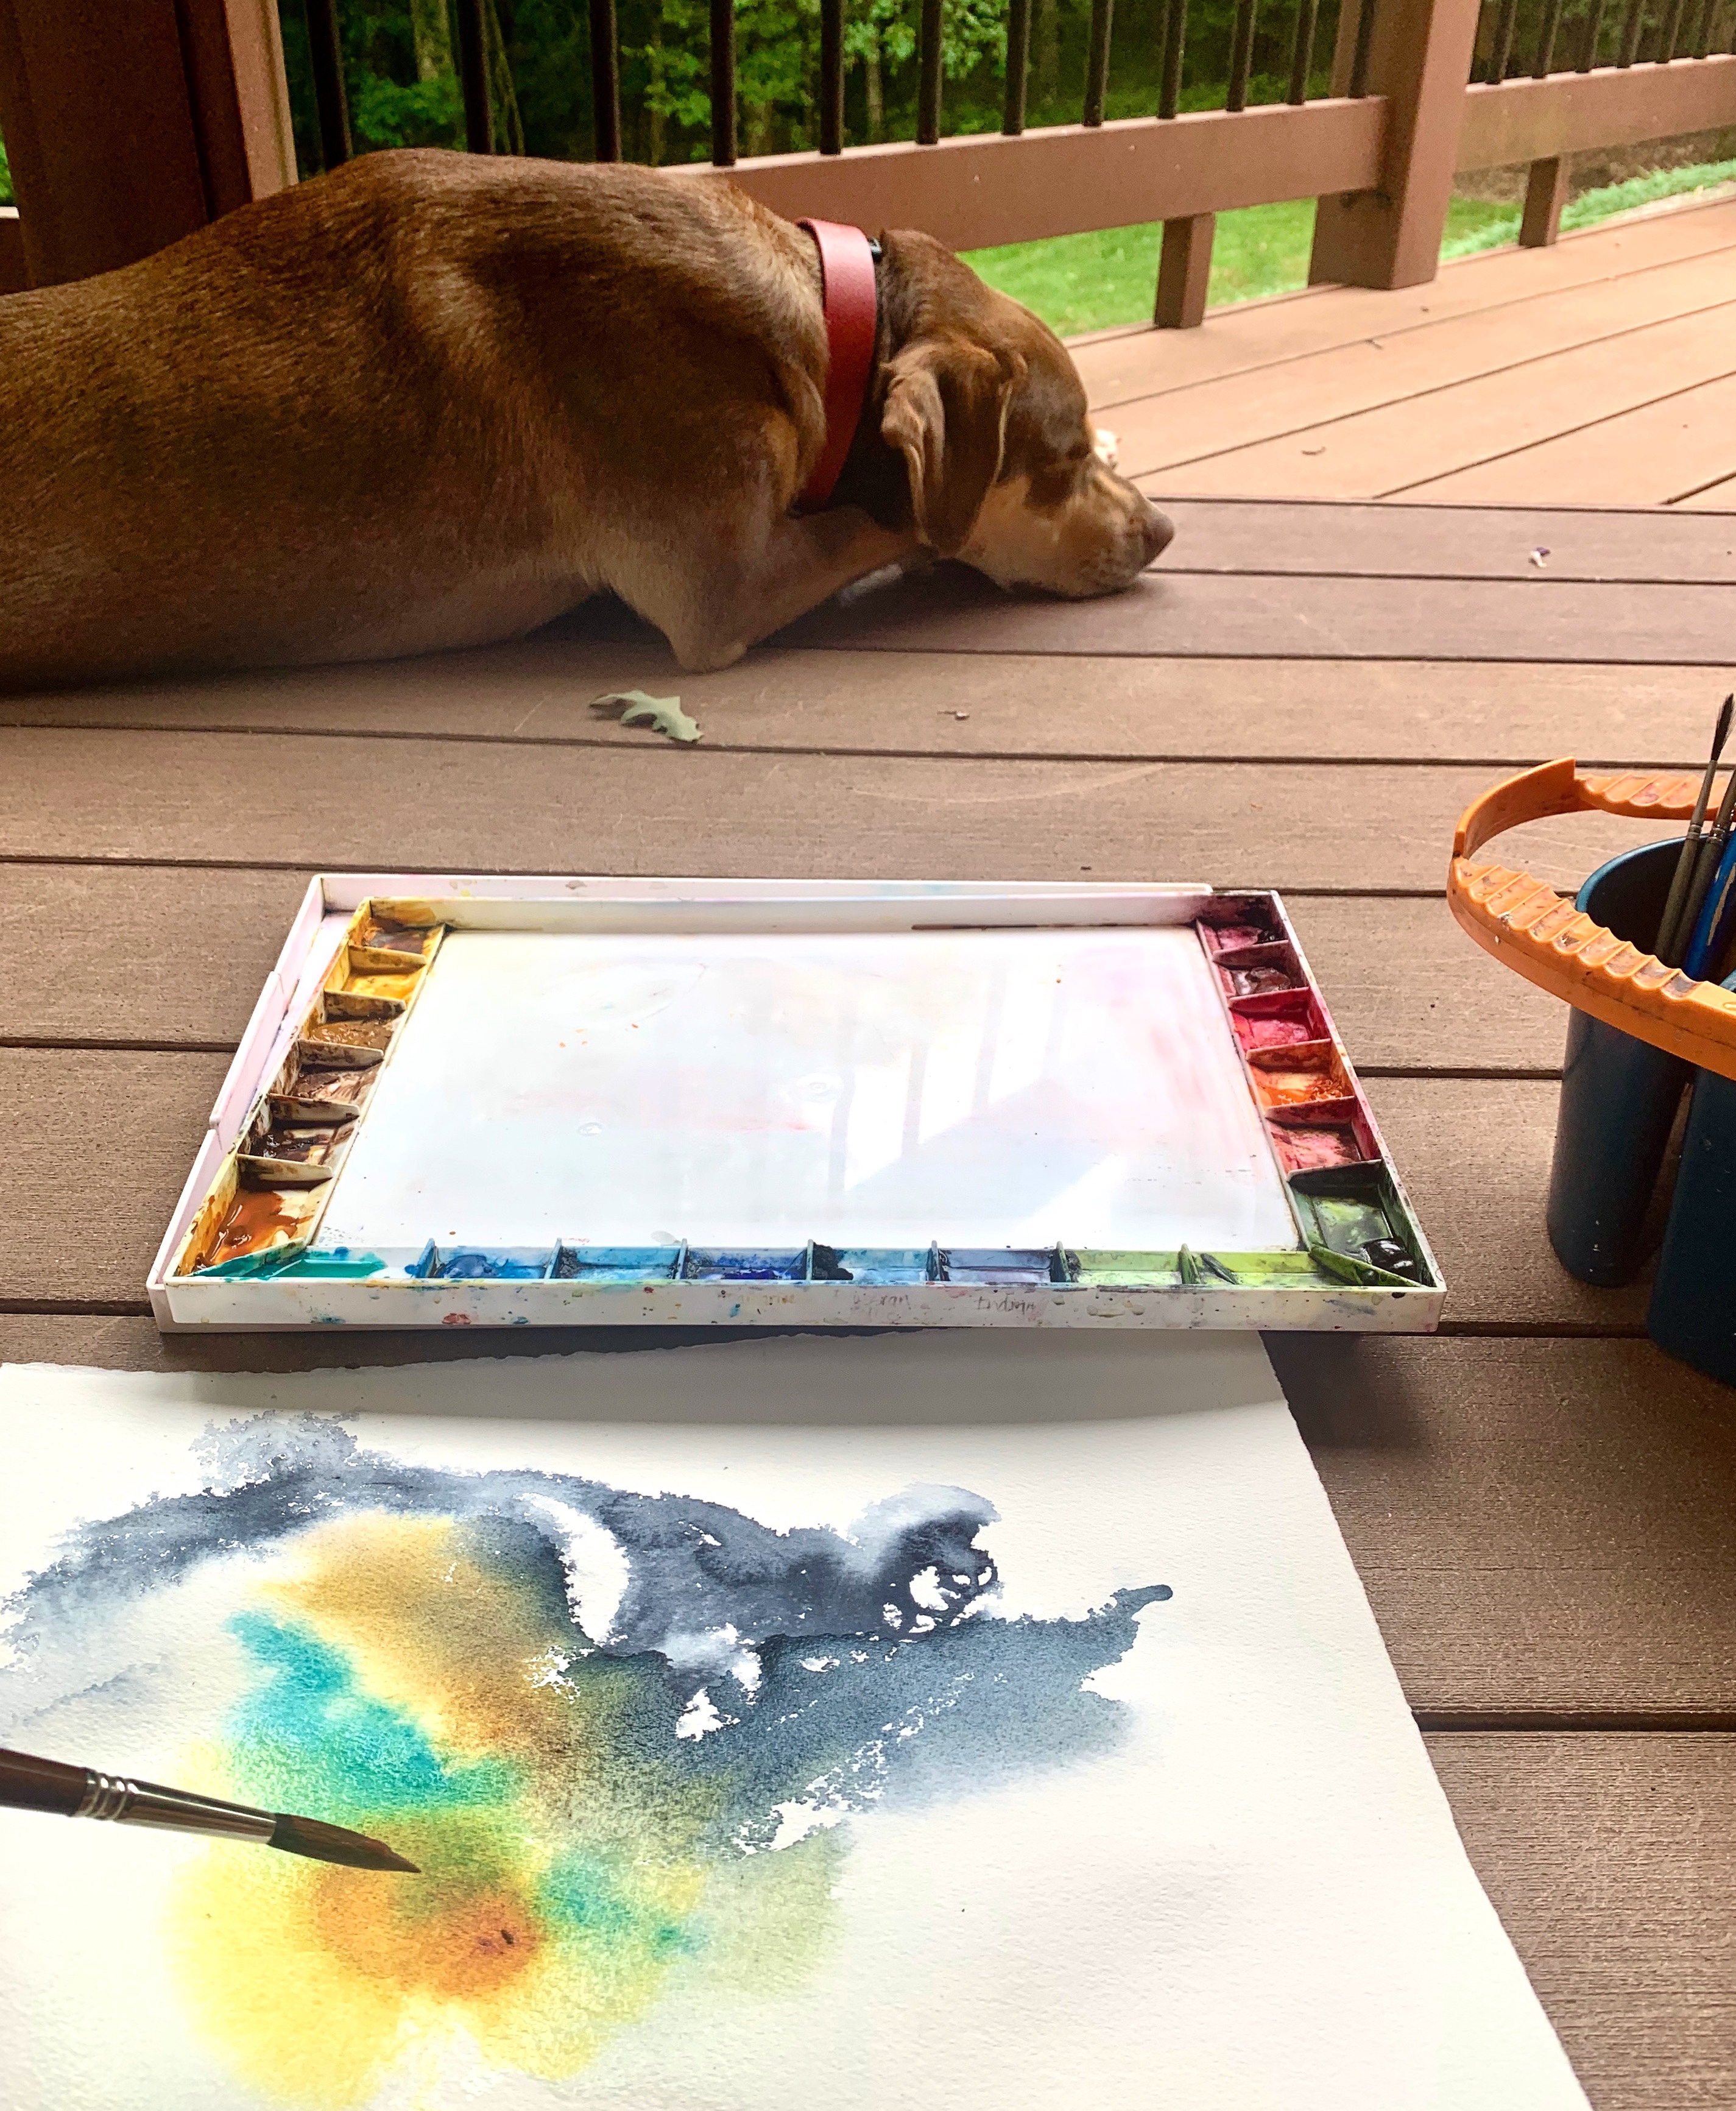
It started with a relaxing Sunday afternoon painting session where I just sat on the porch outside and painted from the heart to one of my favorite songs.
I had no idea what it was going to turn out to be, and I truly had no intention for what I was painting except to “feel” the music.
Sometimes I do these types of paintings and then “sit” on them for a while. I just let them “hang out,” and I glance at them every once in a while until something pulls me in and speaks to me.
And it did. It reminded me of the wound that was healed by the light that entered it.
I woke up at 5 a.m. Saturday morning. Oh how I love when that happens! Waking up without an alarm on a day off means more hours to enjoy the day off!
I felt the muse. I wanted to paint. The same sweet lady who asked for a painting for the new cardiologist also wanted a painting for a new geriatrician.
I worked for over a dozen years for a home health and hospice company, so I have a special place in my heart for the elderly and also the end of life journey.
I had a vision for what I wanted to paint. I wanted to paint an elderly couple embracing and enjoying the journey at end of life.
I like to paint a bit more impressionistic and abstract, though, so how to portray in a way that a new doctor entering this “journey” might appreciate?
This is what I came up with. I just wasn’t sure about it though. I sat on it for a few hours before sending a picture of it to the person who commissioned it. I told her I would understand if it was not what she had in mind and told her it was very different from the heart one I did previously, so I would understand if she didn’t want it and would just like a flower or something completely different…
Turns out she loved it, so off to its new home this one went.
I hope it will bring joy to the recipient as she enters her new journey caring for people at the journey at end of life.
Cheers & Hugs,
Jodi
#WorldWatercolorMonth is only days away! July 2020! Join the fun!
I was recently asked to do a commissioned watercolor piece that is a gift for a new doctor. This doctor is a brand new cardiologist who has a favorite quote about love.
This is the painting that evolved from that commissioned request, and I have to admit I love it! I am actually giddy about how it took on a complete life of its own and came so easily with a message that resonated with me so deeply. It feels so relevant to me at this time in the world and in my life, and it actually made me tear up. (Though those that know me well, know that is a common occurrence… I am a crier. Happy tears… Sad tears… Sappy movie tears… Overwhelmed with life, work, the world tears… Embarrassment tears… Just an emotional crier!)
The words speak to me. Do they to you?
Love.
Not just a feeling…
but something you do!
Love others – –
but most importantly…
Love Yourself – –
What you do…
and what you stand for!
I hope you will love yourself – what you do – and what you stand for!
Don’t forget – July is World Watercolor Month, and I will be joining Charlie and so many others with the goal of painting every day in July!
Need ideas? Here is a list of prompts that I am going to follow.
It’s been a while! Hope you all are well! What crazy times we are living in right now. Five months ago when I stepped back to take a break from blogging, I don’t think any of us knew what lay ahead with this worldwide Coronavirus pandemic and quarantining and all the changes that have taken place in our country and world!
Hubby and I are supposed to be on a once-in-a-lifetime vacation right now in Italy celebrating a very special family event, but instead, we toasted with Italian wine last evening in Conneaut Lake, Pennsylvania with those we were going to be with at a social distanced outdoor get-together and Zoom event. We cried and laughed and felt grateful that we are all still here and healthy!
But what brings me back here to the blog is a very special event created four years ago by a very special man that honors me with the privilege of allowing me to be a small part in it: World Watercolor Month and the amazing Charlie O!
Charlie O’Shields, the creator of Doodlewash®, founded World Watercolor Month in 2016. His own love of the medium led to the creation of a blog and social artist movement dedicated to promoting and connecting the vast community of watercolor artists all over the world. After hosting a few early art challenges, celebrating various fun and delightfully obscure holidays, it became apparent that there wasn’t an official celebration of the medium he and so many of us love. Over 18,000 applications are submitted for “official days” each year and only 30 are added to the calendar so it was a long shot, but the registrars agreed with the cause and now it’s official! July is now and forever World Watercolor Month!
Charlie and I started watercolor painting and blogging around the same time, and we immediately became lifelong friends. If you are not following him on Doodlewash, you are missing out on a very bright spot every day!
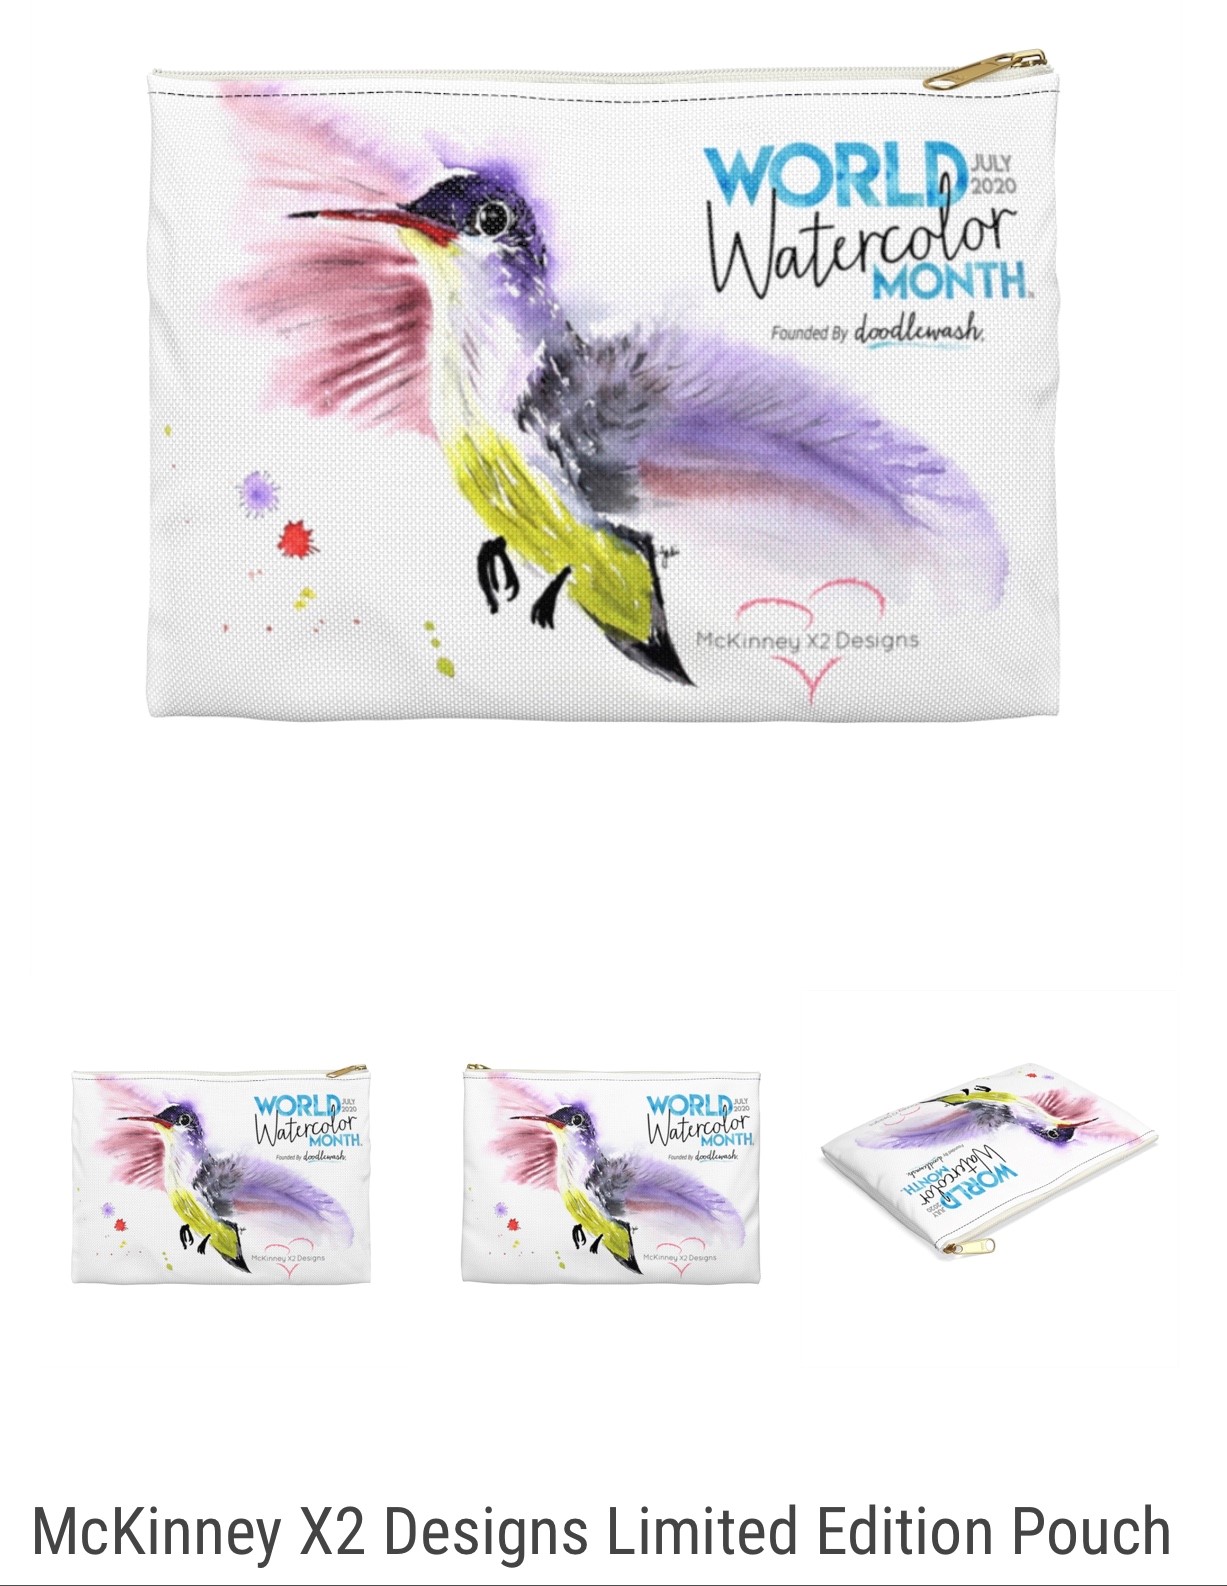
I can’t wait to make a commitment to pick up my brushes and paint every day in July again! But beyond being a celebration and inspiration for those of us who love to paint in watercolor, it is an opportunity to raise awareness for the importance of art and creativity in the world. It is an opportunity to help children in need of art supplies and art education around the globe through our partnership with The Dreaming Zebra Foundation.
If you would like to purchase this year’s World Watercolor Pouch, the proceeds directly help provide art and music supplies to underprivileged children throughout the world.
So what else have I been up to? Well – I started a new job four days before COVID-19 quarantine and work-from-home status hit, so I have been busy learning and growing at a wonderful non-profit organization, Green Building Alliance, where I get to participate in helping make our communities and world a greener, more sustainable and equitable place where everyone can thrive. Hubby is an “essential” worker in the community, so he has been working hard through all of this to keep our community operating. My grandie girls are growing and thriving, and I am so fortunate to get to spend time with them each week.
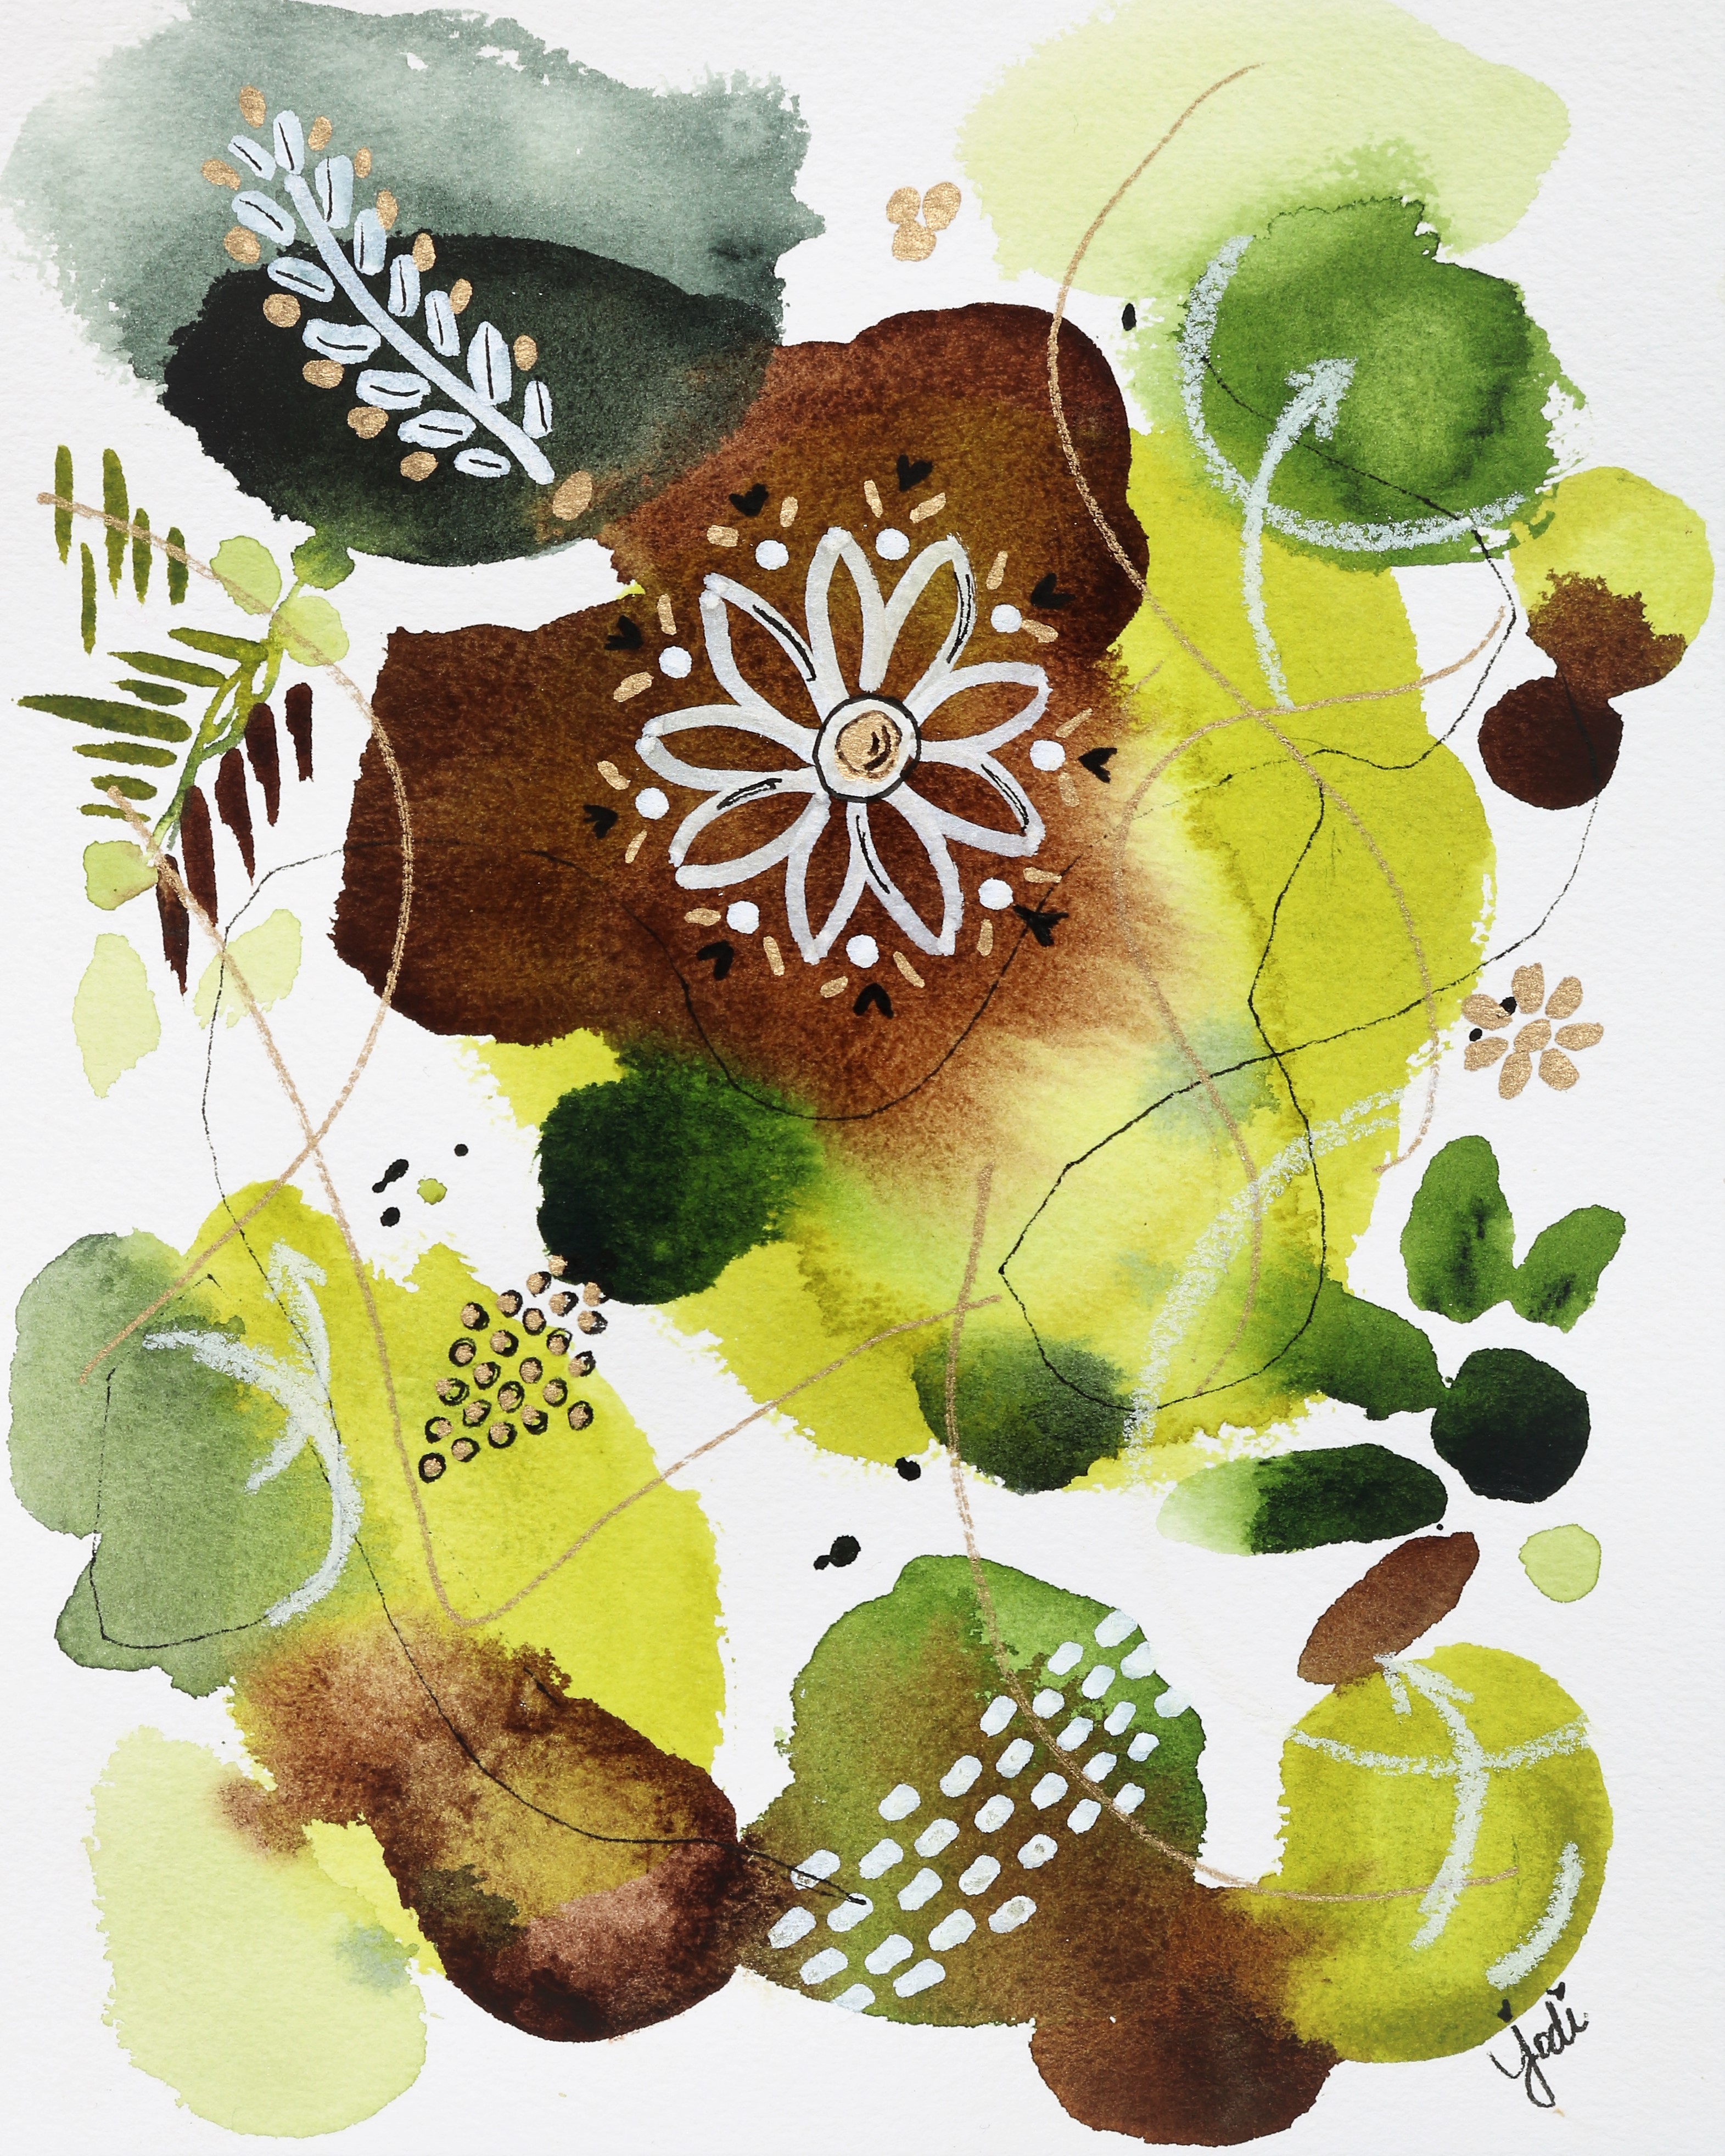
Here is some art I’ve created over the past few months. My DIL, Colleen and I, still have our McKinneyX2Designs ETSY shop, and we enjoy creating art and home decor.
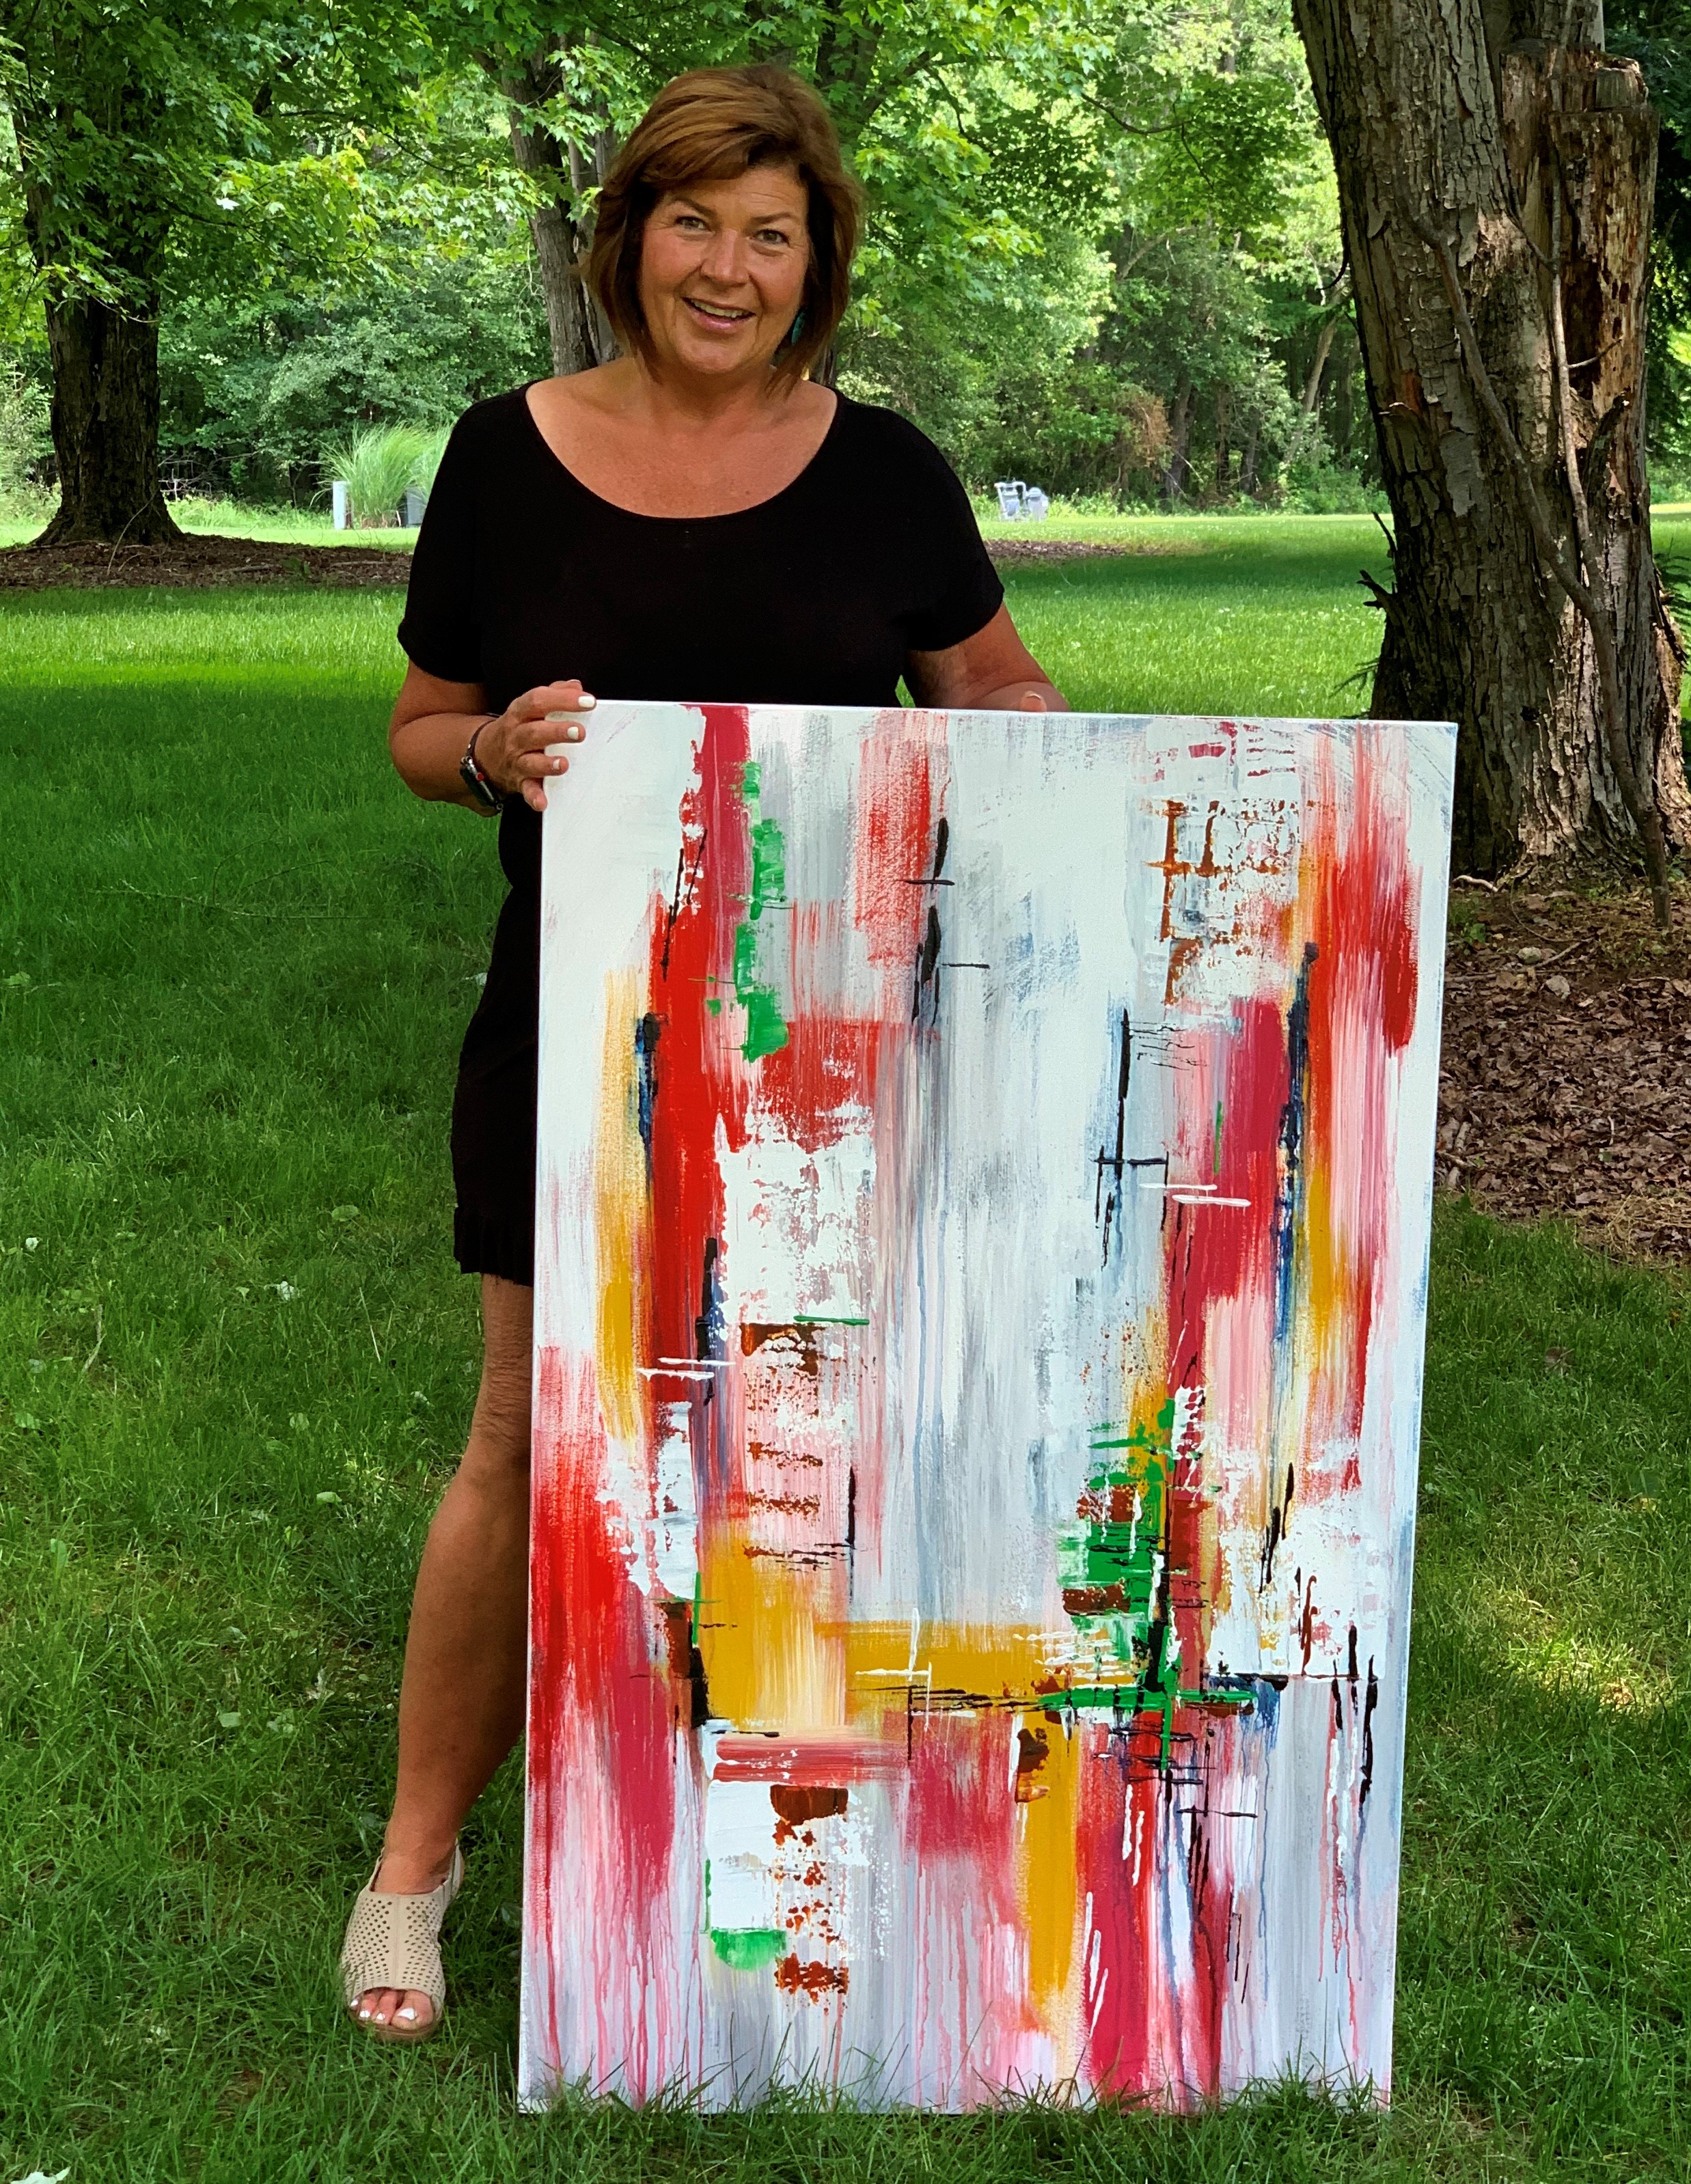
I occasionally dabble in acrylic abstract art too. Here I am with my most recent and largest to date piece.
And my dear friend Ellen, asked me to add this “poem” to last year’s World Watercolor Month bee painting, so I created cards from it and love them!
Hope to keep in touch a little more in July, and hope you will join in on the fun and supporting World Watercolor Month!
From time to time, people ask if I can do a tutorial on my watercolor painting process. Though I am not brave enough to do a video yet, nor do I feel “expert” enough to teach, I thought I would share a little step-by-step process of some of the ways I go about doing a painting and some of the tools I use.
I am a completely self-taught artist. Everything I learned over the past almost five years in my adventure in discovering watercolor painting I learned by watching YouTube videos, reading blogs and books, and experimenting. (You can see and read about my very first watercolor painting here.)
This past Sunday morning, I woke up early with a burning desire to paint. I had to get up and go to my art room and paint. Early morning hours on the weekend are my most creative time. I think I might dream about ideas, because I wake up thinking about something I want to paint and how I want to do it.
The muse woke me at about 3:30 am. I tossed and turned until finally getting out of bed at 5:00 am to just do it.
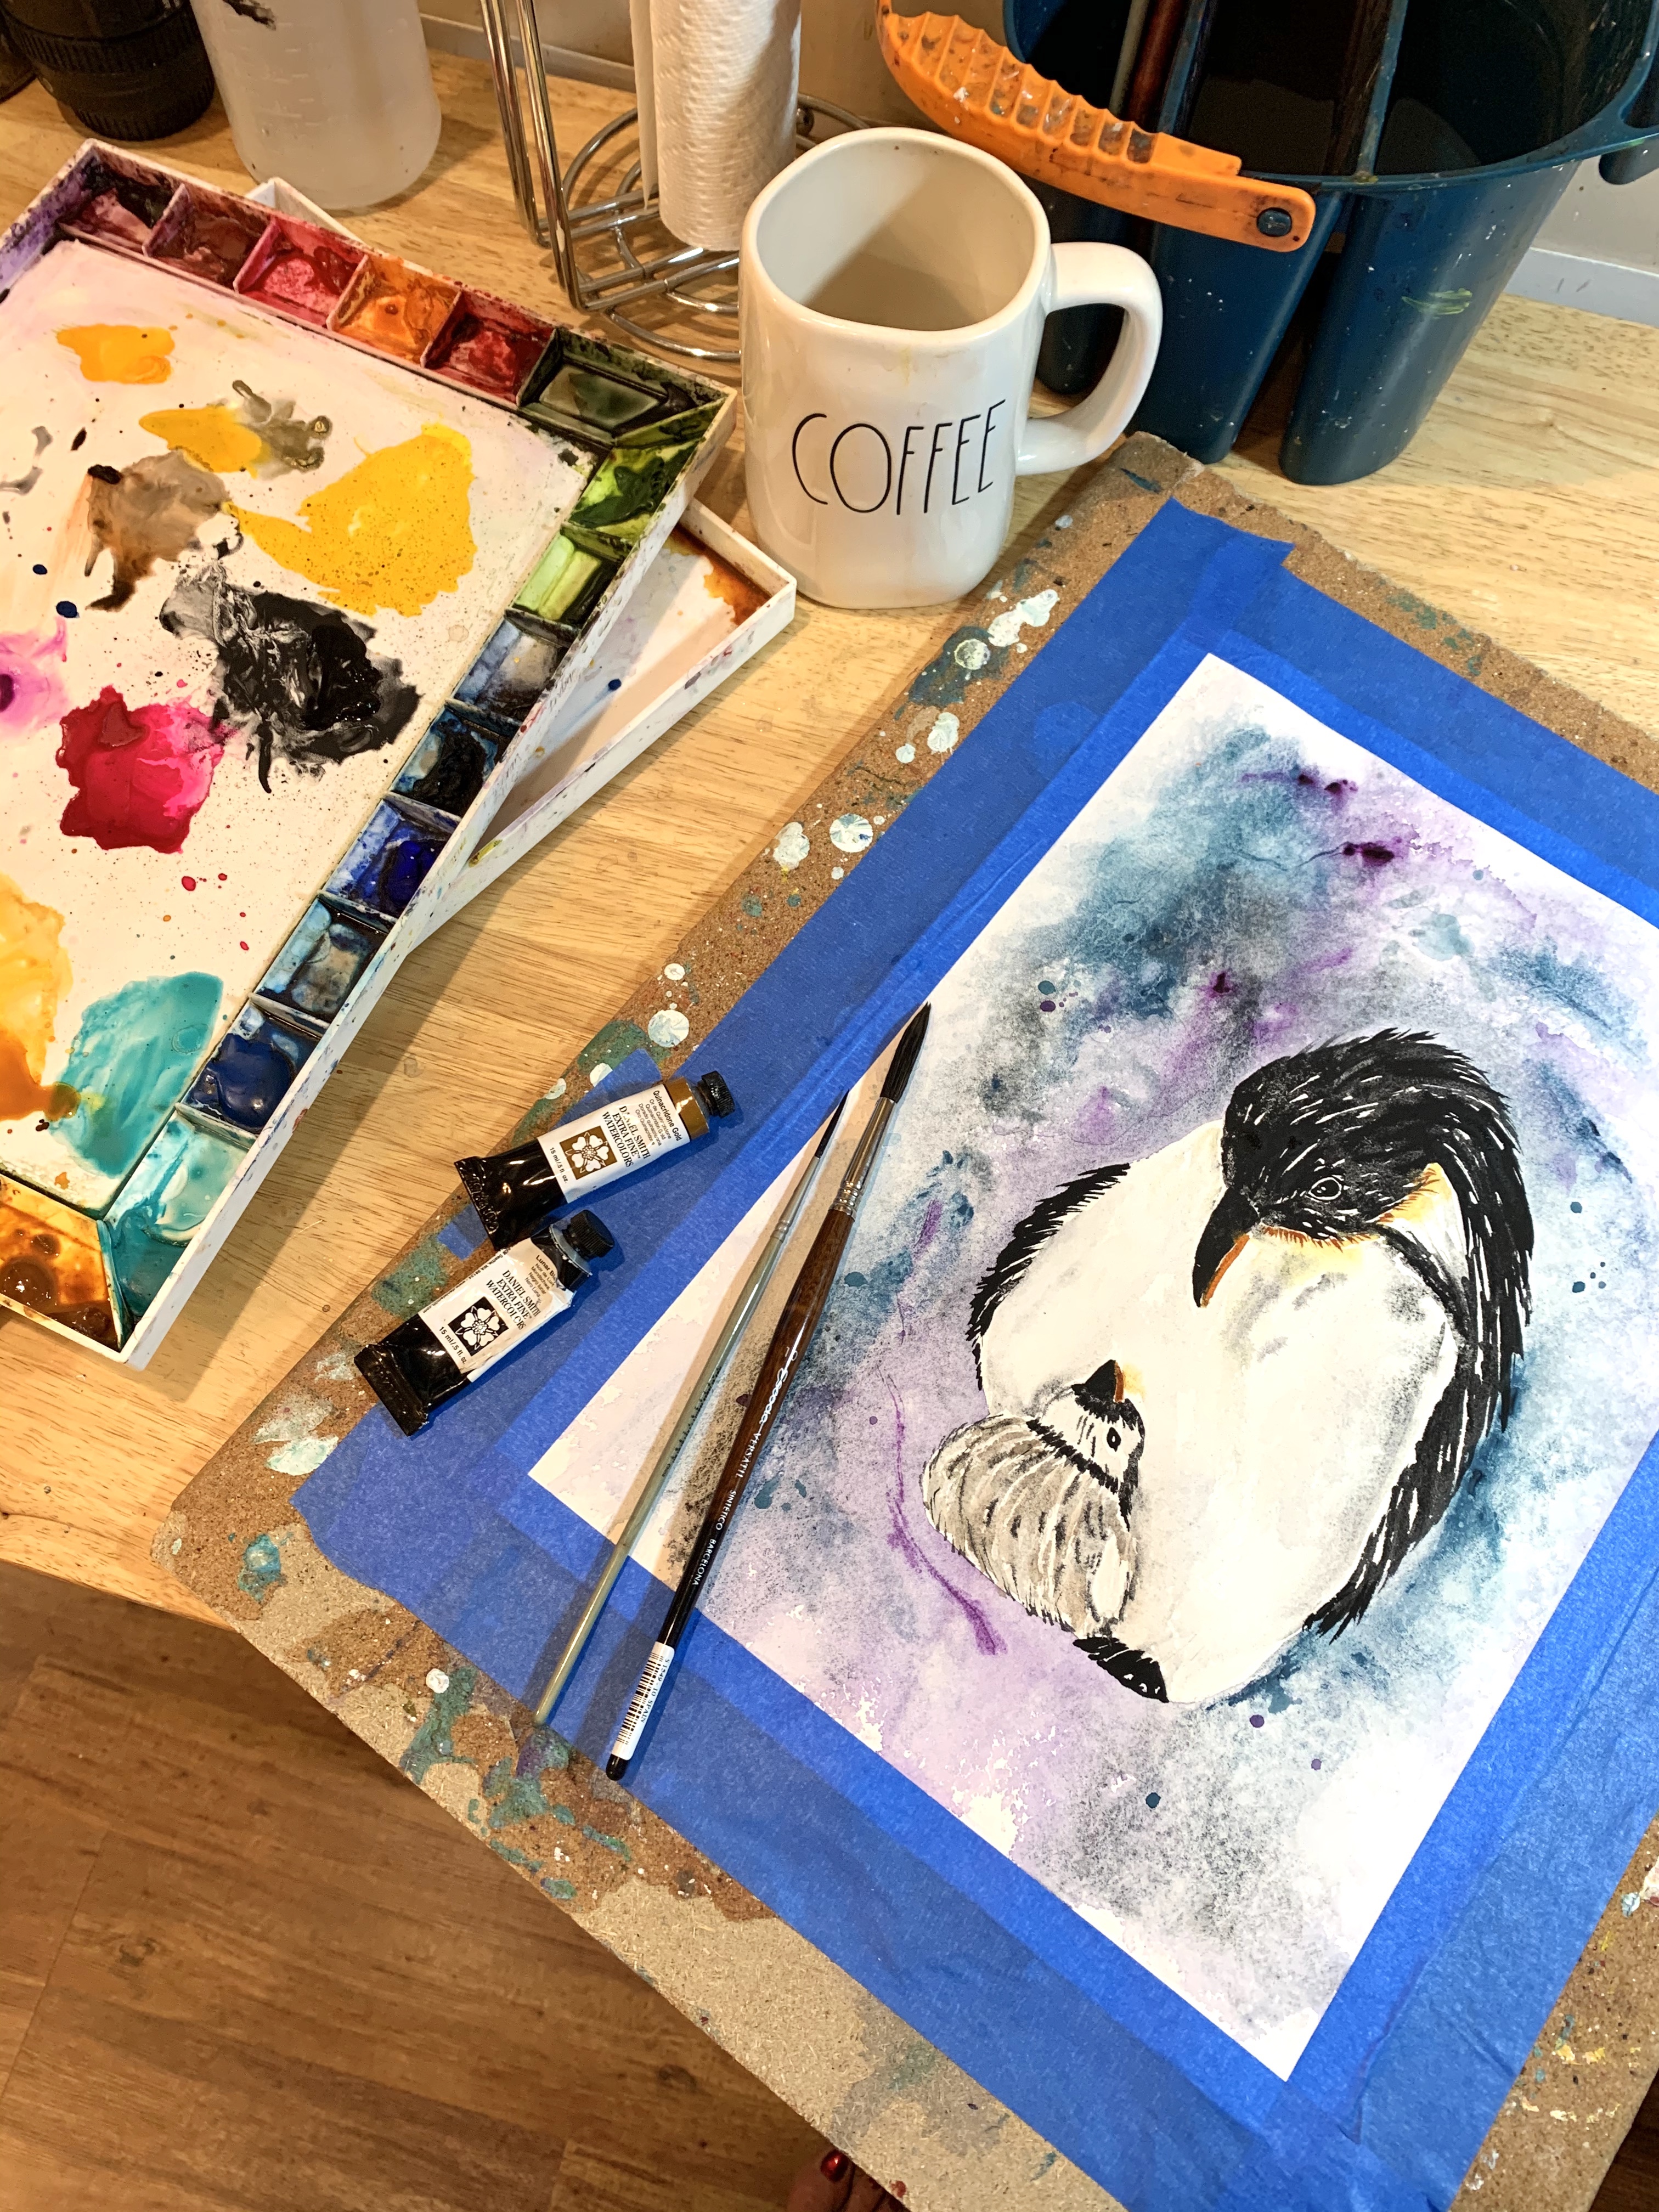
A friend had mentioned penguins the day before. So a penguin painting it was.
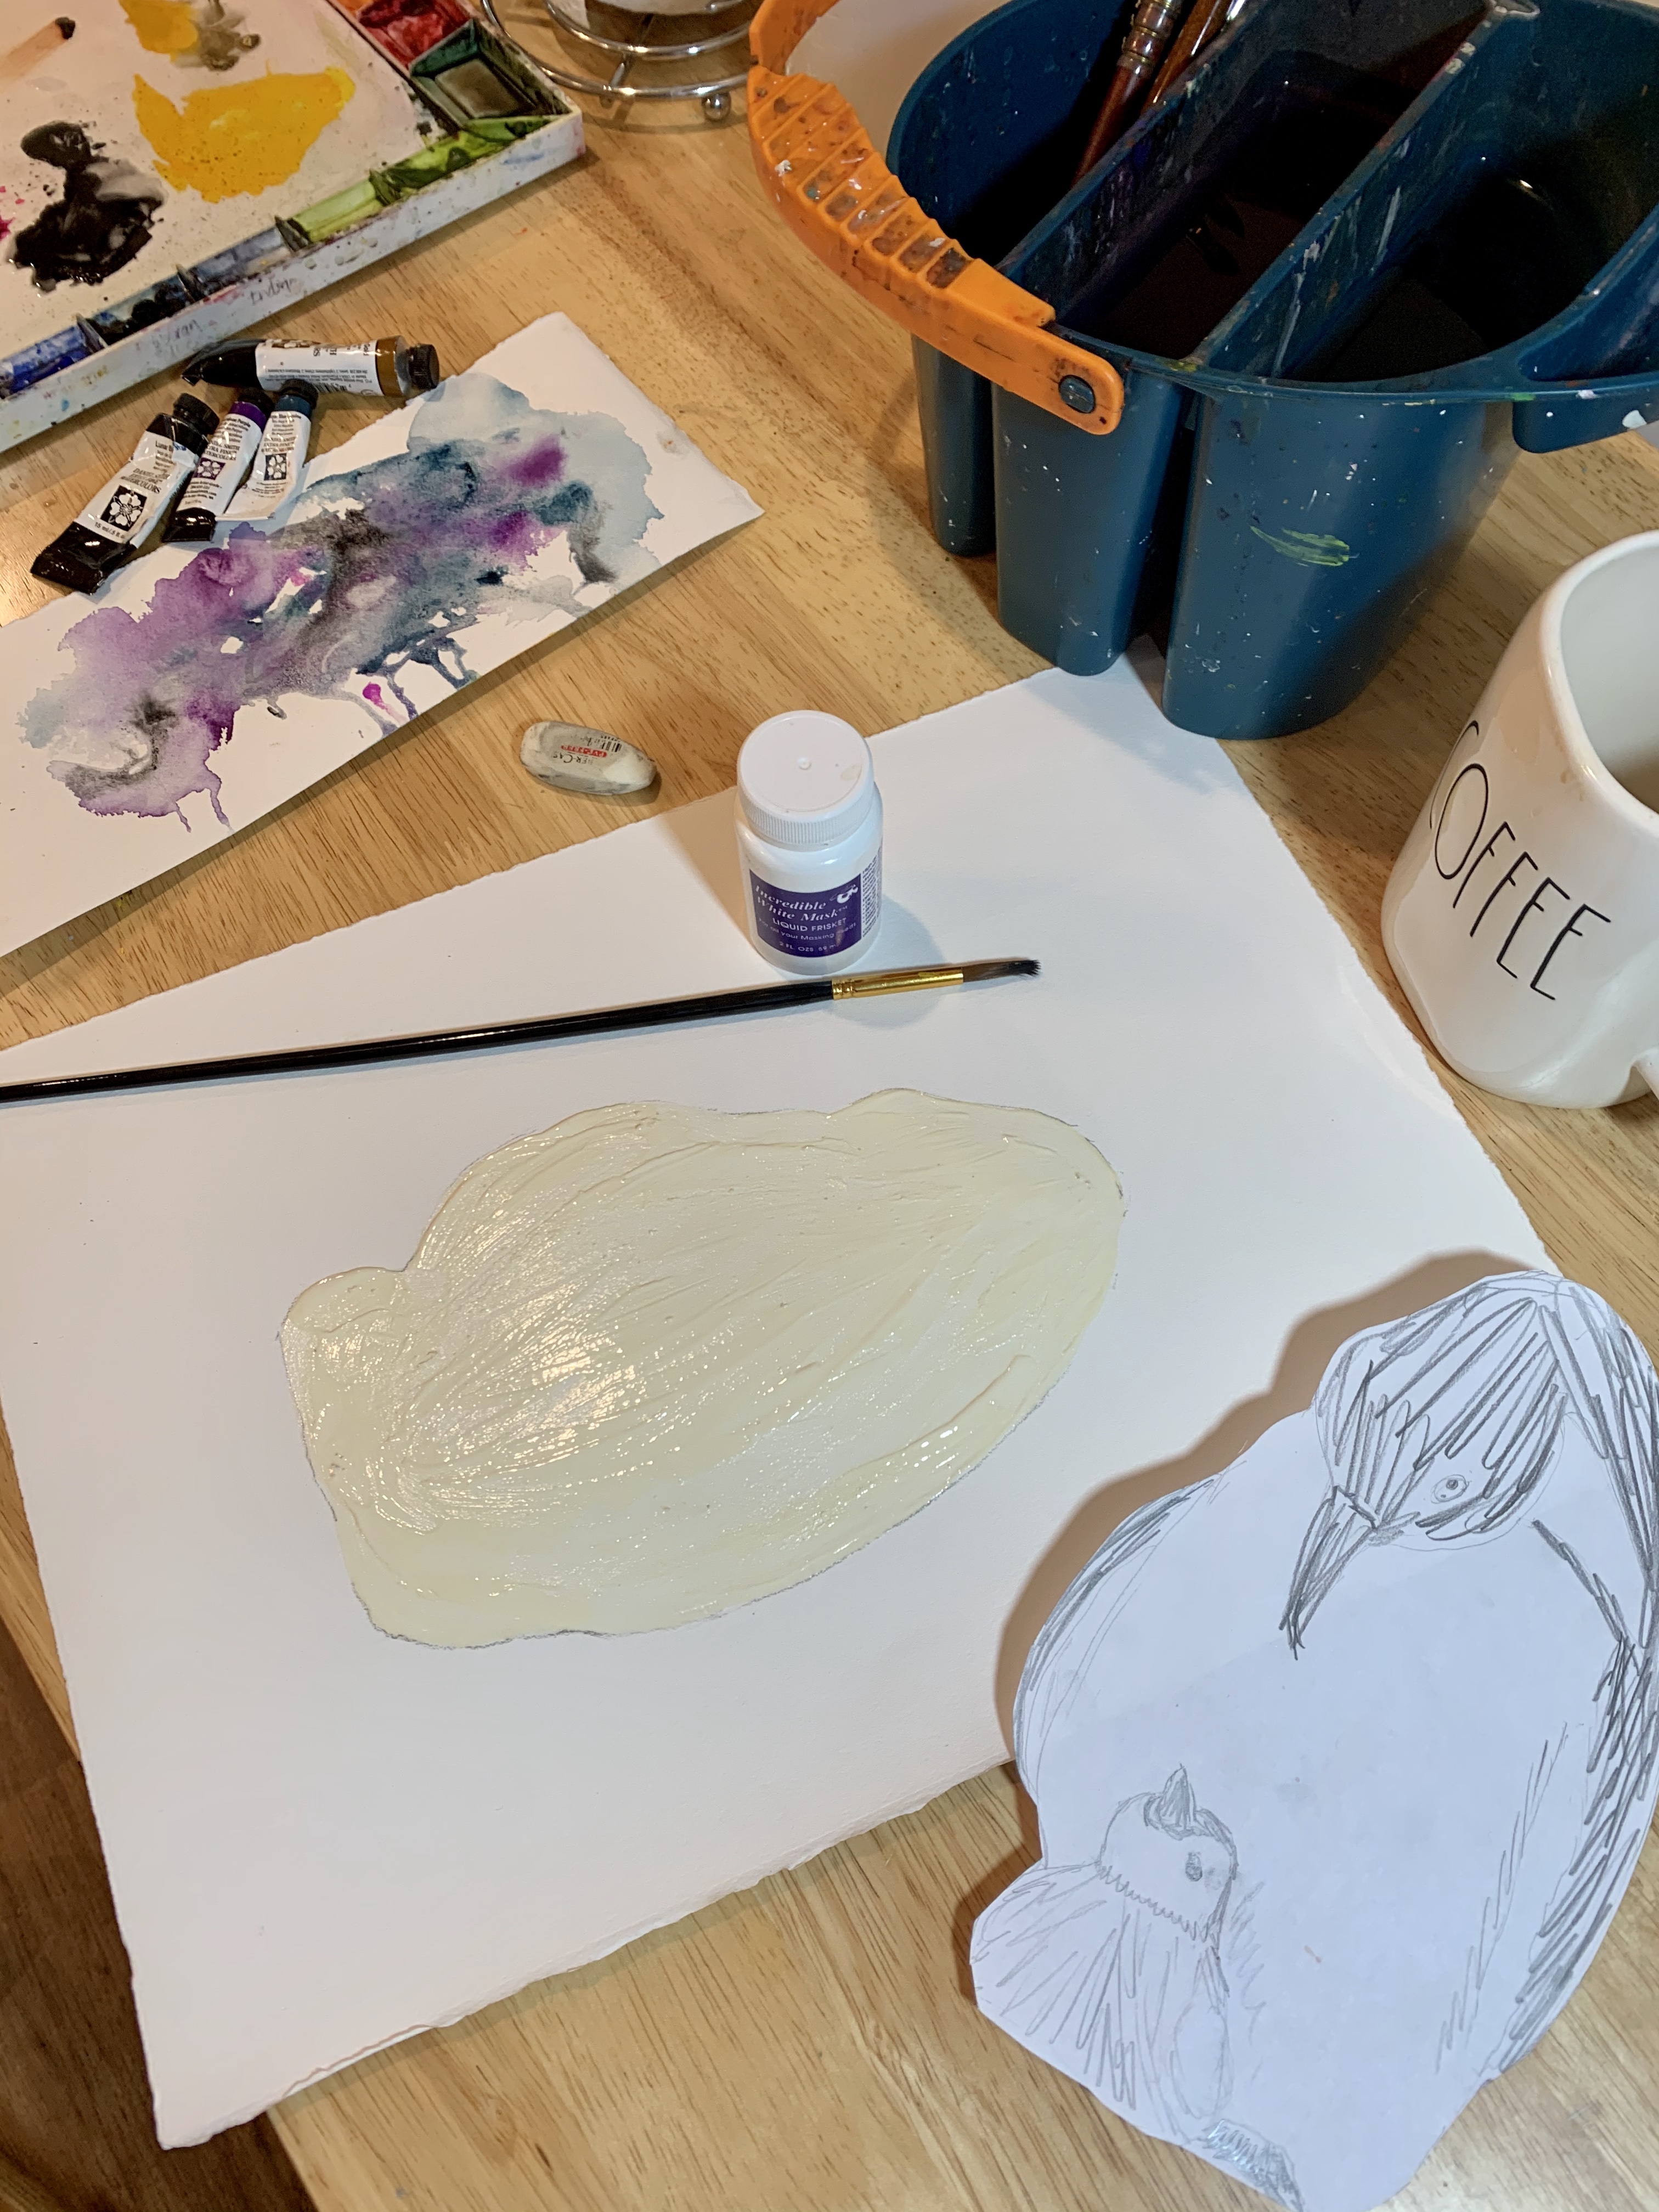
I started by searching for some photos on the internet, and I saw a cute Christmas tree ornament of a penguin daddy and baby. It was my inspiration. I drew a rough pencil sketch on plain copy paper where I also created the shading for my lights and darks and medium values.
I wanted to create a colorful cool-feeling background. Creating granulating effects and blooms with watercolor pigment is one of the things that gives me the greatest joy in the watercolor painting process. I chose a blue (Daniel Smith Mayan Blue Genuine) and purple (Daniel Smith Quinacridone Purple) to go with a little of the black (Daniel Smith Lunar Black) I knew would be the main color I used for the penguins and practiced with them on a scrap of watercolor paper to see how it would look.
Time to transfer all of these ideas to my painting. I most often paint on an 11×14 inches piece of Arches 140 lb. Cold Press Watercolor paper. I buy the paper in large 22×30 inch sheets and tear them into fourths to paint on.
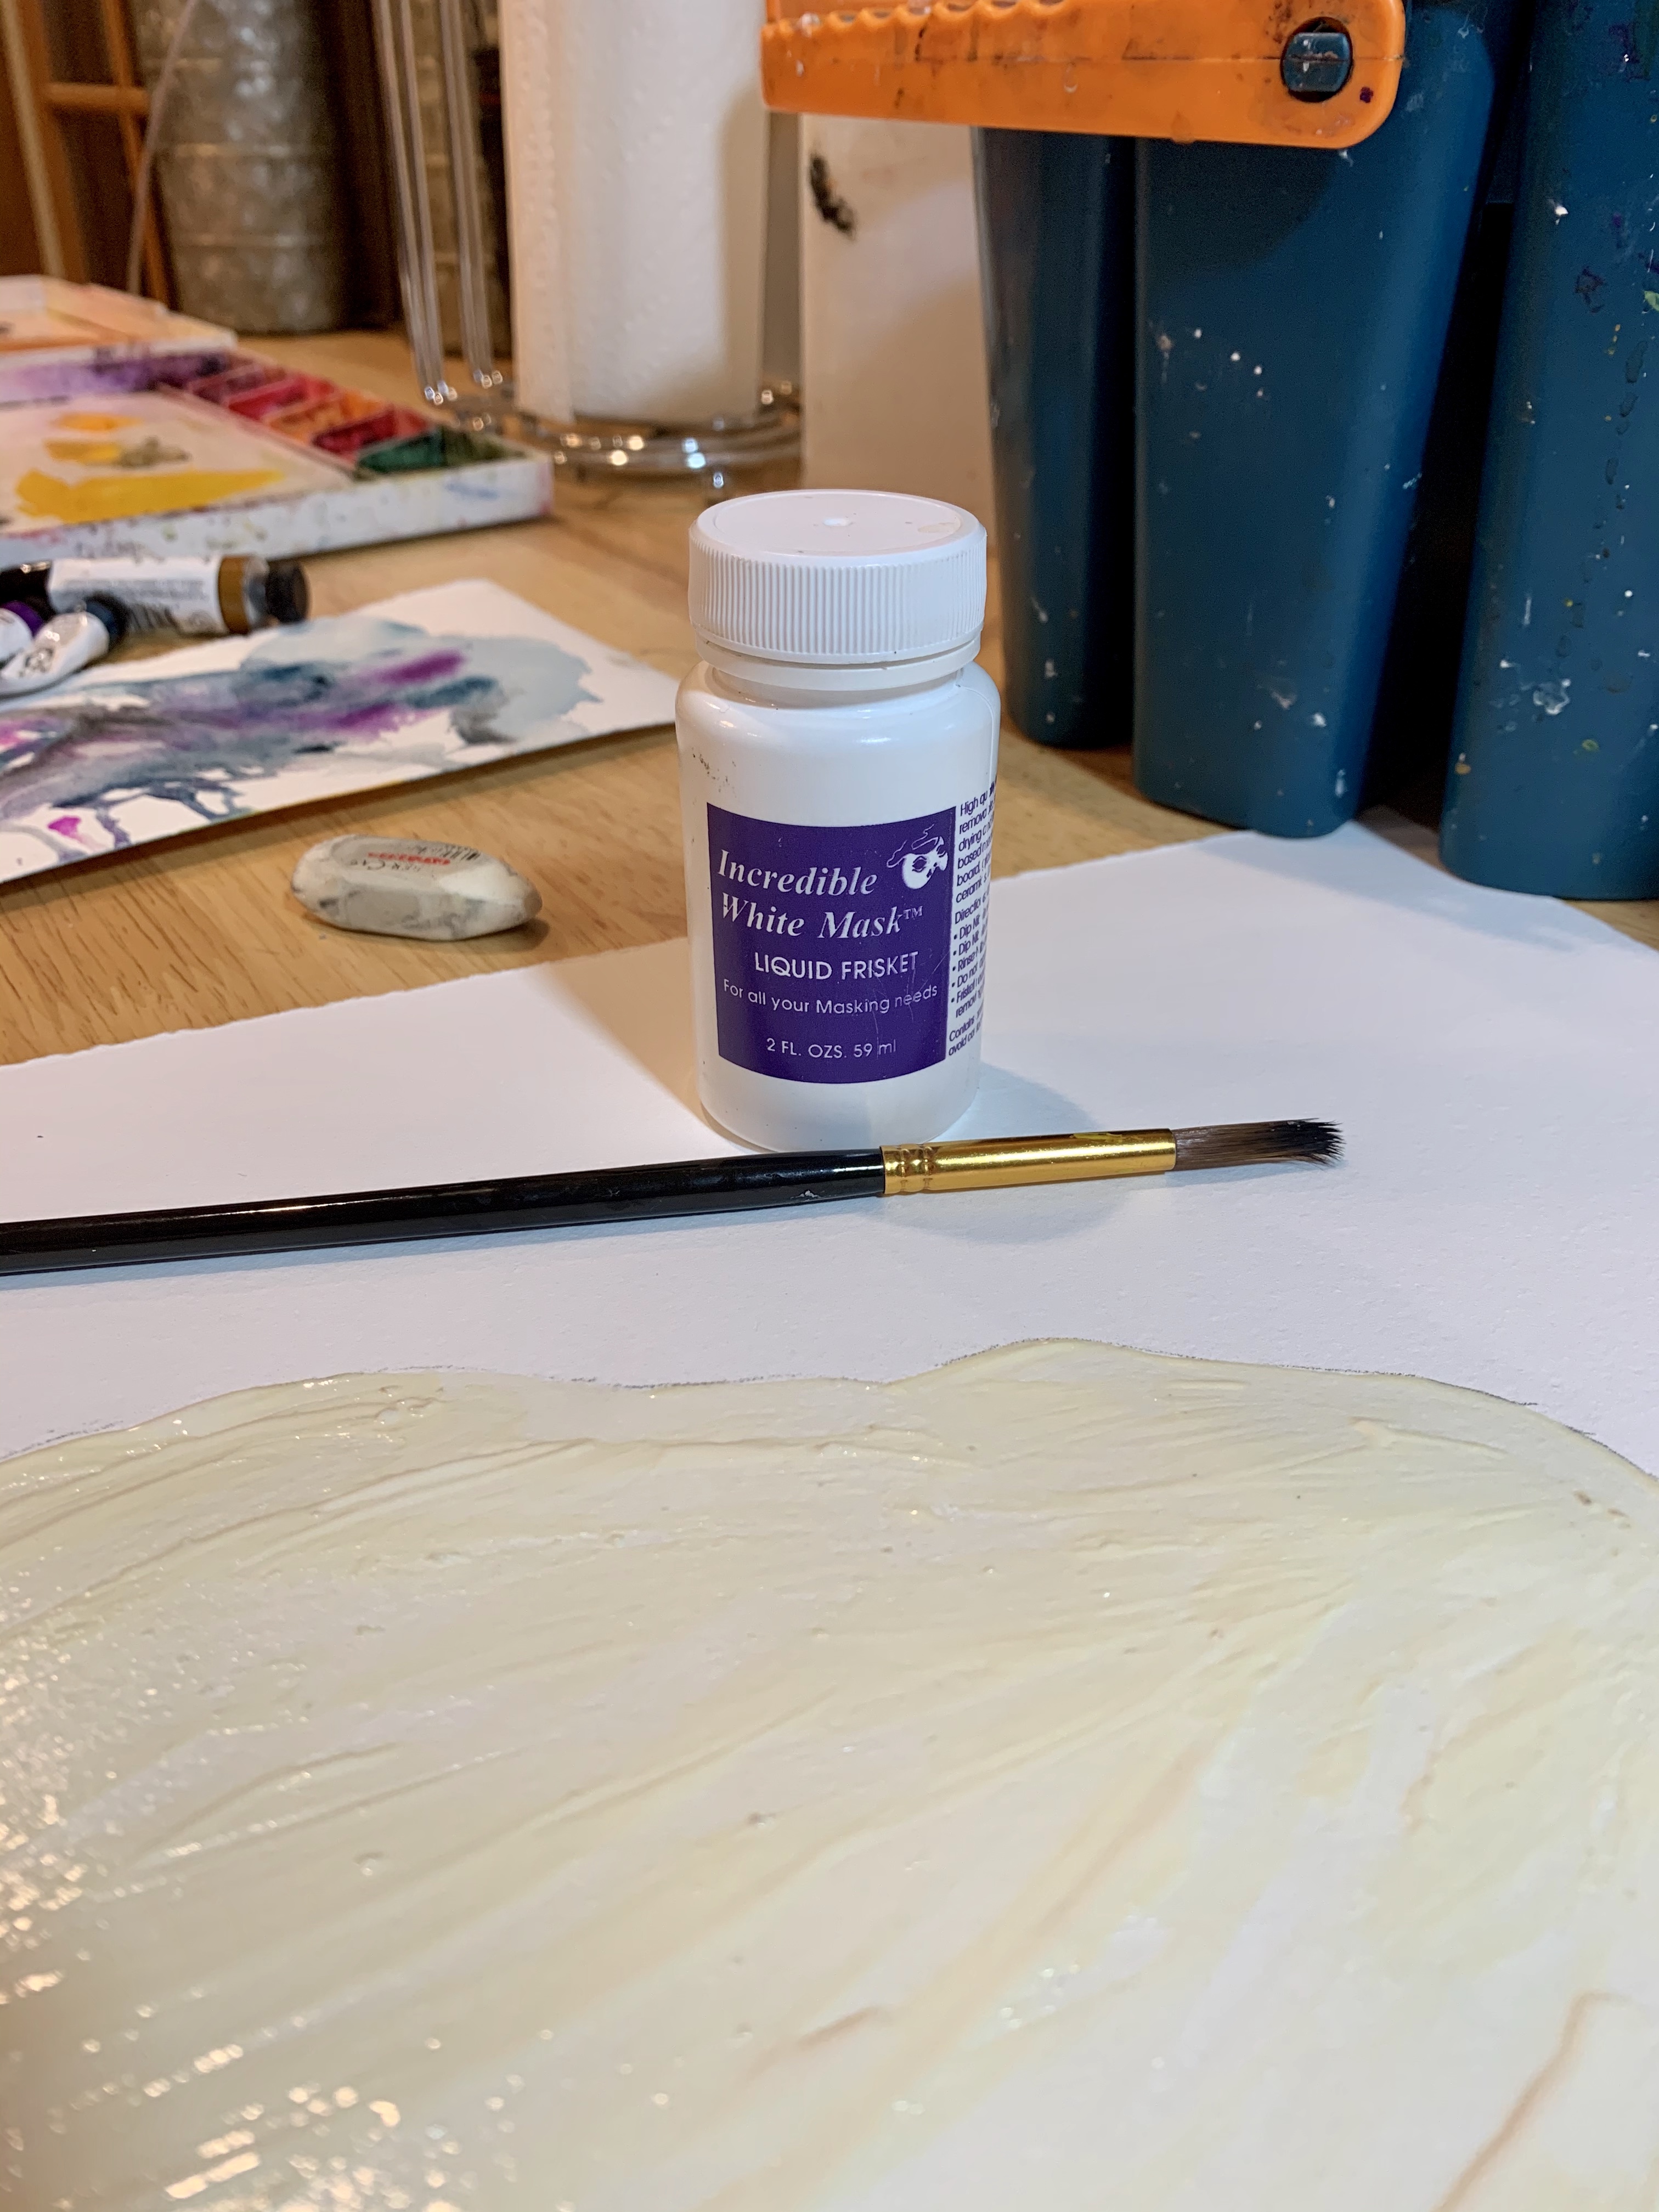
Instead of re-drawing the penguins, I simply cut out the outline and lightly traced it onto the watercolor paper. I then painted the shape in with masking fluid, so I could create the background effect first.
The masking fluid resists paint and water allowing you more freedom to splash and tilt your paper and assure you don’t get background paint into the place you want to paint the main object. It only takes a few minutes to dry – about the time it takes to grab a fresh cup of coffee.
I then taped my paper to a board to prevent it from curling too much since I knew I was going to make it quite wet. I spritzed it lightly with water and randomly dropped in my watercolor paint. I spritzed it some more and tilted it back and forth and sprinkled a few grains of salt here and there.
Then the hard part….. waiting for it to dry.
So off on a walk I went – with Charlie and a friend – in the crisp dawn of daylight.
After a walk and breakfast with hubby, I returned to my art room to a dried background.
I removed the masking fluid by gently lifting with an eraser, and began painting in the penguins.
There really wasn’t a lot of paint needed since penguins are basically black and white.
One of the most important and hardest things to learn in watercolor painting is to allow white, unpainted space. It is the light, and it adds so much to the painting in the end result. It cannot be added back in and takes restraint!
The only colors I used were the same Lunar Black as in the background and a tiny bit of Daniel Smith Quinacridone Gold. And isn’t it amazing how much you see that gold even though such a tiny amount was used? The black and grey were done using the same color, but in varying ratios of water and paint.
One of the most fun parts of finishing a painting is peeling off the painter’s tape creating a crisp, clean line on the edge of your painting.
The last step is signing my name.
And here is the finished painting when fully dry.
I take high resolution photos of my paintings for prints and cards, which I sell on Etsy and in a local gift shop.
Matting and framing adds so much (though it is hard to photograph without a glare)!
I hope this was informative for those who have asked about my process. I am still learning, and I continually try different methods and products.
I don’t always do the background first. Sometimes I paint an object and then decide to paint a background around it. Sometimes I don’t paint a background, but just an object. Other times I paint complete abstracts. I never try to do exact photographic duplicate type paintings. I prefer painting looser and more impressionistic.
I’m not sure I’ve refined my style into any particular area yet. I may never. But the journey is filled with so much joy.
And that is what matters most… finding joy… at life in between.
Somewhere over the Rainbow (in pink) Original Watercolor by Jodi McKinney 11×14
Somewhere Over the Rainbow.
Where rainbows are iridescent pink…
and hearts have wings…
and drip like rain…
That’s where you’ll find me.
Somewhere over the rainbow.
Another piece I painted on my “pink binge” this weekend in the art room.
Maybe not as elegant as yesterday’s, but something about this makes my heart soooo happy!
Playful and fun and full of love. That’s where you’ll find me!
Sparkly Trees in Pink and Blue – Original Watercolor Jodi McKinney 11×14
The Sparkly Magic of the Season.
Are you feeling it friends?
Are you feeling the sparkly magic of the season?
Christmas is only eight days away!
But the magic is here already.
Do you feel it too?
Don’t miss it.
Don’t get too caught up
in what you feel you “have” to do…
in what you “have” to buy…
in what you “have” to bake…
in what you “have” to accomplish.
Relish the magic
that is all around!
To me, the magic is now….
in these days that lead up to Christmas and New Year.
The excitement…
The anticipation!
Oh how I wish we could bottle it to sprinkle on everyone throughout the year!
I went to the post office this afternoon.
The line was longer than I have ever seen it –
and I go almost ever day.
But people were smiling and laughing and cheerful –
those that worked behind the counter –
and those I stood in line and chatted with.
Customers balanced stacks of packages in their arms.
Postal workers kindly explained options.
Friends and strangers chatted.
I visited my son and grandie girls for a brief time
on my way home from work
like I do most every Monday afternoon.
We danced and sang.
We snuggled and hugged.
They dug through my purse with expectant anticipation
of treats they knew they would find.
And then they decided – for the first time ever –
to send home a piece of one of their treats
to their Pap, who they love…
and who loves them back more dearly
than he could ever express,
but we all know.
I went to the grocery store after work.
Sam, a high school junior at a local private Christian school,
was my check-out attendant.
He asked me what special plans I had for the holiday,
and he shared his.
He told me he would be taking the test for his driver’s license
the day after Christmas,
so it was either going to be a Merry Christmas
or a disappointing one,
but he had been practicing his parallel parking with his Dad
and was feeling confident.
He was also studying for mid-terms
and telling me how much he enjoyed music and the arts.
And while we were talking,
a voice from behind –
cheerful and surprised –
told him she was glad to hear he was studying…
and didn’t know he worked here.
She was his high school music teacher.
When I arrived home,
the mail contained colorful envelopes
and tightly sealed packages…
cards and letters from friends and relatives
and a box filled with juicy grapefruits and crisp apples,
bright oranges and ripe pears…
All delivered from a mail carrier
who always takes the time to chat
and scratch Charlie’s ears…
even when his day is running hours later than usual.
This painting…
is a product of a late night visit to my art room.
I was feeling the magic,
and I painted my feelings.
Do you feel it?
I sure hope so!
Feel the sparkly magic of the season!
It is as special as a pink or blue or turquoise tree
found in a magical forest…
or in an art room…
or on a piece of paper…
or in your heart.