Butternut Squash, Caramelized Onion, & Feta Cheese Pizza

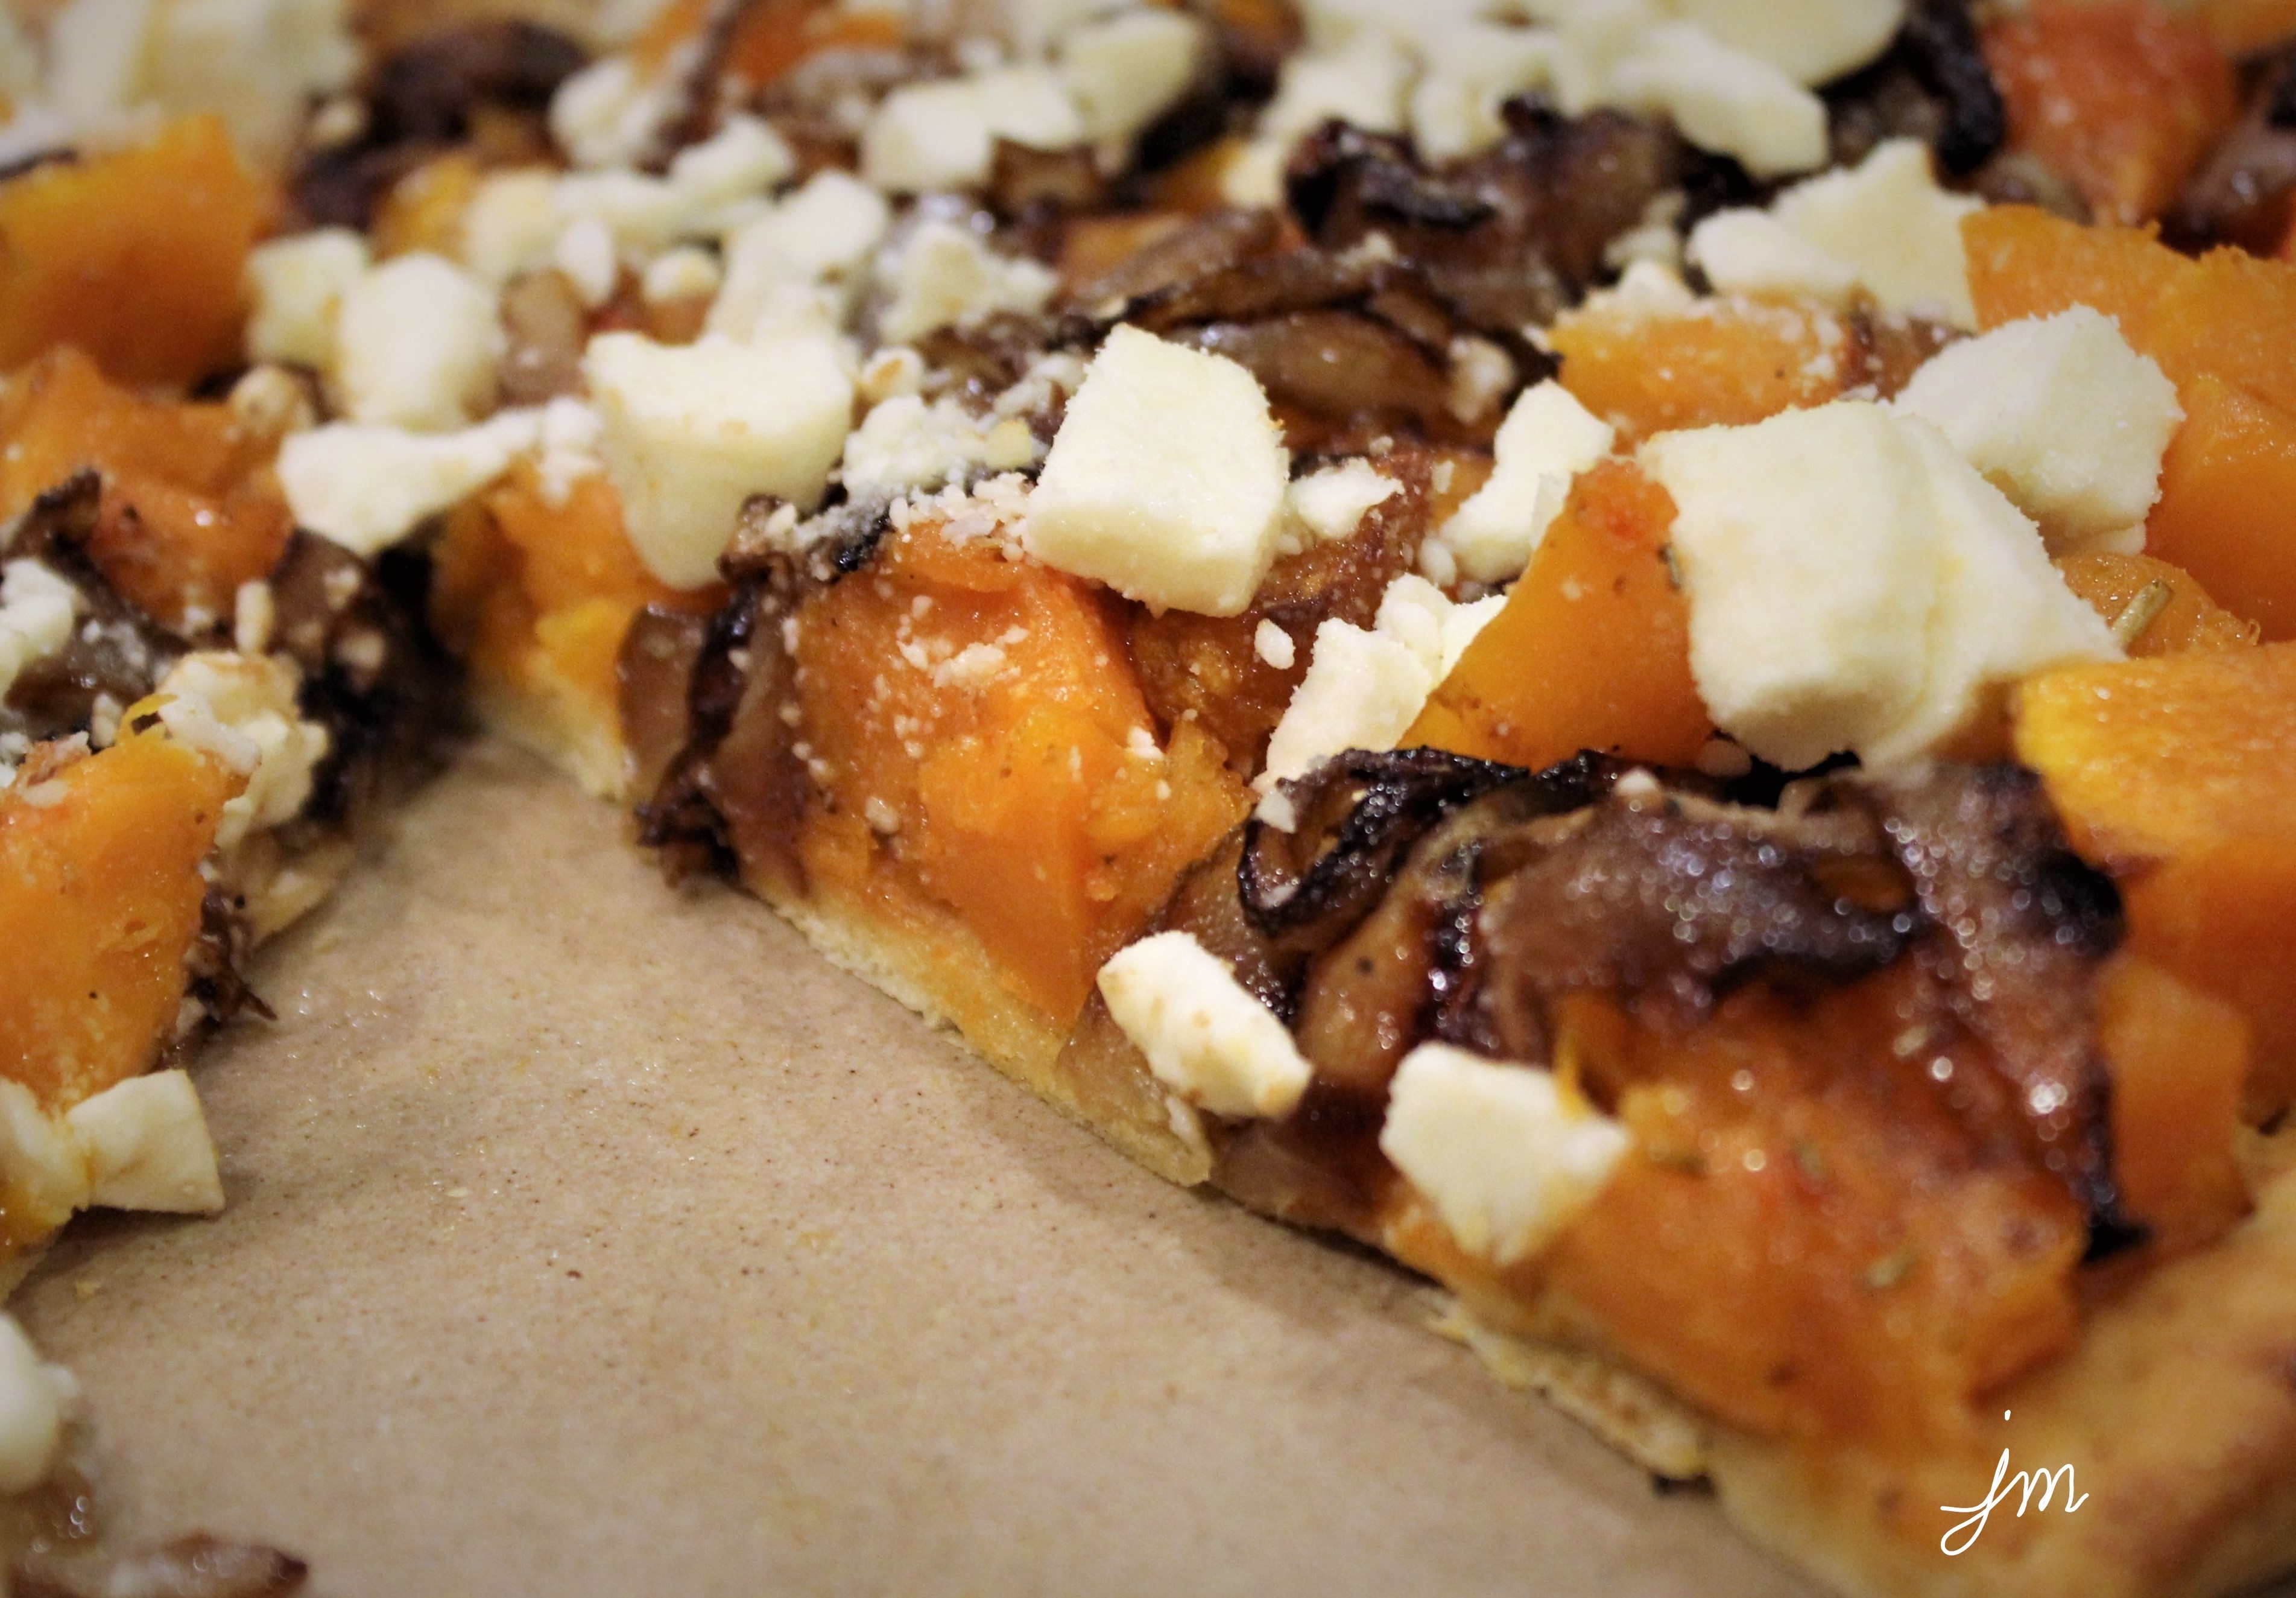
Butternut Squash, Caramelized Onion, and Feta Cheese Pizza.

I am always looking for new ways to enjoy butternut squash, so I did a quick search and found a variety of pizzas using butternut squash.  Yum!

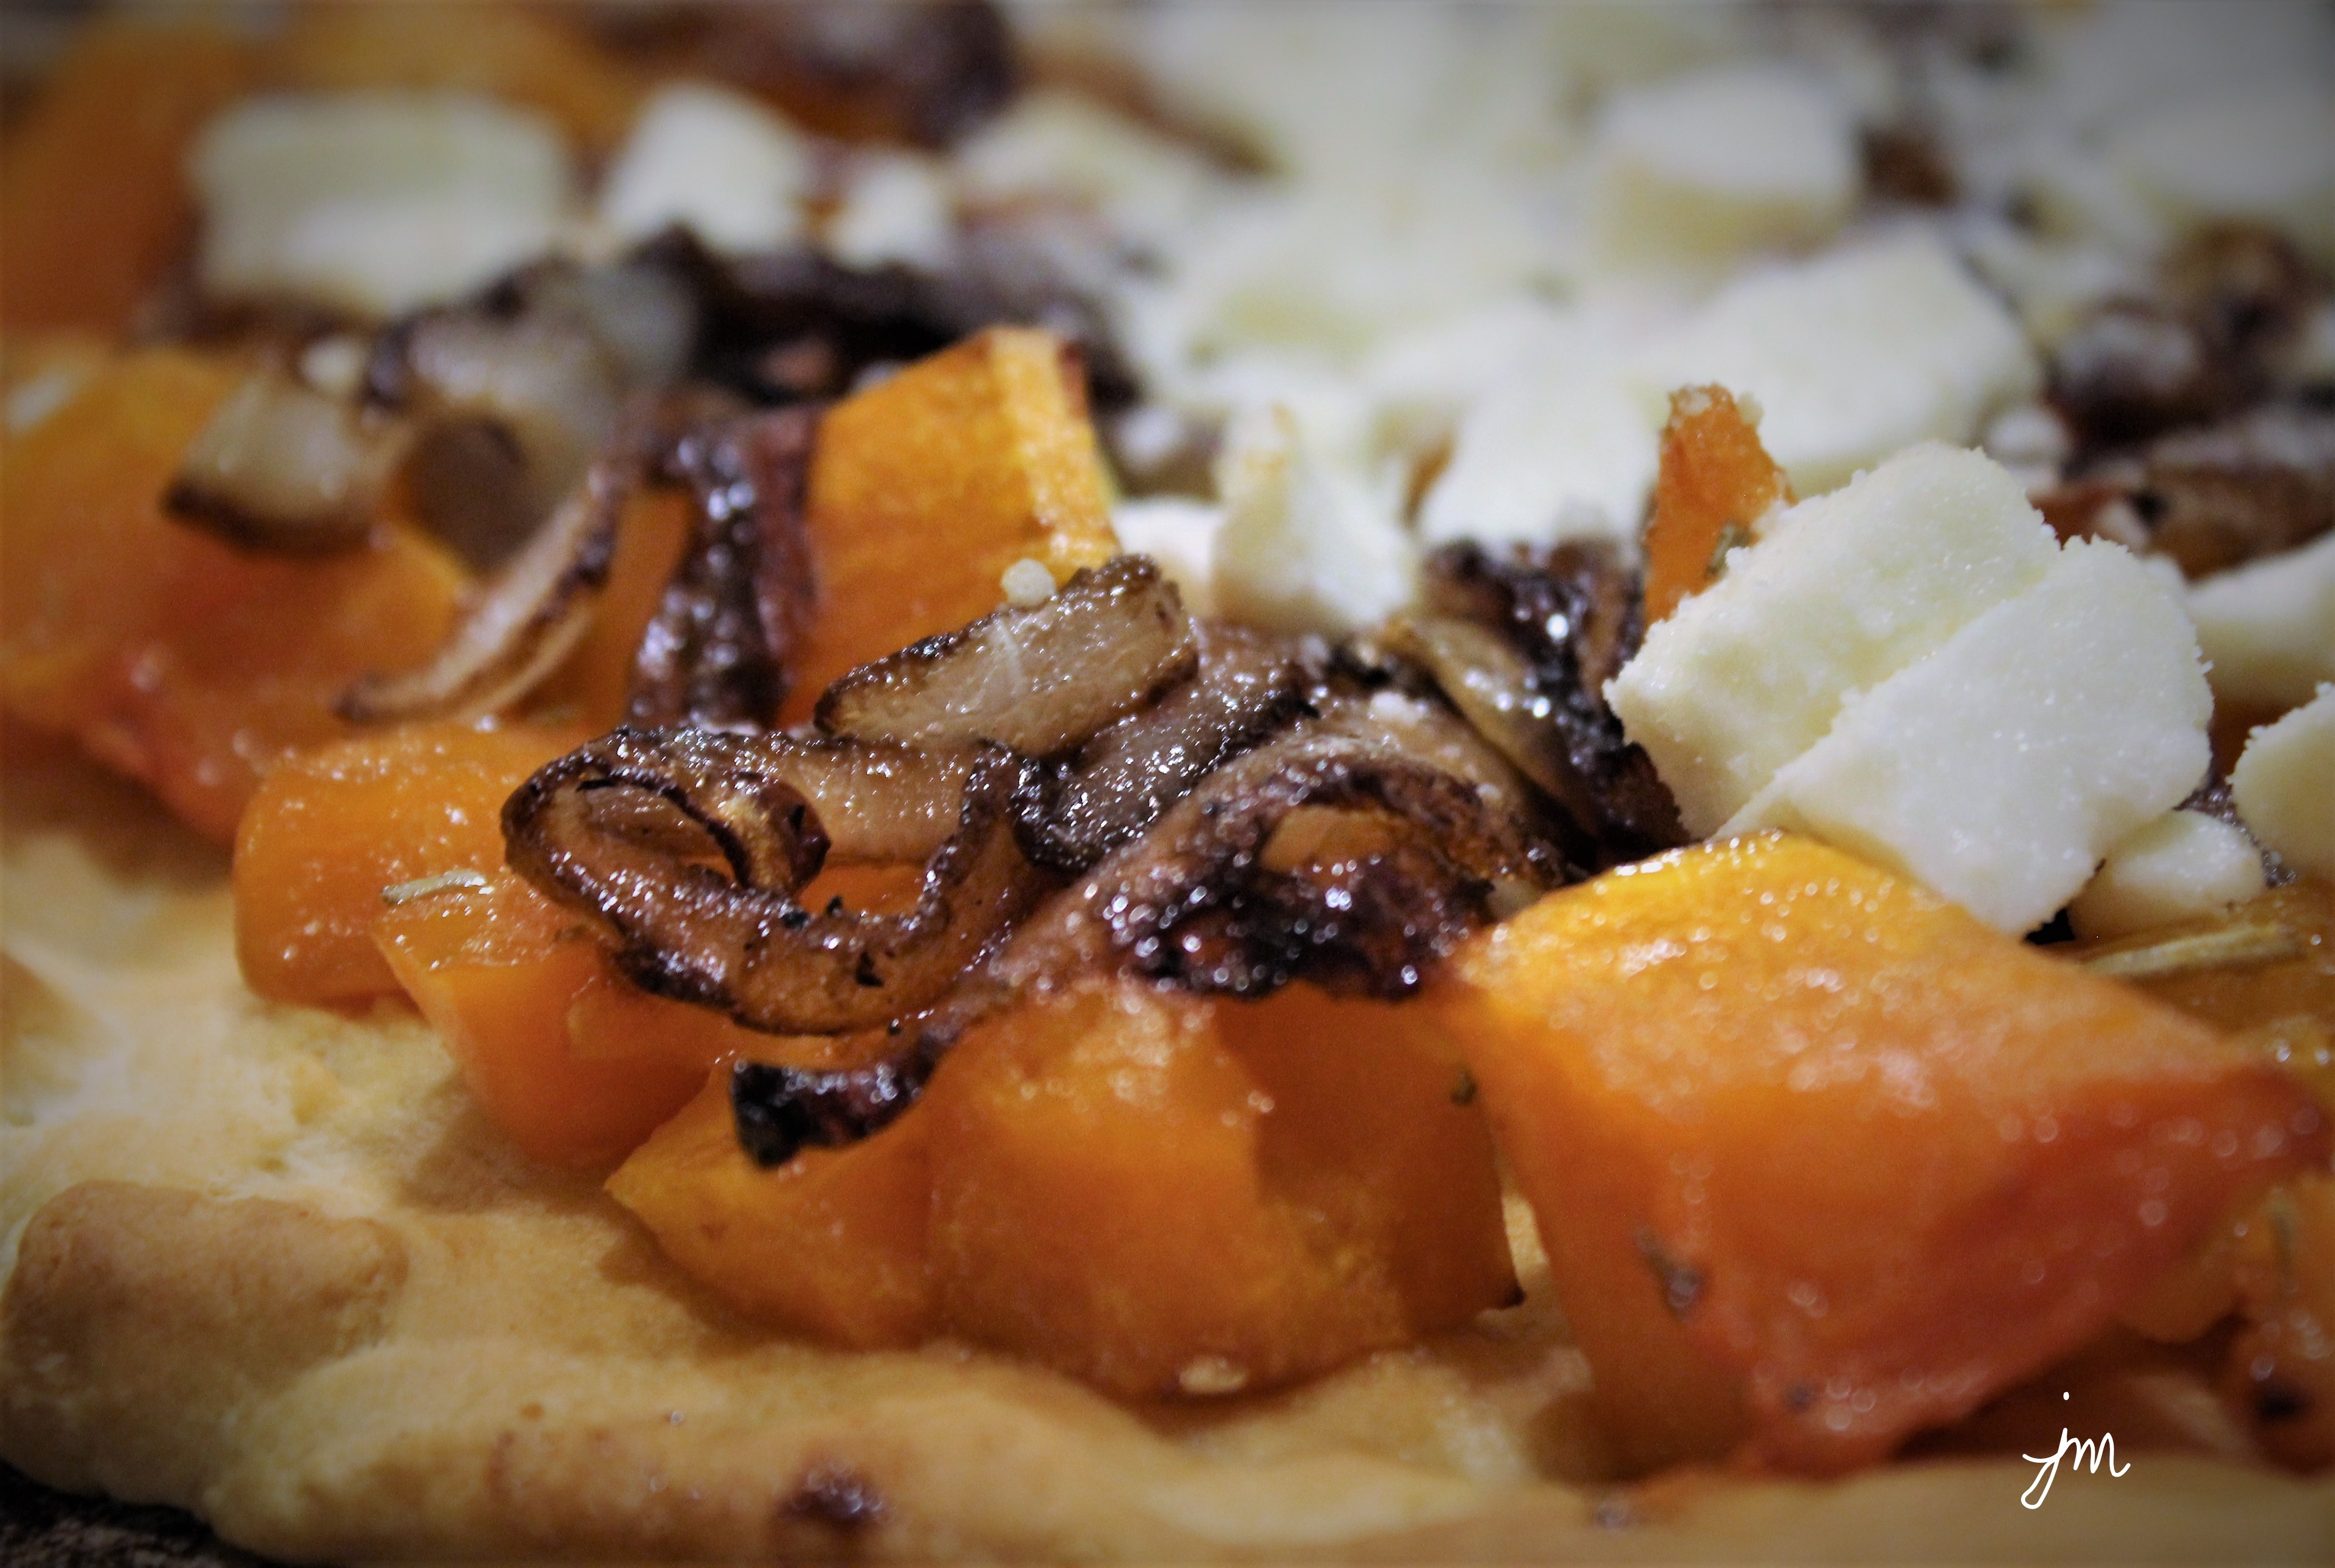
The one I found that had the flavors I love (and ingredients I had on hand), called for mashing the butternut squash as the “sauce” on the pizza, but I prefer the taste of cubed and roasted butternut squash, so I changed it up.

Each roasted chunk gets a bit browned and even a bit crispy on the outside corners, but is soft and sweet and tender on the inside.   I prefer that texture to mashed.

And I might just possibly eat anything with caramelized onions on top.  Just saying…

Add feta cheese – and SCORE!

We had this for dinner with a tossed green salad.

If you are looking for a new twist on pizza or a meatless meal, this may just be the ticket!

Here is how I made it.  Hope you will give it a try.

Butternut Squash, Caramelized Onion, and Feta Cheese Pizza

Ingredients:

  • 1 medium butternut squash, cubed
  • 1 large sweet onion, sliced
  • 1/2 cup crumbled feta cheese
  • 2 Tbsp olive oil, divided
  • 1 Tbsp butter
  • 2 tsp brown sugar, divided
  • 1 Tbsp balsamic vinegar
  • salt & pepper to taste
  • Pizza dough or Pillsbury crescent roll tube

Directions:

Preheat oven to 400 degrees F.  Place cubed butternut squash on stoneware baking pan or baking sheet.  Drizzle with 1 Tbsp olive oil, 1 tsp brown sugar, salt and pepper.  Roast approximately 20 minutes, turning once midway through roasting, until slightly browned and tender.

While squash is roasting, saute onions in 1 Tbsp olive oil and 1 tsp. butter, salt and pepper over medium heat until onions begin to caramelize, approximately 10-15 minutes.  Add balsamic vinegar and brown sugar, and continue to cook for another 5 minutes.

Bake pizza crust five minutes short of done on a round baking stone.  Remove from oven, and layer butternut squash cubes, caramelized onions, and feta cheese on crust.  Return to oven for 5-10 minutes.  Serve immediately.

Enjoy!

Cheers & Hugs,
Jodi


Hearty Beef Barley Stoup & Homemade Beef Broth

Hearty Beef Barley Stoup and Homemade Beef Broth.

Stoup…  Yep…  That is not a typo.

This “soup” recipe is so hearty, you might almost consider it a stew, so my clever blogging friend Kathryn at Another Foodie Blogger, aptly named this recipe Stoup.

I was dying to try this recipe, as I am a huge fan of soups, and a huge fan of barley.  (Grandma used to make a Beef Barley Soup, and I haven’t had it in years!)

Hubby is not much of a soup lover, but when I read Kathryn’s recipe and saw how hearty it was, I thought I might be able to get away with this one.

And did I ever!  Hubby actually ate it with a fork and happily ate leftovers the following night.

This is one of the best new recipes I have tried in a long time!  If all of Kathryn’s recipes are this amazing, I will be excited to try more.

This stoup literally tantalizes your taste buds with it’s bounty of complex textures and flavors, and I think what really took it over the top was the fact that I made homemade beef broth  for it (not canned beef broth or water and bouillon cubes).  I made the broth from scratch with beef bones ROASTED in the oven first with vegetables and then simmered for hours until it became a rich, dark brown pot of goodness.  I found the recipe at Taste of Home and will share below.

This recipe is not hard, but it takes time.  It is great for the type of weather we are experiencing in our part of the world right now… very cold and snowy.  It’s a recipe for when you have time to roast and simmer all day while you are home.  A recipe for when you are in the mood for chopping and dicing and then just totally curling up under a blanket by a fire with a crusty piece of bread to dunk in it and sop it up with.

I tweaked up Kathryn’s recipe just a bit.  She added mushrooms.  For those that like, please do add.  Mushrooms are one thing I just can’t eat.  Hubby on the other hand would have loved, but I just can’t put them in my mouth.  I added a bit more beef and veggies to make it even thicker.  And Barley is such a wonderful healthy grain.

I do hope you try this when you have time, and I hope you will visit Kathryn’s blog (or her Austin Street Taco Food Truck if you are anywhere near Bend, Oregon in the summertime) to check out some of her recipes.  She has become a great blogging friend.

Beef and Barley Stoup

Ingredients:

1 1/2 lb. high-quality beef roast, cut into 1 inch pieces
Salt and pepper, for seasoning meat
Flour, for dusting meat
2-3 tablespoons olive oil
1 cup chopped sweet onion
1 cup chopped carrots
1 cup chopped celery
1 tablespoon tomato paste
3 cloves garlic, minced
1/2 cup dry red wine
1 14.5-ounce can diced or stewed tomatoes
4 cups homemade beef broth (recipe follows)
1 bay leaf
3 small sprigs thyme (or 1/2 teaspoon dried)
1/2 cup uncooked pearl barley
Salt and pepper, to taste

Directions:

Season cubed meat with salt and pepper, then toss with some flour to dust it. In a large soup pot or dutch oven, heat olive oil over medium-high heat. Add beef to pot, and sear cubes on all sides until browned. Remove to a bowl and set aside.

Add onion, carrots, and celery to pot that you seared meat in, and cook 8-10 minutes to allow veggies to wilt and brown slightly. Add garlic and tomato paste in the last minute of cooking.

Pour in the red wine, and deglaze the pot by scraping up the browned bits. Add tomatoes, beef broth, bay leaf and thyme. Stir well to combine. Add the meat, including any accumulated juices in the bowl.

Bring to a boil, then stir in the barley. Reduce heat, cover and simmer for about 45-60 minutes or until the barley is cooked. Remove bay leaf and thyme sprigs and taste for additional salt and pepper.

Enjoy!

Best-Ever Homemade Beef Broth

  • Servings: approx 10 cups
  • Print

Ingredients:

4 lbs meaty beef bones (beef shanks or short ribs)
3-4 large carrots, cut into chunks
3-4 ribs of celery with green leafy tops, cut into chunks
2 large onions, quartered
1/2 cup warm water
3 bay leaves
3-4 large garlic cloves
1 tsp coarse black pepper or peppercorns
3-4 sprigs fresh parsley or 1 Tbsp dried parsley
1 tsp dried thyme
1 tsp dried oregano
1 beef bouillon cube
1 tsp salt
12 cups cold water

Directions:

Preheat oven to 450 degrees F.  In a large dutch oven, roast soup bones, uncovered, for 30 minutes.  Add carrots, celery, and onions, and roast an additional 30 minutes.

Remove from oven, and add warm water, stirring to loosen browned bits.  Add remaining ingredients.  Bring to a boil, and slowly boil for 30 minutes.  Reduce heat, and simmer, uncovered 4-5 hours.  Skim any foam that forms.

Remove bones (and send for Charlie!).  Strain broth through a colander, discarding solids.  If time allows, refrigerate to allow removing fat that forms on top.  Otherwise skim as best possible from top.

Broth can be refrigerated for up to 3 days or frozen for 4-6 months.

If you want a super easy, homemade crusty rustic bread to go with it, try this recipe.

Stay warm, and enjoy this hearty and healthy meal.

Cheers & Hugs,
Jodi


Perfect Prime Rib Roast

Perfect Prime Rib Roast.

On Christmas Eve this year, we decided on a Simple Surf and Turf Dinner menu to have with the family.  The Surf was Bacon Wrapped Scallops.  The Turf was Prime Rib.  Both were prepared simply, and turned out delish!  Baked potatoes, Roasted Brussels Sprouts and a Salad of romaine lettuce, apples, dried cranberries and walnuts accompanied the entrees.

I managed to quickly snap this iPhone photo of Hubby cutting the prime rib.  Not the best photo, but this recipe I found and slightly modified is such a keeper, I had to share!  The roasted vegetables not only help to make the perfect base for the au jus, they also taste great too as an extra veggie.

Whenever you want a simple, but elegant entree, this is a winner you will want to try.

Perfect Prime Rib Roast

Ingredients:

  • 7-8 lb Prime Rib Roast (with bones)
  • 1-2 Tbsp Horseradish
  • 1-2 Tbsp Dijon Mustard
  • 2 tsp coarse salt
  • 2 tsp coarsely ground black pepper
  • 4 tsp fresh thyme
  • 2 tsp garlic powder
  • 4-6 stalks celery, cut into 1-2 inch pieces
  • 1 cup carrots, cut into 1-2 inch pieces
  • 1 large sweet onion, quartered
  • 2 beef bouillon cubes
  • 1 1/2 cups water
  • 1 tsp cornstarch
  • 1 tsp water

Directions:

Preheat oven to 450 degrees F.  Rub roast with horseradish and mustard.

Combine salt, pepper thyme and garlic powder, and sprinkle over roast.

Place celery, carrot, and onion chunks in the bottom of a large roasting pan.  Place roast on top of vegetables.

Roast for 30 mins.  Reduce oven temperature to 350 degrees F, and roast until meat is 135 degrees F.

Remove from oven, cover with foil, and allow to rest for 30 mins.

Make  au jus sauce by placing pan drippings in roasting pan (veggies removed and reserved to serve) over a burner set to medium.  Stir in beef bouillon and water.  Bring to a boil.  Combine cornstarch and water, and whisk into sauce.  Allow sauce to thicken slightly, and serve with roast.

Enjoy!

Cheers & Hugs,
Jodi

A Merry Grinchmas Celebration

Grinchmas Feast Christmas Party - TheCreativeLifeinBetween.comA Merry Grinchmas Celebration.

As I sit by the fire late Christmas evening – basking in the warmth and glow of a wonderful Christmas holiday spent over the past week or so with many of those I love most, I feel so grateful.  The house is quiet, except for the dishwasher running, the fire crackling, and a holiday movie playing in the background.

I’m feeling peaceful and content.

There is nothing like the excitement leading up to Christmas, and I loved hosting three dinner parties three days in a row (and that’s not counting one the weekend before).  But there is also something very special too about the days that follow Christmas….

The calm afterglow…  The snuggling in…  The nesting…  Looking at pictures… Smiling at the memories.

Movies, books, leftovers, jammies…

Today, I want to share a fun party we had this past Saturday, the eve of Christmas eve, with our McHendy family.

My bestie, Jill and I decided we wanted to surprise our families with a theme, so we created a McHendy Grinchmas Celebration.

Grinchmas Feast Christmas Party - TheCreativeLifeinBetween.comA Happy Whoville feast –

complete with Roast Beast (Beef Tenderloin),

Grinchmas Feast Christmas Party - TheCreativeLifeinBetween.comWho Mash (Mashed Potatoes),

Grinchmas Feast Christmas Party - TheCreativeLifeinBetween.comGrinch Greens (Sauteed Fresh Green Beans with garlic),

Grinchmas Feast Christmas Party - TheCreativeLifeinBetween.comand Cindy Lou Who Salad (Crisp Greens, Tart Pomegranate Seeds, Crunchy Pecans, and Creamy Goat Cheese).

Grinchmas Feast Christmas Party - TheCreativeLifeinBetween.comThis feast was preceded by some fun appetizers earlier in the day, including Grinchy Green Deviled Eggs,

Grinchmas Feast Christmas Party - TheCreativeLifeinBetween.comGrinch Santa Hats,

Grinchmas Feast Christmas Party - TheCreativeLifeinBetween.comand a Tortilla Wrap Christmas Tree.

Grinchmas Feast Christmas Party - TheCreativeLifeinBetween.comAnd it was followed by a tiered tray of Grinchmas Cookies,

Grinchmas Feast Christmas Party - TheCreativeLifeinBetween.comand plenty of other sweet treats.

Grinchmas Feast Christmas Party - TheCreativeLifeinBetween.comEach guest received a little favor bucket that included a green ornament with a tiny red heart and lime green and red candies,

Grinchmas Feast Christmas Party - TheCreativeLifeinBetween.comas well as a Grinch beanie hat (which we all wore for a fun family photo – with the exception of hubby who wore a full furry Grinch onesie!)

Grinchmas Feast Christmas Party - TheCreativeLifeinBetween.comThe games planned took a different twist than intended, but ended up being just as fun!

Grinchmas Feast Christmas Party - TheCreativeLifeinBetween.comThere were sleigh rides and races,

Grinchmas Feast Christmas Party - TheCreativeLifeinBetween.comI Spy the Who Hash,

Grinchmas Feast Christmas Party - TheCreativeLifeinBetween.comand boxed games around the cleared dinner table.


Grinchmas Feast Christmas Party - TheCreativeLifeinBetween.comGuests of honor

adorned the powder room and office doors.

Grinchmas Feast Christmas Party - TheCreativeLifeinBetween.comAnd as we ate and played and talked and laughed and cried, we celebrated being family in every true, authentic sense of the word.  And we reminded ourselves that “Merry Christmas doesn’t come from the store.  Maybe Christmas perhaps is a little bit more.”

Grinchmas Feast Christmas Party - TheCreativeLifeinBetween.comCheers & Hugs,
Jodi

Dill Pickle Soup

Dill Pickle Soup.

Have you heard of it?!

This was something new and intriguing to me when mentioned by a friend on Facebook who said she was making it because she was coming down with a cold.

I couldn’t get it out of my mind, and I finally made it this past week.

O M G!

What have I been missing?!?!

As far as I can tell, this recipe was originally posted on The Noble Pig several years ago, and I totally missed it.

It is a wonderful combination of tart, sour, salty pickles and creamy potato soup.  It reminds me of a delicious potato dish we’ve eaten at a local favorite restaurant that combines potatoes and cheese and pickles.

What a great comfort food recipe!

What a wonderful flavorful, warm meal in a bowl.

I can’t wait to hear if you’ve heard of it or if you are going to try it.

I tweaked it up a bit by adding a few more potatoes (especially some small gold, red, and purple ones to add color and texture).

Here is how I made it.

Dill Pickle Soup

Ingredients:

  • 6 cups chicken broth (I use 6 cups water and 6 tsp. chicken base)
  • 2 lbs potatoes (large potatoes peeled and quartered or small yellow, red, and purple potatoes halved – I used a combination of all)
  • 2 cups chopped carrots
  • 1 cup chopped dill pickes
  • 1/2 cup (1 stick) butter
  • 1/2 cup flour
  • 1 cup sour cream
  • 1/4 cup water
  • 2 cups dill pickle juice
  • 2 tsp. Old Bay Seasoning
  • 1 Tbsp. coarsely ground black pepper
  • 1/2 tsp. cayenne pepper

Directions:

In a large pot, combine chicken broth, potatoes, carrots, and butter.  Bring to a boil, and cook until the potatoes are tender.  Add chopped pickles, and continue to boil.

In a medium bowl, whisk together flour, sour cream, and water, making a paste.  Vigorously whisk paste into soup, small portions at a time, breaking up lumps.  Add pickle juice, Old Bay Seasoning, pepper and cayenne.  Cook 5 more minutes to incorporate.

Soup is now ready to serve.

Enjoy!

Cheers & Hugs,
Jodi

Turkey Cranberry Quesadilla

Turkey Cranberry Quesadilla.

Today is December 9th.
Hopefully your leftover turkey and cranberry sauce is long gone from Thanksgiving.

But Christmas is right around the corner.
And more turkeys will be on the menu.

This Turkey Cranberry Quesadilla is so so delicious, it is worth roasting a turkey for!

Remember the Cranberry Jalapeno Holiday Dip recipe I shared that I made for Thanksgiving?

Turns out – it is an AMAAAZZZING sandwich spread and Quesadilla Filling!

With the last of our turkey, a generous slathering of Cranberry Jalapeno Holiday Dip, and some shredded cheddar cheese, I made this Turkey Cranberry Quesadilla last week that I am still “jonesing” for right now.

It is pretty hard to beat any type of protein (turkey, chicken, beef, pork) topped with some veggies or fruit and cheese, pressed between a couple of tortillas and toasted up crisp on the outside, but warm and gooey on the inside.

Here is how I made my Turkey Cranberry Quesadilla.

Turkey Cranberry Quesadilla

Ingredients1/2 cup chopped or shredded cooked turkey

Directions

Heat a large cast iron skillet over medium-high heat.  Butter one side of each tortilla.  Place one tortilla on skillet.  Top with Cranberry Jalapeno Holiday Dip, turkey and cheese, followed by remaining tortilla.  Top with cast iron press and grill for 2-3 minutes.  Flip tortilla and grill for an additional minute.

Cut into wedges to serve.

Enjoy!

Cheers & Hugs,
Jodi

Herb and Garlic Roasted Spaghetti Squash

Herb and Garlic Roasted Spaghetti Squash.

Simple.
Healthy.
Amazingly Delicious!

I thought I was going to make something a bit more extravagant when I decided to roast some spaghetti squash by simply drizzling with olive oil, sprinkling with coarse ground pepper and salt, and topping with some garlic cloves and fresh herbs.

But when it came out of the oven looking like this….

And I took a teensy taste when scraping the flesh with a fork….

I ended up eating an entire half for my lunch!

I adore spaghetti squash, and have made it a number of ways that I’ve shared here:

Four Cheese Garlic Spaghetti Squash

Parmesan Garlic Roasted Spaghetti Squash

Italian Spaghetti Squash

But this super simple, quick and easy way is my new fave…..   at least for today!

Here is how I made it:

Herb & Garlic Roasted Spaghetti Squash

Ingredients:

  • 1 Spaghetti Squash
  • Extra Virgin Olive Oil
  • 4-6 cloves garlic
  • Salt & Pepper
  • Fresh Herbs

Directions:

Preheat oven to 400 degrees F.

Cut spaghetti squash in half, and scoop out seeds.  Place in cast iron skillet.  Drizzle liberally with extra virgin olive oil, toss garlic cloves and fresh herbs on top (I used fresh parsley and rosemary), and sprinkle liberally with fresh ground pepper and salt.

Roast for 45-55 minutes.

Remove from oven, and scrape flesh with fork to create spaghetti.  Serve immediately.

Enjoy!

Cheers & Hugs,
Jodi


Cheesy Bacon Ranch “Crack” Dip

Cheesy Bacon Ranch “Crack” Dip.

It’s party food time of year!

Time for dips and spreads, puffs and cups, hors d’oeuvres and crudites, balls and logs… Time for bits and bites in every color and shape and flavor.

When you are looking for an easy, crazy addictive, crowd-pleasing recipe, give this warm, cheesy, bacony, ranchy dip a go.

It’s sure to be a hit!

Cheesy Bacon Ranch Crack Dip

Ingredients:

  • 8 oz cream cheese, softened (I used 1/3 Less Fat)
  • 16 oz. sour cream (I used Light)
  • 2 cups cheddar cheese, shredded
  • 1 lb. bacon, cooked crisp and crumbled
  • 1/2 cup thinly sliced green onions (reserve a few for garnish)
  • 2 Tbsp. (or one 1oz. envelope) Ranch Dressing mix

Directions:

Preheat oven to 400 degrees F.

Combine all ingredients in bowl, reserving a bit of cheddar cheese and a few green onion slices for garnish.

Transfer dip to a pretty oven-proof serving bowl, fand back 20-25 minutes, uncovered until browned and bubbly.

Remove from oven, and immediately garnish with reserved shredded cheddar cheese and green onions.

Serve warm with tortilla chips, pretzel sticks, carrot or celery sticks, crackers, or your favorite dipper.

Enjoy!

Cheers & Hugs,
Jodi


Double Crumble Apple Crisp

Double Crumble Apple Crisp.

Nothing says Autumn like the taste of sweet, tender baked apples layered with cinnamony, nutty, crunchy oat crumble in a divine Apple Crisp.

Right?!

So of course I had to bake one with a bunch of apples I was gifted with from a local farm market.

Hubby likes his warm with creamy vanilla bean ice cream melting on it for dessert.

I like mine refrigerator cold for breakfast with steaming coffee flavored with Italian Sweet Cream.

However you like it, this is a classic worth making at least once each Autumn – just because!

Here is the recipe I like best, which is slightly tweaked from a recipe found at Creations by Kara.

Double Crumble Apple Crisp

Ingredients:

  • 1 cup oats
  • 1 cup brown sugar, packed
  • 1/2 cup flour
  • 1 Tbsp + 1/2 tsp cinnamon
  • 1/2 tsp salt
  • 1/2 cup butter, room temperature
  • 1/2 cup chopped walnuts or pecans
  • 7 large apples, peeled and sliced
  • 1/4 cup sugar

Directions:

Combine oats, brown sugar, flour 1 Tbsp cinnamon, salt, and butter to crumble consistently.  Add chopped nuts and combine.

Press 1/3 of the mixture into the bottom of a round or square baking dish (9-11″).  Spread peeled, sliced apples on top.  Sprinkle with 1/4 cup sugar and 1/2 tsp cinnamon.  Top with remaining crumble mixture.

Bake at 350 degrees F for 45-50 minutes until apples are tender and crumble is browned.

Serve warm with ice cream or cool whip or cold for breakfast (wink!) – however you prefer!

Enjoy

Cheers & Hugs,
Jodi

Honey Garlic Chicken Stir Fry

Honey Garlic Chicken Stir Fry.

Do you love going to those fun hibachi restaurants where they cook delicious stir fry meals right before your eyes?

This honey garlic chicken stir fry recipe reminds me of the fresh deliciousness of those experiences.

This might very likely be my all-time favorite chicken recipe!

It is simple and easy, made from ingredients typically kept on hand, and so adaptable to your tastes.

Make it with mushrooms and snow peas and onions if they are your favorite vegetables or what you have on hand.

Make it with beef or pork or shrimp – whatever you like best.

Whatever you like, please do try this awesome recipe.

I wonder if it will become one of your favorites like it is for me?

Here is how I made it this past week.

Honey Garlic Chicken Stir Fry

Ingredients:

  • 2-3 Tbsp. olive oil
  • 2 lbs. boneless skinless chicken breasts, cut into 1 inch pieces
  • salt and pepper to taste
  • 2 cups fresh broccoli florets
  • 1 cup sliced carrots
  • 1 cup sweet red peppers, chopped
  • 1 cup zucchini, sliced
  • 5 cloves garlic, chopped
  • 1/2 cup chicken broth
  • 1/2 cup low sodium soy sauce
  • 6 Tbsp. honey
  • 3 tsp. cornstarch

Directions:

Heat 1-2 Tbsp oil in a large skillet over medium-high heat.  While oil is heating up, steam carrots in microwave for 3-4 minutes.

Season chicken cubes with salt and pepper to taste.  Allow to rest.

Add broccoli, carrots, red peppers, and zucchini to skillet.  Stir fry until vegetables are tender (approx. 3-4 mins.).

Remove veggies from skillet, and allow to rest.

Add remaining oil to skillet and stir fry seasoned chicken.  Cook 3-4 minutes on each side.

Add the chopped garlic, and cook for approx. 30 seconds.

Add the veggies back to the pan, and cook for a couple more minutes until the veggies are warmed through.

In a bowl, whisk together the chicken broth, honey, and soy sauce.  Pour over chicken and veggies.  Cook for one minute.

Whisk cornstarch with equal amount of cold water.  Add to skillet.  Bring to a boil, and cook for another minutes or so until sauce begins to thicken.

Serve over rice.

Enjoy!

Cheers & Hugs,
Jodi

*Recipe slightly adapted from DinnerAtTheZoo.