Marinated Cauliflower Salad

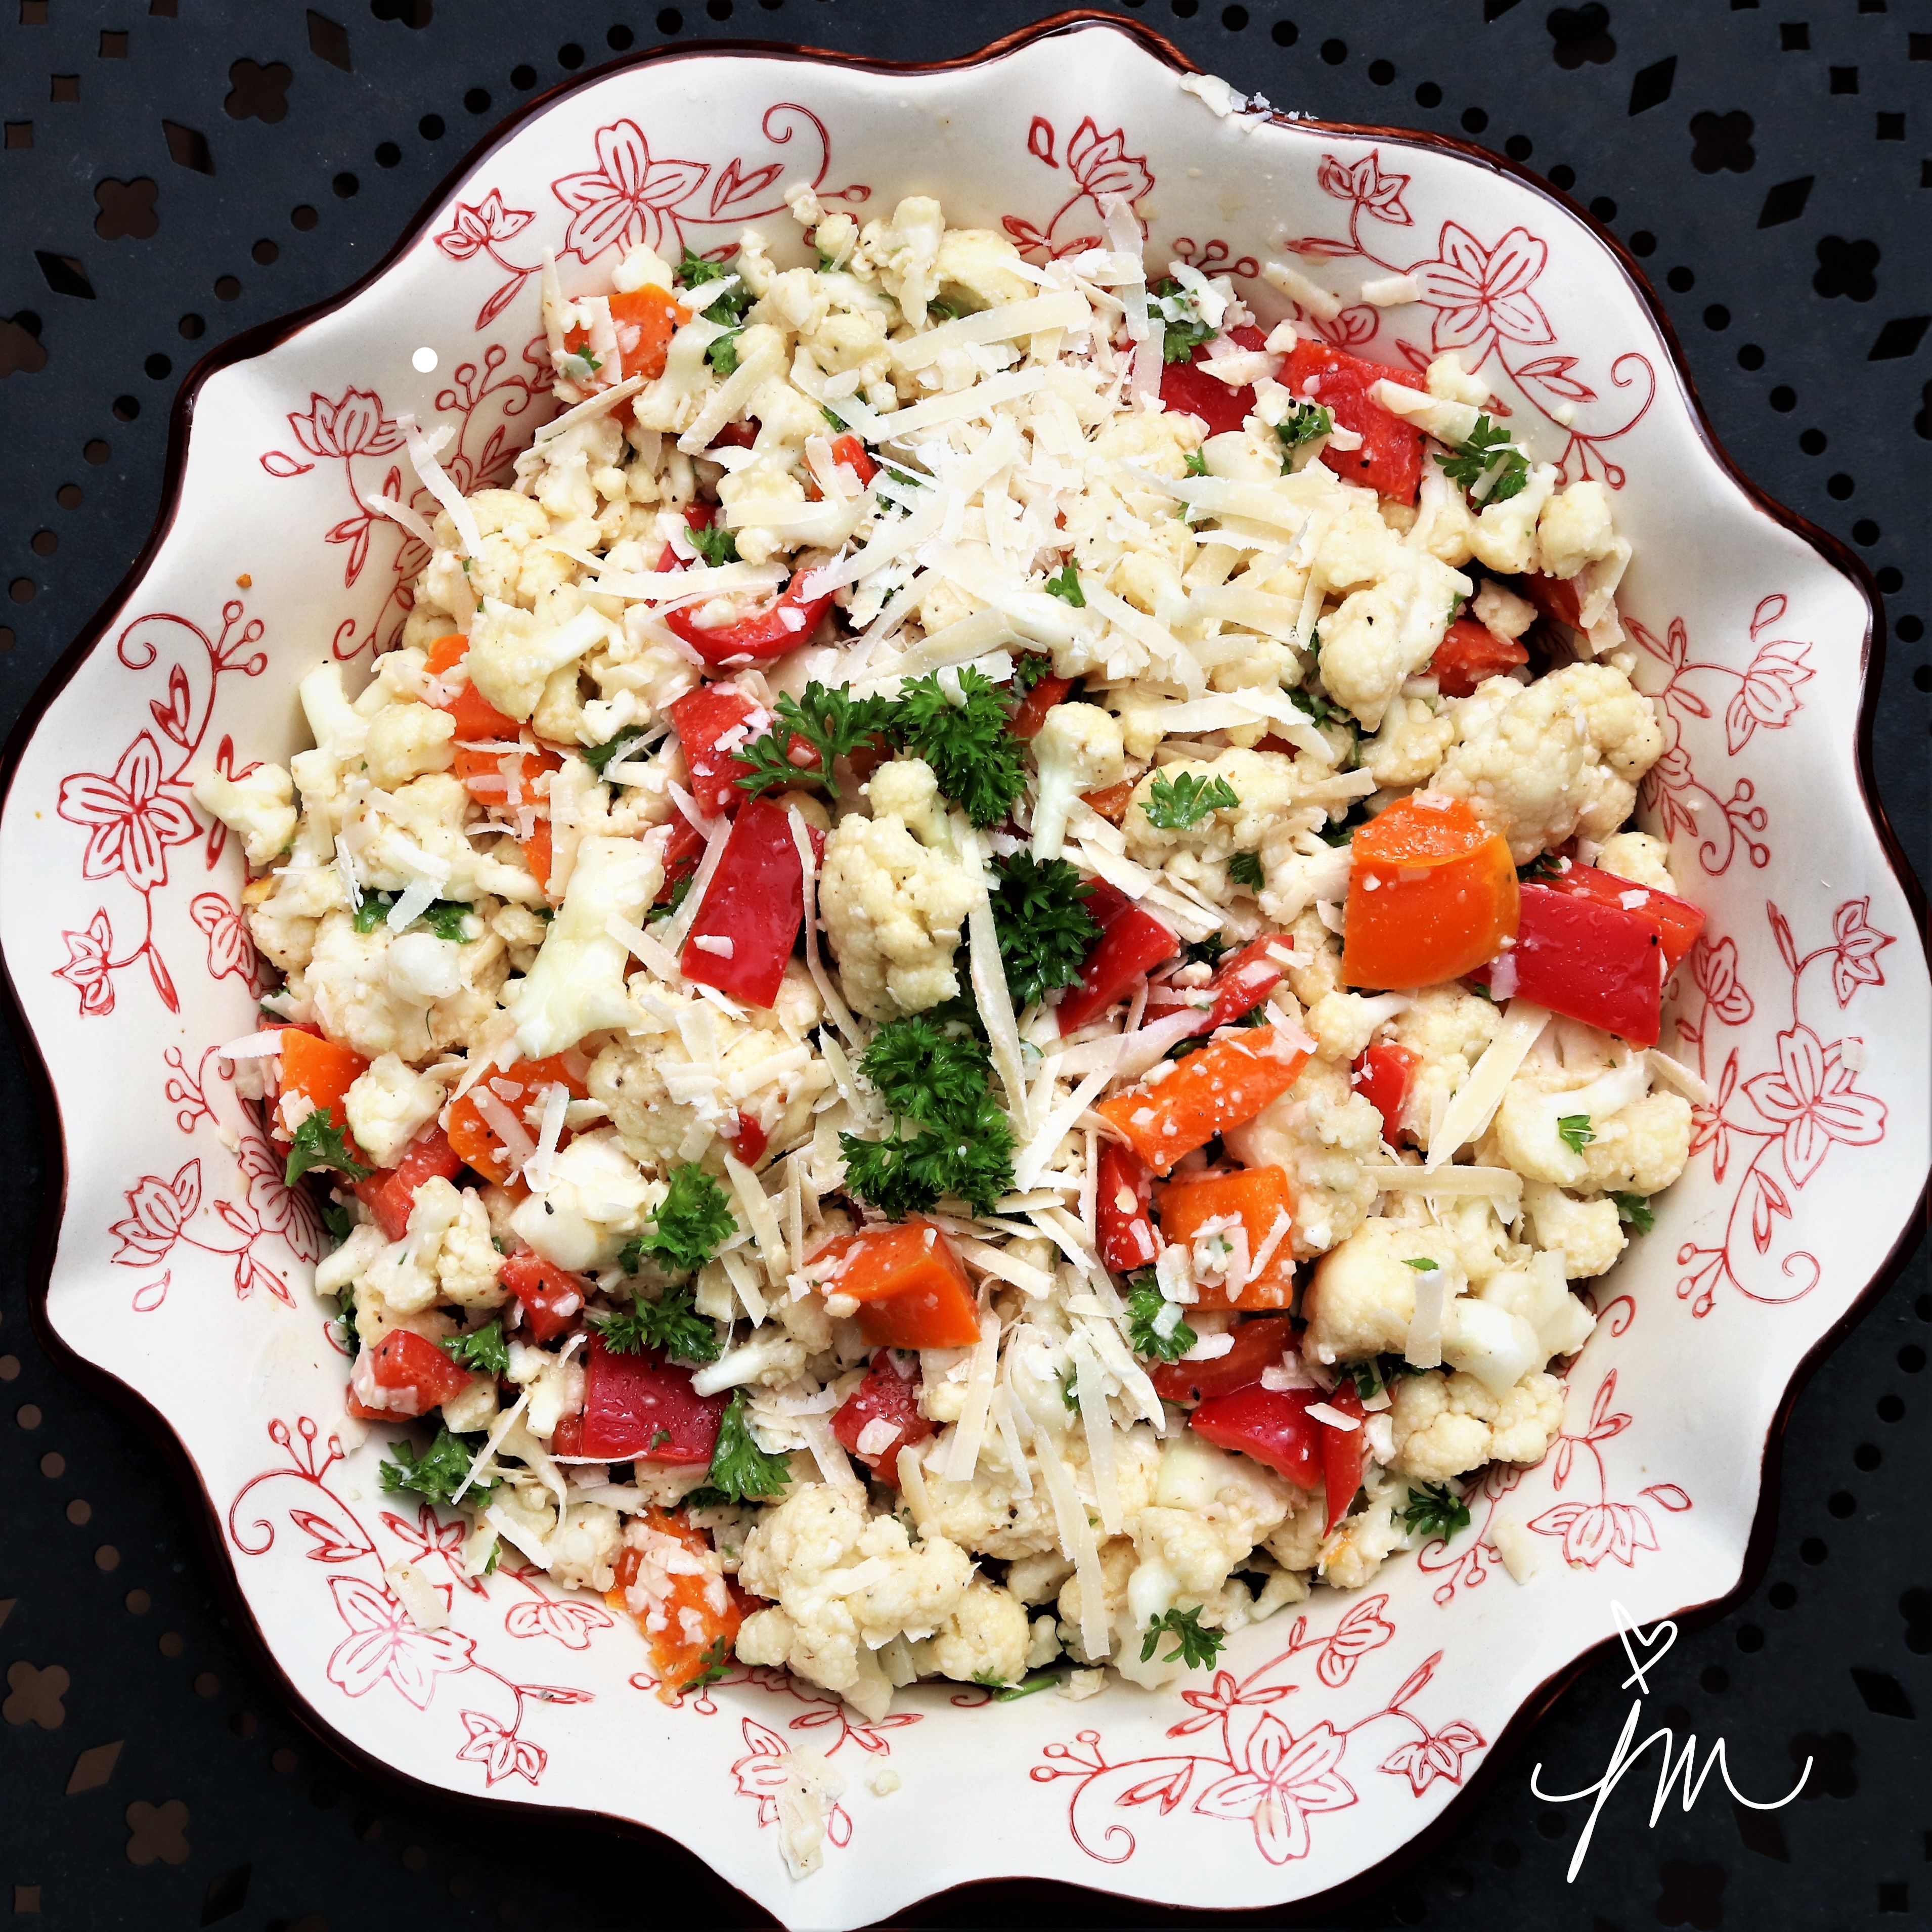
Marinated Cauliflower Salad.

Looking for a unique healthy, yummy, fresh, light summer salad?

Especially after all those cookies recipes last week! 

This one was a crowd pleaser with my family at the function I recently made it for.  It’s a great different way to serve cauliflower, which we eat at least once a week in our house.

Hope you will give it a try and let me know.  Here is how I made it.

Marinated Cauliflower Salad*

Ingredients:

Marinade

  • 6 Tbsp. freshly squeezed lemon juice
  • 2 Tbsp. Dijon mustard
  • 3 cloves garlic, minced
  • 2 tsp. olive oil

Salad

  • 4-5 cups bite-sized cauliflower florets (approx. 2 small heads cauliflower)
  • 2 cups diced red bell pepper
  • 4 Tbsp. chopped fresh parsley
  • Salt and Pepper to taste
  • 1/2 cup shaved Parmesan cheese

Directions:

Whisk marinade ingredients together in a small bowl.  Add to cauliflower in a large glass or plastic bowl and marinade in refrigerator for 4-8 hours or overnight.

Stir bell pepper and parsley into marinated cauliflower when ready to serve.  Season with salt and pepper and sprinkle with shaved Parmesan.  

Enjoy!

Cheers & Hugs,
Jodi

*Original recipe from Vegetarian Times powered by Clean Eating

Black Bean & Corn Salsa

Black Bean & Corn Salsa.

One of my favorite new healthy snacks is black bean and corn salsa.

It makes a wonderful “scoop” with tortilla chips.

It is also great all by itself as a salad or piled on top of a grilled chicken breast or fish.

It is light, healthy, crunchy, tangy, low-calorie, high-fiber, and absolutely DELISH too!

Here is how I make it, but you can surely tweak to your liking.  It would be great with a bit of fresh cilantro, which I didn’t have on hand when I made this batch on Sunday.  You could also switch it up with any other kind of bean you like or other veggies like cherry tomatoes or cucumbers.

Black Bean & Corn Salsa

  • Servings: approx. 3 cups
  • Print

Ingredients:

  • 1 15 oz. can black beans, drained and rinsed
  • 1 1/2 cups frozen or canned corn*
  • 1/2 red bell pepper, diced
  • 3 stalks celery, diced
  • 1/3 cup diced onion
  • salt and pepper to taste
  • Balsamic vinegar to taste (approx. 2 Tbsp)

Directions:

Combine all  vegetables in a bowl.  Stir to combine.  Sprinkle with salt and pepper to taste.  Drizzle with Balsamic vinegar to taste.

Serve as a salsa for tortilla chips, as a salad, or as a topping for grilled chicken or fish.

Store well in airtight refrigerator container for several days.

*TIP:  When we buy fresh corn on the cob in the summer, we always buy a full dozen, though we never eat all of that for the two of us.  We cut the leftover off the cob, throw it in a Ziploc freezer bag, and toss it in the freezer for the winter months or times when fresh corn is not available.  It is so much better than canned corn.

Enjoy!

Cheers & Hugs,
Jodi

Easy Fresh Homemade Salsa

Easy Fresh Homemade Salsa.

I LOVE salsa!

And this time of year when tomato plants in our gardens are overflowing with more tomatoes than we can eat, it is the perfect time to make fresh salsa.

It is so easy to make and so healthy and versatile for snacking or cooking.  I love dipping tortilla chips in it for snack.  It is also my favorite baked potato topping.  Skip the butter and sour cream for me, and pile on the salsa!  Throw frozen skinless, boneless chicken breasts in a crockpot on low, top with a pint of salsa, and ignore it for 8 hours.  Return for a delicious, nutritous main course of Salsa Chicken.

There are gajillion ways to make salsa.  You can add corn and black beans for a heartier twist.  You can add chopped peaches or mango for a sweeter twist.  You can add jalapenos or your favorite spicy, hot peppers if heat is your style!

What are your favorite ways to enjoy salsa?

Here is how I made it this past weekend.

Fresh Homemade Salsa

  • Servings: approx. 6 cups
  • Print

Ingredients:

  • 4-6 Ripe Tomatoes, quartered
  • 1 10 oz. can Rotel Diced Tomatoes & Green Chiles
  • 1/2 Large Vidalia Sweet Onion, quartered
  • 2-3 cloves garlic, peeled and cut in half
  • Fresh Cilantro (or dried) to taste
  • 3 green onions, cut into pieces
  • Juice of a fresh Lime
  • 1/2 tsp chili powder
  • 1/4 tsp cumin
  • 1 Tbsp Maldon Sea Salt Flakes or your favorite salt

Directions:

Combine all ingredients in a food processor.  Pulse several times until desired chopped consistency.  Serve immediately or store in a jar or airtight container in refrigerator for up to several weeks.

Enjoy!

Cheers & Hugs,
Jodi


Lightened Up Vinaigrette Broccoli Salad

Lightened Up Vinaigrette Broccoli Salad.

I love broccoli  – cooked or raw.
And I love broccoli salad.

The traditional version has a creamy mayonnaise-based dressing, and it is delicious!

But I was looking for a way to “lighten it up” a bit when making dinner one day this week, so I tried it with a vinaigrette dressing instead.

And it is DELISH too!

It is lighter and fresher tasting, and it is about half the calories of the traditional version!

This really is a nice twist on a classic that is healthier and just as yummy.

Here is how I made it.

Lightened Up Vinaigrette Broccoli Salad

Ingredients:

  • 4 cups fresh fresh broccoli florets, cut into bite-sized pieces
  • 1/4 thinly sliced, chopped sweet onion
  • 1/2 large sweet red pepper, thinly sliced and cut into bite-sized pieces
  • 1/3 cup golden raisins
  • 1/4 cup raw sliced almonds
  • 1/4 cup shredded cheddar cheese
  • 3 slices bacon, diced and cooked
  • Vinaigrette:
    • 2 Tbsp apple cider (or your favorite – red wine, white, etc.) vinegar
    • 2 Tbsp sugar
    • 2 Tbsp olive oil
    • 1 tsp salt
    • 2 Tbsp freshly ground pepper

Directions:  Combine first seven ingredients in large bowl.  Whisk together vinaigrette ingredients in a small bowl.  Pour over salad and toss to coat well.  Refrigerate for several hours before serving.

Enjoy!

Cheers & Hugs,
Jodi

Fresh Blueberry Scones

Fresh Blueberry Scones.

I had a friend come over Saturday morning.

HOORAY!  Excuse to bake something yummy.

I surely couldn’t know someone is coming and not have something freshly baked to share if I could help it.  Right?

Surprise visitors might not be as lucky – but are equally welcomed!   (They may just have to look beyond my make-up-less face, a potentially less than clean house, and deal with frozen cookies.)

It was so good to catch up with this friend I haven’t seen in a while – munching on these tender, buttery, lightly sweet biscuits bursting with tart blueberries and sipping on Cinnamon Dolce coffee with Italian Sweet Cream.

Sometimes it takes a guest to make us sit back and relax and truly appreciate our home.  My friend asked me how I ever get anything done with the beautiful view and comfy surroundings?

It made me think….

I need to quit apologizing for the carpet that needs replaced or the walls that need a fresh coat of paint or the old “stuff” I have.

The greatest compliment I receive is when someone tells me they feel completely comfortable and relaxed and welcome in my home.

Isn’t that what makes a house a home?   I have two signs in my home (one I bought and one made for me by my BFF who didn’t know I had bought the same sign!) that say “The thing I love best about my home is who I share it with.”

That could not be truer for me.  A house is made of wood and nails, but a home is made with love and family and friends.

And maybe fresh Blueberry Scones!

Here’s my recipe.

Fresh Blueberry Scones

Ingredients:

2 1/2  Cups Flour
1/2 cup Sugar
2 1/2 Tbsp Baking Powder
Pinch of Salt
1 tsp Cinnamon
1 1/2 Sticks Cold Butter
1 tsp Vanilla
1 Cup Buttermilk (easy substitute is 1Tbsp white vinegar added to 1 cup milk)
1 cup Blueberries
Coarse Raw Sugar for Sprinkling

Directions:

Preheat oven to 400 degrees F.

In a large bowl, mix together flour, sugar, baking powder, salt, and cinnamon.  Cut butter into small cubes and cut into dry ingredients with a pastry blender until coarse crumbs are formed.  Pour in vanilla and buttermilk, and mix with pastry blender just until incorporated.  Dump dough onto counter, gently incorporate blueberries into dough, and gently shape into a 15″ x 3″ rectangle.  Cut dough in half, then each half in half, then each quarter in half, so that you have 8 rectangles.  Cut each rectangle on the diagonal to form 16 triangular shaped scones.

Place on backing stone or cookie sheet, brush with some milk or water, and sprinkle with coarse raw sugar.  Bake at 400 degrees F for 10-15 minutes.  Cool for a few minutes on stone or cookie sheet, then remove to cooling rack to cool completely.

Enjoy!

Cheers & Hugs,
Jodi

The BEST Summer Sammie

Fresh Tomato and Basil Sandwich - Best Summer Sammie

Fresh Tomato and Basil Sandwich – Best Summer Sammie

The BEST Summer Sammie.

My tomatoes
are FINALLY
ripening!

We planted
a bit late
this year.

But
it was well worth
the wait.

I can now
eat my FAVORITE
summer sammie…

For breakfast,
lunch,
or dinner!

Fresh tomato slices,
fresh sweet basil,
and toasted ciabatta slathered with mayo.

Who needs a burger?
Who needs a dog?
When these rubies and golds have finally arrived!

Cheers & Hugs,
Jodi


Quick and Easy Peach Puff Pastry Tartlets

Quick and Easy Peach Puff Pastry Tartlets.

This Sunday, we had the family over for dinner.  Hubby made the most amazing BBQ spare ribs, which we served with grilled sweet corn on the cob, cowboy baked beans and a caprese salad.  A fresh peach dessert seemed the perfect ending for this BBQ, but I didn’t feel like fussing much.

Knowing I had a package of puff pastry in the freezer, I quickly googled “peaches and puff pastry” and found this wonderful recipe at Natasha’s Kitchen.

These only took about 10 minutes to throw together and 15 minutes to bake for a beautiful and super delicious dessert.

Well – at least that is what I hear…. You’ll have to take my family’s word for how delish they were as I didn’t get to try one.  They’re gone (which is always a good sign).

When your sons ask for a second (or a third), you happily feed them and drink a glass of wine instead <wink>!  I can make these anytime I want again, but feeding my guys and daughter-in-laws and granddaughter and a bestie – – – seeing smiles, hearing yums, and getting hugs – – – well – that’s all this momma needs.

I’m pretty sure I’ll be making these again!  I’m betting sliced apples and walnuts would be a wonderful Autumn version as well as loads of other fruit and nut combinations.

Here’s Natasha’s recipe as I made it.

Quick and Easy Peach Puff Pastry Tartlets

Ingredients:

  • 1 sheet of frozen puff pastry, thawed 20-30 mins.
  • 1 egg
  • 2 large fresh peaches
  • 2 Tbsp sugar
  • 1 Tbsp flour
  • 1/2 tsp cinnamon
  • 1/2 tsp vanilla
  • 1/3 cup sliced almonds
  • 1/2 cup powdered sugar
  • 1 tsp vanilla extract
  • 1 Tbsp milk

Directions:

Preheat oven to 400˚F.

Cut thawed puff pastry into 9 equal sized squares and place on parchment lined baking sheet or baking stone.

Beat egg in a small bowl and set aside.

Slice peaches and place in a medium mixing bowl. Sprinkle with sugar,  flour, cinnamon, and vanilla.  Gently fold together.

Place 3 -4 peach slices in the center of each pastry square. Avoid getting peach juice on pastry edges. Brush edges generously with beaten egg. Sprinkle sliced almonds over pastry and peaches.

Bake at 400˚F for 15-18 minutes or until puffed and golden on the edges.  Remove from oven and let cool on baking sheet for 10 minutes.

While cooling, make the glaze by stirring together powdered sugar, vanilla and milk in a small bowl or measuring cup. Add more milk if needed to reach desired consistency.   Drizzle over cooled tartlets.

Enjoy!

Cheers & Hugs,
Jodi

#Natashaskitchen

Fresh Blueberry, Pistachio, & Edamame Salad with Goat Cheese

Fresh Blueberry, Pistachio, & Edamame Salad with Goat Cheese.

Summer is such a glorious time of fresh bounty.

Salads become meals made from fresh fruits and vegetables.  Like this yummy salad I made for lunch one day with some plump sweet and tart blueberries, crunchy pistachios, protein and fiber-rich edamame, and creamy crumbled goat cheese piled on a bed of greens.

All of this drizzled with a honey red wine vinaigrette is heaven in a bowl!

What is your favorite summer salad?  There are so many wonderful combinations and possibilities!

Fresh Blueberry, Pistachio, & Edamame Salad with Goat Cheese

Ingredients:

  • Mixed Greens (Kale, Arugula, Spinach Swiss Chard – any of your faves)
  • Fresh Blueberries
  • Pistachio Nuts, shelled
  • Edamame, shelled
  • Goat Cheese, crumbled
  • Green Onions, chopped (optional)
  • Red Wine Vinaigrette Dressing (homemade or your fave – this is how I make mine – it will make more than you need for one salad) 
    • 1/4 cup Red Wine Vinegar
    • 1/2 cup Olive Oil
    •  Tbsp Honey
    • Salt & Pepper

Directions:

In a bowl, place a handful of mixed greens.  Top with fresh blueberries, pistachios, edamame, goat cheese, and green onions (if desired).  Drizzle with Red Wine Vinaigrette Dressing.

Enjoy!

Cheers & Hugs,
Jodi

Easy Grilled Sweet Corn on the Cob

Easy Grilled Sweet Corn on the Cob.

It is Fresh Sweet Corn on the Cob Season in our part of the world!

Corn is a vegetable we rarely eat – except in the heat of summer when it is fresh and sweet and bought the same day it was picked from a local farm stand.

After being in Arizona for a week recently, where it seemed everything we ordered had grilled or roasted corn in it (even a delicious deconstructed Caesar Salad), I had corn on the brain.

We had always boiled our sweet corn on the cob, but I fell in love with the magically charred kernels we experienced on our Southwest trip, so we decided to grill it this time.

O.M.G!  We LOVED it!  Oh how easy!  Keep the heat outside by using the grill.  And save clean up time with no pots of boiling hot water.

When I buy corn on the cob, even though is only the two of us now, I buy a full dozen.  We usually only eat about half of it, so we cut the rest off the cob and either freeze it in Ziploc bags for a fresh corn treat in the winter or save it for using in other recipes or reheating another day that week.

Here is how we did it.  Quick, easy, and oh so delicious!

By the way – I think the mistake many people make with corn on the cob is OVERcooking it.  Sweet corn on the cob truly tastes its best when you just cook it long enough to heat, but retain its wonderful sweetness, crunch and flavor.  Also, don’t look for the biggest ears of corn.  They could likely be tough.  Look for smaller, young, tender ears, and buy them from the farm or farm market – not the grocery store, where it could be several days old.  There is nothing like eating corn the day it is picked!

Roll it in some butter and sprinkle with salt and pepper for even more yumminess, but when you get fresh, sweet, seasonal corn, it barely needs anything else!

Here is how we made it.

Easy Grilled Sweet Corn on the Cob

Ingredients:

  • 1 dozen fresh ears of corn on the cob

Directions:

Heat grill to approximately 450 degrees F.

Husk corn, and clean of the silks as best you can.  Rinse under cold water.

Place cleaned ears of corn directly on grill for 5 minutes.  Turn and grill for another 5 minutes.

Serve immediately with sweet butter, salt, and pepper.

Enjoy!

Cheers & Hugs,
Jodi


Lemon Butter Chicken

Lemon Butter Chicken 2

We found yet another way to make an easy and oh so delicious chicken dinner this past week.  My son, Nick, actually made this from a recipe he found and we adapted slightly.

lemon butter chicken

He’s been practicing cooking more, and is getting really good (at breakfast and chicken at least!).

He will soon be moving out, and I am trying very hard not to be sad.  I am trying to focus on the fact that we have done a great job in raising our boys to be independent, competent men who have found wonderful partners to share their lives with.

Both of my boys know how to cook and are very handy.  They are smart and kind and generous.  (I’m not partial at all – right?!)   They both have found amazing women who are just right for them, and who we love dearly.

I digress….

Back to the point….   Chicken!

Here is another Winner Winner Chicken Dinner we hope you will try.

Lemon Butter Chicken

Ingredients:Lemon Butter Chicken 2

  • 2 lbs boneless skinless chicken breasts and/or thighs
  • 1 stick butter
  • 4-6 cloves garlic, finely minced
  • Juice of 3 lemons
  • Zest of 1 lemon
  • 1/2 cup Half and Half, Milk, or Cream
  • 1 pt cherry tomatoes, halved
  • 1/4 cup fresh basil, chopped
  • Salt & Lemon Pepper to taste
  • 2-3 Tbsp olive oil
  • Cooked Rice to serve with it (I love Jasmine)

Directions:

Season chicken with salt and lemon pepper.  Heat olive oil in large skillet.  Add chicken and sear until golden and cooked through, about 5-7 mins. per side depending on thickness.  Transfer chicken to a plate and make the sauce.

Add butter to pan drippings and let melt.  Add garlic and stir until fragrant, about 1 minute.  Add lemon juice and zest and half and half.  Bring to a simmer.  Add cherry tomatoes and basil.  Simmer until thick, about 5 minutes.  Add chicken back to sauce and coat.   Serve over rice.

Enjoy!
I’m sure we will be making this one again.

Cheers & Hugs,
Jodi