Chocolate Orange Crinkle Cookies (with Terry’s Chocolate Orange)

Chocolate Orange Crinkle Cookies 1

If you haven’t finished your holiday cookie baking yet – you are in luck!  I have discovered an amazing new recipe for Chocolate Orange Crinkle Cookies using Terry’s Chocolate Oranges that is TO DIE FOR!

Chocolate Orange Crinkle Cookies 2

Terry’s Chocolate Oranges are sometimes only available around this time of year, so drop what you are doing and get to the store and stock up on these so you can make them now and throughout the year!  ( You can always order from Amazon too!)

Chocolate Orange Crinkle Cookies 3

I found this recipe on a lovely blog called, What Jessica Baked Next, and I’m looking forward to continuing to see what Jessica bakes next!   In Jessica’s recipe, she calls for using EITHER Terry’s Chocolate Oranges OR chocolate chips with fresh orange zest.  I, however, used both Terry’s Chocolate Oranges AND fresh orange zest!  OH MY MY MY!

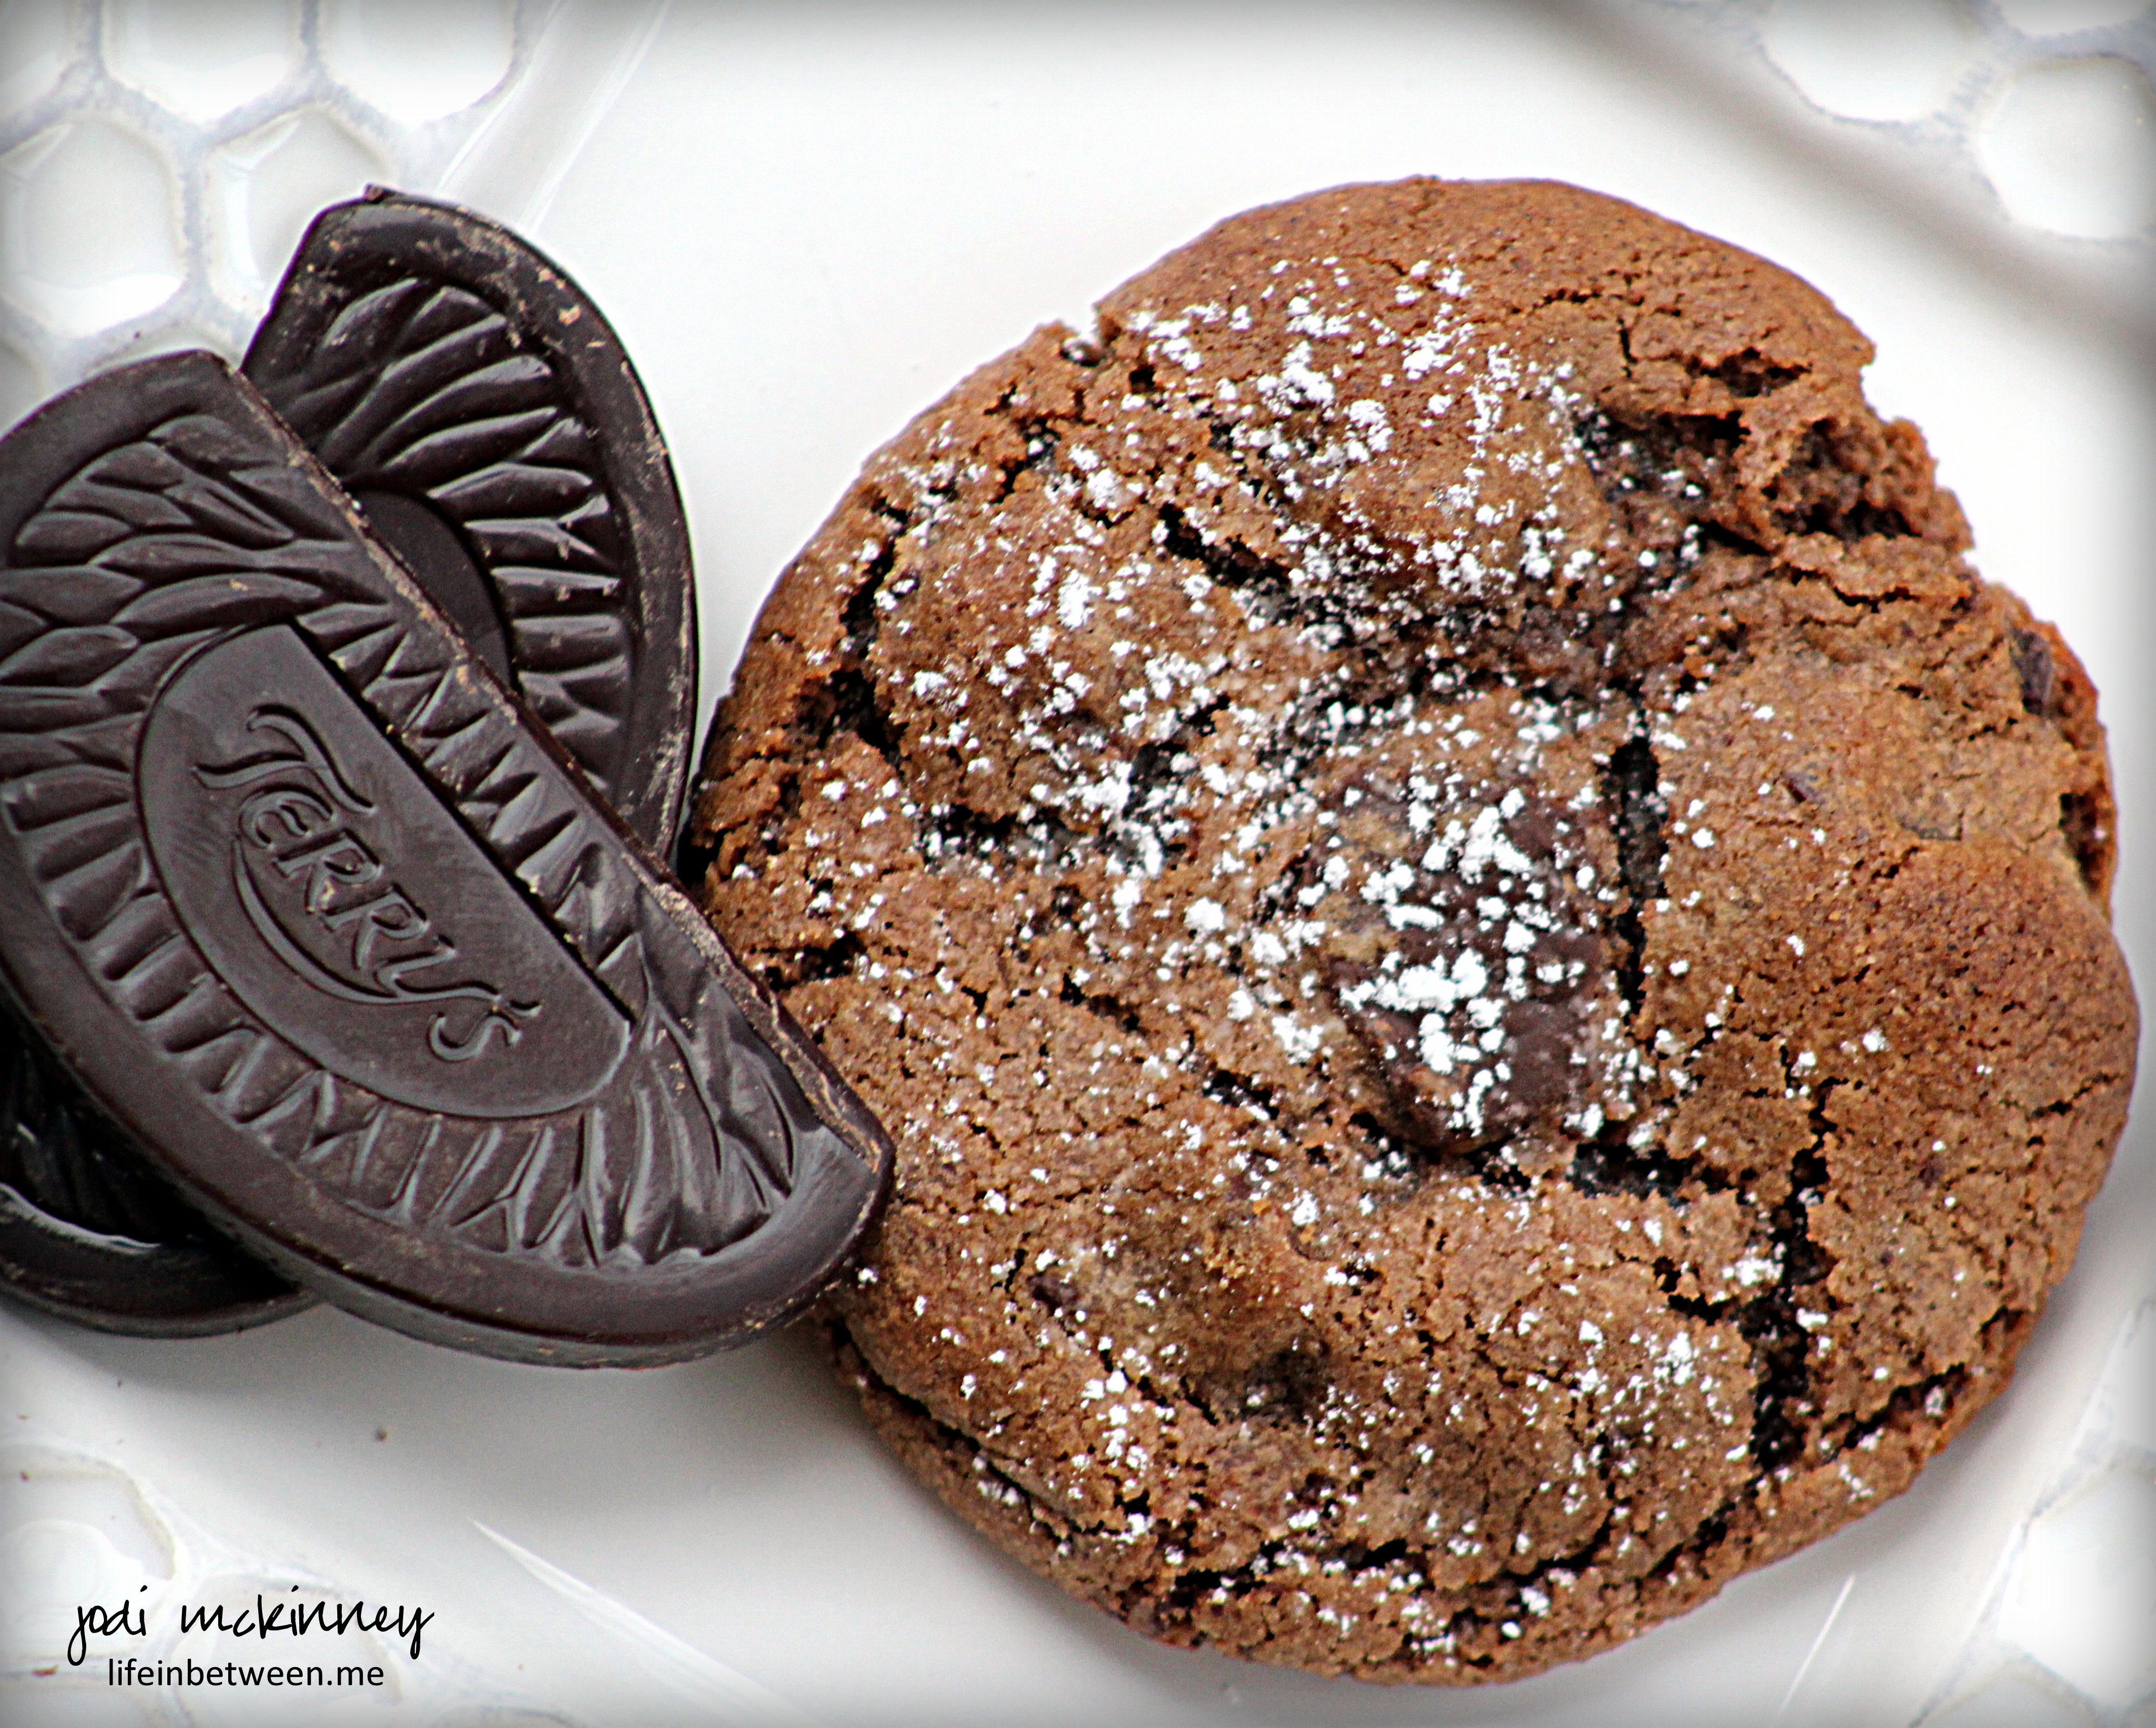
I also decided to dust them with a sprinkle of powdered sugar to make them look a bit more festive.

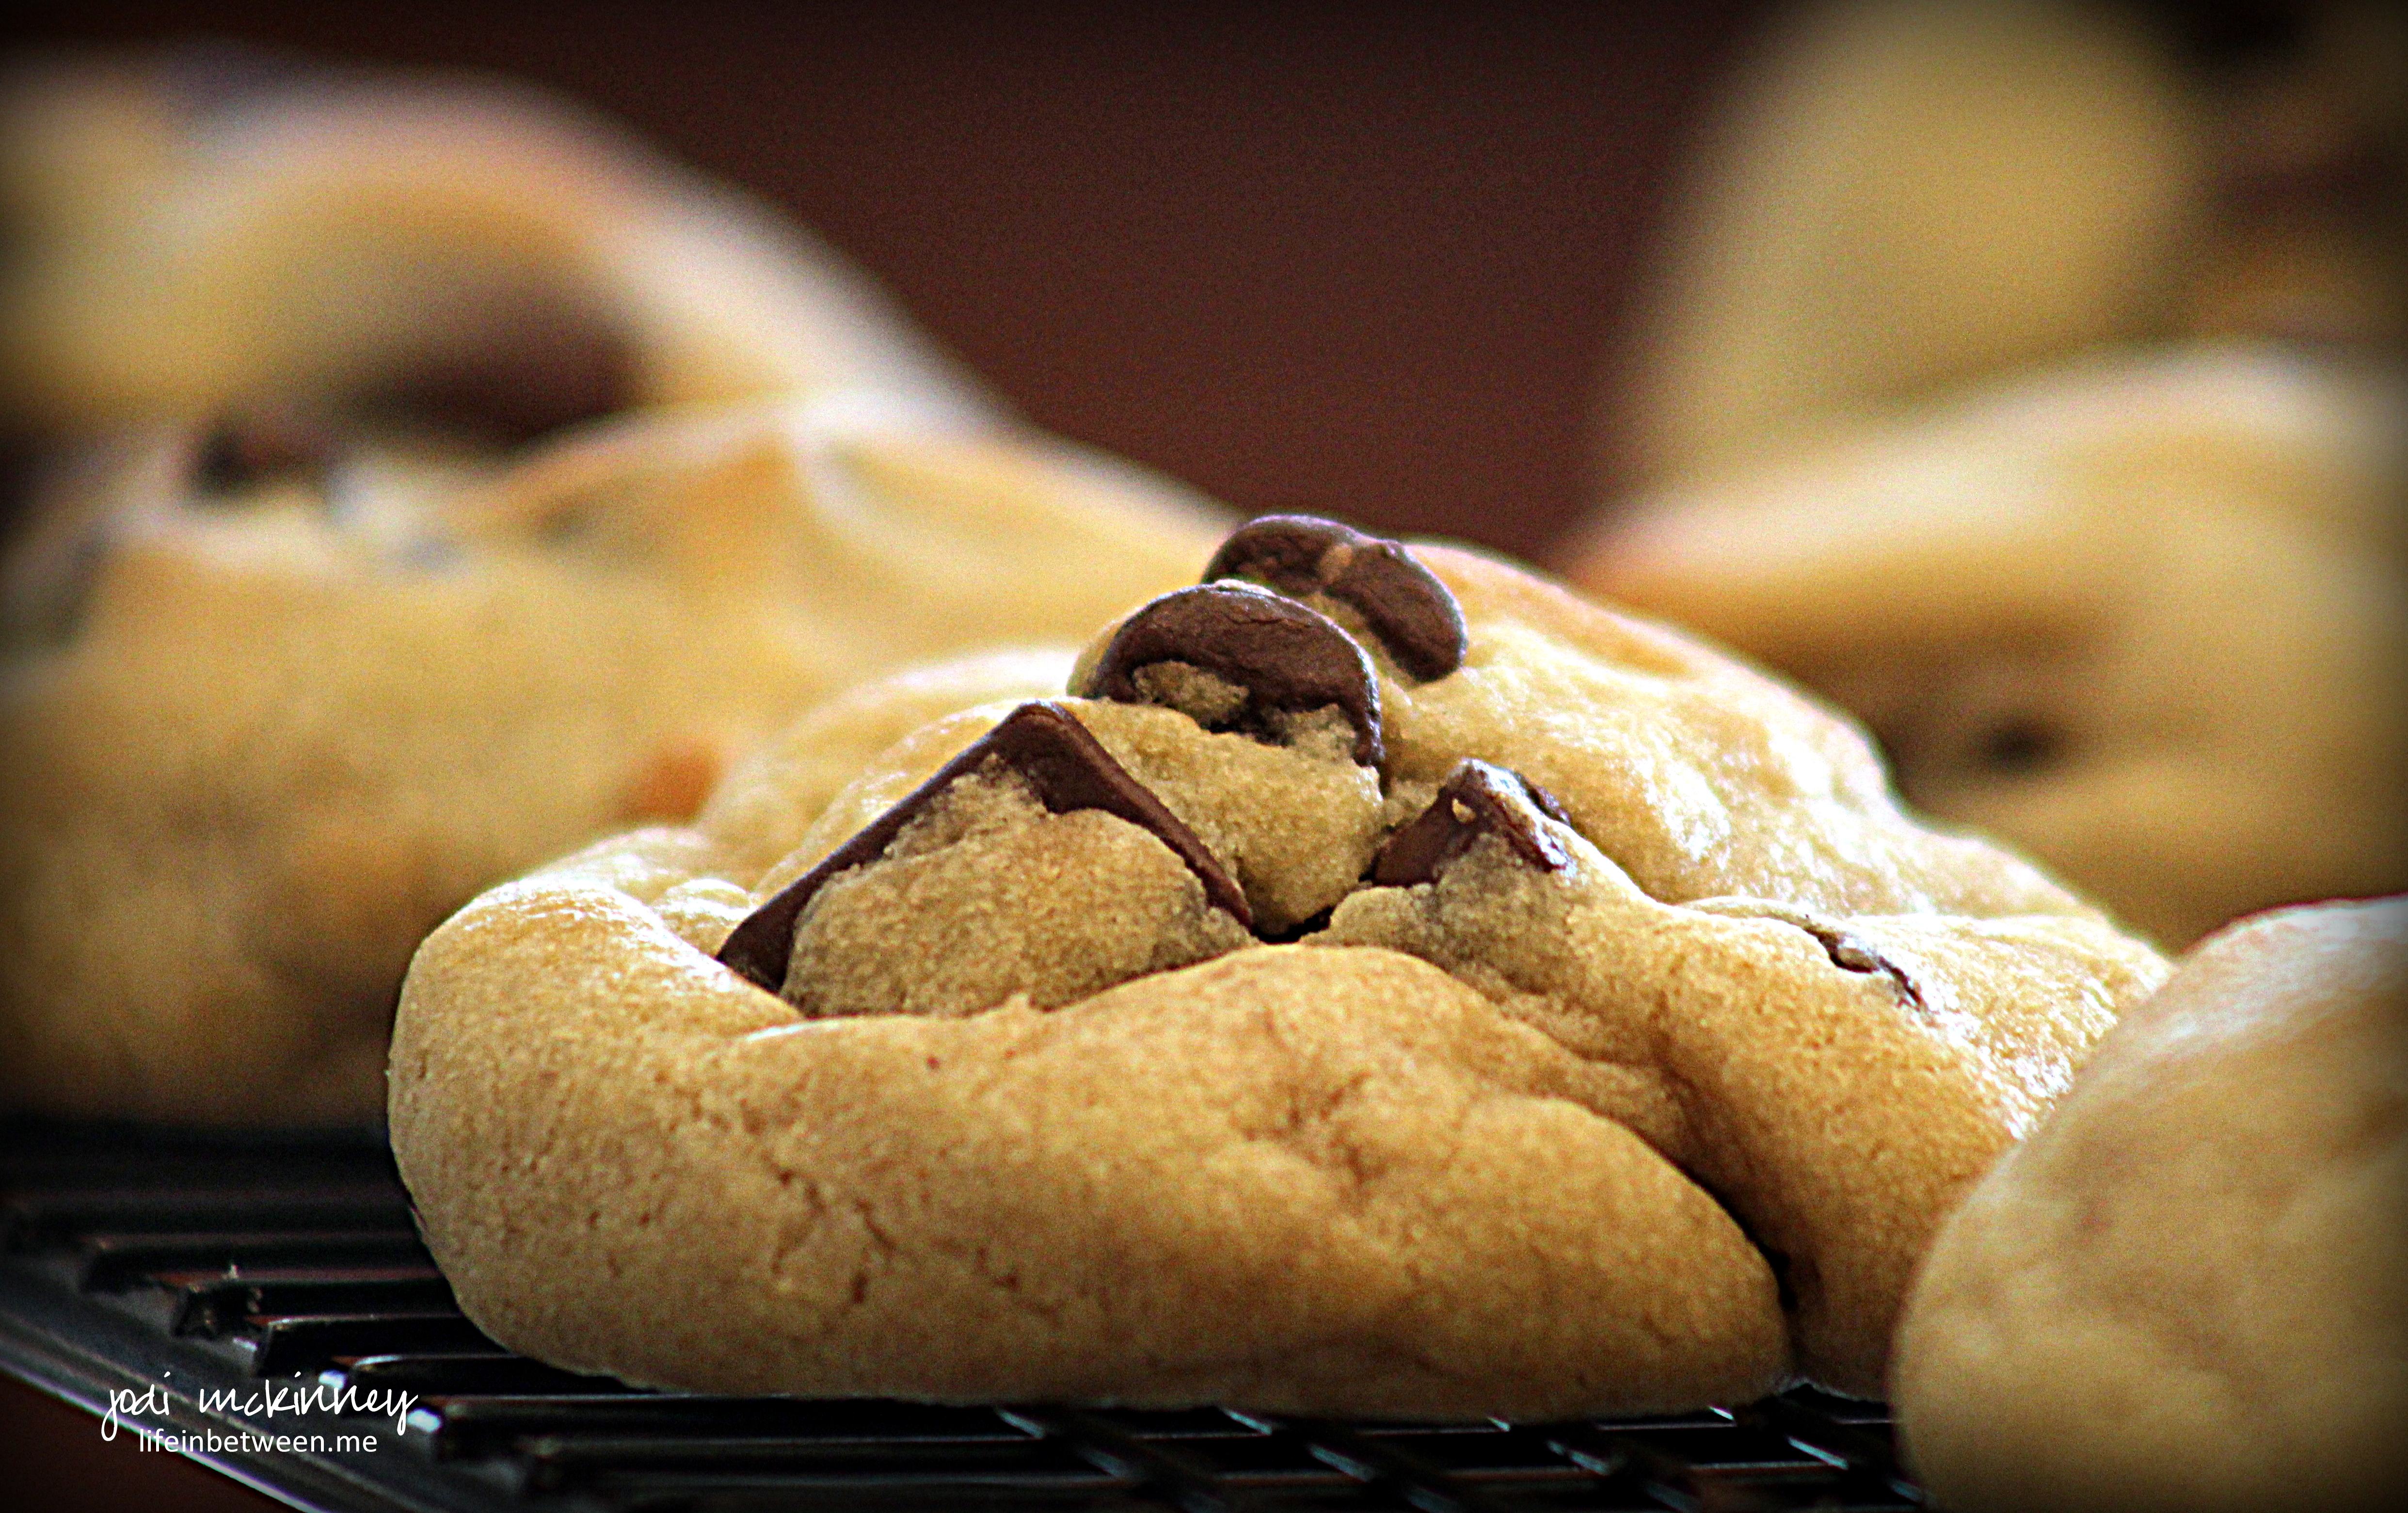
This cookie is like a brownie and a cookie all in one.  Crispy on the outside, gooey on the inside and just that right amount of fresh orange taste to compliment the chocolate in such a divine way!

Here is the recipe.  ENJOY!

Chocolate Orange Crinkle Cookies

Ingredients:Chocolate Orange Crinkle Cookies 2

  • 1 cup butter, softened
  • 2 cups packed light brown sugar
  • 2 large eggs
  • 2 tsp vanilla extract
  • 2 1/4 cups all-purpose flour
  • Dash of salt
  • 1 tsp baking powder
  • 1 tsp baking soda
  • 4 Tbsp cocoa powder
  • 2 (6.17 oz) Terry’s chocolate oranges, chunked (I used the DARK chocolate)
  • 1 tsp fresh orange zest
  • Powdered Sugar for dusting, optional

Directions:

  • Preheat oven to 375 F.
  • Cream butter, brown sugar and vanilla together with electric mixer until light and fluffy. Add egg and beat until incorporated.
  • Add flour, salt, baking powder, baking soda and cocoa powder, and mix until dough comes together.
  • Add the chocolate chunks and orange zest and gently mix to combine.
  • Make heaping tablespoon sized balls and place on baking stone or baking sheet.  Bake for 10 minutes until crackling occurs on top.
  • Allow cookies to cool on stones/baking sheets for 5 minutes, then sprinkle with powdered sugar.
  • Cool 5 more minutes on stone/baking sheet, then remove to cooling rack to completely cool.

Cheers & Hugs,

Jodi

Christmas Apricot Kolache Cookies

apricot kolaches christmas cookie baking 2015

Holiday baking continues this week.

apricot kolaches christmas cookie baking 2015 single

The other day I shared Grandma’s Old-Fashioned Apricot Nut Bread and told you how that is one recipe I bake for “me.”

Well…. Hubby, who reads my blog daily, mentioned it is one of HIS faves too.

These little treats I’m sharing today – Apricot Kolaches – however, I make for him!  I know this is one of his favorites, and that is why I make them.

apricot kolaches christmas cookie baking 2015 2

Yep – Grandma made these too, and I shared this recipe last year around this time also, but I just had to share again since they are such a part of our holidaying.

I cannot believe Christmas Eve is only a week away.  For some reason, I am as excited as a child this year.  Not sure why…  Not really fussing more than usual….  Nothing particularly unusual going  on….. Just feeling happy….. Just cherishing the moments…

Hope you are too!  Amidst all the “stuff” we all deal with (and we ALL have “stuff”- me included) – I hope you are taking time to “cherish the moments.”

They really are precious, and they bring such joy.

It might just be a smile from a stranger, the realization of timing that protected you from a “near accident,” the beauty of a sunrise or a sunset, the sound of a bird chirping or the laughter of a child or of a senior, the taste of that first sip of coffee in the morning, the warmth of a fire, the twinkling of Christmas lights, a lick from a dog, a purr from a cat, a kiss hello or a kiss good-bye, an “I love you,” a card in the mail, a “like” on your Facebook page, an email from your boss that says “perfect,” singing a Christmas carol or a favorite hymn, the softness of your pillow, the thirst-quenching of a tall glass of fresh water.

You see – we all have an abundance of moments to cherish each day.

I cherish each one of you reading this.  Thank you for giving me some “moments” of your day.

Christmas Apricot Kolache Cookies

2 8-oz blocks of cream cheese, softened
2 cups (4 sticks) butter, softened
5 cups all-purpose flour
1 1/2 cups apricot preserves or apricot filling (I use Baker’s)
1 Egg, beaten
Confectioner’s (Powdered) Sugar, for dusting

Beat cream cheese and butter on medium-high speed of stand mixer until light and fluffy, about 3 minutes.  Turn mixer on low, and gradually mix in the flour until a smooth dough forms.

Knead dough on lightly floured work surface, and gently form a ball.  Divide dough into fourths, flatten, and wrap each in plastic wrap.  Refrigerate at least 4 hours.

When ready to bake, preheat oven to 400 degrees F.  Line cookie sheet or baking stone with parchment paper.  Working with one piece of dough at a time (after bringing back to room temperature from refrigeration), roll out to approximately 1/8 inch thick rectangle.  Trim edges and cut dough into 2 inch squares.

Spoon about 1/2 teaspoon of apricot filling into the center of each square.

Fold one corner into the center, dab with the beaten egg, then bring the opposite corner into the center and press firmly to seal.

Place on parchment-lined cookie sheet, and bake for approximately 10 minutes.

Dust with confectioner’s sugar and cool on wire rack.

These cookies freeze well and thaw quickly.

This recipe makes about a million ….  or at least feels like it when you are making them!

Enjoy!

Cheers & Hugs,

Jodi

Grandma’s Old-Fashioned Apricot Nut Bread

apricot nut bread

It’s not officially Christmas baking time until I make Grandma’s Old-Fashioned Apricot Nut Bread.

apricot nut bread mini

And that is exactly what I did this past Sunday.

Unlike most of the things I bake, this recipe is for me.

Measuring the flour with my favorite antique tin measuring cup from Grandma,

snipping the apricots just like she did with kitchen shears,

mixing with old-time Christmas music playing like we did when I helped her as a child…

Remembering how she smelled, remembering how her hands looked and felt, remembering her voice, remembering her love.

Baking this bread every year at this time just takes me back – makes me smile – allows me to remember – fills me with love.

apricot nut bread slice

The smell of this bread baking is one of my very favorite smells in the entire universe.  (In fact, sometimes I go outside for a couple of minutes, so that I can come back in and be HIT by the smell!)

The taste of this bread…

not too sweet – a bit dry – densely filled with bursts of tart apricot chunks and crunchy walnuts….

For me – this bread is love – it is memories of childhood – memories of a grandma’s heart.

Do you have a recipe that does this to you?

I wonder if Grandma is why I often express my love for people by baking?

Thanks for the memories, Grandma.  Thanks for the love.  You are my Stella Star!

You can  find the recipe for my all-time favorite thing to bake here – Grandma’s Old-Fashioned Apricot Nut Bread where I shared it last year.

Hope you are enjoying the season.  I’m going to go have a slice and a cuppa!

Cheers & Hugs,

Jodi

Christmas Pittsburgh-Style Thumbprint Cookies

Christmas Pittsburgh Thumbprint Cookies 2

Christmas baking time is in full swing around here.

Christmas Pittsburgh Thumbprint Cookies 3

And those of us that live in and around Pittsburgh make thumbprints our own special way.  With icing!  and Sprinkles!

Christmas Pittsburgh Thumbprint Cookies

So for my Cookie Swap Party this coming weekend, Christmas Pittsburgh Thumbprints it is!

If you’d like to give them a try and share something different with your family and friends, try a few new thumbprints – like last week’s Twix Chocolate Caramel Shortbread version and these tasty Pittsburgh favorites.

Christmas Pittsburgh Thumbprint Cookies

Cookie Ingredients:

  • 5 cups all-purpose flour
  • 1 teaspoon salt
  • 2 cups butter, at room temperature
  • 2 cups powdered sugar
  • 4 tsp vanilla extract
  • Sprinkles

Directions:

  1. Preheat oven to 350 degrees F.
  2. Using an electric mixer on medium-high speed, cream together the butter, powdered sugar and vanilla extract until light and fluffy, about 3 minutes. Reduce the mixer speed to low and add the flour and salt. Once it is mostly incorporated, slowly increase the speed back to medium-high and beat for another minute or so until a dough forms.
  3. Form tablespoons of dough into balls and roll in the sprinkles.  If dough is a bit dry, you can add a little bit of milk or cream or put on your hands when rolling the balls to allow sprinkles to stick.
  4. Place on baking stone about 1 – 1/2  inches apart. Make a slight indentation with your thumb or finger on the tops of all the cookies.
  5. Bake for 8 minutes, then make a deeper indentation in the middle, and bake for an additional 7-8 minutes. The cookies should not brown much at all around the edges. Transfer the cookies to a wire rack to cool completely.

Icing:

  • 1 1/2 cup powdered sugar
  • 2 Tbsp corn syrup
  • 3 Tbsp milk or cream
  • Pinch salt
  • 1/2 tsp vanilla
  • 2 tsp butter, room temperature
  • Food coloring

Stir together all ingredients until smooth, then drop a spoonful into each cooled cookie.

Enjoy!

Cheers & Hugs,

Jodi


Twix Chocolate Caramel Shortbread Thumbprint Cookies

twix cookies 1

It’s Christmas cookie baking time, and I always like to try cookies that are a little different, a little more decadent, a little fancier, a bit more festive than usual for holiday baking.

I think I am on a chocolate caramel kick (Rolo Hot Chocolate Recipe Monday)!

I found a ton of different cookies with these ingredients, but ended up trying one posted by The Recipe Critic and tweaking it very slightly.

Twix Cookies

If you are a fan of Twix Candy Bars, you are going to go BONKERS over these awesome thumbprint cookies.

Twix Chocolate Caramel Shortbread Thumbprint Cookies

  • Servings: Approx. 4 dozen
  • Print
Ingredients:twix cookies 1
Shortbread Layer:
  • 4 sticks (1 lb) Butter, softened
  • 1 1/2 cups sugar
  • 6 Eggs (yolks only)
  • 3 tsp vanilla
  • 4 1/2 cups all-purpose flour

Caramel Filling:

Chocolate Topping:

Directions:

  • Shortbread Cookies:  With electric mixer, combine butter, sugar, egg yolks and vanilla. Beat at medium speed until creamy.   Add flour, and beat at low speed until well mixed. Cover and refrigerate at least 1 hour or until firm.
  • After dough has chilled, shape into 1-inch balls. Place 2 inches apart onto ungreased cookie sheets or baking stone. Make indentation in center of each cookie with thumb or end of wooden spoon handle. Bake at 375 degrees F for approximately 8 minutes or until edges begin to brown. Cool completely.
  • Caramel filling: Melt the caramel and cream in the microwave stirring every 30 seconds until fully melted. Using a teaspoon fill each indentation with the caramel.
  • Chocolate: Melt the chocolate in the microwave stirring 30 seconds at a time until smooth.  Spoon into a ziploc bag.  Cut a tiny snip in the corner of the baggie to pipe the chocolate onto the cookies.

I bet these would taste wonderful with a steaming mug of Rolo Hot Chocolate!   Can you even imagine!?!  ‘Tis the season!

Cheers & Holiday Hugs,

Jodi

Homemade Old-Fashioned Coconut Cream Pie

coconut cream pie slice

One of the ways I express love is through my baking.  And amidst all of the darkness and sadness of the past few days, I thought it time to share some love.

coconut cream pie

When my dear “Oh Rob” sweetly requested an old-fashioned coconut cream pie for Thanksgiving this year, I was so happy to oblige.

coconut cream pie slice2

As it turns out, his mom always made a coconut cream pie (or two) for Thanksgiving.  Coconut Cream is also one of hubby’s faves and our dear 92-year old Aunt Francie’s too, who joined us this year to celebrate.

coconut cream pie2

This pie was a huge hit – even with the kiddos.

Made with lots of love and dreamy, creamy awesomeness.

Delicious, nostalgic, and oh so yummy!

Old-Fashioned Coconut Cream Pie

Ingredients:coconut cream pie slice

For the crust:

  • 1 cup flour
  • 1/3 cup Crisco shortening
  • Dash of salt
  • Approximately 1/2 cup cold water

Coconut Cream Filling:

  • 3 cups Half and Half (or whole milk)
  • 1/3 cup flour
  • 2/3 cup white sugar
  • pinch of salt
  • 1 cup sweetened shredded coconut
  • 3 large egg yolks, beaten
  • 4 Tbsp butter
  • 2 tsp vanilla extract
  • 1/2 tsp almond extract

Whipped Cream Topping:

  • 1 cup heavy whipping cream
  • 1 1/2 tsp vanilla extract
  • 3 Tbsp powdered sugar

Directions:

  • Prepare pie crust by blending flour, shortening, and salt with a pastry blender until mixture resembles coarse crumbs.
  • Gently blend in water until dough forms.  Do not overwork.
  • Roll dough out into approximately 12 inch circle, and place into a  9 inch pie plate.  Flute edges and poke bottom of crust with a fork 6-8 times.
  • Bake at 400 degrees for 12-15 minutes.
  • Cool completely before adding the filling.
  • For the filling, scald the milk in the microwave or on stove top to almost boiling.
  • Combine flour, sugar, salt and coconut into a saucepan.
  • Over medium heat, whisk 1 cup of the scalded milk into the flour/sugar mixture.
  • As this mixture begins to thicken, add another cup of scalded milk and continue whisking until it begins to thicken again.
  • Add the final cup of milk, and cook over medium heat until mixture  begins to thicken.
  • Remove from heat, and pour 1/2 cup of thickened mixture into the beaten egg yolks, continuing to whisk.
  • Pour this mixture back into the pot and continue to whisk.
  • Cook for an additional 2-3 minutes until mixture reaches pudding consistency.
  • Remove from heat, and stir in butter, vanilla and almond extract.
  • Cool for 15-20 minutes.
  • Pour into baked pie shell.
  • Chill completely before adding vanilla whipped cream.
  • For whipped cream, combine heavy whipping cream, powdered sugar, and vanilla.  Beat until soft peaks form.
  • Spread on top of cooled coconut cream filling.
  • Garnish with toasted coconut

Enjoy!

Cheers & Hugs,

Jodi


We interrupt this regularly scheduled blog….

originalcolorbars1080

We interrupt this regularly scheduled blog for….

Thanksgiving Pie Baking Day.

You know I am in my glory!

Wishing you visions of pumpkin and dutch apple and chocolate and coconut cream dancing in your head!

Cheers & Hugs,
Jodi

Heavenly Hot Cocoa Brownies

Heavenly Hot Cocoa Brownies 1

Chocolate lovers look out!

Heavenly Hot Cocoa Brownies 2

Brownie lovers beware!

Heavenly Hot Cocoa Brownies 3

If you are still baking boxed brownie mixes, get ready to rock your world.

I have discovered the ultimate homemade brownie recipe that is not only easy, but has an amazingly crispy, crinkly, chewy cracked crust floating atop a rich fudgy center that is going to cause you to hear angels rejoicing from your taste buds singing.

Heavenly Hot Cocoa Brownies 4

I wanted to create a brownie that was like taking a bite of a sip of hot cocoa.

So tweaking this amazing recipe (originally from Taste of Home) up just a bit made a real winner.

Get ready to bake and taste and share and treat those you love with a brownie that is simply beyond anything you have ever tasted before.  I dare you!

Heavenly Hot Cocoa Brownies

  • 3/4 cup cocoa (I used Hershey’s)Heavenly Hot Cocoa Brownies 1
  • 1/2 tsp. baking soda
  • 2/3 cup melted butter, divided
  • 1/2 cup boiling water
  • 2 cups sugar
  • 2 large eggs
  • 1 1/3 cups flour
  • 1 1/2 tsp pure vanilla extract
  • 1/4 teaspoon salt
  • 12 oz. package semi-sweet chocolate chips (I used Trader Joe’s, which I found delightful, but I often use Nestle’s also)
  • 3/4  cup miniature marshmallows

Directions:

  • Preheat oven to 350 degrees F.
  • In a large bowl, combine cocoa and baking soda.
  • Blend in half (1/3 cup) of the melted butter.
  • Add boiling water and stir until well blended.
  • Stir in sugar, eggs and remaining 1/3 cup melted butter.  Mix until well incorporated
  • Add flour, vanilla, and salt.
  • Stir in chocolate chips and 1/2 cup marshmallows.
  • Pour into a greased 9×13 pan and bake for 30-35 mins. until top begins to crack
  • After removing from oven, top with remaining 1/4 cup mini marshmallows and lightly brown tops with Chef’s Torch (optional)

Cheers & Chocoately Brownie Hugs,

Jodi

My Happy Place

Nick Winston CJ Zach

Nick, Winston, CJ, Zach

Look at these handsome guys!

Could I be any happier than to have the opportunity to have them over and cook for them?

Does that make me a little strange?… unusual?…. old-fashioned….?

I was really looking forward to – and totally enjoyed – the opportunity to cook and bake for my youngest son, Nick (far left in the photo above) and a group of his old college buddies (Winston, Zach, and CJ – two of whom are married already!), who decided to get together for a Saturday afternoon of basketball and an evening of pool and poker, with a short break in between to be nourished by Momma ME!

In talking with my friend, Tracy, on our Sunday morning walk yesterday, I remarked upon reflection that it is good to be 52 and not so worried about what is the right or wrong way to be a woman today.

For a while, I tried to be a “modern” business woman – one who enjoys working as much as the rest of “the guys” and has no time for such silliness as cooking and baking….

But I can’t help it….

It is my happy place.

It is in my DNA.

When I was a young girl, if asked what I wanted to be when I grow up, I most often would say, “A Mom.”

Being a mom is a job that should be as equally admired as those that serve as doctors and lawyers and teachers and executives.

It really is a tough job.  Little training is provided.  Little recognition is provided.  The monetary rewards are quite minimal.  The days are long.  Then nights are short.  The worries are many.

But the rewards…..

especially when looking back and knowing you raised your kids to become amazing adults….

well – there really is nothing greater.

So the chance to cherish moments with my “kids” (who aren’t really kids anymore)…

is pretty darn great.

I am most happy when I am cooking or baking or having guests in my home.

I TRULY love my work too.  Don’t get me wrong.

I am extremely fortunate to have a work-life balance that allows me to work as passionately at my job in corporate communications for home health and hospice and enjoy it as much as I do my “life in between” activities.

I also truly and equally admire women who don’t choose to be mothers, but dedicate their lives to noble careers because that is their passion.

But put me behind the kitchen counter with pots steaming and cookies cooling and bread kneading…..

kitchen

with Charlie by my side napping as the Autumn sunshine streams in the window…

charlie sleeping in the sun

and life is perfect.

I baked some classic chocolate chips cookies,

chocolate chip cookie

and made Zach’s favorite – good old-fashioned peasant food – Haluski.

halushki cabbage

I made some yummy rosemary roasted butternut squash that they all surprisingly LOVED, some freshly baked rustic crusty bread, and some dry rubbed pork tenderloin (recipe in tomorrow’s blog!), as well as some mini pumpkin pies….

mini pumpkin pies

served up with a side of dreamy, creamy whipped cream.

single mini pumpkin pie bite

In the midst of it all, with dishes piled high in the sink…

flour all over the counter….

dough in my hair…

Nick asked,

“Do you REALLY ENJOY doing this?”

“Oh YES!,” I didn’t even hesitate when I replied…

“This is my happy place.”

Thanks, guys, for the wine!
Thanks, girls, for the surprise visit!
Thanks, Merv, for being the grill master and my “partner in crime” through it all.
Thanks for allowing me to nourish your bellies as much as you nourish my heart! ❤

Cheers & Hugs,
Jodi

Lemon Strawberry Pound Cake

lemon strawberry pound cake photo

Lemons and strawberries in November?  (A time when we are usually baking with pumpkin and cinnamon and apples….?)

Well – we are experiencing some amazing Indian Summer weather here in Mars – with temperatures in the 70’s, the sun shining brightly, and the sky a vibrant shade of blue – so why not – right?

lemon strawberry pound cake 3

Well – the truth be told – that same cute little bugger who requested the Royal Flush Halloween t-shirts recently found a photo on Reddit that struck his fancy a few days ago of a freshly baked loaf of lemon pound cake with strawberries.  He texted me the photo saying, “Please make.”

Well…. how could I resist?  (I know….. pushover! – but really…. I live for this stuff!)

Turns out the sweet young lady who posted the photo stating “this just came out of the oven” did not post the recipe!  How dare she??!!  More than one reader called her “evil” for not posting the recipe!

I did some digging, however, and found the source and the recipe… Score!!  (I know – I have issues!)

Turns out Bianca Davies, the “evil” baker/Reddit poster, is a trained chef from Cape Town, South Africa, who attended Le Cordon Bleu in Paris, but is equally inspired by her Granny and Granny’s lemon trees.

Per Bianca, Granny likes a cake that is “rich, moist, light, airy and slightly fudgy.”   This little pound cake amazingly delivers on all of that – and more!

lemon strawberry pound cake 4

So before we get seriously into Autumn and Winter baking and cooking, you might want to enjoy one last taste of summer!  You will not regret it!

Lemon Strawberry Pound Cake

Ingredients:lemon strawberry pound cake photo

  • 3 eggs
  • 1 ½ cups powdered sugar, sifted
  • 2 tsp vanilla extract
  • 1 ½ cups plain flour
  • ¾ tsp baking powder
  • ¾ cup salted butter
  • zest of 2 large lemons
  • 8-10 fresh strawberries

 Directions:

  • Preheat oven to 350˚F.
  • Grease a loaf pan well with butter.
  • Whisk eggs, sifted powdered sugar and vanilla together in a bowl.
  • In a separate bowl whisk flour and baking powder together.
  • Place butter in a small saucepan. Zest lemons into your butter and place on a low heat to melt. (Do not boil)
  • Combine all three mixes together a little at a time. Do not over mix.
  • Pour into your prepared loaf pan.
  • Chop your strawberries into quarters and arrange evenly on top of the batter.
  • Bake in the middle of the oven for approximately 40 minutes. (The cake should be golden brown and ‘just’ done with your knife or cake tester not coming out completely clean. Do not over bake.)
  • Let cool slightly in the pan, turn out gently and leave to cool on a wire rack.
  • Dust with powdered sugar and try not to eat the whole cake in one go!

Converted recipe from http://thesecretlifeofbee.co.za/ (Bianca Davies, Cape Town, South Africa)

Cheers & Hugs,

Jodi