Happy Birthday Dad!

PP249 Birthday Color Challenge

It’s time for another Paper Players Challenge Guest Designer Post.  This week’s challenge (PP249) is a color theme using Real Red and Blue Shades of Pool Party and Indigo Blue.

pp249

My Dad’s birthday is coming up in a few days, and we are going to visit him today to celebrate, so I thought I would use the opportunity to create a birthday card for him.

PP249 Birthday Color Challenge 3

Instead of using those colors in ink, I used them in creating shapes and cut-outs of some beautiful StampinUp designer series paper (DSP) with the StampinUp Star Framelits Dies.

PP249 Birthday Color Challenge 2

I wanted to give it a bit of a “vintagy” look too, so I sponged each piece with Tim Holtz Tea-Dye Distress Ink.  I popped the stars and sentiment (from Paper Smooches Sentiment Sampler) on with some dimensionals.

Looking forward to celebrating Dad’s birthday and Father’s Day with him today.

Love you Dad!

Cheers & Hugs,

Jodi


Watercolor Butterfly

watercolor butterfly Jill bday

Today is my BFF’s birthday.  And what kind of bestie am I when I am pretty sure she is going to see this card here before she receives it in the mail???!!!  UGH!

BFF Jill is one of the most creative, supportive, generous, loving people I know.  And here I am late getting her card to her…

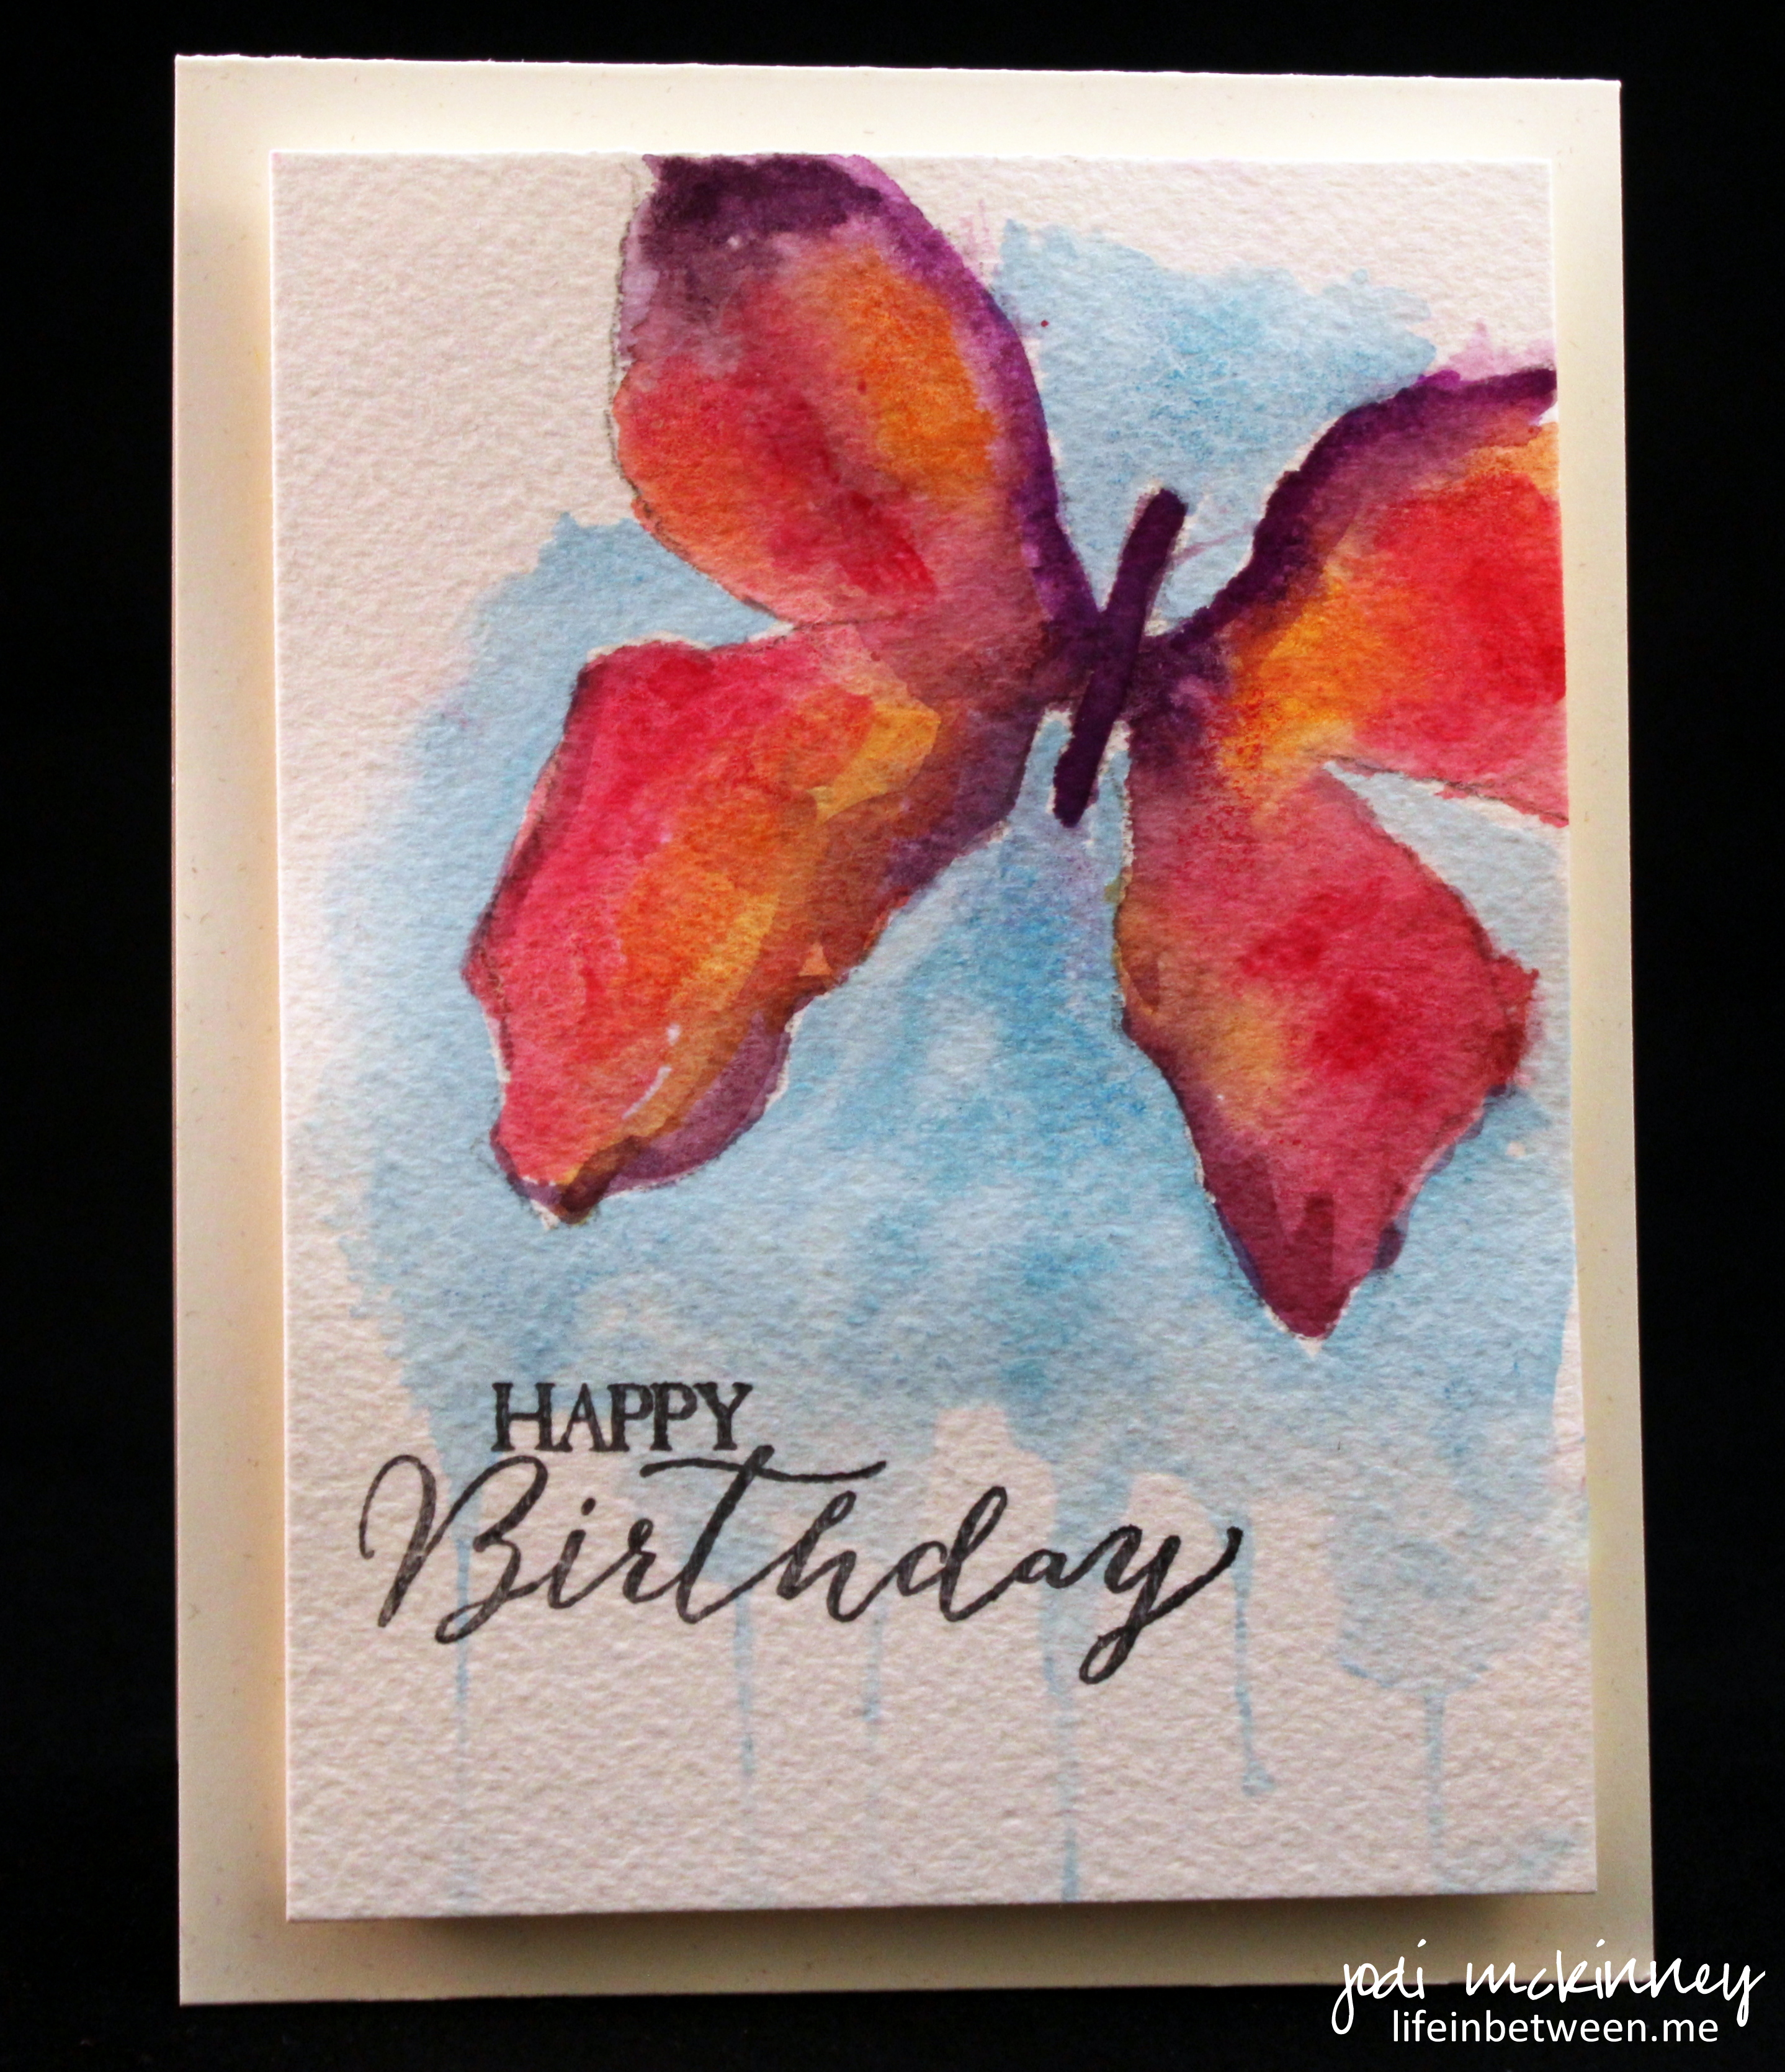
I have been wanting to draw and watercolor a butterfly for a while now.

This past week, however, had me in New York City for three days, home a day, and then off to Cleveland for an overnighter with another bestie for Saturday and Sunday.  All awesome stuff I must say, but little time for relaxing and creating.

Sunday evening, I finally found some time to sit down and be “creative.”  It was good to get my watercolor paint out again, draw a butterfly outline, and let it flow.  I was inspired by some designs I had seen done using a butterfly diecut at SimonSaysStamp.  For my card, I just drew a butterfly outline and then dropped in some color.

Jill and I have been through so much together.  I don’t know what I’d do without her. She and her family are our chosen family.  She is there for me in the most important of times (difficulties with family, emergencies, doubts, disappointments, but also celebrations, holidays, and milestones).

Many years ago, Jill and I went to a Bette Midler concert.  We’ve watched the movie “Beaches” together.

You know how couples have a “song?”  Well, Jill and I have a “song.”  It is “Wind Beneath My Wings,” by Bette Midler.  (and yes – hubby and I do have a song too – wonder if he knows it as the same one I do…. Merv?!).

So a butterfly seemed the perfect card for Jill – the wind beneath my wings.

If only I could have got it there on time….

Love ya Jill!  Happy Birthday!

Cheers & Hugs,

Jodi

I’ve been asked to be a “Designer”

Birthdays are for the Birds!   Child Birthday Card  Punch Art   SU Bloom with Hope

My Most Pinned Card on Pinterest – Birthdays are for the Birds!

How about that?  Pretty exciting stuff – eh? (at least in my little corner of the world)

I am so honored to be asked and super excited to participate as a Guest Designer for the next three months at ThePaperPlayers.

SUO 114 Dots Big Day

My second most pinned card on Pinterest – Dots Big Day Birthday Card

The Paper Players is a fun community of artsy crafty paper peeps who love to stamp or draw or paint handmade paper crafts.  The design team is a group of amazingly talented, inspiring individuals that are as kind and encouraging as they are artistic.  They truly embody creating HeARTwork!

I originally discovered The Paper Players when I started stamping, and for those that have been with me here a while know this is a weekly challenge I often participate in – – – and have actually won a few times!

I added "Jodi McKinney" to an #inlinkz linkup!https://lifeinbetween.me/2014/09/14/the-colors-of-fall/

One of my winning cards

I will be creating one card per week as “inspiration” for the challenge in hopes that others will join in and play along.

I hope some of you that love or would like to try paper crafting will check it out and join in with us weekly or as you like from time to time.

Stampinup By the Tide

One of my faves – Stamin Up By the Tide Hello There Card

The guidelines are very simple:

1. Create a new paper or digital project.
2. Upload your creation to your blog with a link back to ThePaperPlayers. (Please provide a direct link to the post featuring your challenge entry as opposed to you blog home page.)
3. We also ask that you link your project to no more than three challenges.
4. Have fun! 

Wish me luck, and I hope this inspires YOU to do more of what makes YOU Happy!

Happy Life Stampinup Watercolor Technique

Happy Life Watercolor Card


Cheers & Hugs,

Jodi


Watercolor Whimsy – Week 6

whimsical green and purple polka dot birdie watercolor card

This week I went in a little different direction with my watercoloring…

Wanting to loosen up and just create FUN like my artsy bloggin’ buddies, Laura at CreateArtEveryDay and Jill at JillsArtJournal, I poked around on Pinterest and found some super fun work by Lucia at StressieCat.  Such unique, original, crazy, zany, whimsy!  I used Lucia’s inspiration to draw and paint this first crazy green and purple polka-dotted bird.  You should check out her blog – crazy awesome talent!  Mine turned out nothing like hers, but I still kinda like it.

whimsical green and purple polka dot birdie watercolor card birdie doo doo inside birthday

And any card that has a crazy green and purple-polka dotted bird on it naturally needs some green birdie doo doo on the inside!  Right?

whimsical watercolor birdie card

Then I made this other silly guy from a photo I saw that stuck in my head, but I’ve lost the source (since I did it over two days – starting one evening and letting the base dry and polka-dotting the next day).  It was a paper mache bird, but I thought I’d recreate it in watercolor and for a card.  I just tore off a piece of watercolor paper and went to town.

whimsical watercolor birdie card 2

I really had fun making these silly guys, and this green one is already on its way to a friend who is celebrating a birthday this week.  He’s a pretty great guy – so he even gets a Superman stamp!

whimsical green and purple polka dot birdie watercolor card read to mail

Have some fun today – and EVERY day!

Cheers & Hugs,

Jodi

Vintage Birthday Card

masculine card hero artsferns watercolor penny black letter background

This card was one of those projects that just evolved….

I had no idea where I was going with it, but I love how it ended up.

I felt like just splashing some watercolor on paper.

I wanted to get “wild and crazy” and just tear the paper instead of cutting it.

After the watercolor dried, I stamped Penny Black’s Letter Stamp on top.

I then heat embossed Hero Arts’ ferns on top of that.

Then I splattered…

and I sponged the edges…

and I wrapped with some SU linen thread and a wooden button.

masculine card happy birthday paper smooches sentiment hero arts fern watercolor

For the inside, I painted some “leftover” watercolor paint onto the Hero Arts Fern stamp.  I LOVE how it turned out.

Then, I used the Paper Smooches Happy Birthday Sentiment on top of it.

masculine watercolor penny black letter hero arts fern vintage card

It turned into a birthday card for a very special brother-in-law.

I hope he feels the love and passion that went into each step of the creation.

Kinda like the love I feel for him. 🙂

Happy Birthday Ron!  May your birthday be as special as you!

Cheers & Hugs,
Jodi

P.S.  I am entering this card in the CanYouCaseIt Designer’s Choice Challenge this week (CYCI#66).

CYCI66

Celebrate Today

Happy Birthday Nick Celebrate Today

Celebrate today!

Celebrate every day!

Hey – it’s Friday…

and it’s a birthday weekend around here!

My “baby” turns 25 in a few days.  How did that happen when I am only like (ahem)….  Hey – I just realized as I am typing this I am the exact reverse number…. 

In my current “clean and simple” (CAS) mode, I made this card using the StampinUP Celebrate Today stamp set.  It is so fun and festive!

After stamping the birthday balloons in Pear Pizazz and Marina Mist, I heat embossed the stars inside the balloons, as well as the birthday greeting, with silver glitter.  A few star sequins and some white baker’s twine for the balloon strings finished off this card.

I am so looking forward to spending time together with my family and celebrating.  I’m not sure how I got so lucky having two wonderful sons, an amazing daughter-in-law and a dear girlfriend, and a hubby that puts up with my shenanigans… but I’ll take it and run with it!

Cheers & Hugs,
Jodi

Butterfly Birthday Wishes

butterfly birthday 2

I have several birthday girls on my list this upcoming week.  Marty (hubby)’s Aunt turns 92 young years young, and I have a wonderful cousin and a sweet niece all celebrating their special days.

I love, Love, LOVE this Stampinup Butterfly Basics stamp set!  It is appropriate for young, old, and everything in between.  It has so many complimentary pieces to create fun collages.  And it works so nicely with the Butterfly Thinlits to add an extra pop of WOW.

Hopefully it will be a bit more Spring-like next week when these are received by the birthday girls. After all – in our part of the world we Spring Ahead into Daylight Savings Time this weekend – Woohoo!

butterfly birthday 1

I saw a card done by Heather @ HandcraftingwithHeather and thought I would use it as inspiration, but I just so loved how she did it that I practically CASE’d (copied) it completely.  I changed it up a bit, but be sure to check out her beautiful creation here. (CASEing is a huge compliment in the stamping world!  And such a great way to get your creative mojo flowing when it is waning) 🙂

I did try it two different ways, one with a purple (Blackberry Bliss) border and one without.  Which way do you prefer?  Clean and Simple (CAS) or with the border?  I should have tried one more version without sponging the edges with the Blackberry Bliss ink and keeping it all white (Very Vanilla) for even more simplicity.

butterfly birthday inside

What I love about this stamp set is it gives you everything in the one set to create a million different versions, colors, and distinctly different (or similar) cards.  Many times I use a number of sets together, but for this it was just this set and the thinlit to cut out the butterfly.  I only used three colors on the front of the card, carried to the inside, and even on the envelope:  Blackberry Bliss, Mossy Meadow, and Hello Honey.

butterflly basics envelope

So Happy Friday!  Happy Spring Coming Soon (fingers crossed), and Happy Birthday Aunt Francie, Sarah, and Dawn!

Cheers & Hugs,
Jodi

Grandma’s Easy Poppy Seed Cake

poppy seed cake

As a child, my Grandma made me a poppy seed cake every year for my birthday.   Sound odd?  Well – my birthday is on New Year’s Eve, and who isn’t sugared out by then after all the Christmas cookies and holiday treats?

So this poppy seed cake was always just right – not too sweet – no heavy, sugary icing – just a fun old-fashioned bread-like cake that speaks love to me.

poppy seed cake slice

Marty used to make it for me sometimes through the years; but the older we get, the more I just don’t want anything sweet by my birthday. (Red wine, however, is ALWAYS welcome!) 🙂

So I have had a hankering for poppy seed cake lately, and when I passed a package of poppy seeds in the grocery store yesterday, I just threw them in the cart and came home and baked it!

poppy seed cake 2

Don’t be surprised if it reminds you more of a sweet bread – more like banana bread or zucchini bread. It is yummy for breakfast with coffee or just as a treat.  (And of course it goes well with red wine.  What doesn’t?)

Here’s our recipe:

Grandma's Easy Poppy Seed Cake

  • Servings: One Yummy Cake
  • Print

INGREDIENTS:
3 cups flour
2 cups sugar
1/2 tsp baking soda
1/2 tsp salt
4 eggs
1 tsp vanilla
1 cup vegetable oil
1 can evaporated milk
1/4 cup poppy seeds
DIRECTIONS:
Preheat oven to 350 degrees F.  Grease and flour 10 inch tube or bundt pan.
In a large bowl, mix dry ingredients.
Make a well in the center and add eggs, vanilla, oil, and milk.  Mix well.
Fold in poppy seeds.
Pour into prepared pan, and bake for 1 hour or until toothpick inserted into cake comes out clean.
Cool 10 minutes in pan, then turn onto rack to cool.

When cool, sprinkle generously with sifted powdered sugar.

ENJOY!
Cheers & Hugs,
Jodi

Come On Get Happy

hello you thinlits circle framelits so social happy birthday card

A very special little lady reminded this past week that her birthday is coming soon, so I wanted to come up with a fun, unique card for her.

I was inspired by a cute idea I saw done using circle framelits in fun colors with a die cut greeting by Mayuri at Candles in the Garden.  Once I made my card and checked the link to credit, I realized I hadn’t even come close to doing Mayuri’s design justice!  She used a beautiful inlaid technique on her card which I may have to try some time.

For my card, I cut multiple sizes of circles using the StampinUp Circle Framelits and layered them on top of each other on black paper.  I then cut out two layers of the word “happy” from the StampinUp Hello You Thinlit Set.  I covered “happy” with a glossy layer of Crystal Effects to give it a little more pop.  I then stamped “@birthdaygirl” from the StampinUp So Social Stamp set and added a few sequins for embellishment.

For some reason this card reminds me of the song, “Come on Get Happy” with the psychedelic Partridge Family bus colors, and it makes me smile.  (I know – sometimes I’m living in my own little happy place…)  🙂

I hope the birthday girl will enjoy her card.

Happy Friday friends!

Cheers & Hugs,
Jodi

Celebrate Today

celebrate today pp233

I had so much fun making this birthday card, and I’m pretty happy with how it turned out.  I must give credit for the inspiration to Justin Krieger at jkcardsonline.com.

I knew I needed a birthday card this week, and I was anxious to get back to playing in The Paper Players Challenge.  When I saw Jason’s watercolor confetti balloons card and the sketch from Sandy at The Paper Players Challenge #233 this week…

pp233… this was the result.

celebrate today pp233 flat

I even carried the theme to the inside.

celebrate today pp233 inside

So here are the details for my stampin’ friends:

Supplies:

StampinUp Whisper White Cardstock for the Base
Watercolor paper
Vellum Paper
StampinUp Celebrate Today Stamp Set
StampinUp Balloon Framelit Die
Jim Holtz Distress Inks: Broken China, Salty Ocean, Peeled Paint
Versamark Ink
White Embossing Powder
Silver Embossing Powder
White Linen Thread
Foam Adhesive Tape, Glue Dots, Snail Adhesive

Directions:

Cut the Whisper White Card Stock into 4 1/4 x 11 and fold in half at 5 1/2
Cut watercolor paper to 4 x 5 1/4
Brush with clear water, then watercolor with distress ink colors
When dry, sprinkle with droplets of water, dab dry
Cut Balloon Shape out with framelit die, and reserve cut-out for inside of card
Adhere foam adhesive tape to back, and affix to card base
Cut three balloons from vellum
Emboss with Celebrate Today stamps
Adhere to card using glue dots discretely behind embossed dots and words
Stamp Happy and Birthday with VersaMark and heat emboss with silver
Adhere balloon strings
Adhere balloons and strings to inside of card

Wishing anyone with a birthday today or this week a very happy day!

Celebrate Today!

Cheers & Hugs,
Jodi