Butterscotch Haystacks

Butterscotch Haystacks

Butterscotch Haystacks.

It’s a cookie?
It’s a candy?
Not quite sure what you call it….
but it is a scrumptious little treat!

Does anyone remember these little gems from their childhood?

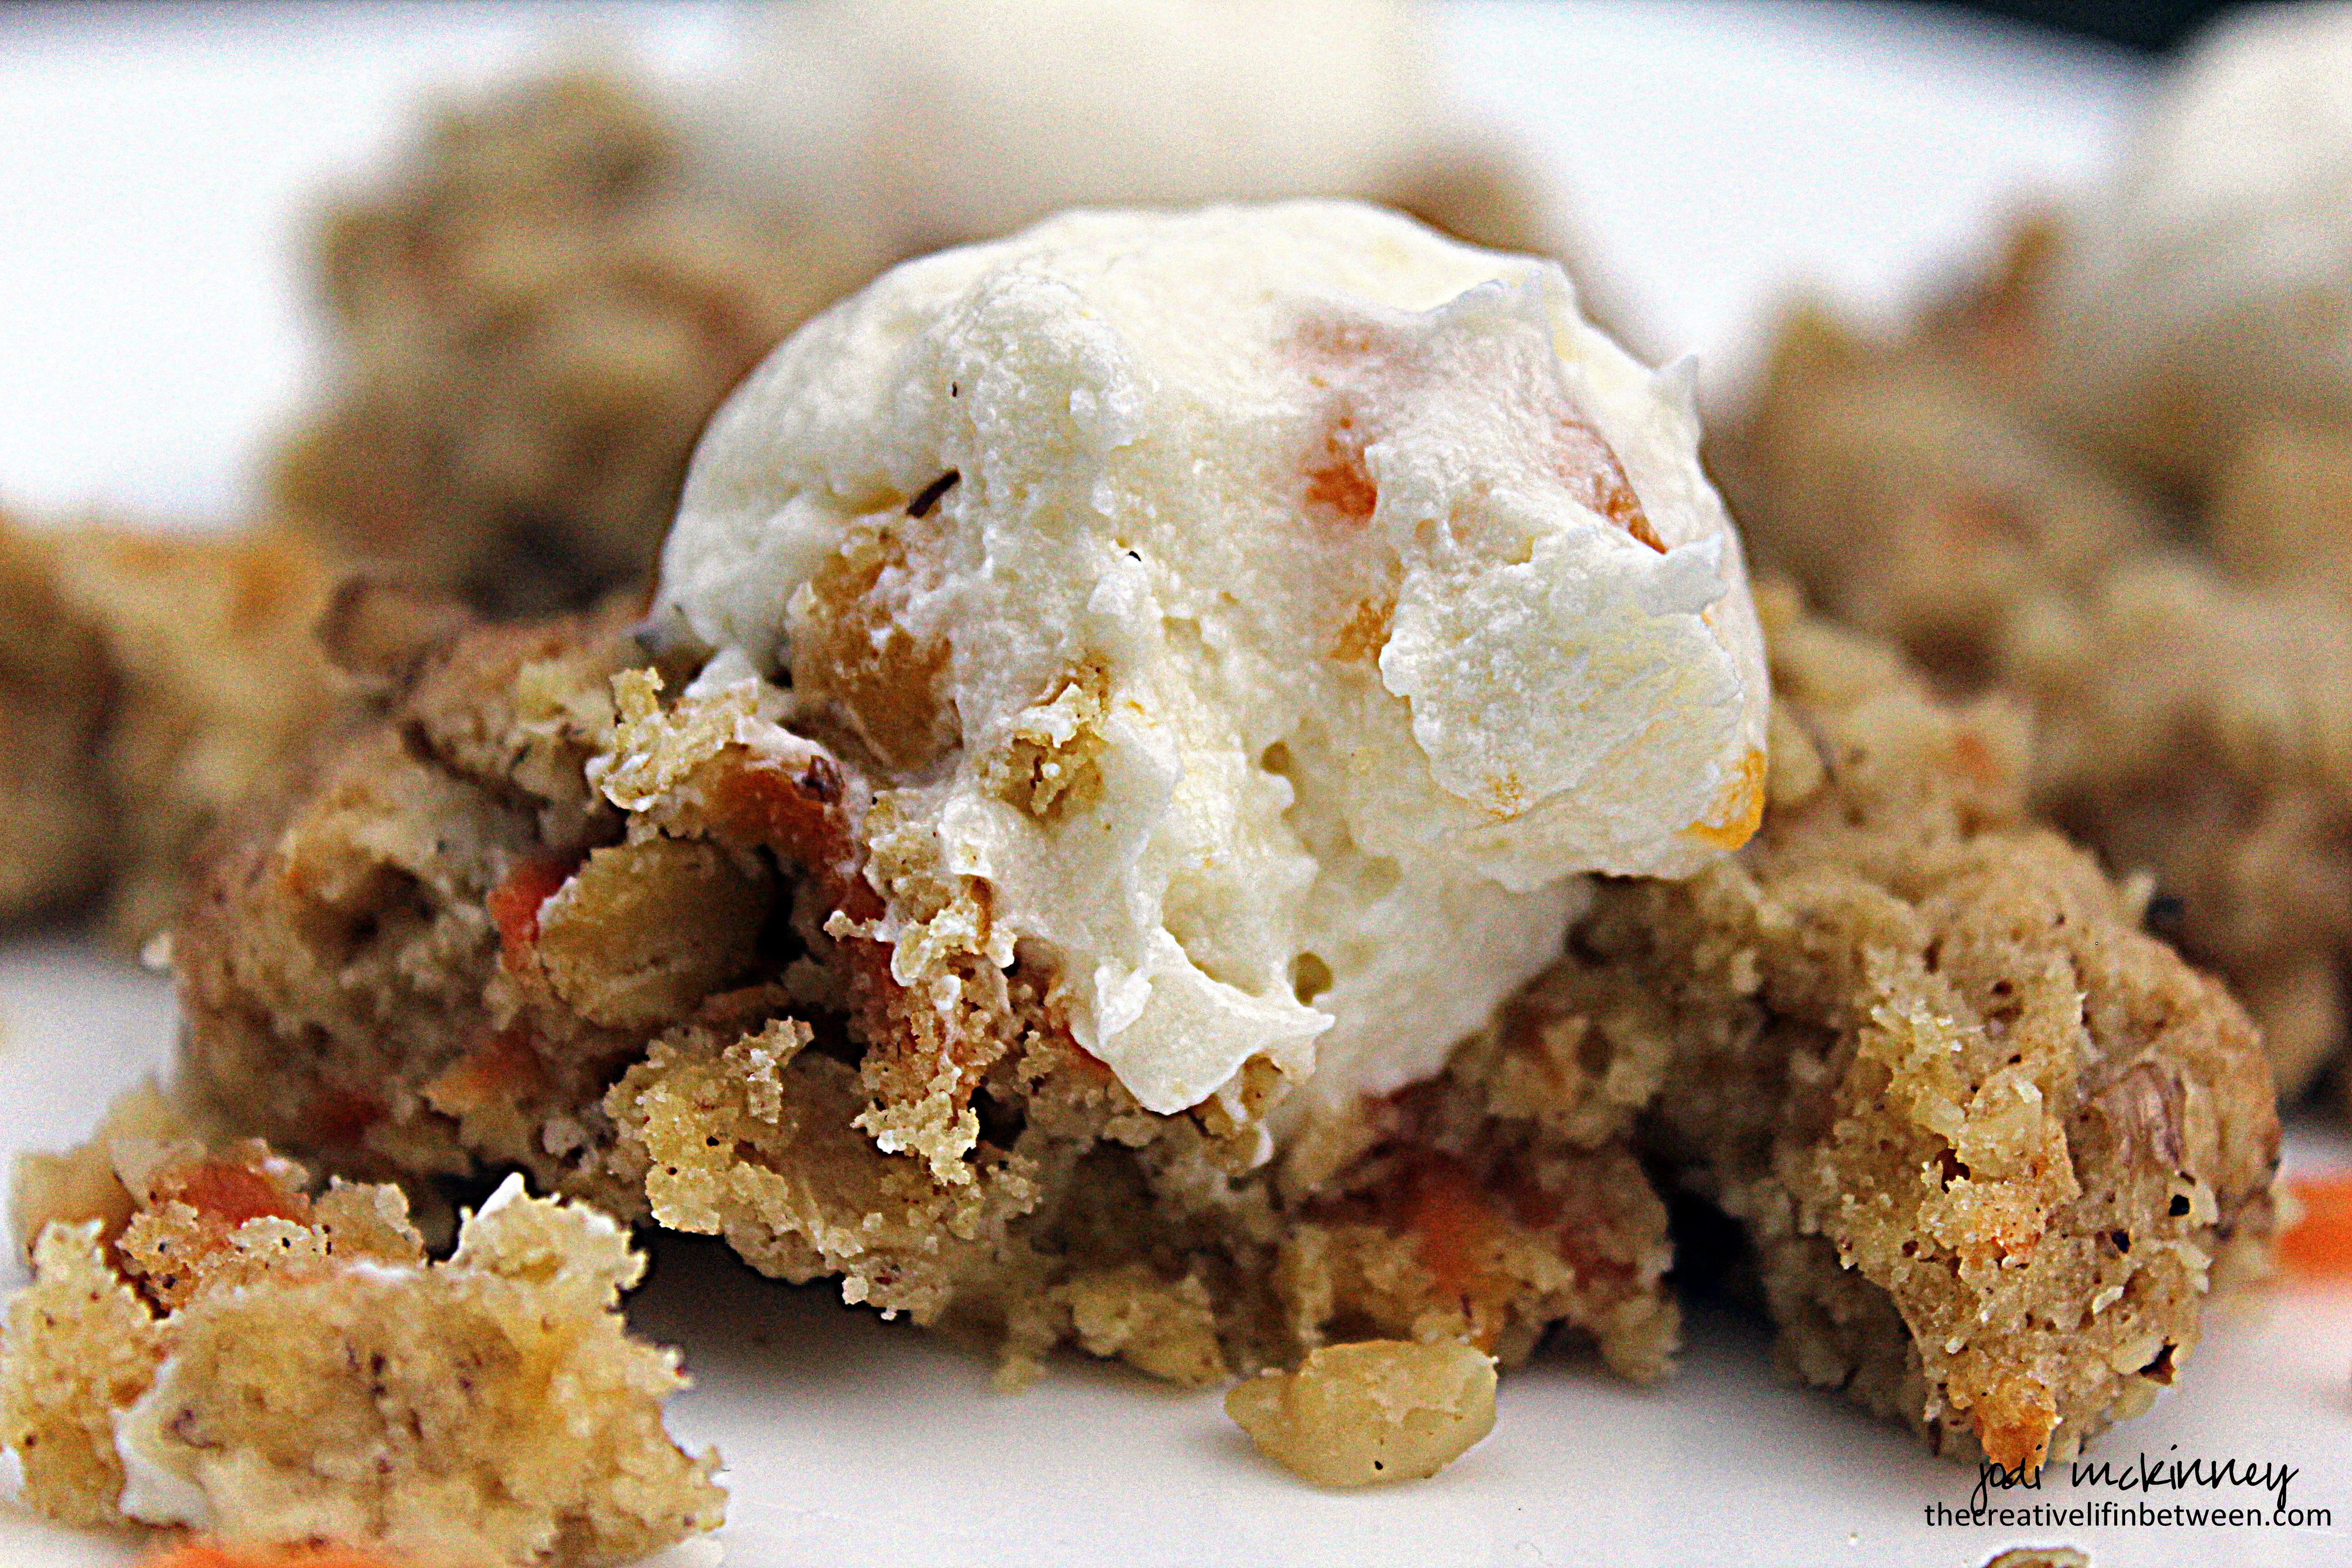
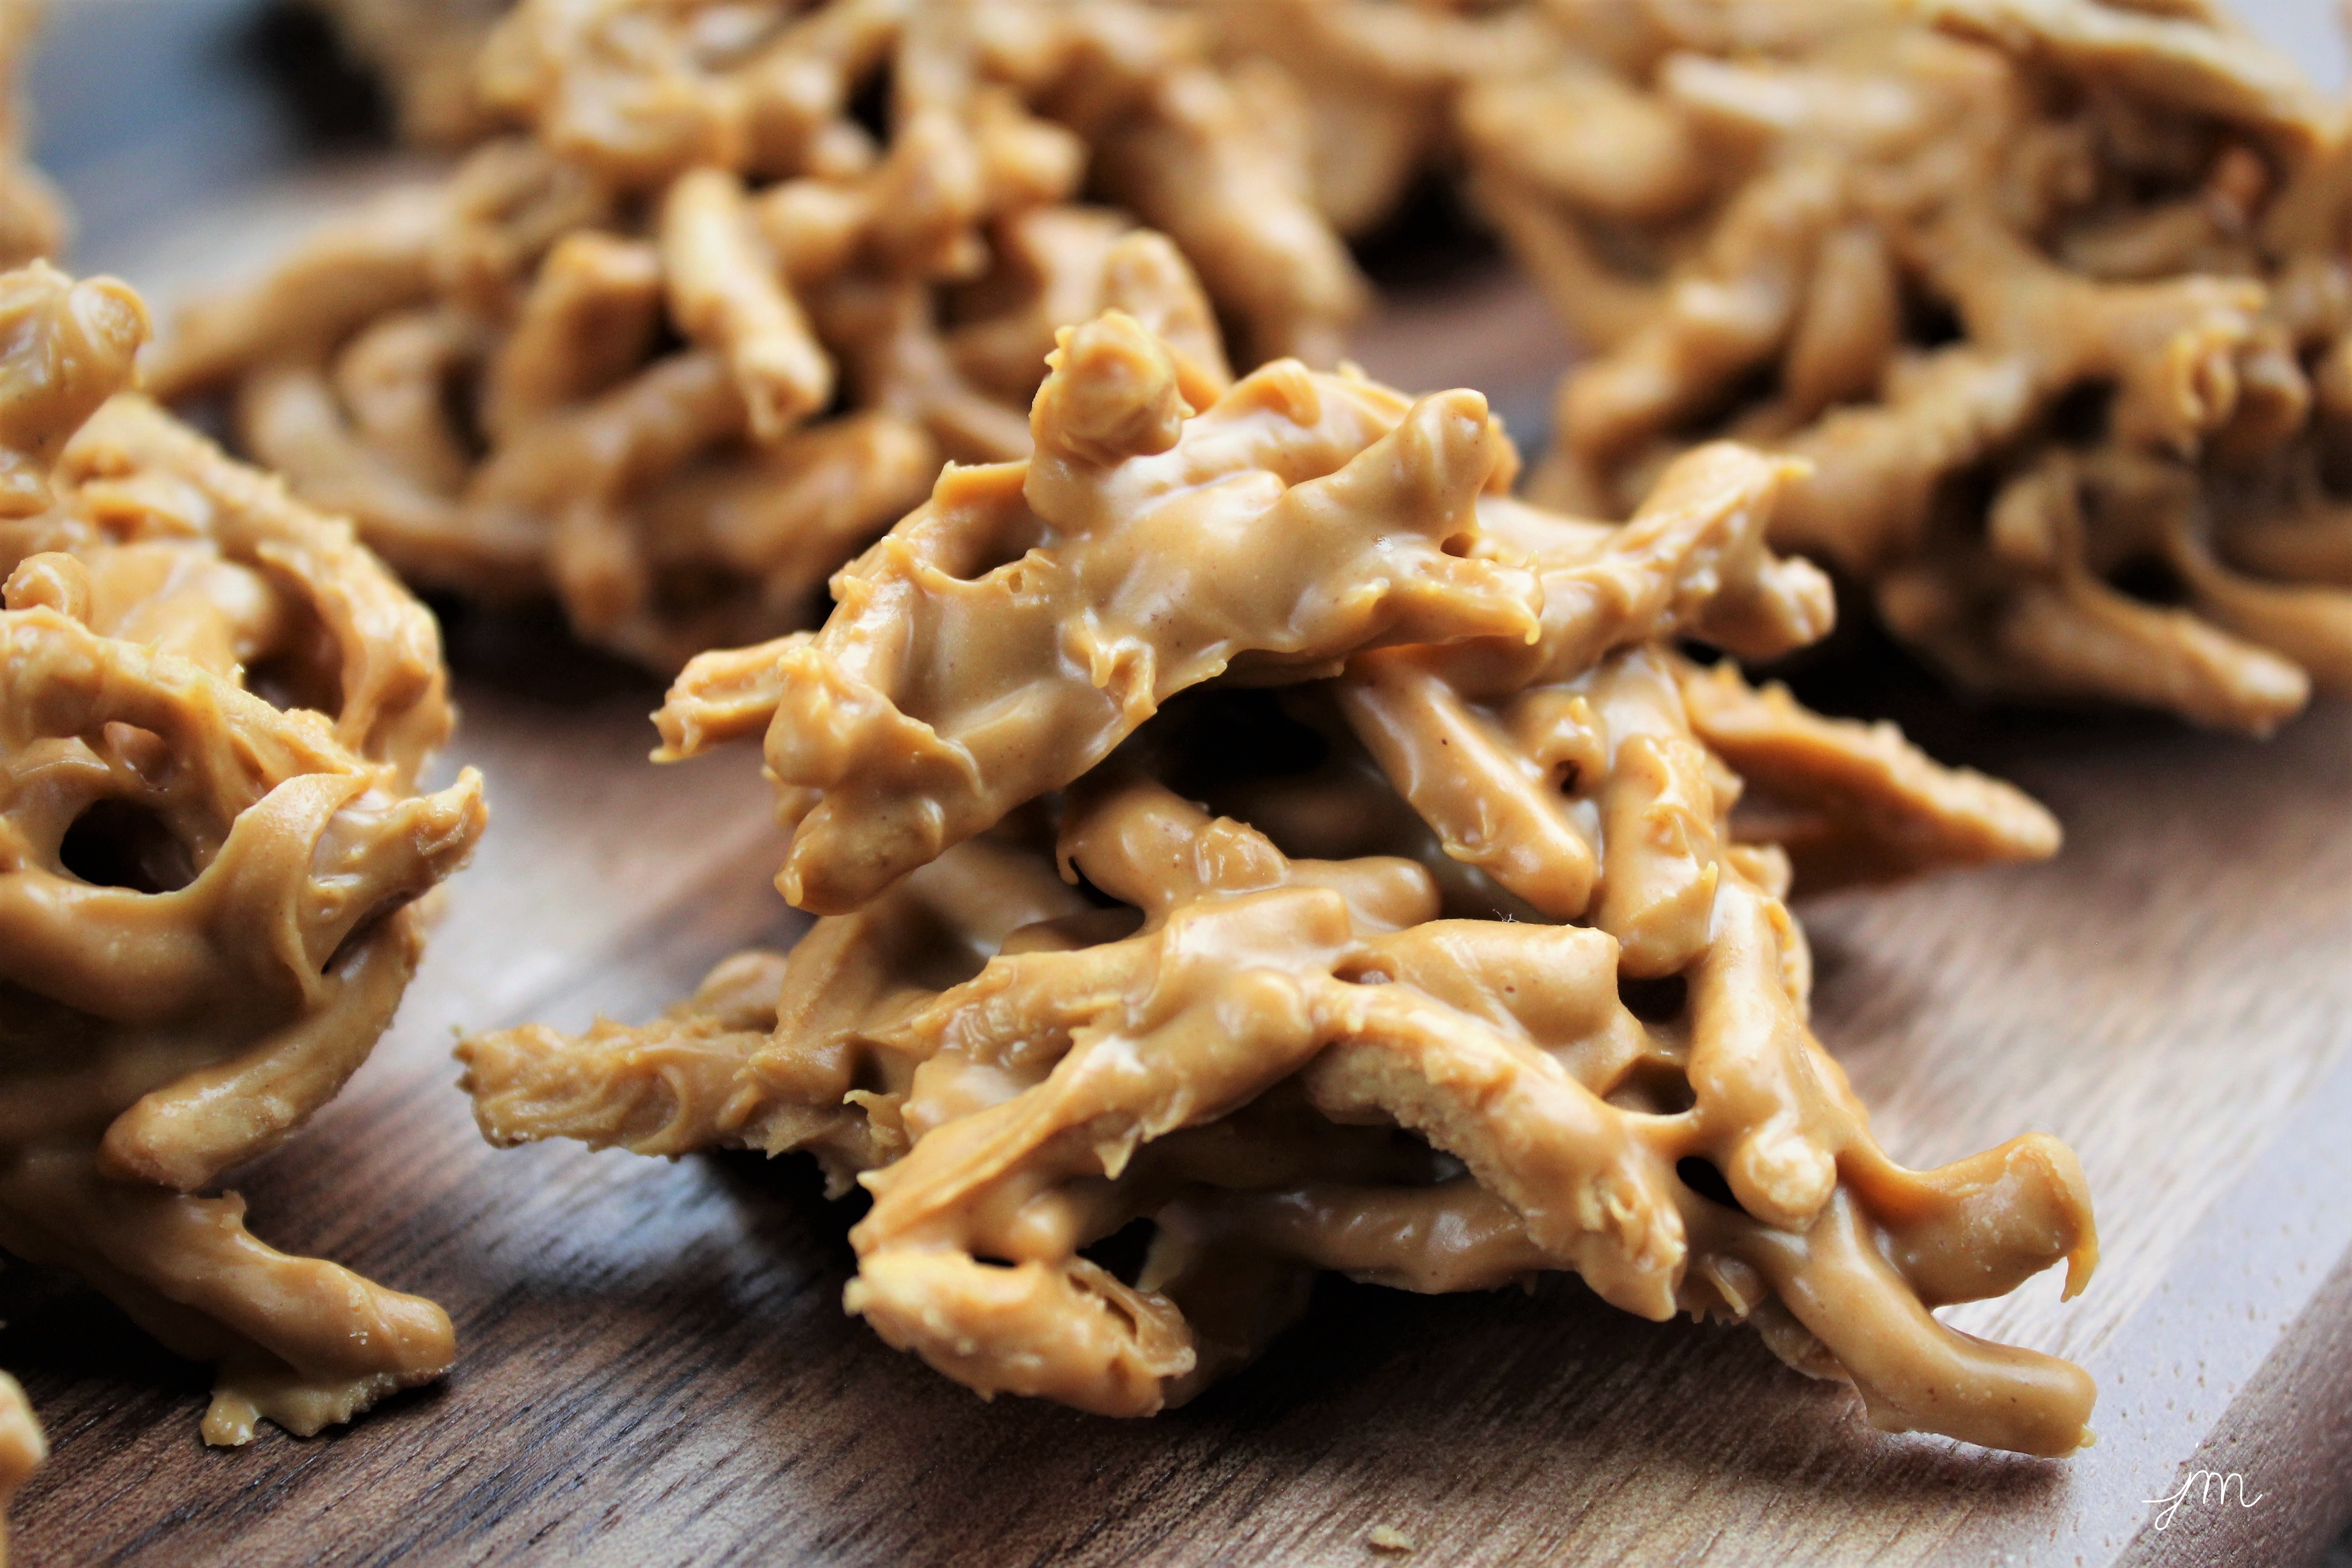
A simple mixture of crunchy chow mein noodles, butterscotch chips, peanut butter, and dry roasted peanuts make a treat that looks like a tiny little haystack and is just the right mixture of sweet and salty, crunchy and creamy.

I made these for a “Wizard of Oz” party, thinking they were just the thing to do with the leftover “straw” that fell out of Scarecrow.

There are a variety of ways people have made them through the generations…

With our without the peanuts… with or without the peanut butter.
Some add a bit of vegetable oil.
Some add a a mixture of chocolate and butterscotch chips.

How about you?

Here is how I made them.

And if you haven’t tried them, they are definitely worth a try!  Super easy and super yummy!

Butterscotch Haystacks

  • Servings: approx. 3 dozen
  • Print

Ingredients:

Directions:

Melt butterscotch chips in a large microwavable bowl in microwave on high for 1 minute.  Stir.  Microwave an additional 30 seconds.  Stir again.  Add peanut butter.  Microwave 30 more seconds, and stir well.  At this point, mine is completely melted.  Add 30 second increments if necessary according to your microwave’s power until all is melted and smooth.  (If necessary, you can add a teaspoon of vegetable oil to create a smoother texture, but do not overcook or it will create a thick, gunky texture that will not work.)

Add bag of chow mein noodles and peanuts and stir gently until all noodles and peanuts are coated and ingredients are well combined.

Working relatively quickly before mixture cools, drop by tablespoonfuls onto wax paper or parchment paper.  Allow to set for several hours.  Store in an airtight container at room temperature or serve.

Enjoy!

Cheers & Hugs,
Jodi


Pumpkin Snickerdoodles

Pumpkin Snickerdoodles.

It’s the most pumpkiny time of the year…….. (are you singing with me to the tune of “It’s the Most Wonderful Time of the Year?”)

Seems we just can’t get enough of it.

I know I’m having fun trying new things with pumpkin…. Like my recent Pumpkin Chili recipe!  YUM!

How about a new twist on old-fashioned snickerdoodles by pumpkin’in them up?

Oooo Laaa Laaaa!

They just taste like Autumn!

Hope you’ll give them a try.

Pumpkin Snickerdoodles*

Ingredients:

  • 1 cup butter, softened
  • 1 cup sugar
  • 3/4 cup brown sugar, packed
  • 1 large egg yolk
  • 2 tsp vanilla extract
  • 3/4 cup canned pumpkin (not pumpkin pie mix)
  • 3 1/2 tsp cornstarch
  • 1 tsp cream of tartar
  • 1 tsp baking soda
  • 1/2 tsp baking powder
  • 1/2 tsp salt
  • 2 tsp ground cinnamon
  • 1/2 tsp ground ginger
  • 1/2 tsp ground nutmeg
  • 3 1/4 cups flour
  • For rolling:  1/4 cup sugar + 2 tsp ground cinnamon, combined

Directions:

Cream together butter and sugars with electric mixer.  Add egg yolk, vanilla and pumpkin, and combine.

Add next 8 ingredients, followed by the flour, and mix until combined.

Refrigerate dough for at least 1 hour.

When ready to bake, preheat oven to 350 degrees F.

Roll and shape dough into golf ball sized balls.  Roll balls in sugar-cinnamon mixture.  Place on baking stone or sheet and bake approximately 12 minutes until tops begin to crack.  Remove from oven and allow to cool on baking stone/sheet for an additional 10 minutes.  Transfer to wire rack to cool completely.

Enjoy!

Cheers & Hugs,
Jodi

*Recipe tweaked very slightly from Cooking Classy


I’ve Fallen Madly in Love…. with Biscotti

I’ve fallen madly in love… with Biscotti!

I’m not sure why?  But all of the sudden, I can’t get enough of it.

It all started with an “impulse” purchase (dang hungry shopping!) – where I picked up a small package of almond flavored biscotti.

I’ve never really been drawn to biscotti – thinking it rather dry and bland tasting, but oh was I wrong!

Dry?  Maybe… but in an amazingly crispy, crunchy way.

Bland?  Far from it!  So full of flavor and texture.

And when served with coffee (or red wine) 🙂 – and dunked – Wowza!

The word “biscotto” means “biscuit” or “cookie.” Biscotti are named according to their method of baking. The root words “bis” and “cotto” literally mean “twice” and “baked.” When Italians first created biscotti in the region of Tuscany many centuries ago, they were careful to bake the cookies twice, in order to form their unique shape and allow the cookies to develop their signature crisp texture.

So after purchasing the almond…… and then the orange pecan…… I decided it was time I try to bake my own biscotti.

I considered what I had on hand and chose to try a Starbucks Copycat recipe of Dried Tart Cherry and Walnut.

I’m not sure I achieved the correct shape, but I’m pretty sure I nailed the flavor!

Hubby, who would normally not choose biscotti…. well – let’s just say he definitely liked them.  We won’t talk about how many he ate when he found them cooling, but suffice it to say, they were a hit!

Here’s the recipe I tried, and I cannot wait to try more flavors.

This could be a very dangerous love affair!

Cherry Walnut Biscotti

Ingredients:

1 stick  butter, softened
3/4 cup sugar
2 eggs
2 tsp vanilla
1/2 tsp baking powder
1/2 tsp cinnamon
1/4 tsp salt
1 3/4 cups all-purpose flour
1 cup chopped walnuts
1/2 cup dried cherries
1 teaspoon grated orange zest

Preheat oven to 350 degrees F.

Beat butter in electric mixer on high speed until fluffy. Add sugar and continue beating for about 2 minutes. Reduce the speed to low and add eggs, one at a time, beating well after each addition. Beat in vanilla.

Add baking powder, cinnamon, and salt, and mix.  Add flour just until blended.

Mix in walnuts, cherries and  orange zest by hand.

Turn the batter out onto a floured work surface and divide in half.  Shape each half into a log 12 inches long and 1 1/2 inches in diameter.  Transfer to baking sheet.

Bake 20-25 minutes until golden brown. Place baking sheet on wire rack and let logs cool for 10 minutes. Using a serrated knife, cut the logs into 1/2 inch wide slices, and carefully place the slices back onto the baking sheet.  Bake for another 10 minutes. Let the biscotti cool completely on the baking sheet. Store in airtight container.

Enjoy!

Cheers & Hugs,
Jodi


Terry’s Chocolate Orange Double Chocolate Cookies

Terry’s Chocolate Orange Double Chocolate Cookies.

I’ll bet some of you are surprised to see me baking cookies again after the past month of wedding cookie baking.

But those cookies are gone.  And we were invited to a friend’s house last weekend for a little get together, and guess what I was asked to bring???

I had a couple of Terry’s Chocolate Oranges in the pantry that I’ve been waiting to make something yummy and chocolatey with, and so I found a recipe that I modified to include them.

They were yummy!  A double chocolate chewy, fudgy cookie with a hint of orange.

I had to laugh when a friend said he didn’t really like chocolate cookies – while he was eating his fourth one!

Hope you will give these delightful treats a try!

Terry's Chocolate Orange Double Chocolate Cookies

Ingredients:

  • 1 lb. (4 sticks) butter, softened
  • 3 cups sugar
  • 4 eggs
  • 4 tsp vanilla extract
  • 1 1/2 tsp baking soda
  • 1/2 tsp salt
  • 1 1/3 cup unsweetened cocoa powder
  • 4 1/4 cups all purpose flour
  • 2 Dark Chocolate Terry’s Chocolate Oranges, coarsely chopped

Directions:

Cream butter and sugar in electric mixer.  Beat in eggs and vanilla until light and fluffy.  Mix in baking soda and salt.  Slowly mix in cocoa powder and flour until combined.

Gently stir in chopped Terry’s Chocolate Oranges.  Refrigerate for at least two hours or overnight.

Preheat oven to 350 degrees F.  Drop by tablespoonful onto baking stone or cookie sheet and bake for 8-10 minutes just until set and beginning to crackle.

Leave on baking stone for 5 minutes after removing from oven to begin cooling.  Transfer to wire rack to cool completely.  

Enjoy!

Cheers & Hugs,
Jodi

My Favorite Roasted Brussels Sprouts

My Favorite Roasted Brussels Sprouts.

After all the cookie recipe posts of late, I thought I would share an amazing vegetable recipe I recently tried and LOVED!

I recalled seeing one of those hyperlapse videos someone shared on Facebook that looked so yummy, so I wrangled these up last Sunday for Hubby and me.  We loved them.

Throw all the ingredients in a Ziploc bag to toss together early in the day or right before serving.  Spread them on a baking stone or sheet and roast to yummy goodness!

If you are a brussels sprouts lover, I think you are really going to enjoy this simple, delicious recipe.

My Favorite Roasted Brussels Sprouts

Ingredients:

  • 1 lb. fresh brussels sprouts
  • 1/4 cup olive oil
  • 1 tsp garlic salt
  • 1 tsp coarsely ground black pepper
  • 1/4 cup Panko crumbs
  • 1/2 cup freshly grated Parmigiano Reggiano cheese

Directions:

Preheat oven to 400 degrees F.

Cut tough bottoms off brussels sprouts, and then slice in half.  Throw in a gallon Ziploc bag.  Drizzle with olive oil. Sprinkle in garlic salt and pepper.  Add Panko crumbs and Parmesan cheese.  Shake and massage bag to full incorporate and coat all brussels sprouts.

(If doing ahead of time, place in refrigerator until ready to roast.)

Pour contents of bag onto baking stone or shallow baking sheet.  Roast approximately 20 minutes until browned and tender, stirring once or twice during roasting.

Enjoy!

Cheers & Hugs,
Jodi

Lemon Crinkle Cookies

Lemon Crinkle Cookies.

Amidst all the chocolate and peanut butter and pecans and raspberry and apricot, we needed a fresh, bright, citrusy, spring cookie for the wedding cookie table.

This light, delicate Lemon Crinkle Cookie is just the ticket!

A tangy zip of lemon juice and zest in a small little puff rolled in powdered sugar and “crinkled” will make a lovely  contrast in flavor and color.

It’s wedding week, and we are so excited!

Hope you will give this lovely cookie a try.

And while we are talking about cookies…. my friend Sherrie told me a joke this week that I thought would be fun to share given all the cookie recipes I’ve been sharing lately….

Why did the cookie go to the hospital?

……………………………………………………………………………….Because it was feeling crummy! 😝😝😝🍪

Lemon Crinkle Cookies

Ingredients:

  • 1 8-oz package cream cheese, softened
  • 1/2 cup butter, softened
  • 1 1/2 cups sugar
  • 2 Tbsp freshly grated lemon zest (2 large lemons)
  • 2 Tbsp freshly squeezed lemon juice (from same 2 lemons)
  • 1 tsp vanilla extract
  • 1 tsp lemon extract
  • A couple drops of yellow food coloring
  • 1 tsp salt
  • 1 large egg plus 1 large egg yolk
  • 2 tsp baking powder
  • 2 1/4 ups flour
  • 1 cup powdered sugar (to roll cookies in before baking)

Directions:

In the mixing bowl of electric stand mixer, combine cream cheese and butter until creamy and smooth.  Beat in sugar, lemon zest and juice, vanilla and lemon extract, food coloring and salt.  Mix until well combined, light and fluffy.  Add egg and egg yolk and beat for 1-2 minutes on medium until creamy and light.

Gradually add in baking powder and flour on low speed until just incorporated.  Dough will be quite sticky.  Cover bowl and refrigerate for several hours or overnight.

Preheat oven to 325 degrees F.

Roll dough into 1 inch round balls and then roll in powdered sugar.  Place balls about 2 inches apart on baking stone or cookie sheet.  Bake 10-12 minutes until cookies puff and crinkle.  Do not overbake.  Cookies should not brown.  Cool completely on wire rack.  Cookies are wonderful when frozen or refrigerated for a “cool” taste. 

Enjoy!

Cheers & Hugs,
Jodi

Carrot Cake Thumbprint Cookies

Carrot Cake Thumbprint Cookies.

I tried a new cookie recipe this weekend to add to the wedding cookie table.

And OMG – if you ever dreamed you could have your cake and eat it in a cookie too – well – your dream has come true with this recipe.  Seriously… carrot cake delightfulness in a cookie!

The frosting filling alone…… well…. all I can say is it makes me think of what a cloud might taste like in heaven….  sweet creamy, buttery, cream cheesey delight with a swirl of apricot.  Can you even imagine?!

A nutty, crunchy, shortbread-like cookie with a delightful apricot cream cheese filling.  If you are looking for a beautiful, sweet treat for a special occasion like perhaps – a wedding cookie table – these lovely little morsels are just the ticket!

Carrot Cake Thumbprint Cookies

Ingredients:

  • 4 sticks butter, melted, plus 2 sticks, room temperature, for frosting
  • 1 1/3 cup packed light brown sugar
  • 1 1/3 cup sugar
  • 4 large egg yolks
  • 4 cups all purpose flour
  • 2 tsp ground ginger
  • 2 tsp ground cinnamon
  • 2 tsp salt
  • 3 cups old-fashioned rolled oats
  • 3 cups finely grated carrots
  • 1 cup chopped dried apricots or golden raisins
  • 2 cups chopped walnuts or pecans
  • 1 cup confectioner’s sugar
  • 8 oz cream cheese, softened to room temperature
  • 6 tsp. apricot jam

Directions:

Preheat oven to 350 degrees F.

In a large mixing bowl, beat melted butter, sugars, and egg yolks until light and creamy.  Blend in ginger, cinnamon, and salt.  gradually beat in flour.  Mix in oats, carrots, and chopped apricots or raisins.  Cover and refrigerate for at least 30 minutes.

Roll dough into 1 1/2 inch balls.  Roll into chopped nuts.  Place on baking stone or cookie sheet, and bake for 8 minutes.  Remove from oven, and quickly press an indentation into center of each cookie ball.  Return to oven and bake for 8 more minutes until lightly golden brown.

Transfer to a cooking rack and cool completely.

In a mixing bowl, beat remaining 2 sticks of softened butter and confectioner’s sugar until light and fluffy.  Beat in cream cheese.  Gently swirl in apricot jam.

Place frosting in large Ziploc bag.  Snip corner and pipe into each cooled cookie.

Enjoy!

Cheers & Hugs,
Jodi

*Adapted from Martha Stewart


Jodi’s Best Ever Chocolate Chip Cookies

Jodi’s Best Ever Chocolate Chip Cookies.

Wedding cookie baking continues; and I think if my son Nick had his way, the wedding cookie table would be completely covered with chocolate chip cookies.

I often vary this basic chocolate chip cookie recipe up by substituting a portion of the chocolate chips with dried tart cherries (Nick’s current fave) or half the chocolate chips with peanut butter chips, or making them with white chocolate chips and dried blueberries, or half chocolate chips and half chopped Girl Scout Thin Mint cookies, but this is my classic, stand-by best ever chocolate chip cookie recipe, and I made three batches for the upcoming wedding.

A couple tips for those that ask how I make these: always refrigerate the dough for at least a few hours before baking, roll dough into large balls, bake on baking stones (no greater investment for baking!), electric convection ovens are the best for baking cookies.

Best Ever Chocolate Chip Cookies

Ingredients:

4 sticks (1 lb.) butter, softened
1 1/2 cups packed brown sugar
1 1/2 cups white granulated sugar
2 tsp vanilla
4 eggs
2 tsp baking soda
2 tsp salt
5 cups all purpose flour
2 12-oz bags Nestle Chocolate Chunk Morsels (or your favorite)

Directions:

With electric mixer, beat butter and sugar together until completely incorporated. Add vanilla and eggs, and beat until light and fluffy. Add baking soda and salt, and mix another minute. Gradually add flour and beat until well incorporated, but do not overbeat.

Fold in chocolate chunk morsels.  Refrigerate dough for at least 2 hours or up to 2 days.

When ready to bake, preheat oven to 375 degrees F. With your hands, form a cookie dough ball about 1-1/2 inches in diameter.  Place on baking stone. Bake for 8-10 minutes. Do not overbake. Allow to cool on baking stone for 5-6 minutes, then remove to cooling rack to cool completely.

Happy Baking!

Cheers & Hugs,
Jodi

Hershey’s Kiss Brownie Bites

Hershey’s Kiss Brownie Bites
might just be the ultimate  little treat
for the inner chocoholic in
all of us (well – 99.999999% of us… Hard as it is to believe – there is an itsy bitsy, teeny tiny  population of people on this earth who do not like chocolate!)

But for the rest of us….
Imagine a bite-sized scoop of Ghiradelli Double Chocolate Brownie mix
baked to perfection of fudgy center with slightly hardened and cracked outside
in a mini muffin baking pan (be sure to line) and topped off with a smooth, creamy milk chocolate Hershey’s Kiss.

Not only are they sheer decadent delight, they are about as easy to make as desserts come.

I have started baking for my son’s wedding next month.  We have a unique tradition in our little part of the world that requires an overflowing cookie table at weddings.  The cookies are eaten for appetizers, dessert (along with wedding cake), and supplied to take home in to-go boxes.  I’m happily in charge of the cookie table for the wedding, so a baking I will go.

I started with these little brownie bites and will be stocking the freezer with chocolate chips and apricot kolaches and lots more in the coming weeks!

Wedding cookie table or not, you are going to want to try these.  Your friends and family will thank you, and you won’t be sorry!

Hershey's Kiss Brownie Bites

Ingredients:

Directions:

Preheat oven to 325 degrees F.

Line mini-muffin baking pan with foil mini-muffin liners.

Prepare brownie mix according to package directions by combining mix, water, oil, and egg.  Scoop batter into foil liners to 3/4 full.

Bake for approximately 12 minutes.  While brownie bites are baking, unwrap Hershey’s kisses.  Remove from oven and immediately insert a Hershey’s kiss into the center of each brownie bite.  Press gently.  Allow to cool.  The kisses take a while to set, so be careful.

Enjoy!

Cheers & Chocolate Kisses,
Jodi

Strawberry Chocolate Ganache Tart with Oreo Cookie Crust

chocolate-strawberry-tart-valentines-day-couples-camp-dessert

Strawberry Chocolate Ganache Tart with Cookie Crust (No Bake).

You may recall seeing this dessert I made for our Valentine’s Couple Camp Party.  I promised then that I would share the recipe.

I have to tell you… this dessert is not only beautiful and elegant looking, it is so simple, uses only five basic ingredients, and is possibly the most luscious chocolate dessert I have EVER tasted.  And I’m really not exaggerating.  I absolutely loved this tart!

I typically make dessert, but just taste enough to know it is okay to serve.  This one, however… I not only had the evening of our party, I ate the last leftover slice!

I am certain I will make this tart again.. and again.  It is a great dessert for ANY occasion, any season, anybody.  I would take this to a summer picnic.  I would make this for a birthday “cake.”  I would make this for a Christmas dinner dessert.  I would make this for ANY reason.

chocolate-strawberry-tart-valentines-day-couples-camp-dessert-2

I originally came across this recipe posted by Mary at HomeisWheretheBoatis, and I only tweaked it slightly.  Thanks for sharing Mary!

I so hope you will give this a try, and I cannot wait to hear how you like it!

Strawberry Chocolate Ganache Tart with Oreo Cookie Crust (No Bake)

Ingredients:chocolate-strawberry-tart-valentines-day-couples-camp-dessert

  • 1 pkg. Oreo Cookies (approx. 32 cookies)
  • 1/2 cup (1 stick) butter, melted
  • 12 oz. of Your Favorite Chocolate (I used Baker’s German Sweet)
  • 1 1/2 cups Heavy Cream
  • Strawberries

Directions:

  • Place Oreo cookies in a gallon size Ziploc bag.  Then place entire bag in another bag to double (so you can crush them without making a mess!)  Crush Oreo cookies using a heavy rolling pin, your hands, or whatever way you prefer to smash them fine enough to make a crust from.  (The original recipe calls for pulsing them in a food processor, so feel free to do that if you have one.)  
  • Pour melted butter into the bag.  Zip to close again and  completely incorporate the cookie crumbs and butter using your hands.  Pour crumb and butter mixture into an 11″ tart pan.  Pat onto bottom and up sides of tart pan.  Refrigerate to firm up for one hour before preparing and adding filling.
  • To make filling, break up chocolate and place in a heat-proof bowl.  Bring heavy cream to a boil in a small sauce pan.  As soon as it boils, pour over chocolate.  Let sit for a couple minutes to soften the chocolate, then slowly whisk until until smooth and fully incorporated.  Pour into chilled, firm crust.  Refrigerate for 4-6 hours or overnight.
  • Garnish with strawberries (red raspberries would amazing too if you prefer!).  Drizzle melted chocolate over all if desired.  I also sprinkled just a tiny bit of sea salt flakes, which gave it an amazing, but subtle taste burst.  And then – any cookie crust crumbs that fall off when you remove the tart bottom from the sides of the pan can be thrown on top too. 

Enjoy!  I know you will!

Cheers & Hugs,
Jodi