Apricot Shortbread Thumbprint Cookies

apricot-shortbread-thumbprint-cookies-3

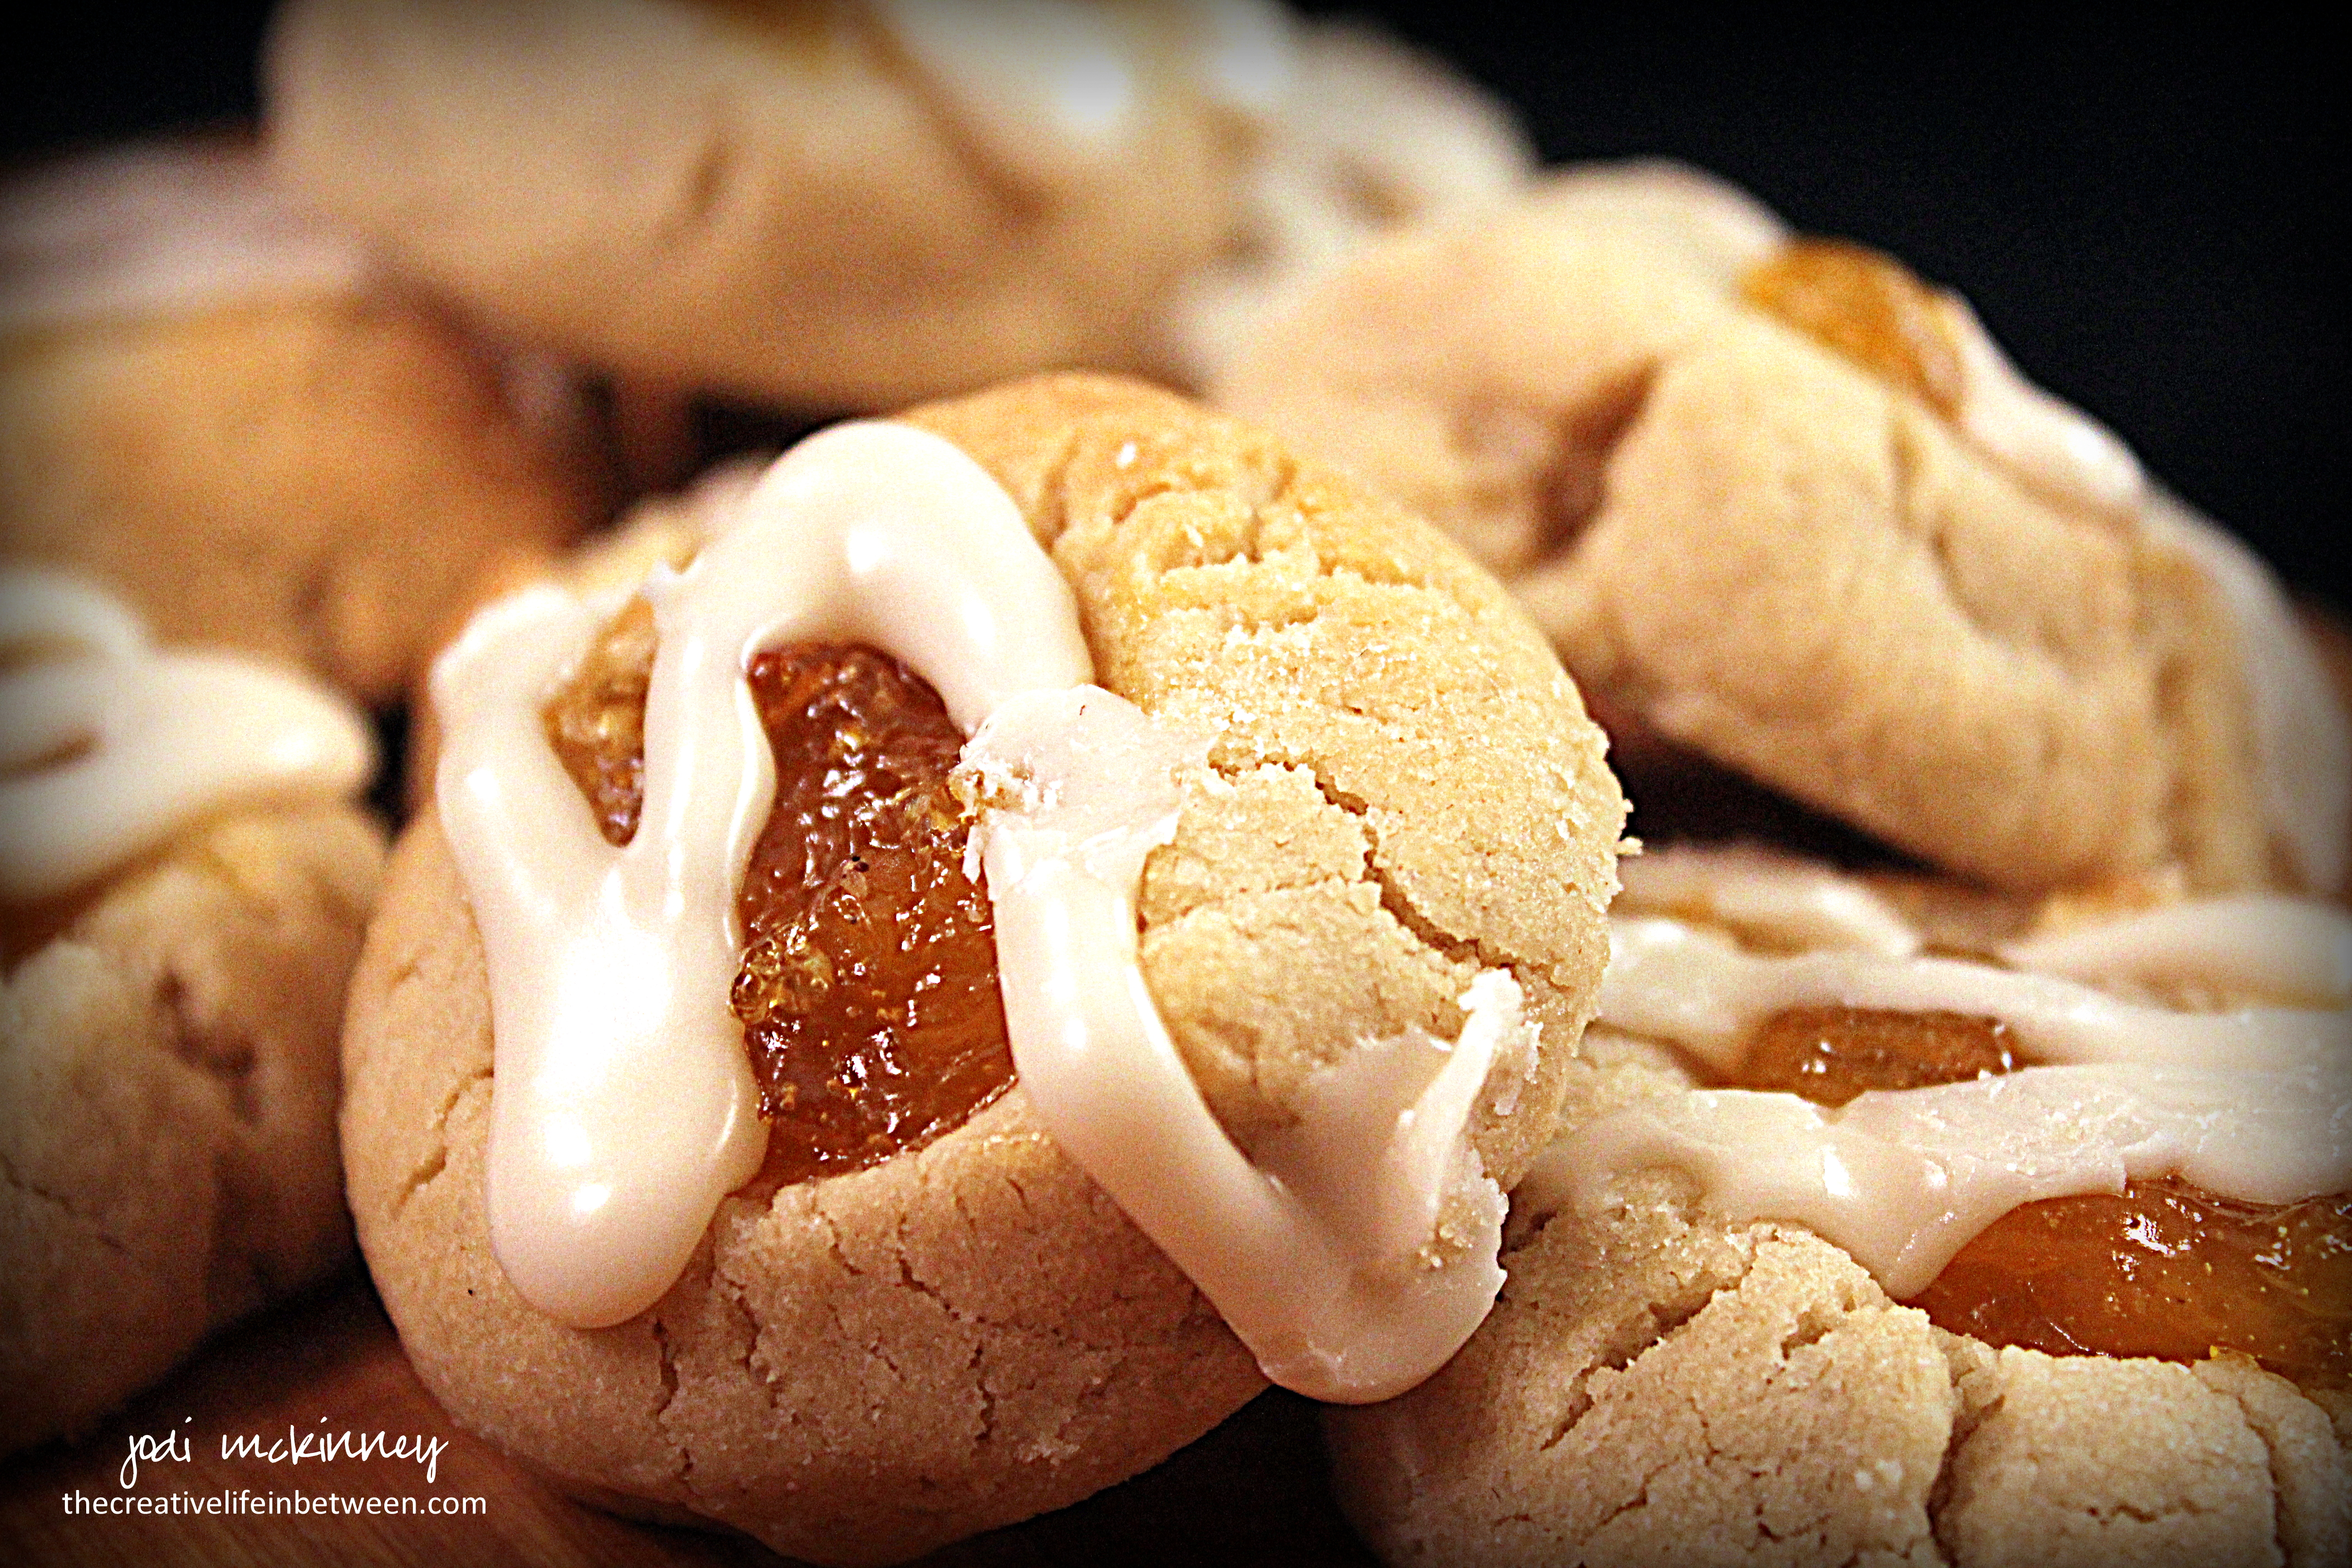
Do you love buttery shortbread as much as I do?
Add a dab of apricot jam and a drizzle of icing, and O M G!

apricot-shortbread-thumbprint-cookies-2

I wanted to bake one more batch of Christmas cookies and wanted them to be something with apricot for hubby as it is one of his faves.

I usually make Apricot Kolaches, which we love, but I just ran out of time and energy to make them this year.  When I found this recipe for Apricot Shortbread Thumbprint Cookies at Little Spice Jar, I thought I would give them a try.  No rolling, no folding, no pinching, less time, less work, and all the ingredients that that make yumminess for a Christmas cookie is a winner in my book.

apricot-shortbread-thumbprint-cookies-1

If you are still baking and still looking for that last amazing, delicious, beautiful cookie, here is a great recipe for you to try!

Apricot Shortbread Thumbprint Cookies

Ingredients:apricot-shortbread-thumbprint-cookies-3

  • 2  cups butter, softened
  • 1 cup sugar
  • 4 egg yolks
  • 4 tsp vanilla
  • 4 cups flour
  • 10-12 oz jar apricot filling or preserves
  • Glaze:
    • 2 cups confectioners (powdered) sugar
    • 2 Tbsp half & half or milk
    • 2 tsp vanilla

Directions:

Cream butter and sugar in electric mixer 1-2 minutes.  Add egg yolks and mix completely.  Add vanilla.  With mixer on low speed, add flour slowly and mix until dough forms.

Place dough in airtight container or Ziploc bag and chill for at least 4 hours.

Heat oven to 350.

Roll dough into tablespoon-sized balls.  Place on backing stone or cookie sheet, and bake 3 minutes.  Remove from oven and carefully indent center with your thumb.  Add 1/4 – 1/2 tsp apricot filling.  Return to oven for approximately 12 minutes.

Allow to cool for 30 minutes.

Prepare glaze by stirring powdered sugar, half & half and vanilla until smooth.  Pour into small baggie.  Snip small corner of baggie.  Squeeze gently to pipe in stripes on cookies.

Enjoy!

Cheers & Hugs,
Jodi

*recipe originally found at Little Spice Jar

A Christmas Cookie Exchange Party

christmas-cookie-party-2016-group-photo

My sweet daughter-in-law never ceases to amaze me!  With a brand-new baby, she still managed to pull off the loveliest of Christmas Cookie Exchange parties this past weekend.  I am so proud of her.  I love that she values creating traditions and memories for her family…. and admire that she does it on a few hours’ sleep each night!

This year, three new babies attended the party.  Although our granddaughter is the first grandie on our side, she is the fourth on her other side – three of which were born this year!   What a joyful occasion.

Of course no cookie exchange party is complete without a hot cocoa bar (oldest nephew’s fave – especially when stirred vigorously with peppermint candy cane sticks).  And my daughter-in-law’s s’mores cookies made it even more special.

christmas-cookie-party-2016-hot-cocoa-bar

And don’t veggies taste better when shaped into a Christmas tree on the platter?

christmas-cookie-party-2016-vegetable-tray-tree

And cheese and sausage on a bed of aromatic rosemary shaped into a wreath?

christmas-cookie-party-2016-cheese-wreath

Deviled eggs are more festive, too, when dyed red and green.

christmas-cookie-party-2016-red-and-green-deviled-eggs

There is nothing like Christmas through the eyes of children and passing down traditions.

christmas-cookie-party-2016-kids

Lovin’ from the oven!  The best kind.

christmas-cookie-party-2016-cookies

Cheers & Hugs,
Jodi

Chocolate Orange Crinkle Cookies (with Terry’s Chocolate Orange)

Chocolate Orange Crinkle Cookies 1

If you haven’t finished your holiday cookie baking yet – you are in luck!  I have discovered an amazing new recipe for Chocolate Orange Crinkle Cookies using Terry’s Chocolate Oranges that is TO DIE FOR!

Chocolate Orange Crinkle Cookies 2

Terry’s Chocolate Oranges are sometimes only available around this time of year, so drop what you are doing and get to the store and stock up on these so you can make them now and throughout the year!  ( You can always order from Amazon too!)

Chocolate Orange Crinkle Cookies 3

I found this recipe on a lovely blog called, What Jessica Baked Next, and I’m looking forward to continuing to see what Jessica bakes next!   In Jessica’s recipe, she calls for using EITHER Terry’s Chocolate Oranges OR chocolate chips with fresh orange zest.  I, however, used both Terry’s Chocolate Oranges AND fresh orange zest!  OH MY MY MY!

I also decided to dust them with a sprinkle of powdered sugar to make them look a bit more festive.

This cookie is like a brownie and a cookie all in one.  Crispy on the outside, gooey on the inside and just that right amount of fresh orange taste to compliment the chocolate in such a divine way!

Here is the recipe.  ENJOY!

Chocolate Orange Crinkle Cookies

Ingredients:Chocolate Orange Crinkle Cookies 2

  • 1 cup butter, softened
  • 2 cups packed light brown sugar
  • 2 large eggs
  • 2 tsp vanilla extract
  • 2 1/4 cups all-purpose flour
  • Dash of salt
  • 1 tsp baking powder
  • 1 tsp baking soda
  • 4 Tbsp cocoa powder
  • 2 (6.17 oz) Terry’s chocolate oranges, chunked (I used the DARK chocolate)
  • 1 tsp fresh orange zest
  • Powdered Sugar for dusting, optional

Directions:

  • Preheat oven to 375 F.
  • Cream butter, brown sugar and vanilla together with electric mixer until light and fluffy. Add egg and beat until incorporated.
  • Add flour, salt, baking powder, baking soda and cocoa powder, and mix until dough comes together.
  • Add the chocolate chunks and orange zest and gently mix to combine.
  • Make heaping tablespoon sized balls and place on baking stone or baking sheet.  Bake for 10 minutes until crackling occurs on top.
  • Allow cookies to cool on stones/baking sheets for 5 minutes, then sprinkle with powdered sugar.
  • Cool 5 more minutes on stone/baking sheet, then remove to cooling rack to completely cool.

Cheers & Hugs,

Jodi

Chewy Honey Oatmeal Raisin Cookies

chewy honey oatmeal raisin cookies 2

It’s cookie time!

chewy honey oatmeal raisin cookies
Not that I need an excuse, but Fall is a wonderful time to bake, and this week’s cookie recipe is a yummy crispy-on-the-edge, but chewy-and-gooey-in-the-middle Honey Oatmeal and Golden Raisin Cookie.

chewy honey oatmeal raisin cookies 3

Oatmeal cookies are one of hubby’s faves, and I also wanted to take a treat into the office for a meeting where we were having a special guest who enjoys my cookies, so Oatmeal it was!

chewy honey oatmeal raisin cookies 1
Your search for the ultimate oatmeal raisin cookie ends here! These are amazing! The touch of honey gives them just the right finishing touch to add that crisp outside texture with the tender inside. These cookies are out of this world! (And not just because I made them in Mars!)

Chewy Honey Oatmeal Raisin Cookies

Ingredients:chewy honey oatmeal raisin cookies 2

  • 1 lb. (4 sticks or 2 cups) Butter (softened to room temperature)
  • 2 1/2 cups packed Brown Sugar
  • 4 Eggs
  • 4 tsp Vanilla
  • 2 Tbsp Honey
  • 2 tsp Baking Soda
  • 2 tsp Ground Cinnamon
  • 3 cups All-Purpose Flour
  • 6 cups Rolled Oats
  • 2 cups Golden Raisins

Directions:

  • Preheat oven to 350 degrees F (175 degrees C).
  • In an electric stand mixer, cream butter. Thoroughly blend in brown sugar.  Then add eggs, vanilla, and honey.  Beat well.
  • Add in baking soda an cinnamon and mix.
  • Gradually add the flour and mix until just incorporated.
  • Remove from mixer and manually stir in the rolled oats and raisins.
  • Drop dough by rounded tablespoonful onto baking stone (or cookie sheet).  Bake 10-12 minutes until cookies begin to brown.
  • Allow to cool on baking stone 5 minutes, then remove to cooling rack to complete cooling.
  • TIP:  I like to chill my dough for at least one hour before baking.

Hope you enjoy!  Bake up some love this weekend!

Cheers & Hugs,
Jodi

Peanut Butter & Chocolate Halloween Spider Cookies

spider cookies 2

Halloween is a week away, and I had more fun than any normal middle-aged (ugh) woman with no children left at home should have making these adorable little peanut butter and chocolate spider cookies!  Heck – we don’t even get a single trick-or-treater, but who says you can’t have fun anyway?!?

spider cookies 4

I had seen a photo of these somewhere, and then a friend texted me a picture from Pinterest by Sommer Collier of A Spicy Perspective saying, “You need to make these for your blog.”  Well… that’s about all it took to get me excited, so I went in search of candy eyes at the local Michael’s Store – but none to be found…

Not giving up, I went to good ole’ Amazon Prime and had them in my hot little hands in two days!

spider cookies 3

They are basically a simple peanut butter cookie with a chocolate truffle in the middle, much like the Hershey Kiss peanut butter cookies (just on Halloween steroids!)

spider cookies

I thought they would be adorable, but wasn’t sure if anyone around here would eat them.

Well – I was wrong!  They loved them!

And it was fun to send some to Nick’s girlfriend, Liz’s office for my blog-following girlfriends at TS 🙂 and deliver some to my daughter-in-law, Colleen at work for a silly surprise.

spider cookie

I must give credit where credit is due.  I found this recipe on A Spicy Perspective’s Blog (which I am a total new fan of!).  She used Lindt Lindor truffles, which I think would be awesome too!  Here is Sommer’s recipe, which I tweaked just a bit for my own brevity’s sake:

Chocolate Peanut Butter Spider Cookies

  • 1/2 cup butter, softened
  • 3/4 cup smooth peanut butter
  • 1/3 cup brown sugar
  • 1/2 cup granulated sugar
  • 1 teaspoon vanilla extract
  • 1 large egg
  • 1 1/4 cup all purpose flour
  • 3/4 teaspoon baking powder
  • 1/4 teaspoon baking soda
  • 1 teaspoon salt
  • 24 round chocolate truffles (I used Ferrero Rocher Truffles, but you can use anything you like best)
  • 3/4 cup Nestle’s semisweet chocolate chips
  • 48 candy eyes
  1. Preheat the oven to 350 degrees F.
  2. Beat the butter and peanut butter until fluffy. Then add sugars, and beat again until fluffy. Scrape the bowl, and beat in the vanilla and egg.
  3. In a separate bowl mix the flour, baking powder, baking soda and salt together. Slowly incorporate into the butter and sugar mixture.
  4. Roll the cookie dough into 24 – 1 1/2 Tbsp-sized balls.   Bake for 7 minutes. Quickly press a cavity in the middle of each cookie with your thumb or pestle, then bake another 6 minutes, until golden.
  5. Cool until almost at room temperature (but not very warm) and place a truffle in the cavity of each cookie.
  6. Melt the chocolate chips in the microwave in 30 second increments, stirring in between, until melted and smooth. Scoop the melted chocolate in a zip bag. Close the bag and snip off a small portion of one corner to create a hole. Pipe 8 legs on each cookie, starting from the truffle body down.
  7. Use remaining melted chocolate to glue 2 eyes onto each truffle spider.

ENJOY!

Cheers & Hugs,

Jodi

PS  Hope you enjoyed this T!  🙂