S’More Cookie Bars

S’More Cookie Bars.

What S’more fun than S’mores?!

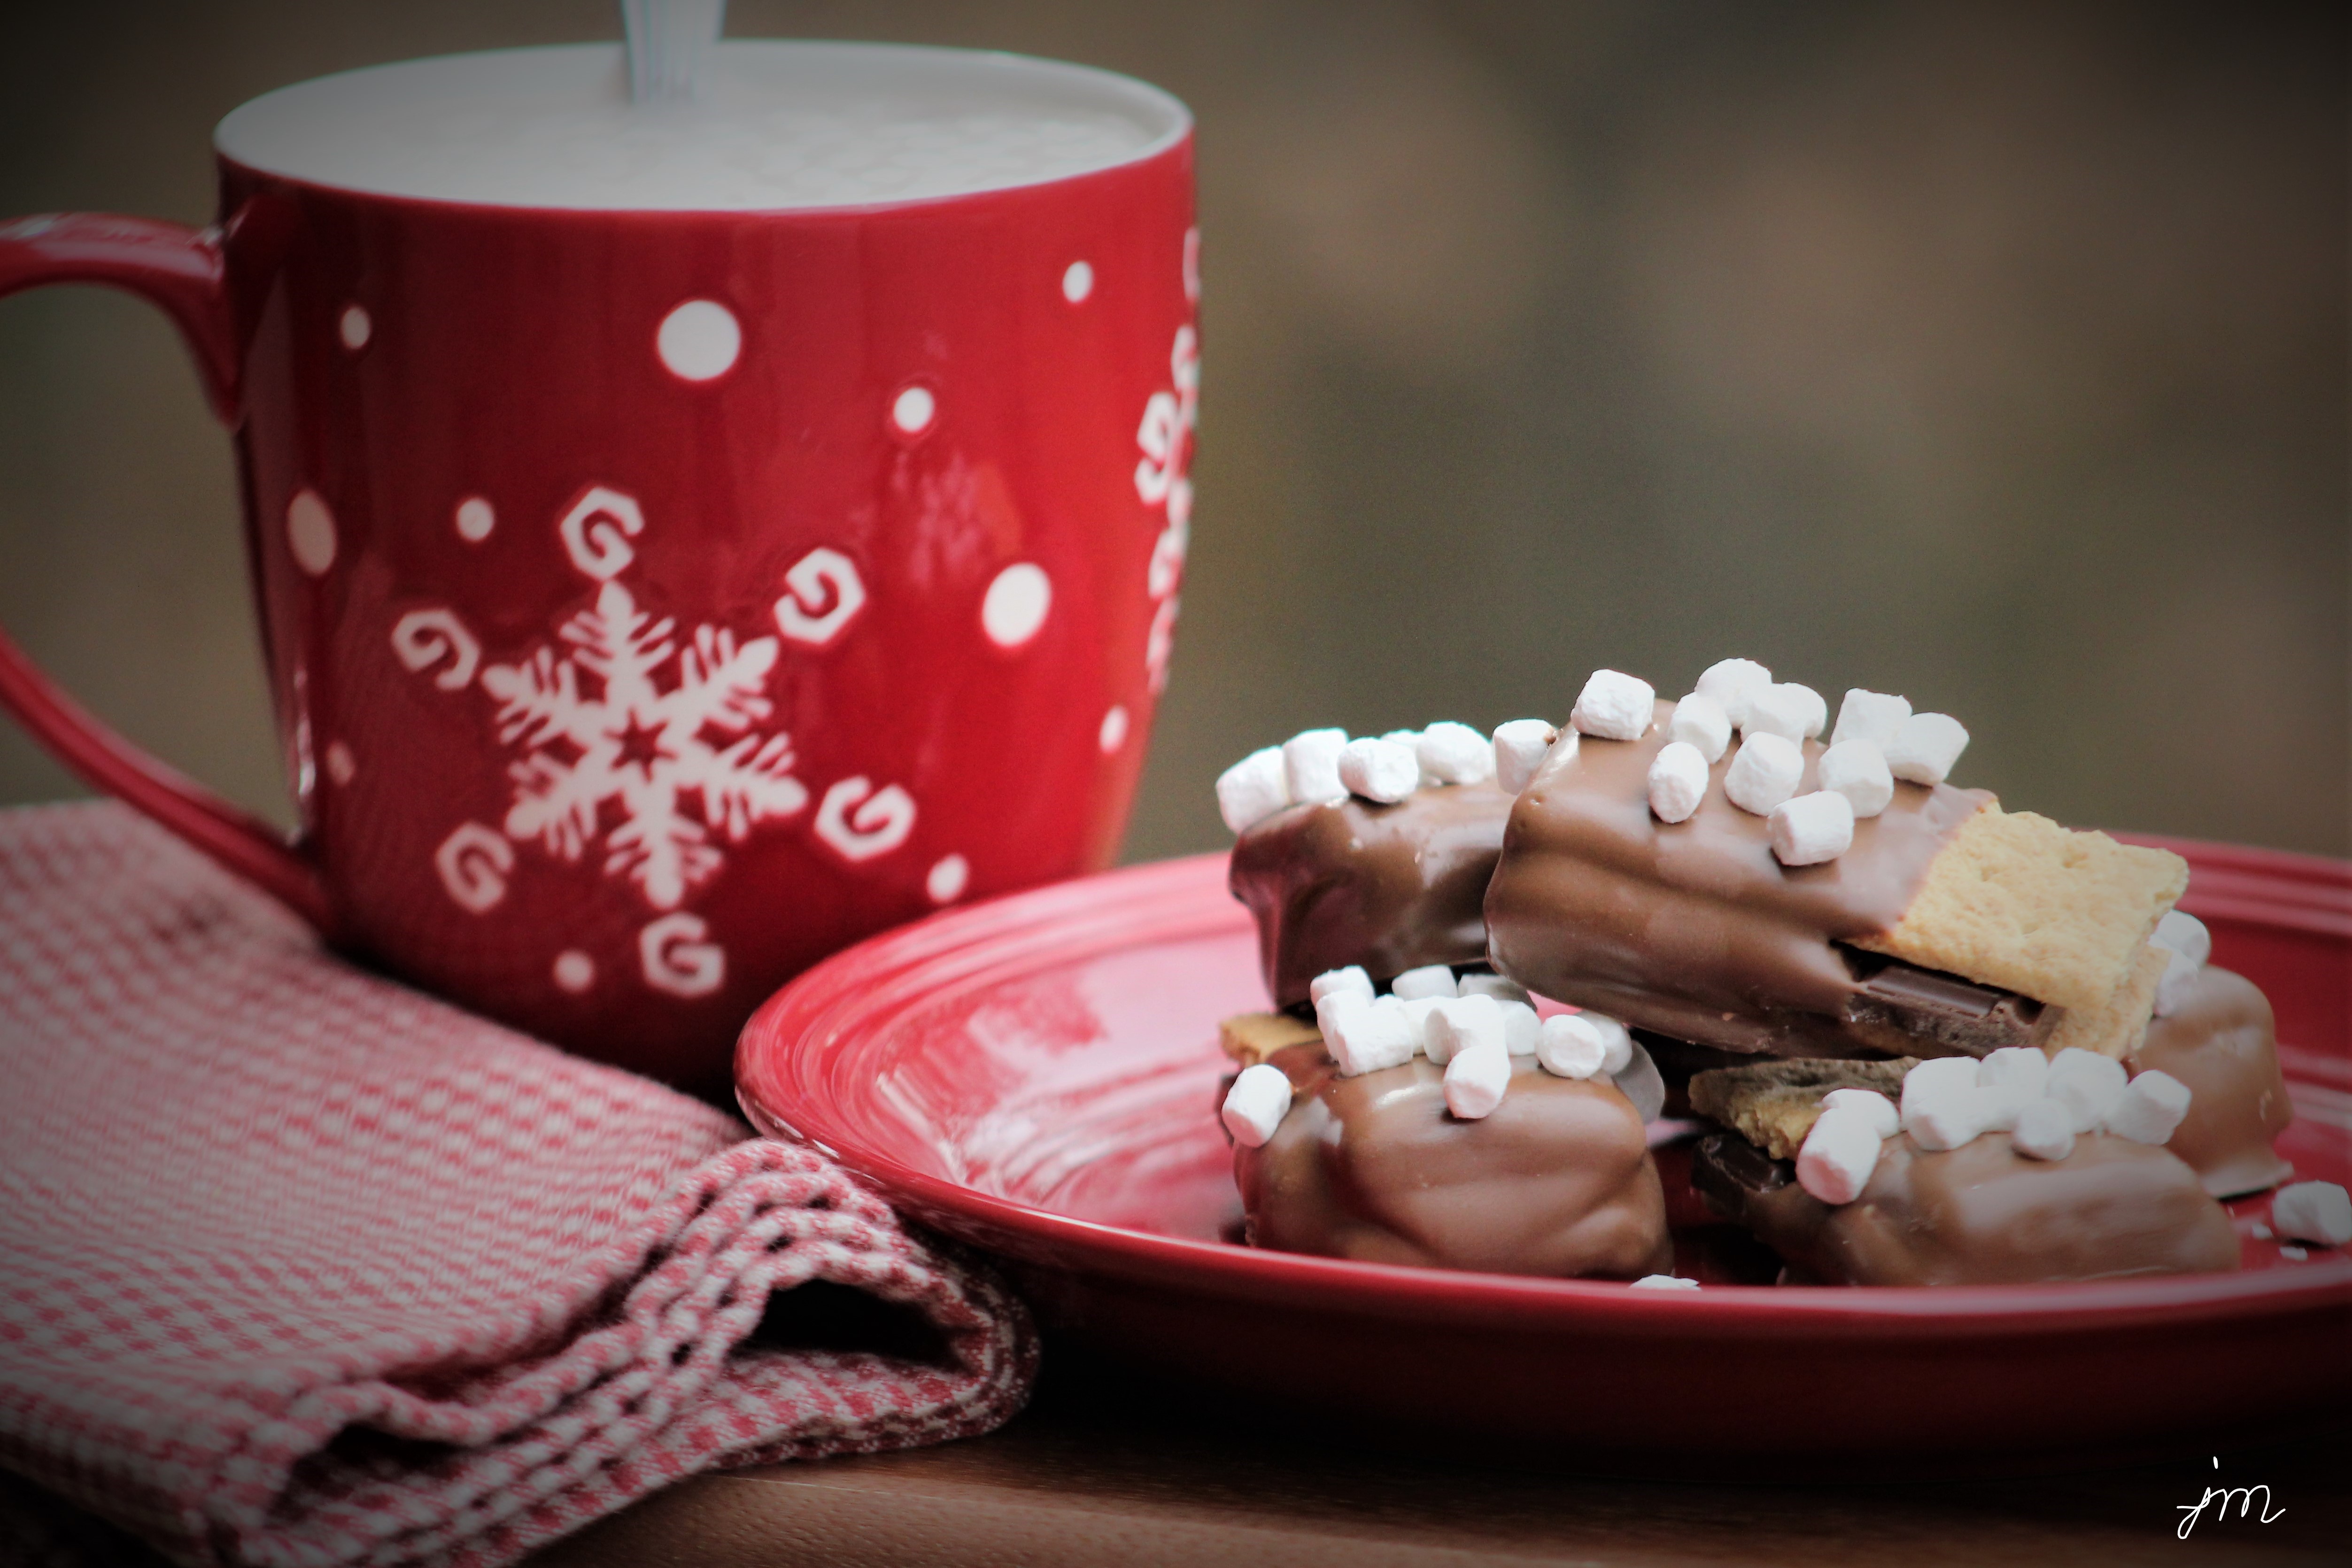
And what s’more perfect with hot cocoa or coffee than s’mores.

And what s’more delicious than campfire s’mores?

S’more cookie bars any time of year!

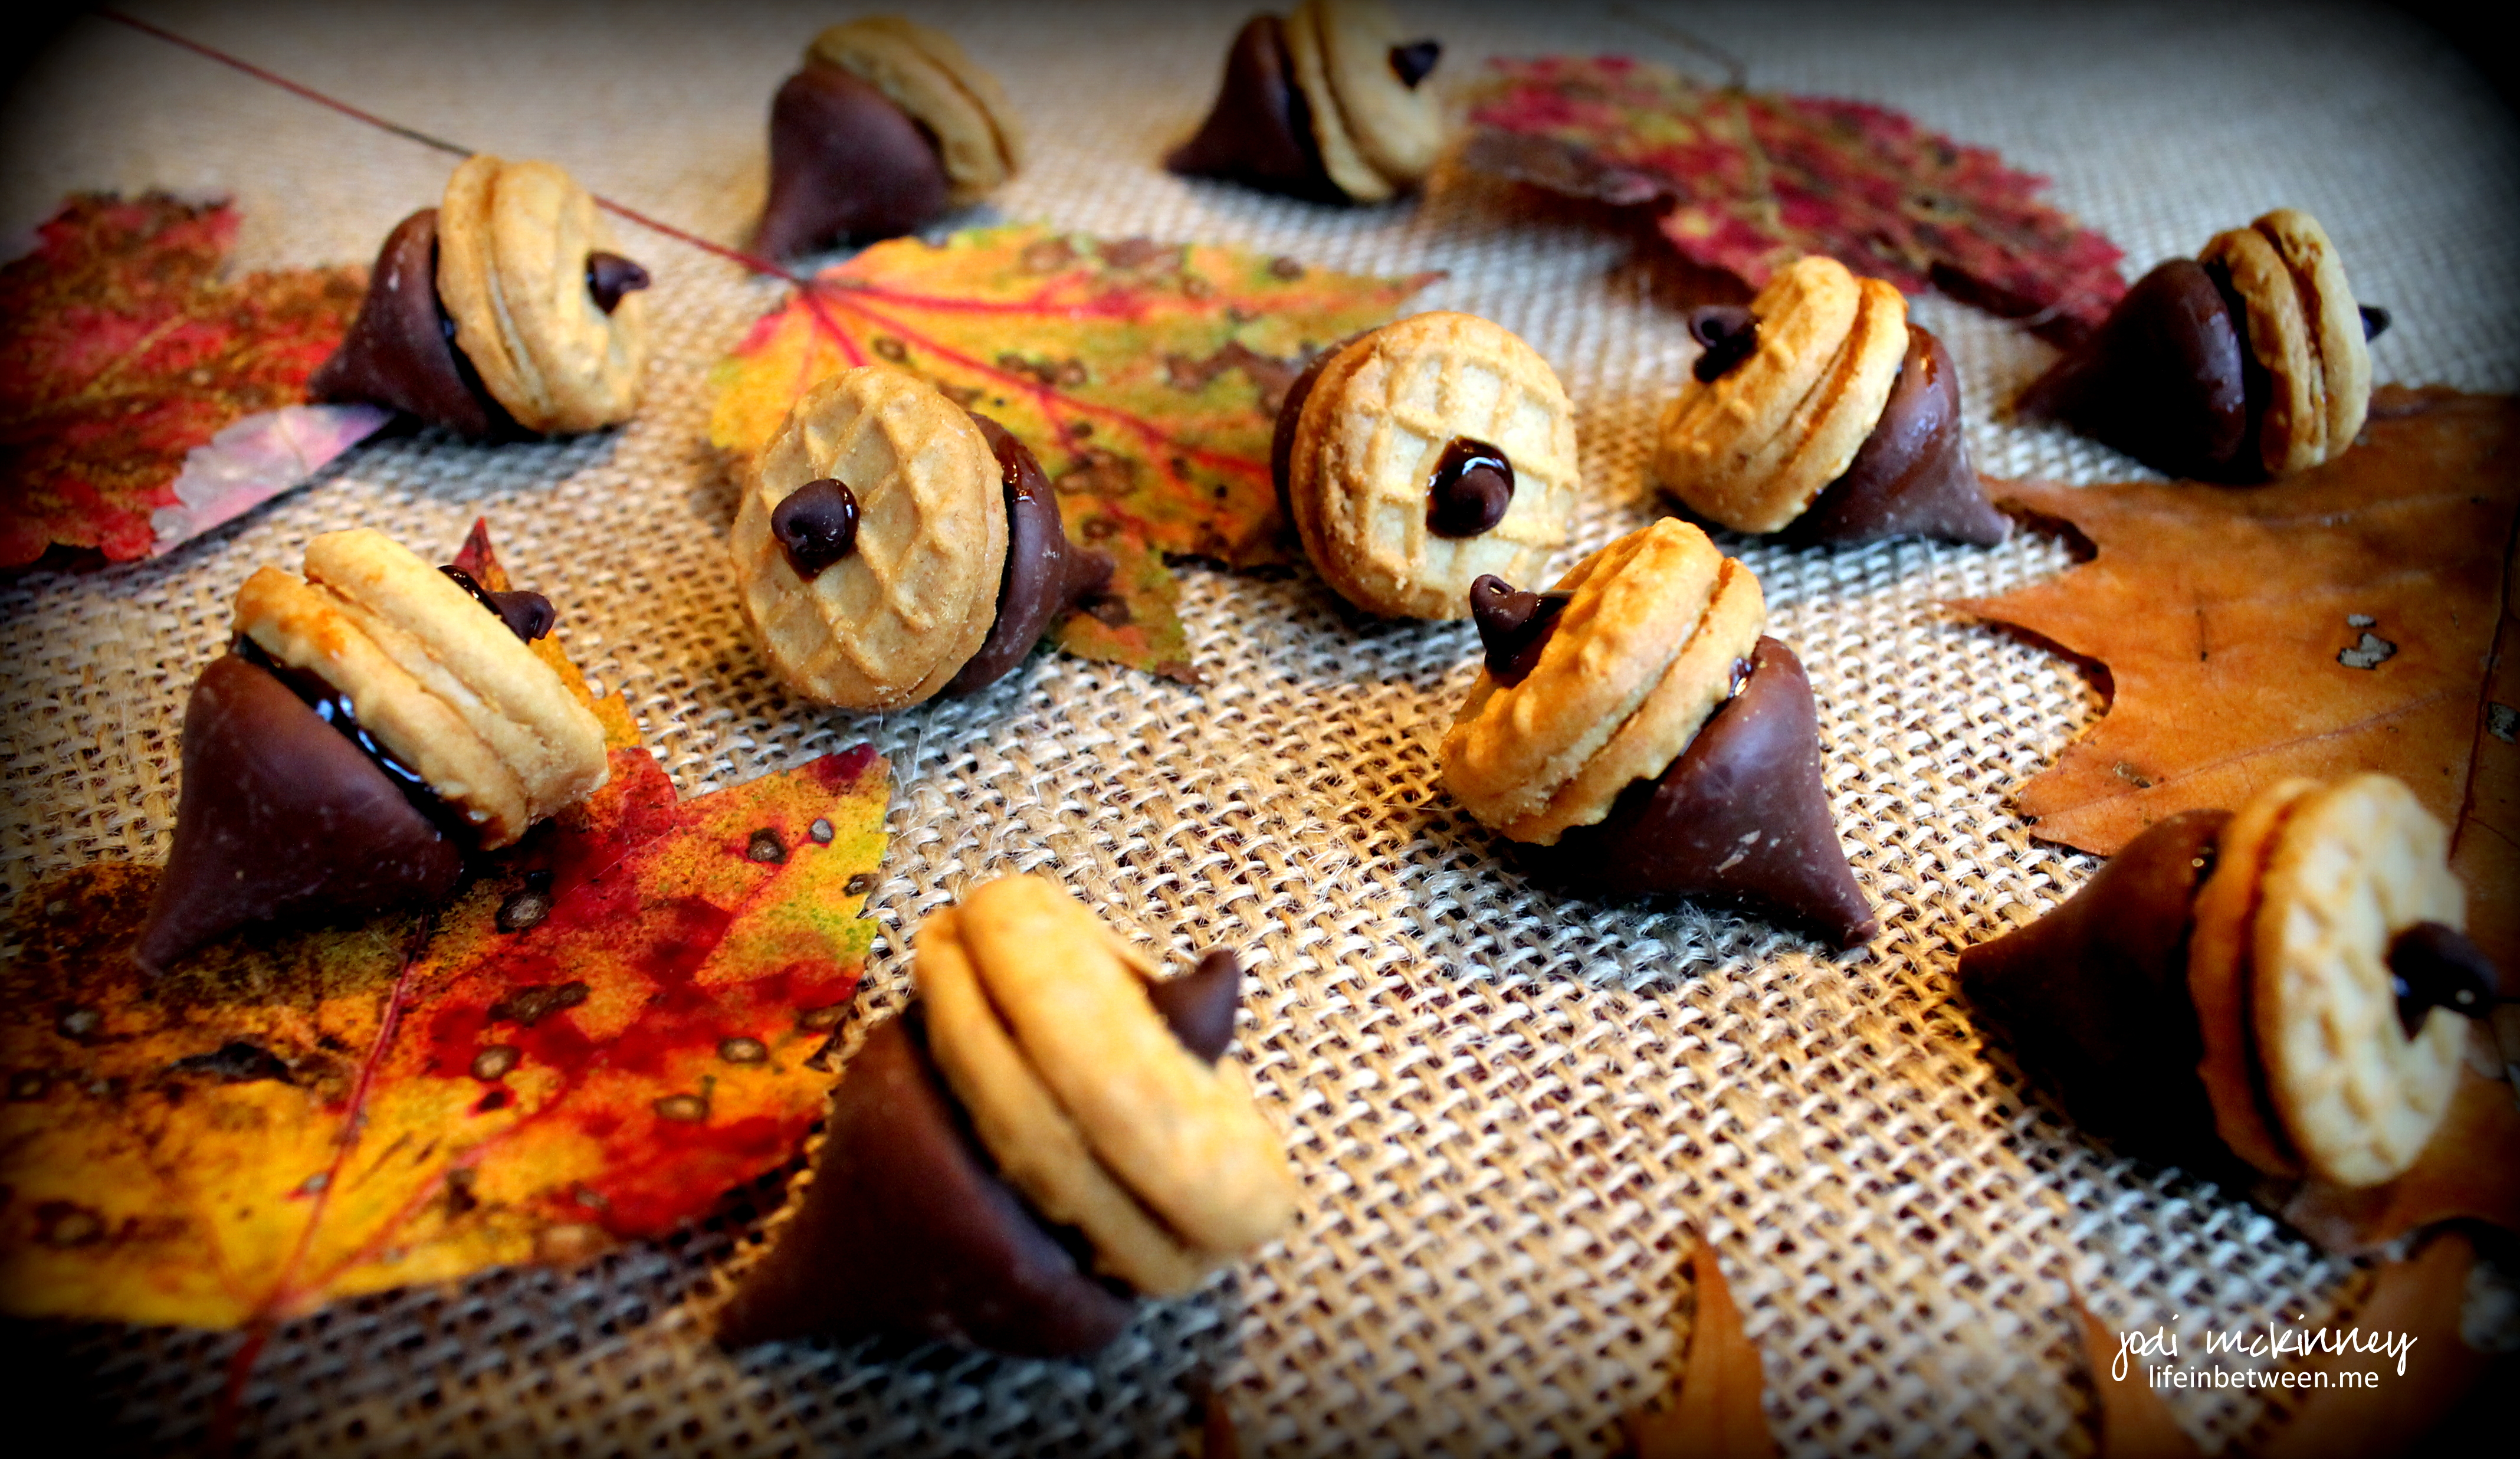
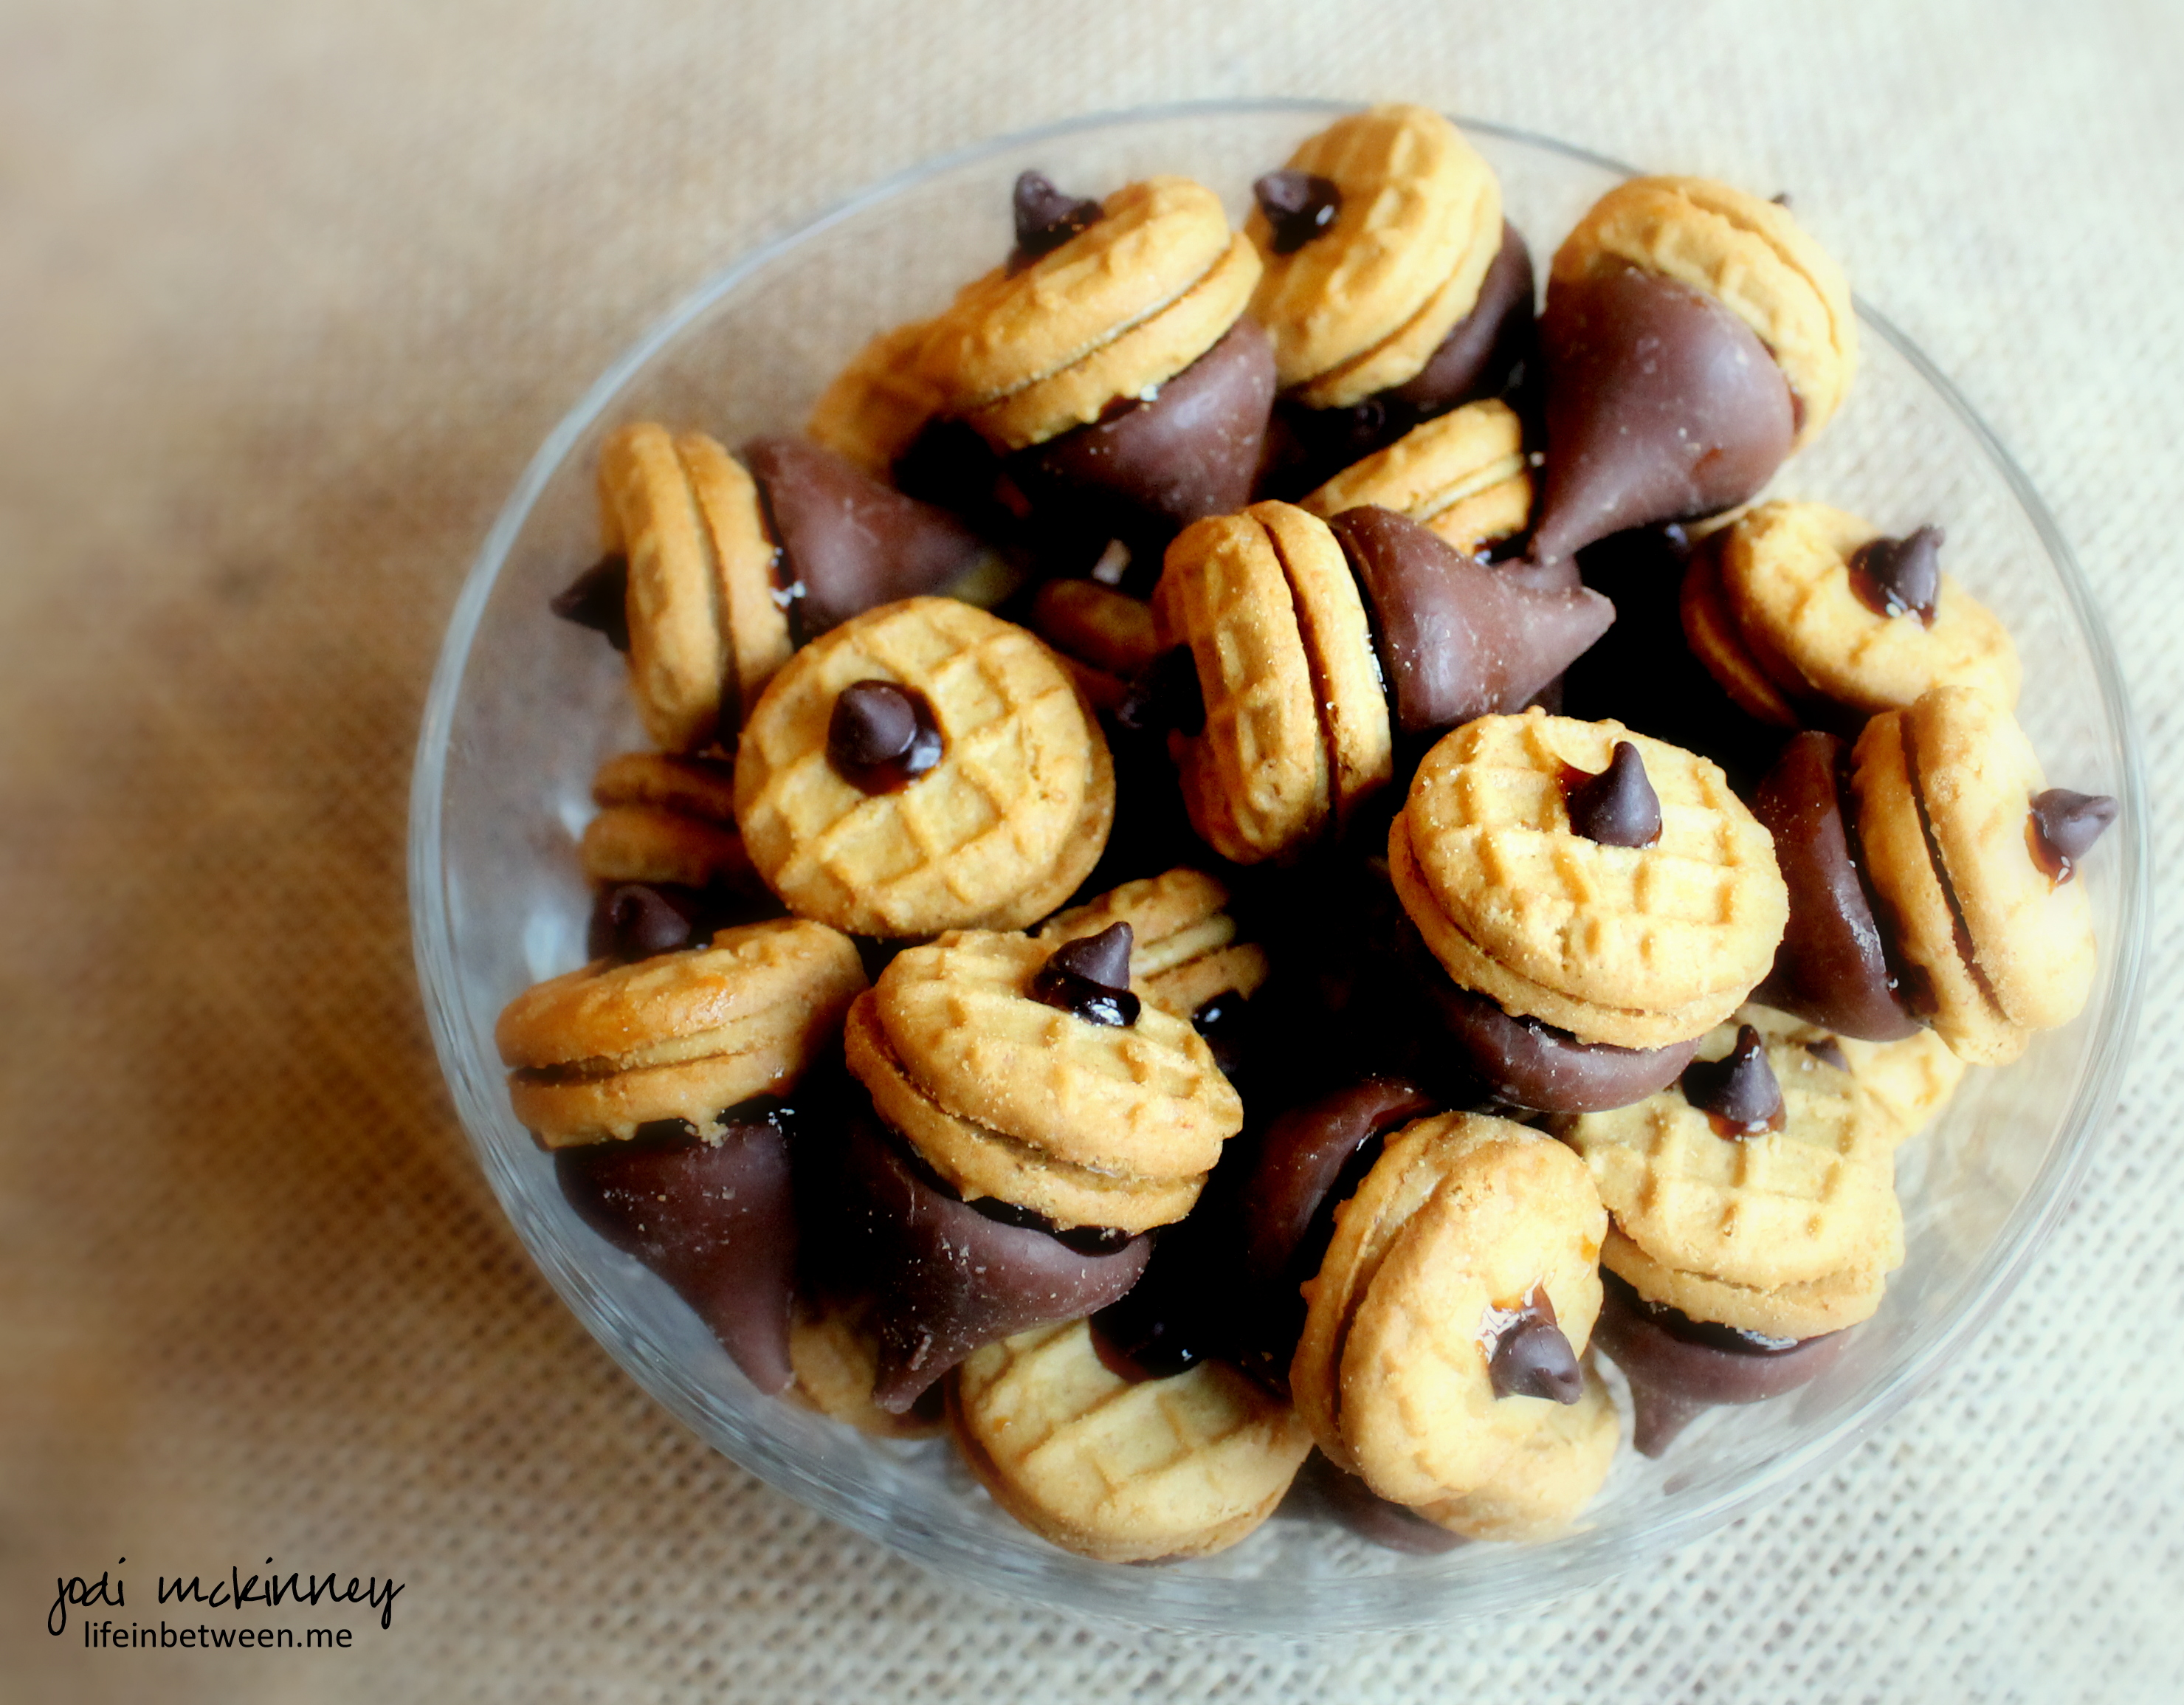
I love these adorable little cookie treats I learned from my daughter-in-law, Colleen, who first served them at a holiday cookie exchange she hosted a couple years ago.

They are simple.   They are fun. They are beautiful.  And best of all, they are SCRUMPTIOUS!

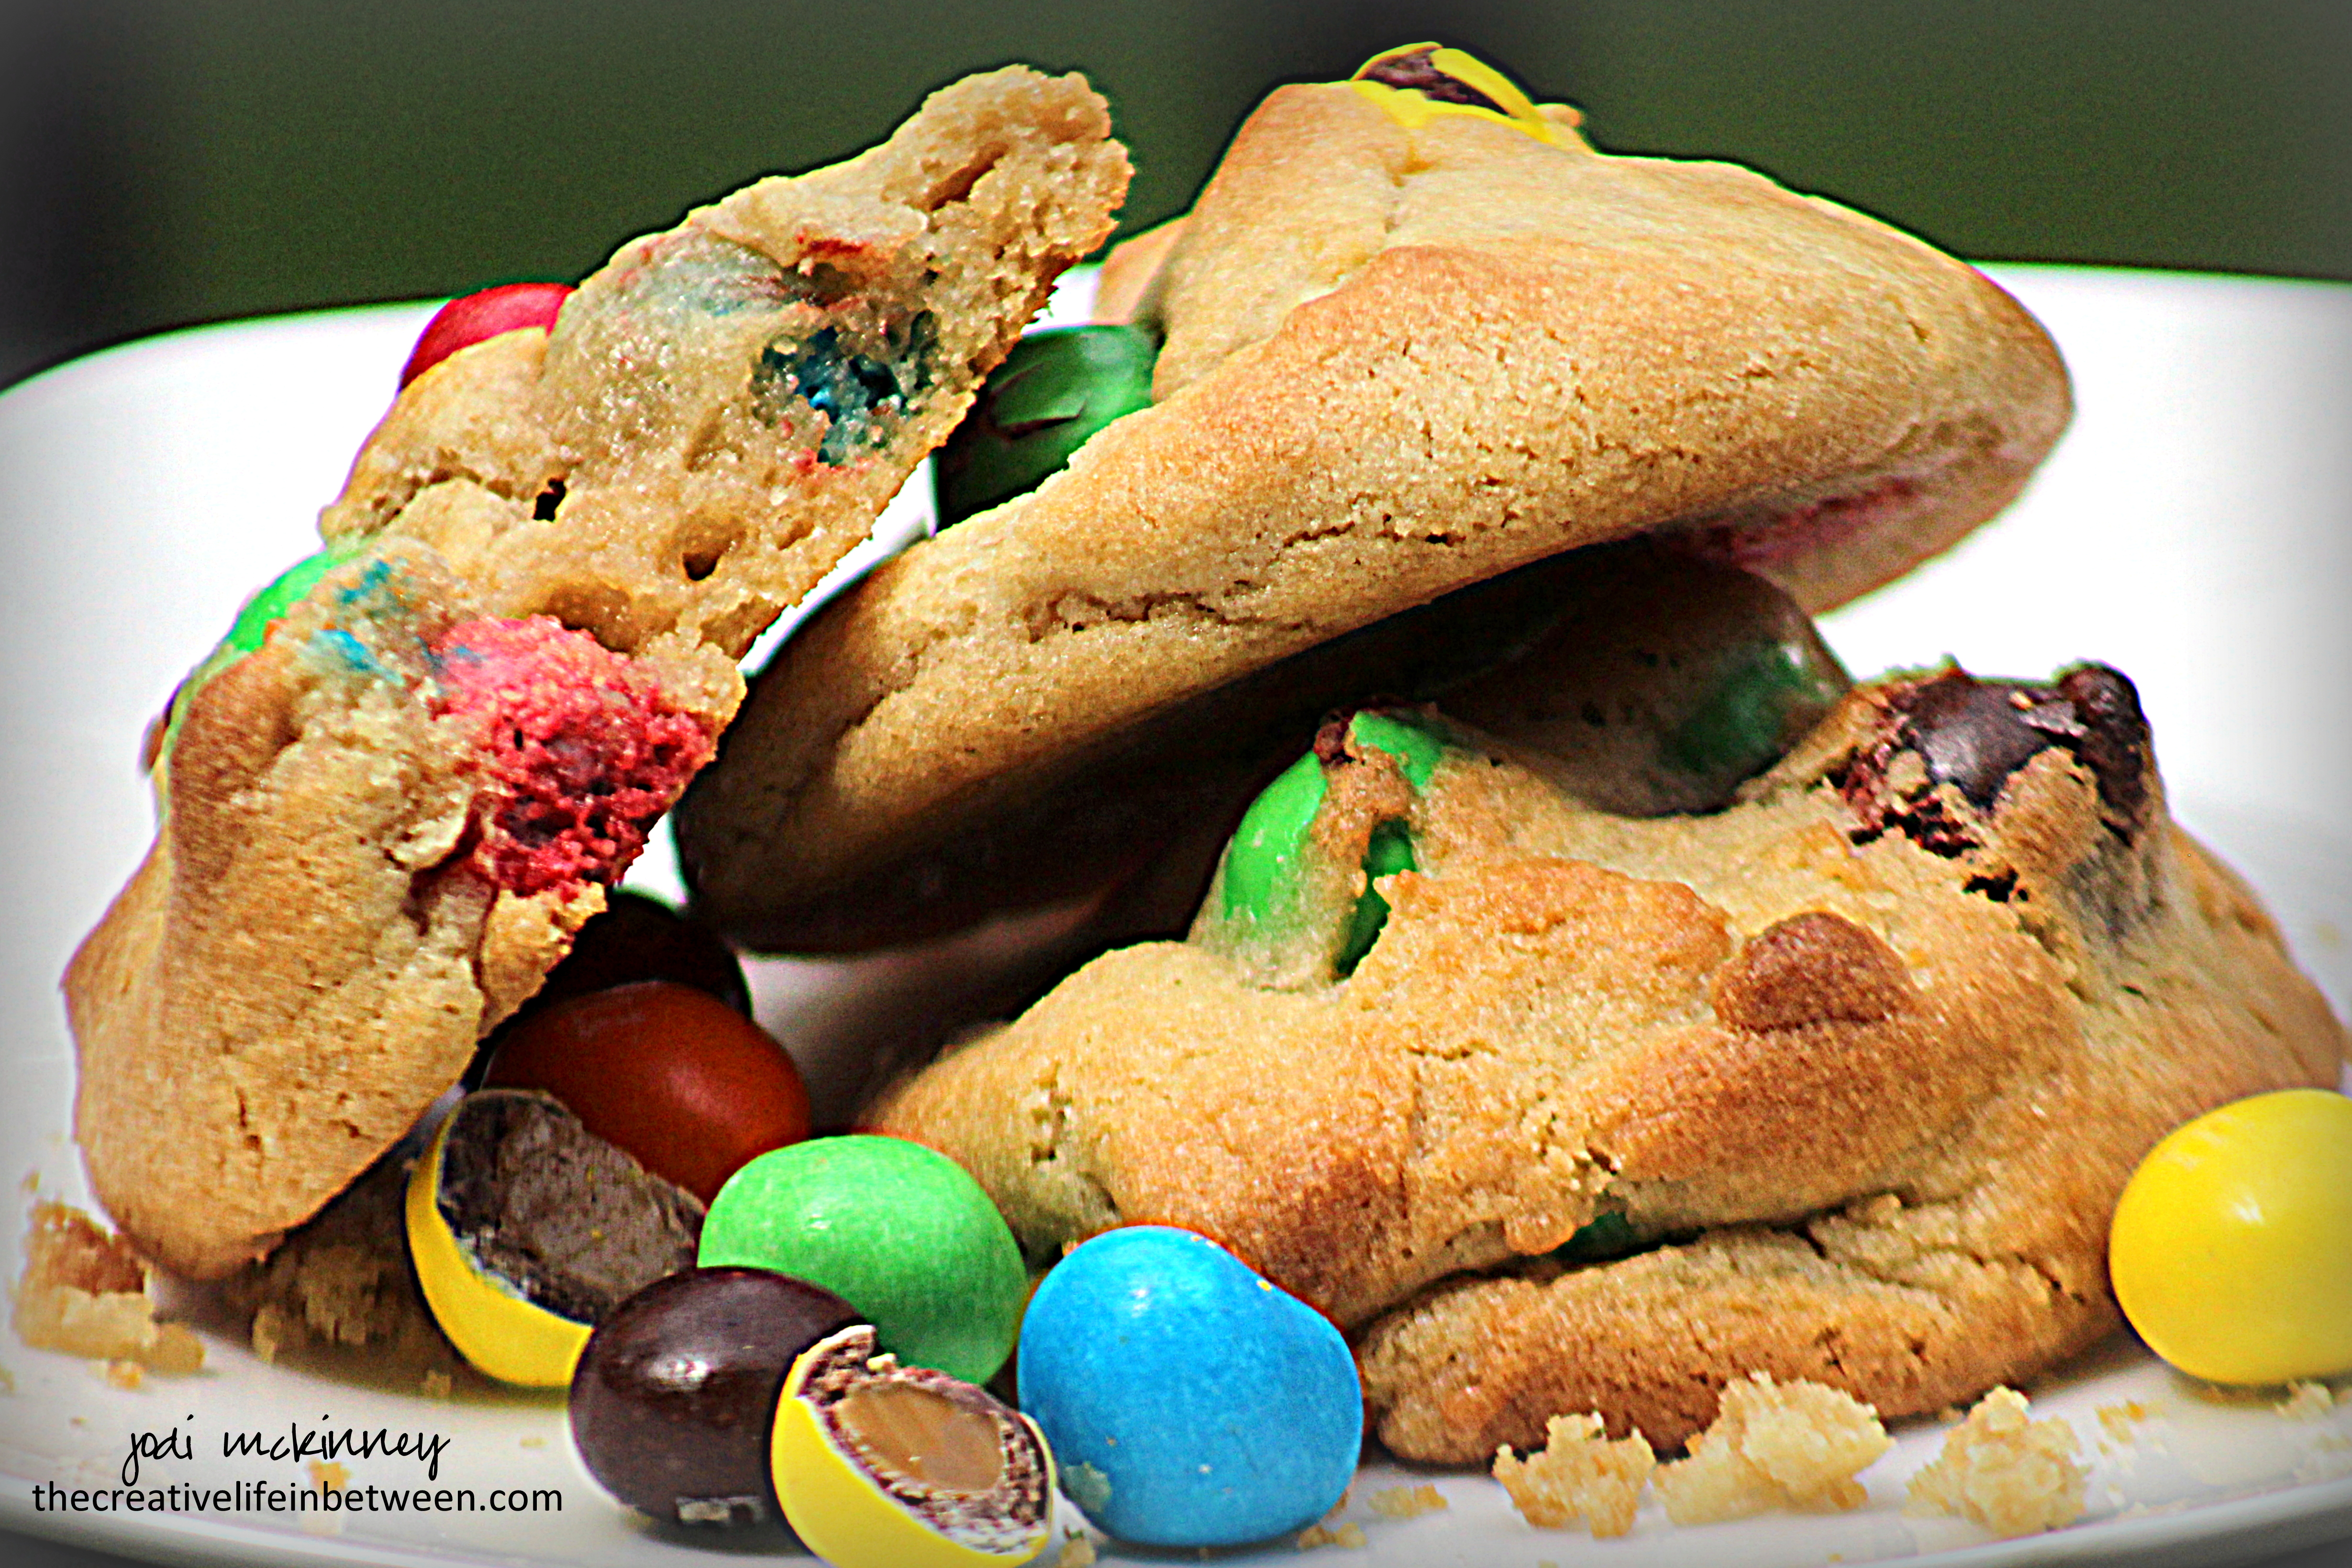
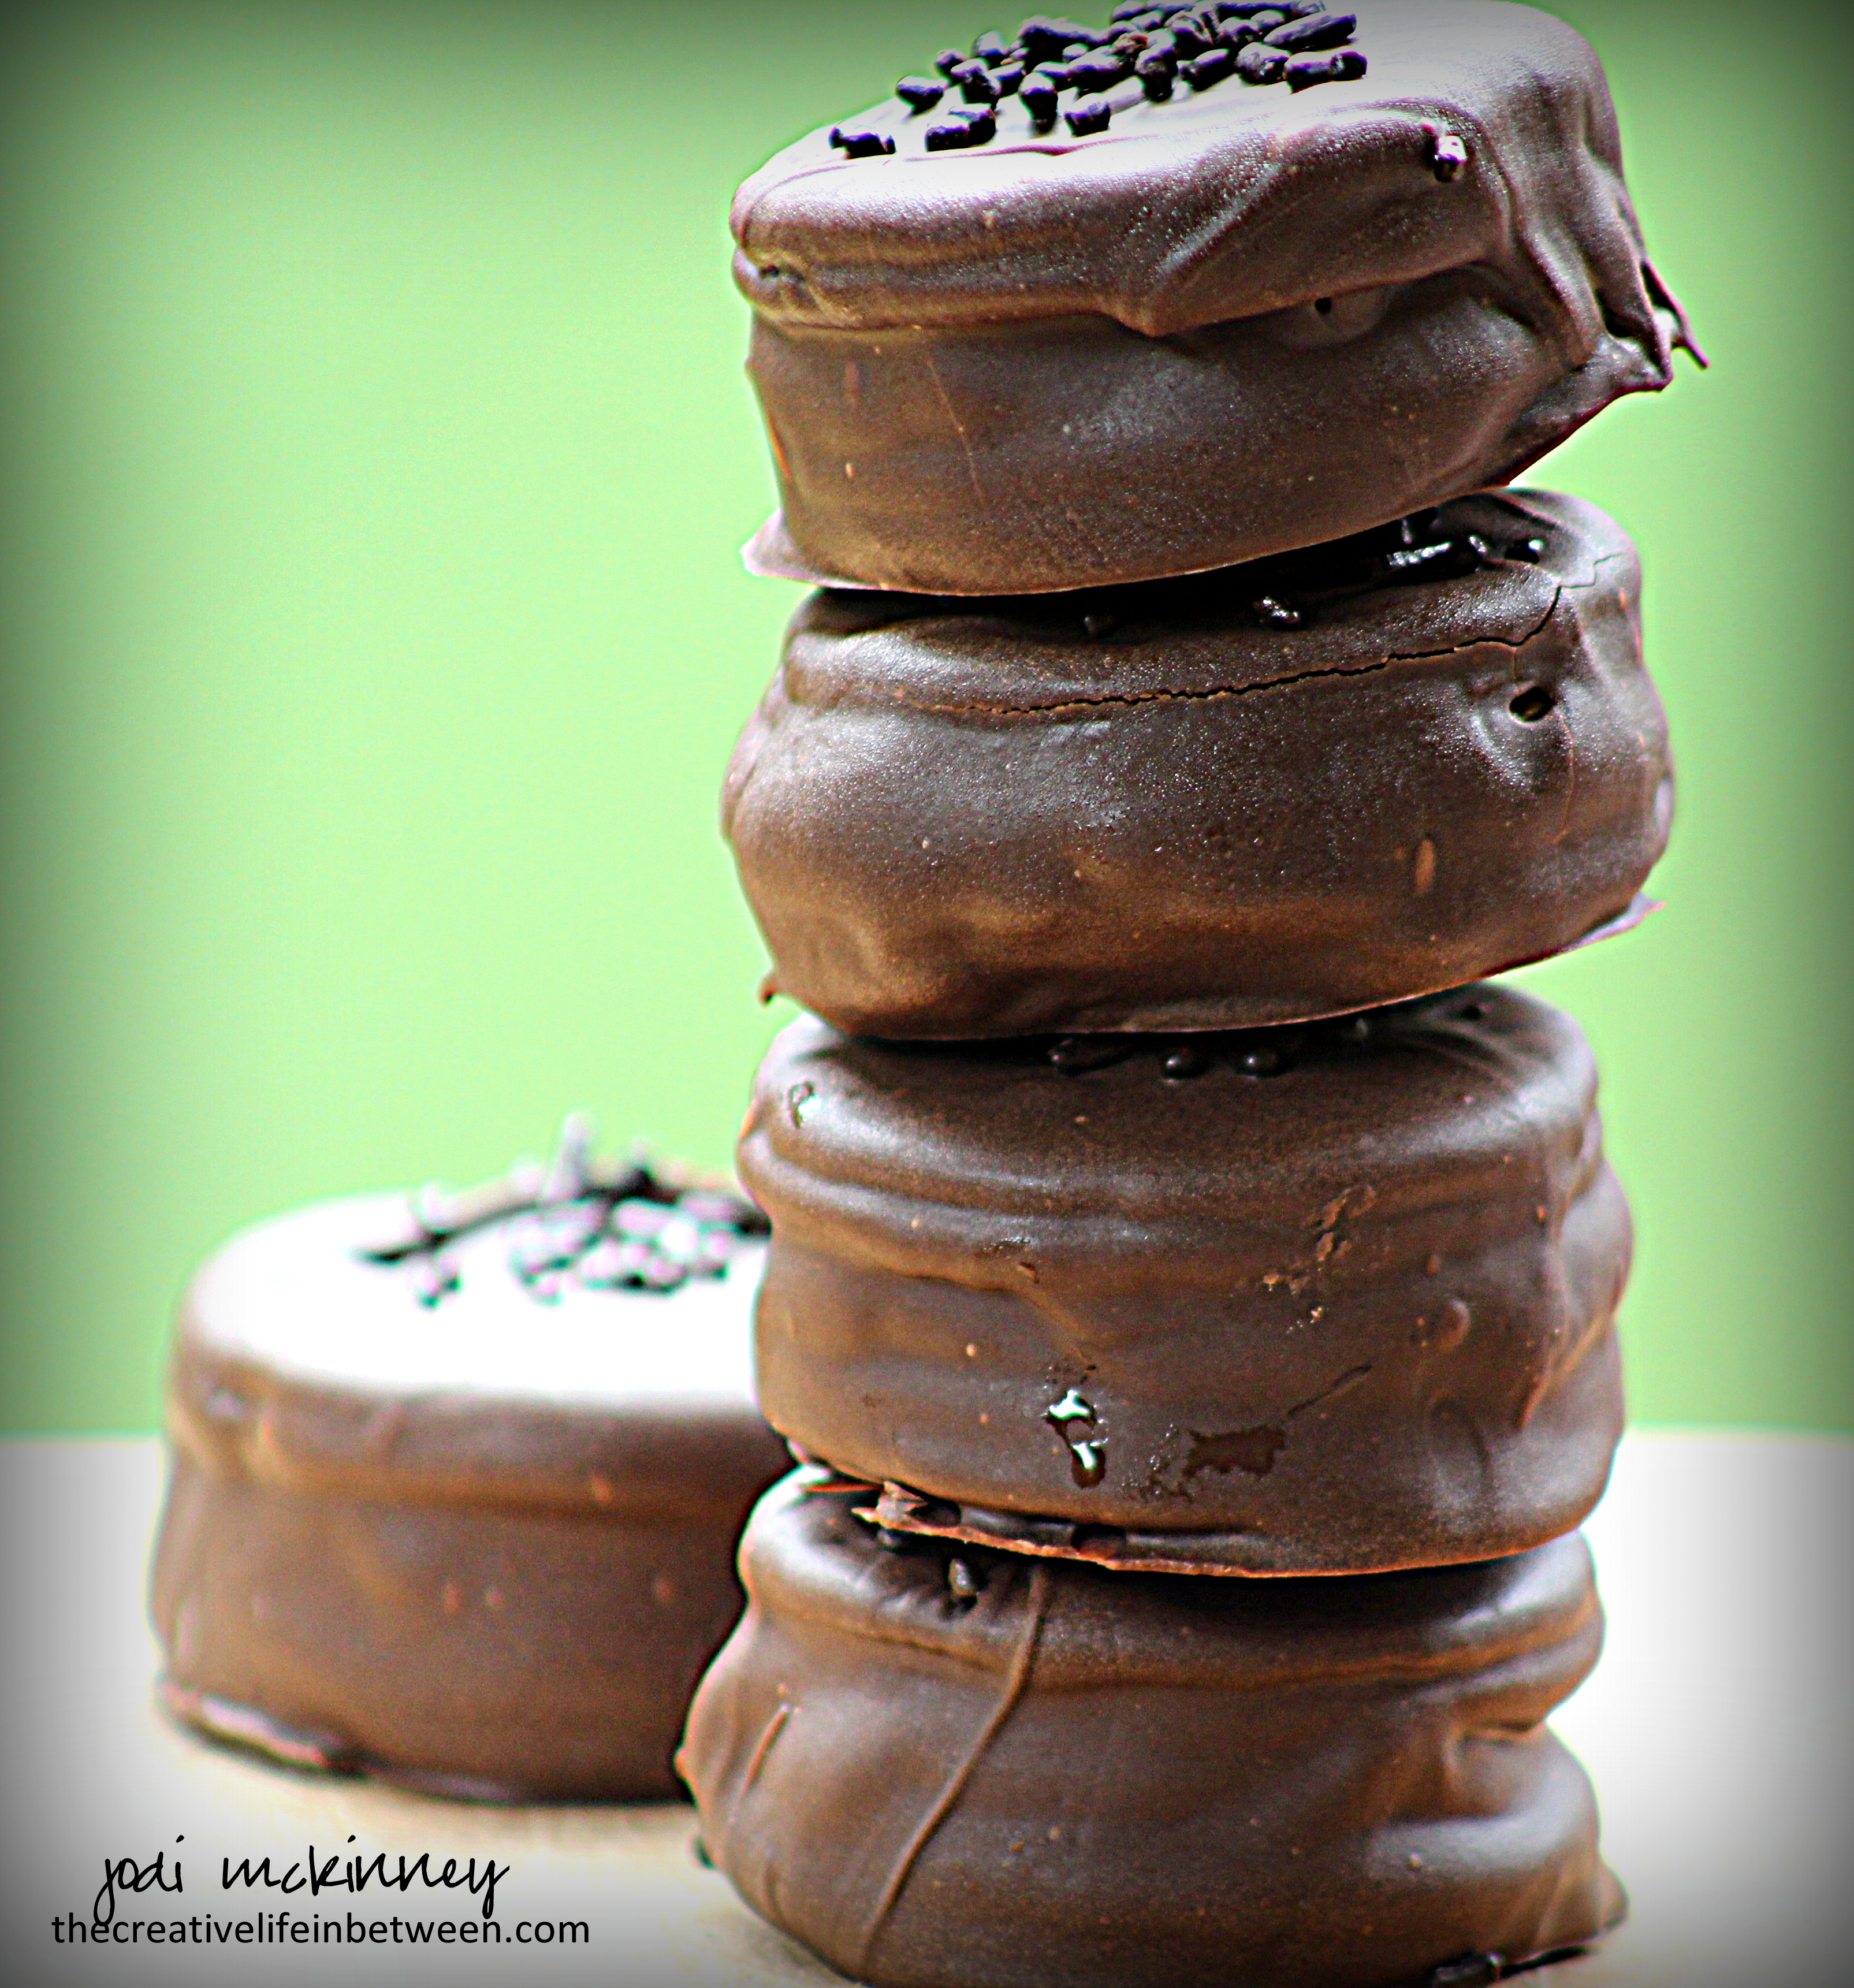
The teeny tiny miniature dehydrated marshmallows totally make them!  I purchased them locally at Make a Cake, a local, charming little cake and candy decorating shop, but they are also available online if you can’t find them near you.

Here is how to make them.

S'more Cookie Bars

Ingredients:

Directions:

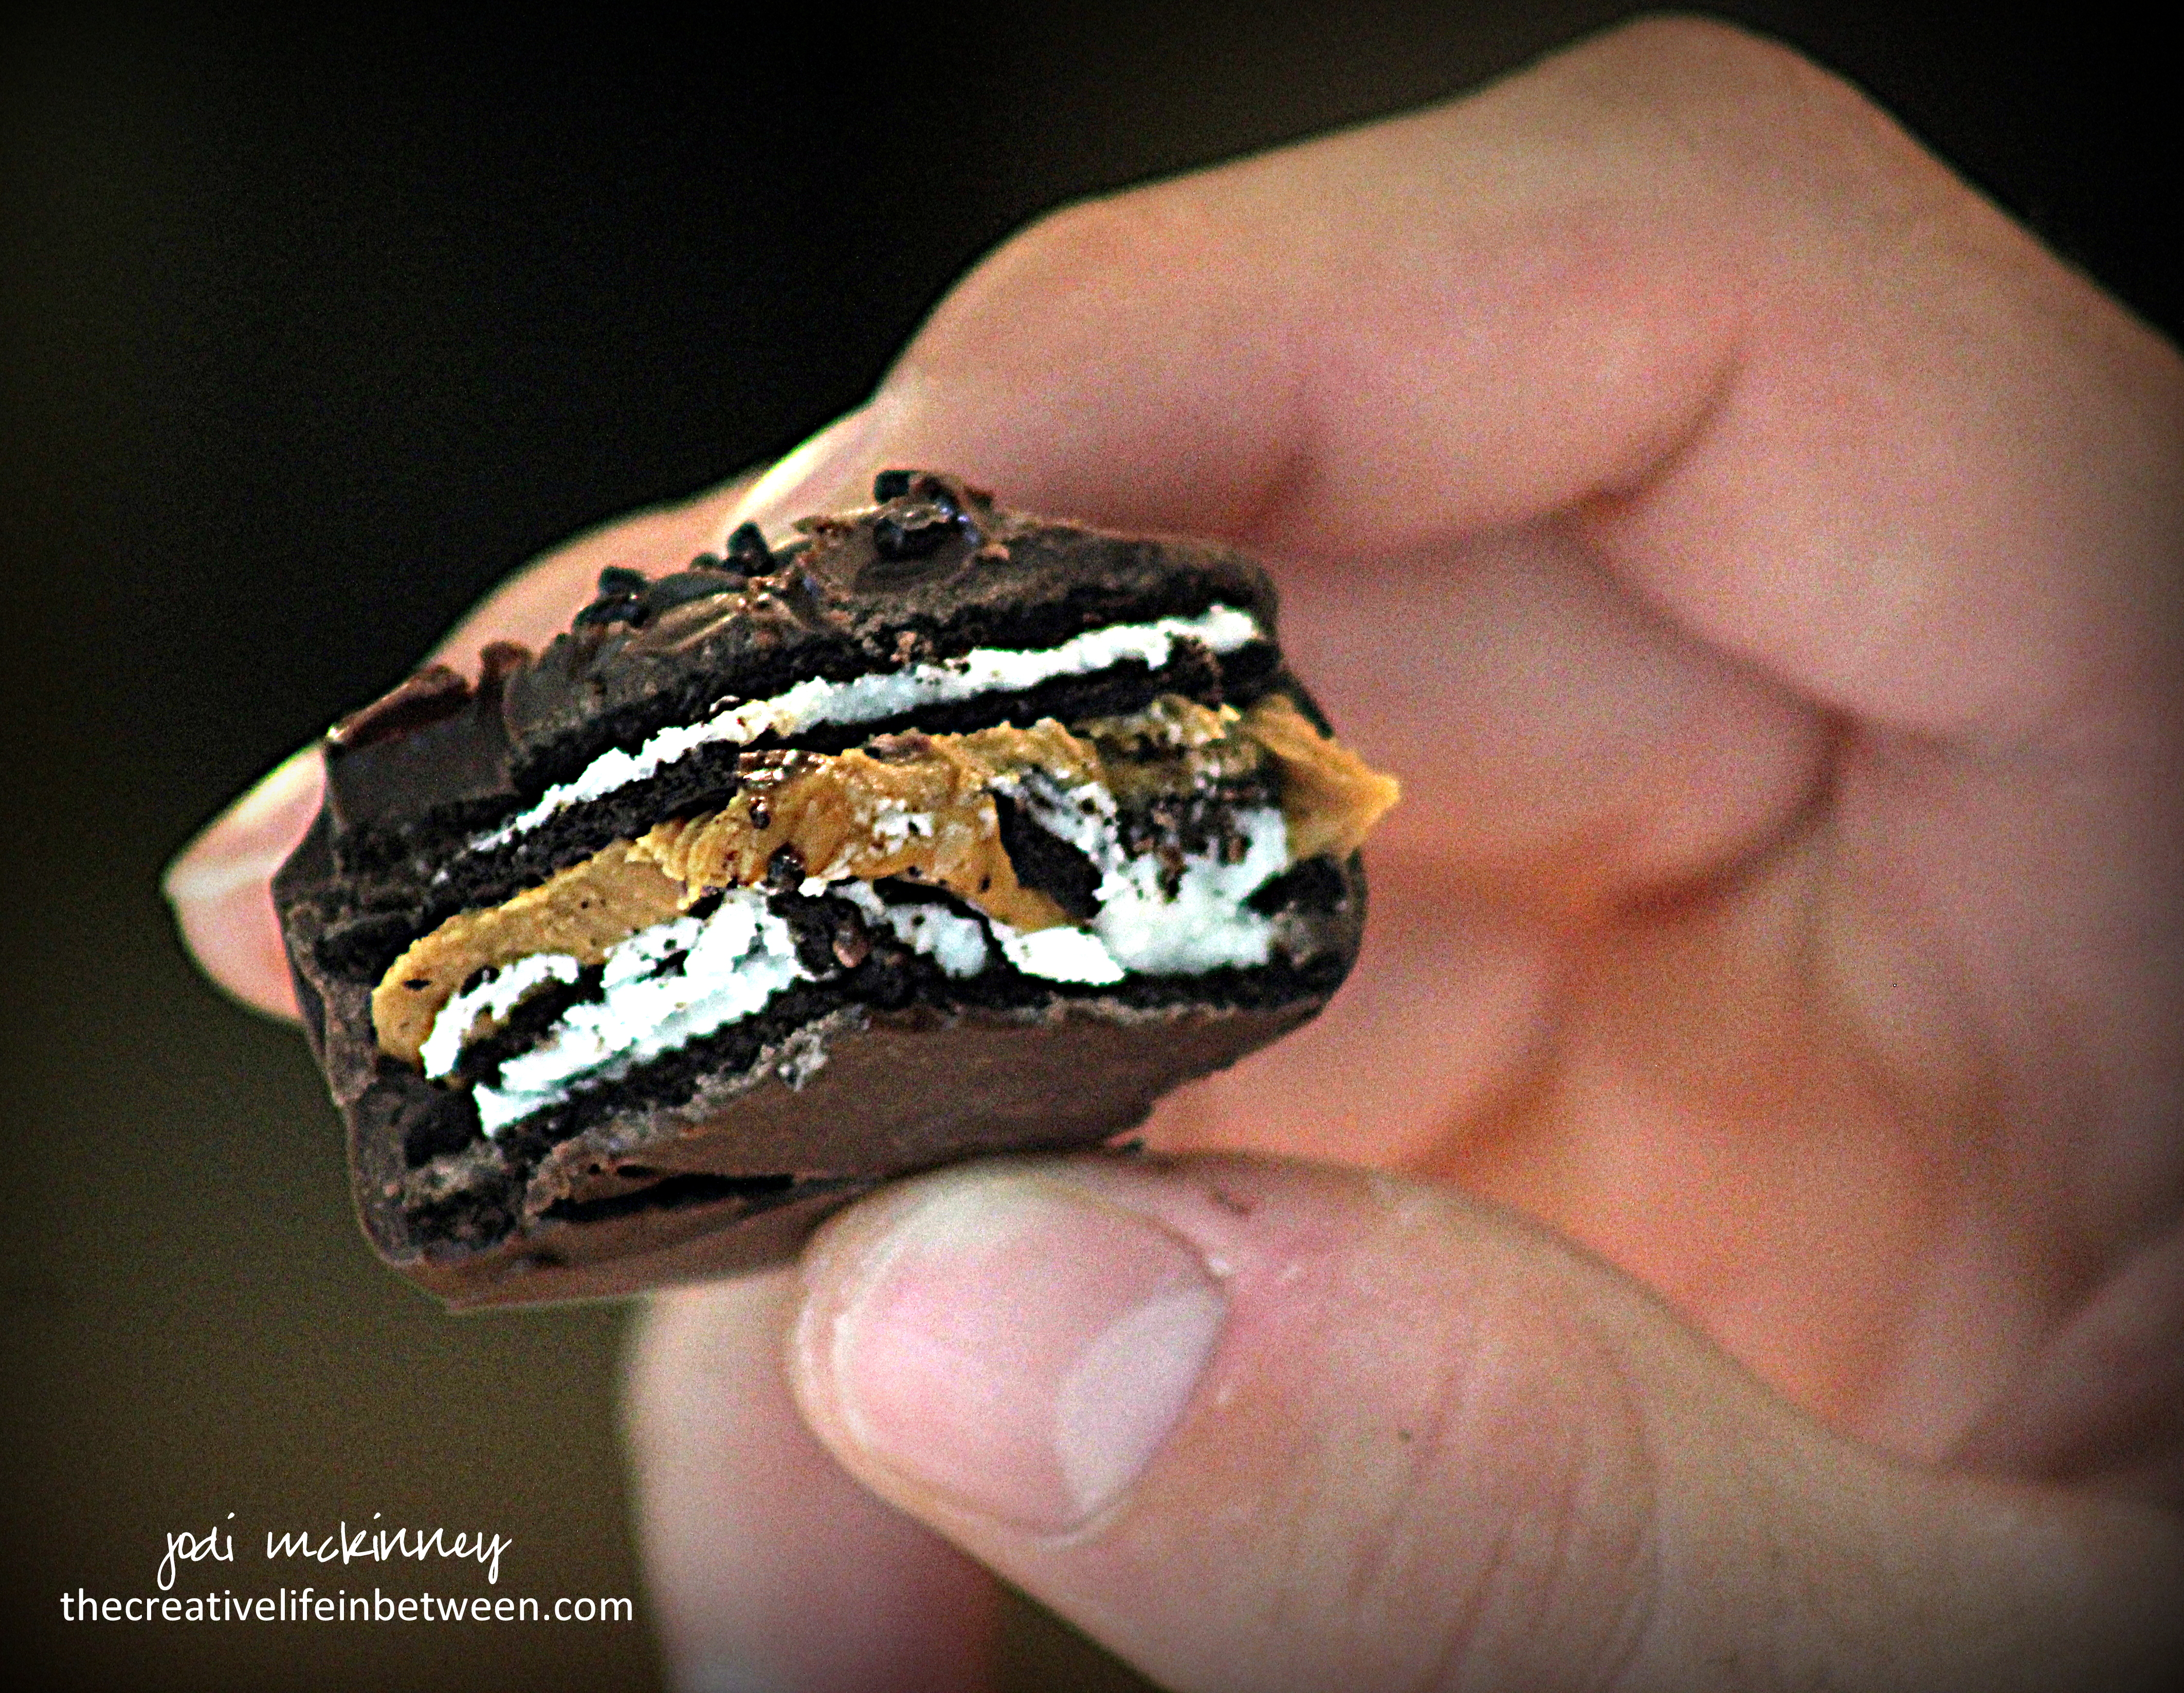
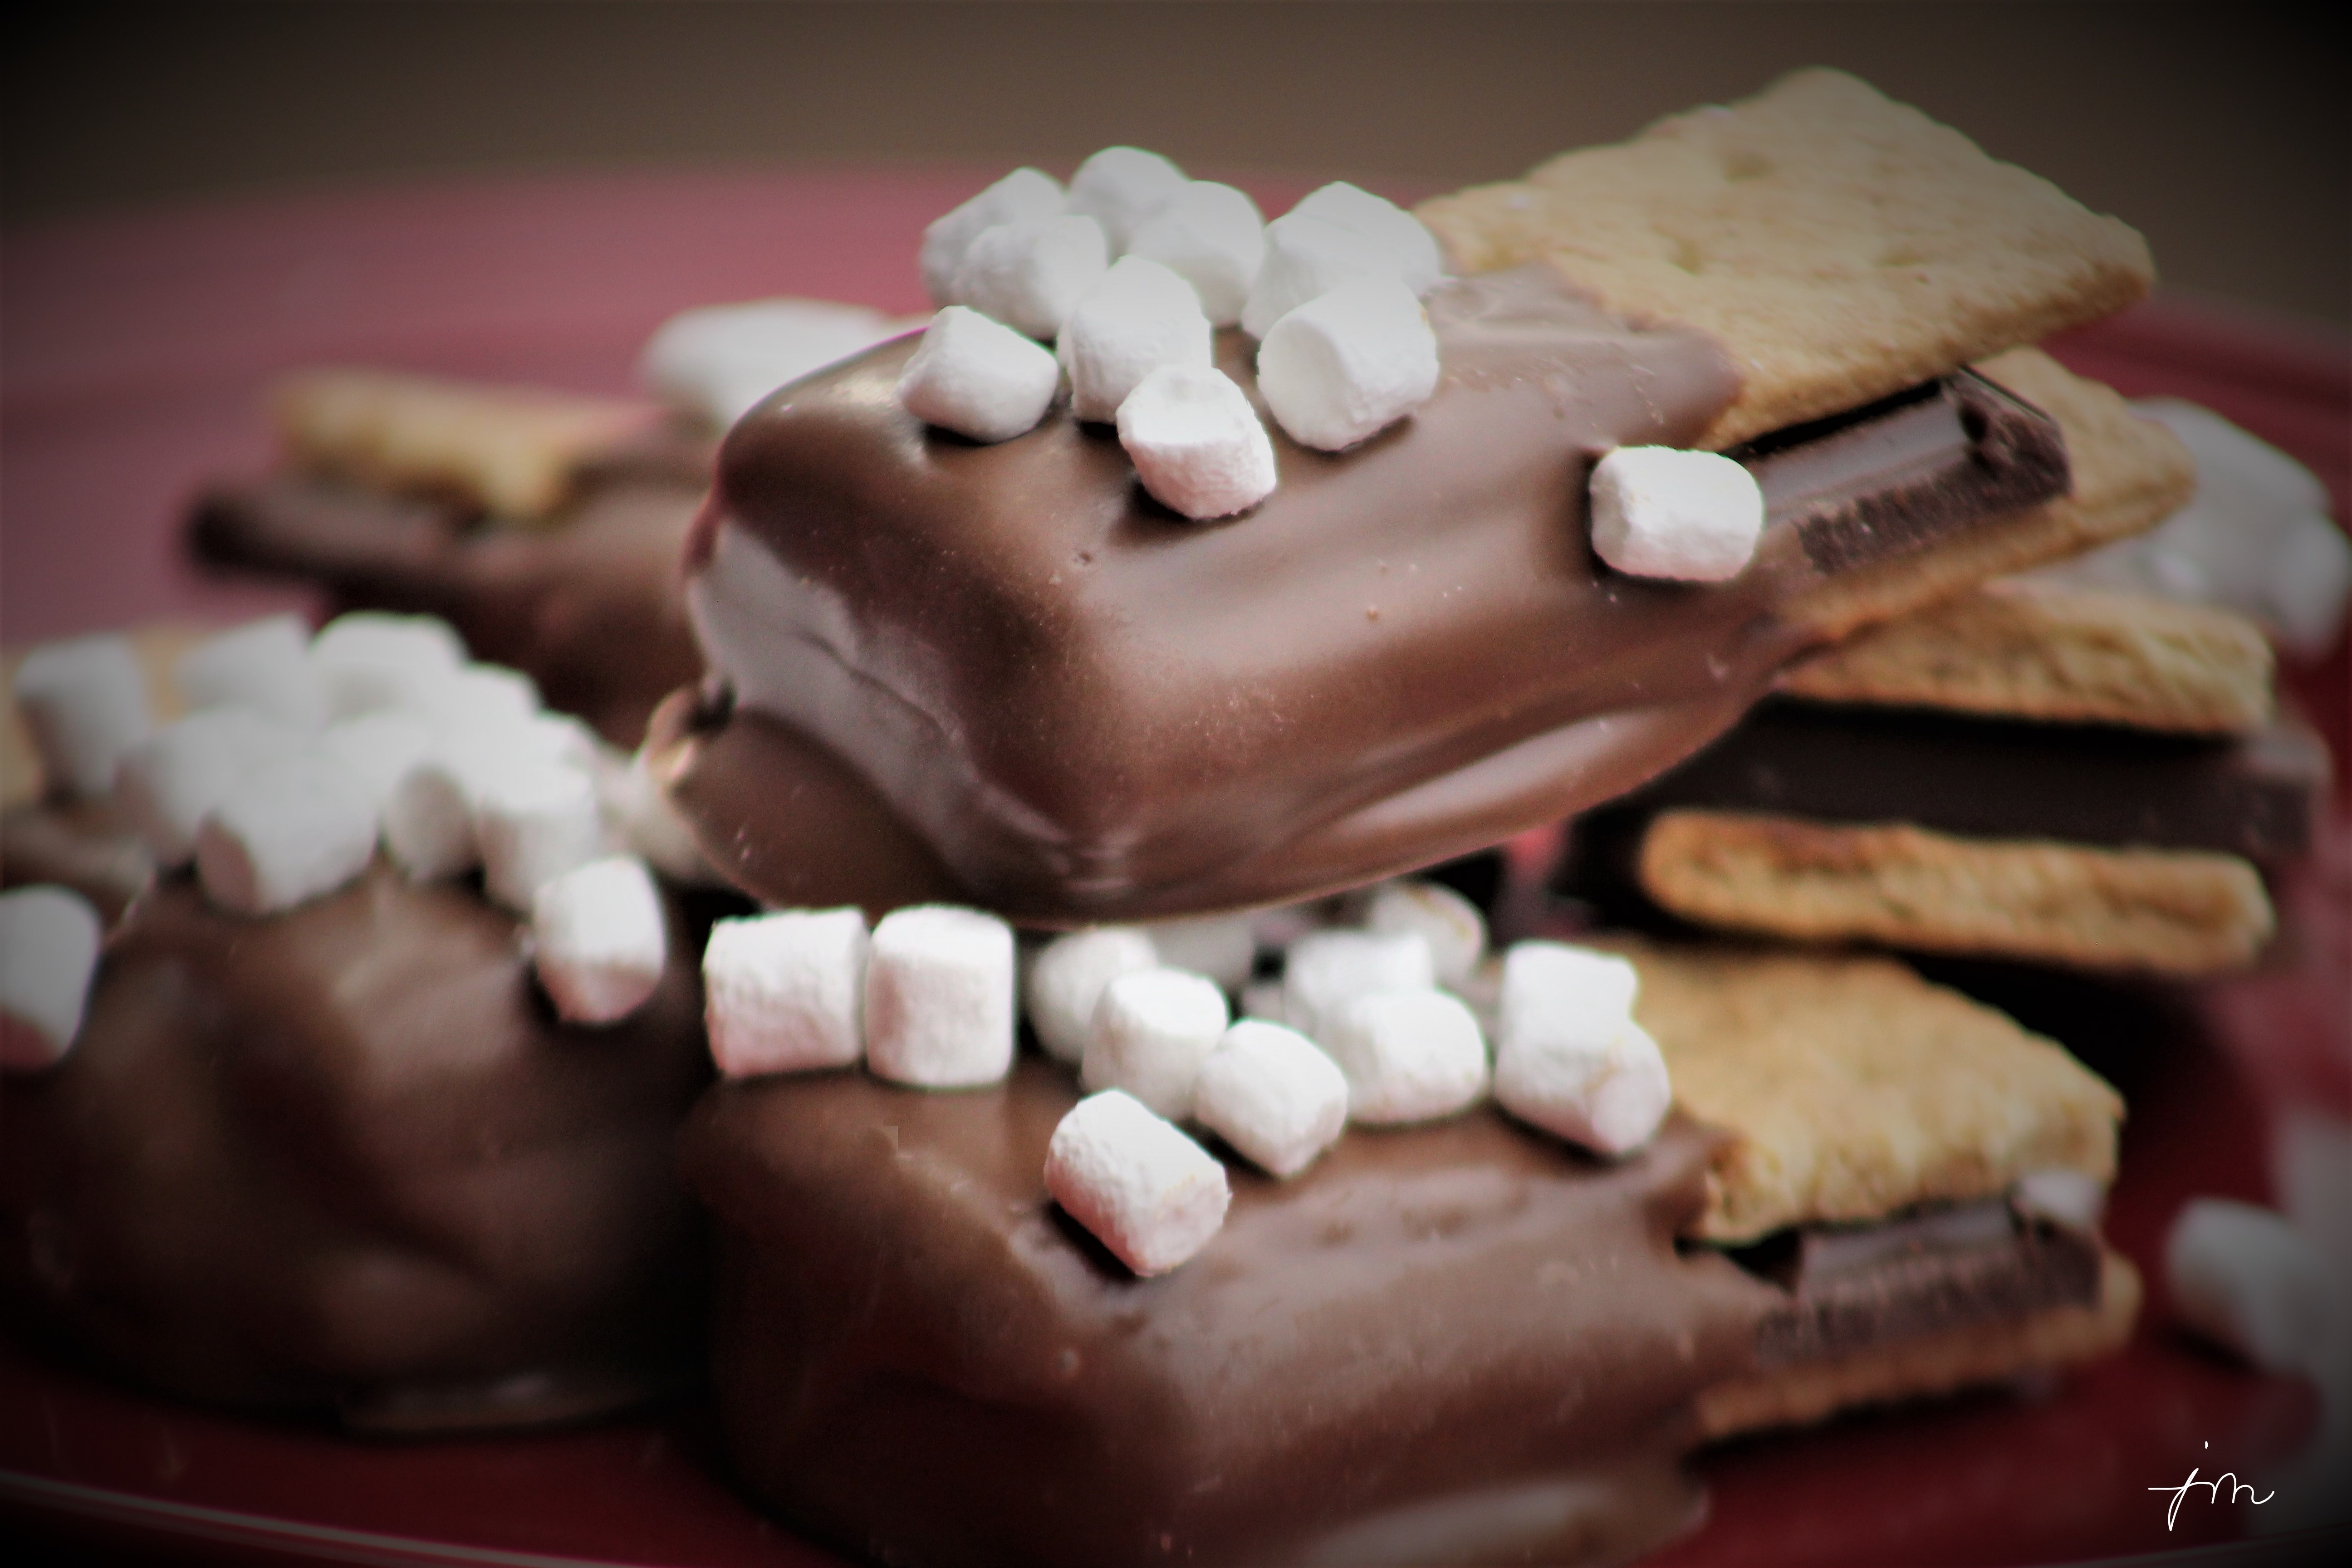
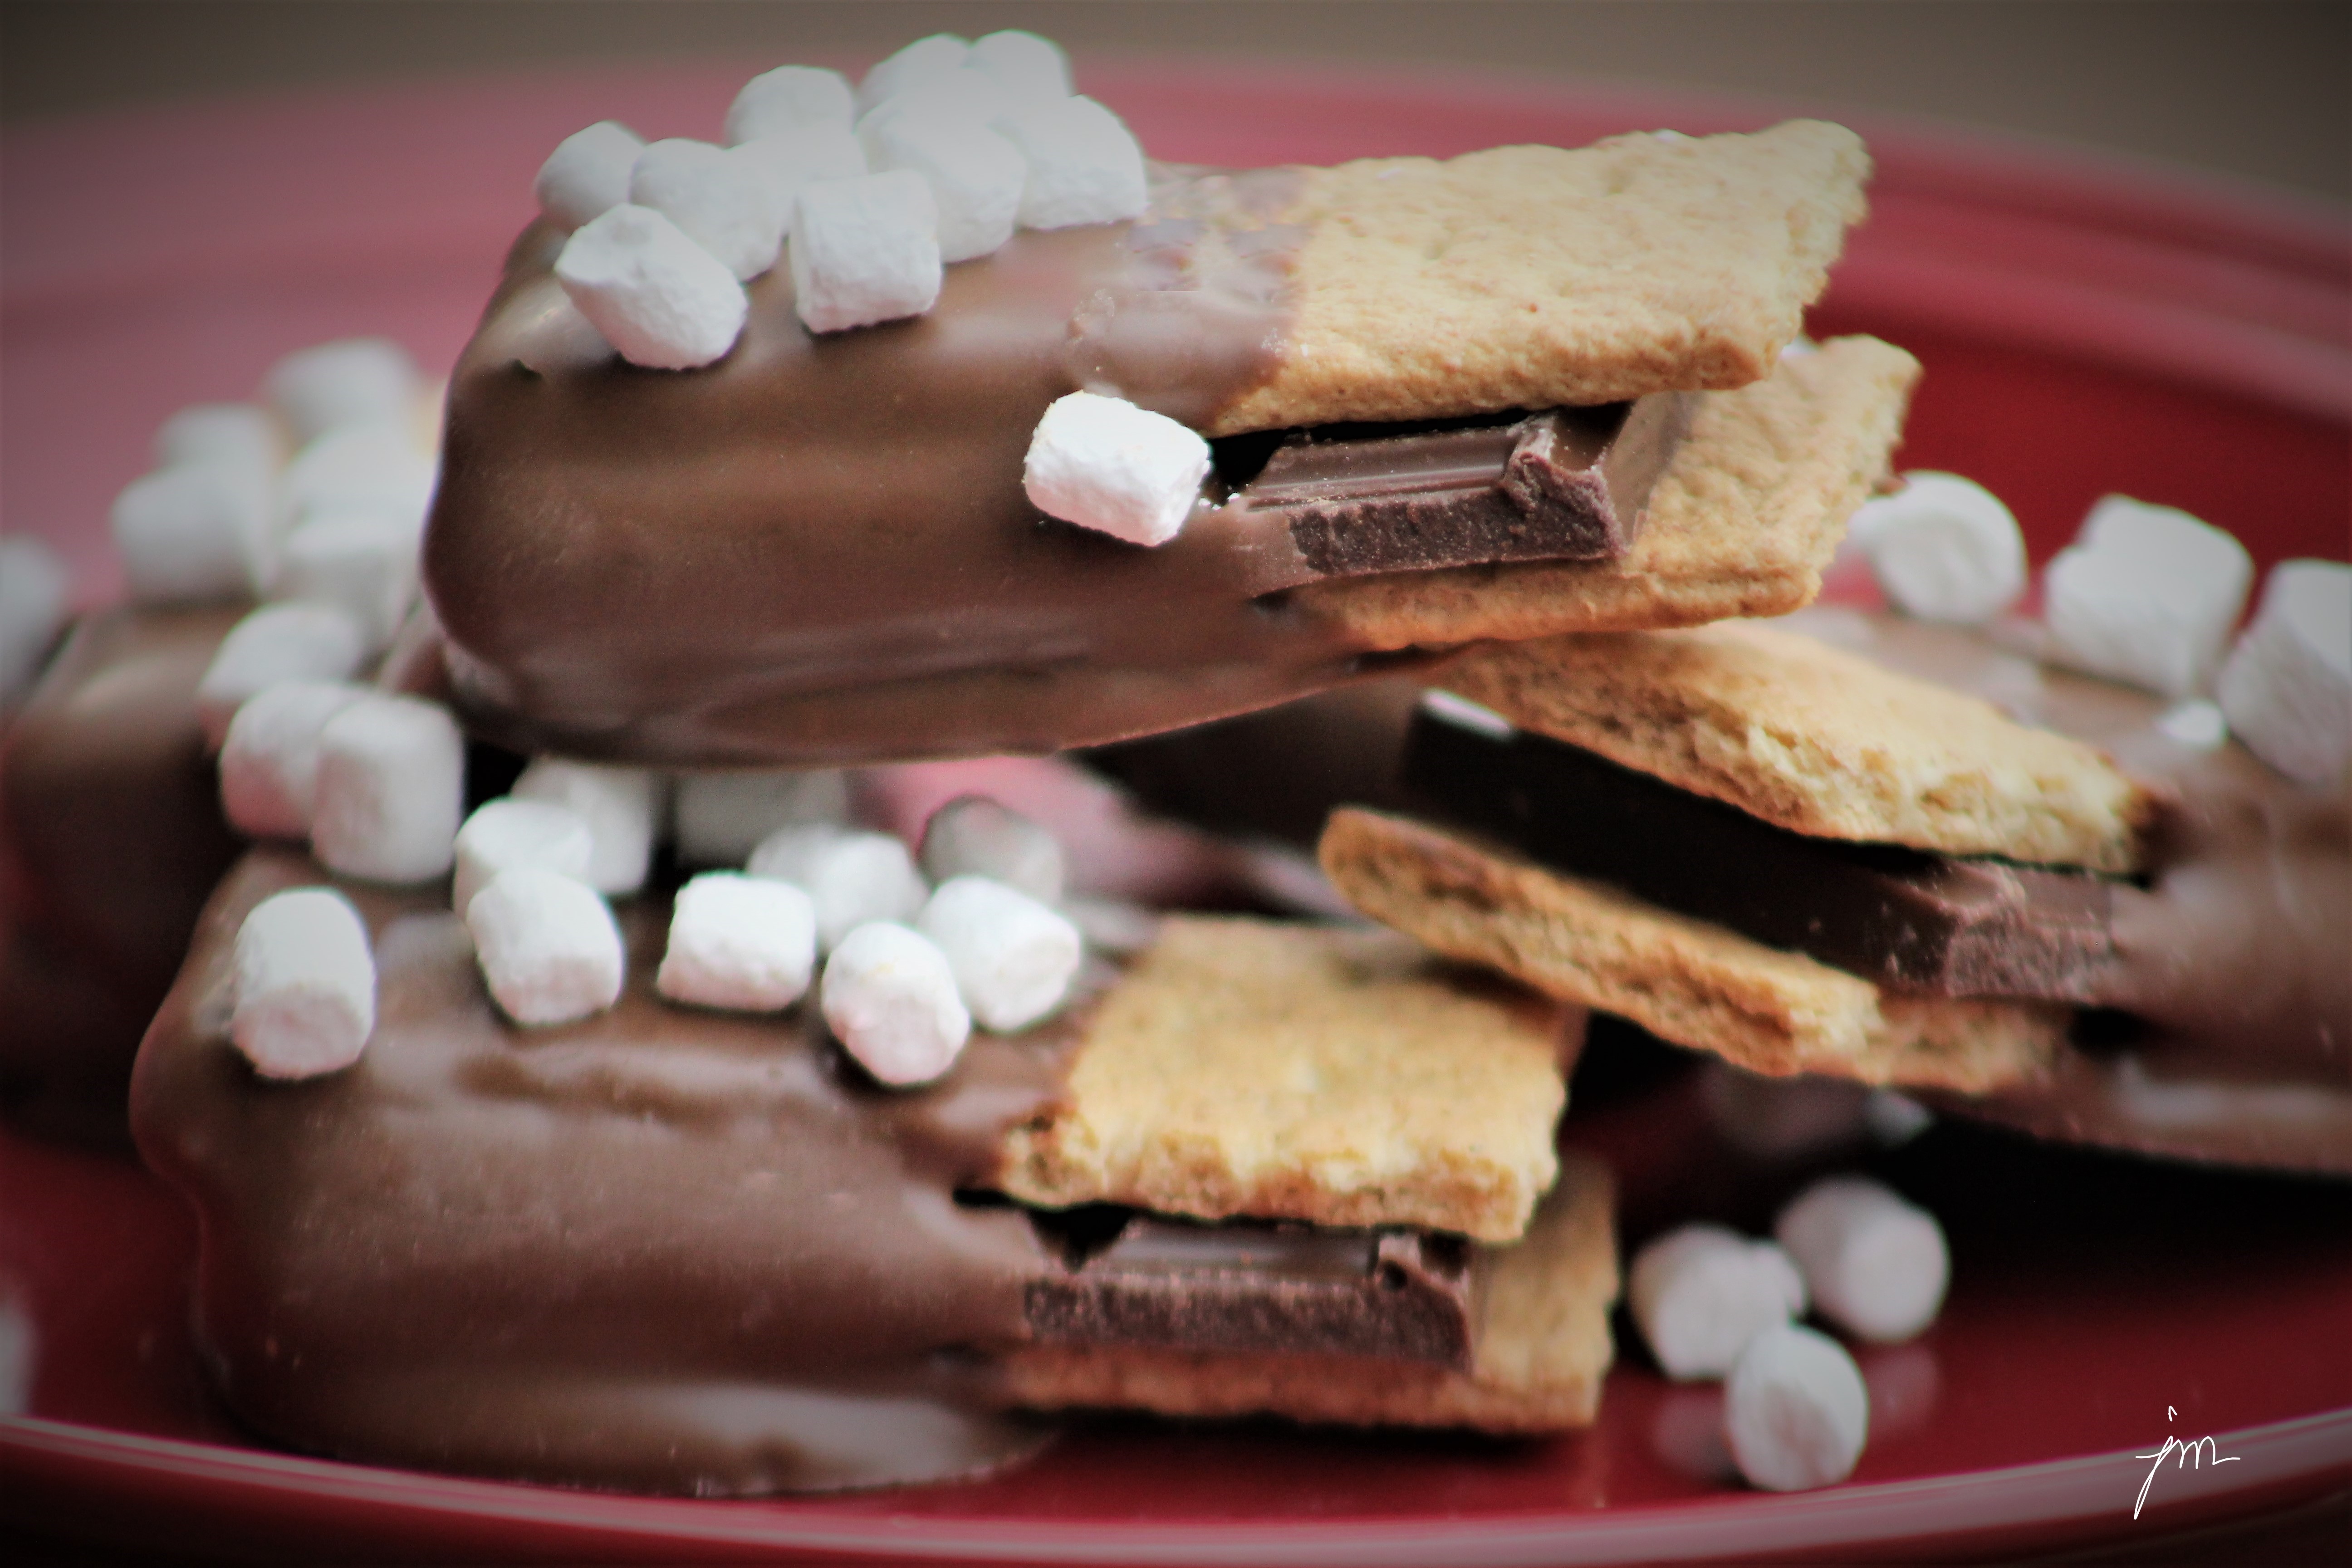
After breaking all graham crackers and chocolate bars into rectangles, place one chocolate rectangle between two graham cracker rectangles forming a sandwich.

Melt Merckens milk chocolate one pound at a time in microwave.  Heat for 1 minute on high.  Stir well.  Heat 20-30 more seconds.  Stir well until smooth.

Dip each graham cracker and chocolate bar sandwich into chocolate – coating 1/2 – 2/3 of cookie.   Let excess drip, and place on sheet of wax paper to cool and harden.  Dip 4-6, place on wax paper, and sprinkle with marshmallows.  Working in groups allows the marshmallows to stick to the melted chocolate before it cools to harden.  Continue until all are coated and sprinkled with marshmallows.  Allow to cool and harden.

They are ready within 20-30 minutes to enjoy or store in an airtight container.

Enjoy!

Cheers & Hugs,
Jodi

P.S.  If you are local, I made these to share at the Berry Vine Gifts Christmas in the Woods Open House, which starts today, Friday, November 17th (10-6).  It also runs through the weekend, Saturday, November 18th (10-6) and Sunday, November 19th (12-4).  Come munch on one with a cup of cocoa while you browse the beautiful holiday handmade crafts, antique furniture, and gifts in this one-of-a-kind shoppe (including my art and Colleen’s rustic pallet signs!) 

A Wizard of Oz Party

A Wizard of Oz Party.

Yesterday, I shared a recipe for Butterscotch Haystacks that I mentioned I made for a  Wizard of Oz Party.  Today, I want to share some more of the super simple treats I prepared for our little group of 11 ADULTS who decided we wanted to watch the Wizard of Oz together.

I prepared a salami, cheese, and olive tray in the shape of the infamous Yellow Brick Road.

And oh what a joy it was to answer my cell phone at exactly the assigned start time of our little party to be asked to come outside…..

When I stepped out onto the porch in the dark and looked into the driveway, a group of seven silly, sweet friends had their arms linked together in a row and came skipping up to the porch singing, “We’re off to see the Wizard… the wonderful Wizard of Oz…” as if they were on the yellow brick road.

I knew we were in for a fun night!   One friend dressed as a scarecrow and another in the “outfit” she wore when she saw the movie for the first time – jammies, a blanket, and pig tails!

We had Bugles “Tornadoes” to dip and munch….


along with Potato Sticks “Scarecrow Straw” and Cheese Curls “Lion Tails.”


There were Hershey’s Kisses “Tin Man Hats”

and bowls of Skittles and Dark Chocolate M&M’s “Somewhere Over the Rainbow.”

We gathered at the bar first for drinks and toasting to get the evening started, then made our plates and settled into comfy seats (some even on the floor) to watch the classic we had discussed weeks before talking about how scared, yet fascinated we were as children.   (Notice even Charlie – peeking from front bottom right below – and his friend Gemma hunkered in.)

For almost two hours, we were mesmerized as if we were children, yet noticing so many more things as adults.  We sang along and recited phrases.  We laughed, we gasped, we recounted childhood memories…

It was a silly theme and reason to get together, yet somehow turned into a sincerely authentic experience…

Maybe I’m still on the Brene Brown buzz of vulnerability and courage to be oneself after reading her latest book, Braving the Wilderness, but I woke up the next morning (granted a bit fuzzy from a wee bit too much wine), but feeling completely joyous and connected and complete.

What would life be like without friends?  I hope I never have to know.

And remember……….

You’ve always had the power my dear.  You just had to learn it yourself.”

Cheers & Hugs,
Jodi


Caramel M&M Cookies

Caramel M&M Cookies.

Have you tried the new Caramel M&Ms yet?

O. M. Geeeee!

I would never have believed the Mars Candy Company could made an M&M better than my favorite – Peanut.

My sons love the Peanut Butter M&Ms, and I know they make Crispy and Pretzel and Dark Chocolate, and of course the good old standby – Plain – but these Caramel M&Ms….

They are just the Rock Stars of the family!  The cat’s meow… The bee’s knees.. The bomb dot com!

Once hubby talked me into buying a bag and we tried, I knew I had to make cookies out of these little gems of heavenly deliciousness!

And they did not disappoint!  I made them for a picnic this past weekend, and it’s a good thing I took them all, because I might not be able to resist these babies!

I used my standard chocolate chip cookie recipe – replacing the chocolate chunks with the Caramel M&Ms.  Simple – but oh so delightful!

Give them a try!  Let me know if you agree.

Caramel M&M Cookies

  • Servings: 4 dozen large cookies
  • Print

Ingredients:

4 sticks (1 lb.) butter, softened
1 1/2 cups packed brown sugar
1 1/2 cups white granulated sugar
2 tsp vanilla
4 eggs
2 tsp baking soda
2 tsp salt
5 cups all purpose flour
2 9.6oz bags Caramel M&M Candies

Directions:

With electric mixer, beat butter and sugar together until completely incorporated. Add vanilla and eggs, and beat until light and fluffy. Add baking soda and salt, and mix another minute. Gradually add flour and beat until well incorporated, but do not overbeat.

Fold in Caramel M&M Candies.  Refrigerate dough for at least 2 hours or up to 2 days.

When ready to bake, preheat oven to 375 degrees F. With your hands, form a cookie dough ball about 1-1/2 inches in diameter.  Place on baking stone. Bake for 8-10 minutes. Do not overbake. Allow to cool on baking stone for 5-10 minutes, then remove to cooling rack to cool completely.

Enjoy!

Cheers & Hugs,
Jodi

#MadewithM

I am not being paid by M&Ms to promote them, though I wish I was!  

Chocolate-Covered Cookie Butter-Stuffed Oreos

About

chocolate-covered-cookie-butter-stuffed-oreos-7

O. M. G!  Have you tried the new Oreo Thins yet?  If there is one store bought cookie I love, it is Nabisco’s Oreo.  There’s really nothing like them.

I rarely buy them, but I have been curious about the new Oreo Thins I’ve been hearing about.  Double Stufs are DIVINE, so how are the Thins?

I needn’t wonder long, because when I saw an incredible idea for Cookie Butter Stuffed Oreos from Ruthanne, the incredibly creative baker at Easybaked, I knew I had to try them.

And they are AMAZING!

chocolate-covered-cookie-butter-stuffed-oreos

But who stops at amazing, when you can make them doubly amazing by topping them with a scoop of cookie butter…

chocolate-covered-cookie-butter-stuffed-oreos-4

placing another on top of that…

chocolate-covered-cookie-butter-stuffed-oreos-2jpg

sandwiching….

chocolate-covered-cookie-butter-stuffed-oreos-3

and covering with chocolate?!

chocolate-covered-cookie-butter-stuffed-oreos-6

I was dying to try them, but knew we didn’t need a batch of these around the house for the three of us.  So when my son Nick was heading over to celebrate his future father-in-law’s birthday yesterday, I asked if I could make them for him to take over for a little birthday gift.

He offered to help, so I gave him the jobs of “hand model” and sampler to assure they were okay to send.

chocolate-covered-cookie-butter-stuffed-oreos-5

He approved!

I filled a little pint-sized red berry basket with a dozen, wrapped it in clear cellophane and tied with some raffia to send on it’s way.

chocolate-covered-cookie-butter-stuffed-oreos-8

And now we only have to worry about having eight of these decadent little buggers around to taunt us with their amazingness!

Such a fun treat!  I hope you’ll give them a try.  And for more cuteness, check out Ruthanne’s Emoji Oreo Pops!    I’m kinda tempted!!   😉

Chocolate Covered Cookie Butter Stuffed Oreos

Ingredients:chocolate-covered-cookie-butter-stuffed-oreos-7

Directions:

Place 20 Oreo Thins Cookies on a cookie sheet.  Top each cookie with a teaspoon-sized scoop of cookie butter.  Press a second Oreo Thin on top to make a sandwich.  Freeze for approximately 30 minutes.

Melt Candy Melts in microwave in 30 second increments, stirring after each increment, until chocolate is melted and smooth.  (It took mine about 3 increments.)

Take 3-4 cookies out of the freezer at a time, and carefully dip – one at a time – in the melted chocolate.  Use a fork to tap excess off, and slide the bottom of the cookie along the edge of the bowl to remove excess.  Set on parchment or wax paper to harden.

Add sprinkles (if desired) before chocolate hardens, or drizzle with white or contrasting chocolate after it hardens.

Enjoy!

Cheers & Hugs,
Jodi

Reese’s Peanut Butter Thanksgiving Turkey Treats

Reeses Peanut Butter Chocolate Thanksgiving Turkey Treats 1

Whether you are a white turkey breast lover or a dark turkey leg, thigh or wing lover, you have to love these adorable Reese’s Peanut Butter Cup Chocolate Thanksgiving Turkeys!

When I saw these cute little treats on Pinterest made by MomonTimeOut,  I knew I had to make these for a couple of little sweeties we will be spending Thanksgiving with.  (And I’m guessing even a few of the big “sweeties” might love them too!)

A Reese’s lover’s dream come true using full size, miniature size, and Reese’s pieces all in one amazing treat!

I had some colorful candy-coated chocolate sunflower seeds I picked up at Trader Joe’s that I used for the noses, but you could use a Reese’s Piece turned sideways too.  I melted some Wilton’s Light Cocoa Candy Melts for the “glue,” but you could use chocolate chips if that is what you have on hand.  For me, it’s all about improvising and using what you have on hand or can get locally.  And these go together super quick!  (Believe it or not, I keep a few sizes of candy eyes on hand!  I know – I have issues!  But I’m betting you can find them at your local craft store like Michael’s or Joann’s or a candy or bake shop – and of course there is always Amazon!)

Reeses Peanut Butter Chocolate Thanksgiving Turkey Treats

There’s still plenty of time to throw these together for your Thanksgiving festivities.

I made 12, and it only took about a half hour.

Reeses Peanut Butter Chocolate Thanksgiving Turkey Treats 2

Reese's Peanut Butter Cup Chocolate Thanksgiving Turkeys

Ingredients:Reeses Peanut Butter Chocolate Thanksgiving Turkey Treats 1

Directions

  • Melt Candy Melts or Chocolate Chips by heating in microwave for 1 minute, stir, then heat 30 more seconds, and stir again.
  • Spoon into a zipper sandwich baggie, push to one corner, seal, and then snip a tiny corner to allow you to squeeze chocolate out for “gluing” chocolate pieces together.
  • “Glue” Miniature Reese’s Cup to Full-Size Reese’s Cup with a dab of chocolate.
  • “Glue” on Reese’s Pieces Feathers using a strip of chocolate squeezed across top of full-size Reese’s Cup.
  • “Glue” on eyes and nose.

Enjoy!

Cheers & Hugs,

Jodi

Chocolate Pretzel Shamrock Pops

Chocolate Pretzel Shamrock Pops

It will soon be St. Patrick’s Day, and I couldn’t let it pass without making a fun treat.  These Chocolate Pretzel Shamrock Pops are about as easy and cute as it comes.  I simply placed three mini pretzels and a cookie pop stick on a piece of parchment paper, spooned about a teaspoon of melted chocolate in the center, and placed a green Mint Dark Chocolate M&M in the center.  Let it cool/dry for about 5-10 minutes, and voila – a fun St. Patrick’s day treat.

Chocolate Pretzel Shamrock Pops. 2jpg

I originally saw a photo of what I thought was the same thing here created by Amy @ MomAdvice. (Amy has an awesome blog, Pinterest boards, and Instagram BTW!)  But then I realized, after actually going back to find the post to give credit, that Amy actually used Rolo candies in the center of hers!  How yummy does that sound?!  SCORE!  And it would have been even EASIER!

I should have read it first, but these became my version, and they are yummy and festive!

Chocolate Pretzel Shamrock Pop

When I ran out of sticks, and knowing my daughter-in-law was coming over and how much she loves white chocolate, I made a small batch of pretzels without a stick, but with a dot of white chocolate and an M&M.

white chocolate pretzel M&M st patricks day

Here’s my recipe (if you can even call this a recipe!) for this simple, festive treat:

Chocolate Pretzel Shamrock Pops

Ingredients:
1 Bag Mini Pretzel TwistsChocolate Pretzel Shamrock Pops
1 Bag Mint Dark Chocolate M&M’s (you could also just use green plan M&Ms or any other favorite flavor)
6-8 oz. Melting Chocolate (whatever is your favorite)
20 Cookie Pop Sticks
Parchment Paper

Directions:
Lay down 3 pretzels in the shape of a shamrock and cookie pop stick on parchment paper.
Repeat with as many as you have.
Melt chocolate in small bowl in microwave for 1 minute at 50% power, stir. Continue at 30 second intervals until completely melted.
Using a teaspoon, place a spoonful of chocolate in the center of the pretzel “shamrock.”
Push together gently if it pushes apart when you spoon the chocolate on top.
Place an M&M in the center.
Let cool/dry for 5-10 minutes.
ENJOY!  (And P.S. – you will have plenty of leftover M&M’s and pretzels to munch on too!)

jodi mckinney @lifeinbetween.me

Wishing you the luck of the Irish this week!

Cheers & Hugs,
Jodi

Chocolate Peanut Butter Acorn Cookies

I couldn’t resist trying this cute idea for a fun little Thanksgiving treat.

chocolate peanut butter acorns 2Aren’t they so stinking cute?!

chocolate peanut butter acorns 3

So easy to make…

chocolate peanut butter acornsand even more sweet to eat!

chocolate peanut butter acorns 1

I simply used chocolate icing in a tube to “glue” Nutter Butter Bites to Hershey’s Kisses and topped with a Nestle Mini Morsel Chocolate Chip.

(I’ve also seen these done with mini Nilla Wafers if you’re not a big peanut butter fan, but I think these are way yummier! 🙂 )

Voila! A fun, easy, and sweet treat!

Cheers & Hugs,

Jodi

Peanut Butter & Chocolate Halloween Spider Cookies

spider cookies 2

Halloween is a week away, and I had more fun than any normal middle-aged (ugh) woman with no children left at home should have making these adorable little peanut butter and chocolate spider cookies!  Heck – we don’t even get a single trick-or-treater, but who says you can’t have fun anyway?!?

spider cookies 4

I had seen a photo of these somewhere, and then a friend texted me a picture from Pinterest by Sommer Collier of A Spicy Perspective saying, “You need to make these for your blog.”  Well… that’s about all it took to get me excited, so I went in search of candy eyes at the local Michael’s Store – but none to be found…

Not giving up, I went to good ole’ Amazon Prime and had them in my hot little hands in two days!

spider cookies 3

They are basically a simple peanut butter cookie with a chocolate truffle in the middle, much like the Hershey Kiss peanut butter cookies (just on Halloween steroids!)

spider cookies

I thought they would be adorable, but wasn’t sure if anyone around here would eat them.

Well – I was wrong!  They loved them!

And it was fun to send some to Nick’s girlfriend, Liz’s office for my blog-following girlfriends at TS 🙂 and deliver some to my daughter-in-law, Colleen at work for a silly surprise.

spider cookie

I must give credit where credit is due.  I found this recipe on A Spicy Perspective’s Blog (which I am a total new fan of!).  She used Lindt Lindor truffles, which I think would be awesome too!  Here is Sommer’s recipe, which I tweaked just a bit for my own brevity’s sake:

Chocolate Peanut Butter Spider Cookies

  • 1/2 cup butter, softened
  • 3/4 cup smooth peanut butter
  • 1/3 cup brown sugar
  • 1/2 cup granulated sugar
  • 1 teaspoon vanilla extract
  • 1 large egg
  • 1 1/4 cup all purpose flour
  • 3/4 teaspoon baking powder
  • 1/4 teaspoon baking soda
  • 1 teaspoon salt
  • 24 round chocolate truffles (I used Ferrero Rocher Truffles, but you can use anything you like best)
  • 3/4 cup Nestle’s semisweet chocolate chips
  • 48 candy eyes
  1. Preheat the oven to 350 degrees F.
  2. Beat the butter and peanut butter until fluffy. Then add sugars, and beat again until fluffy. Scrape the bowl, and beat in the vanilla and egg.
  3. In a separate bowl mix the flour, baking powder, baking soda and salt together. Slowly incorporate into the butter and sugar mixture.
  4. Roll the cookie dough into 24 – 1 1/2 Tbsp-sized balls.   Bake for 7 minutes. Quickly press a cavity in the middle of each cookie with your thumb or pestle, then bake another 6 minutes, until golden.
  5. Cool until almost at room temperature (but not very warm) and place a truffle in the cavity of each cookie.
  6. Melt the chocolate chips in the microwave in 30 second increments, stirring in between, until melted and smooth. Scoop the melted chocolate in a zip bag. Close the bag and snip off a small portion of one corner to create a hole. Pipe 8 legs on each cookie, starting from the truffle body down.
  7. Use remaining melted chocolate to glue 2 eyes onto each truffle spider.

ENJOY!

Cheers & Hugs,

Jodi

PS  Hope you enjoyed this T!  🙂