Kathy’s Bluebird in Watercolor

Kathy's Bluebird in Watercolor - 11x14 140 lb cold press

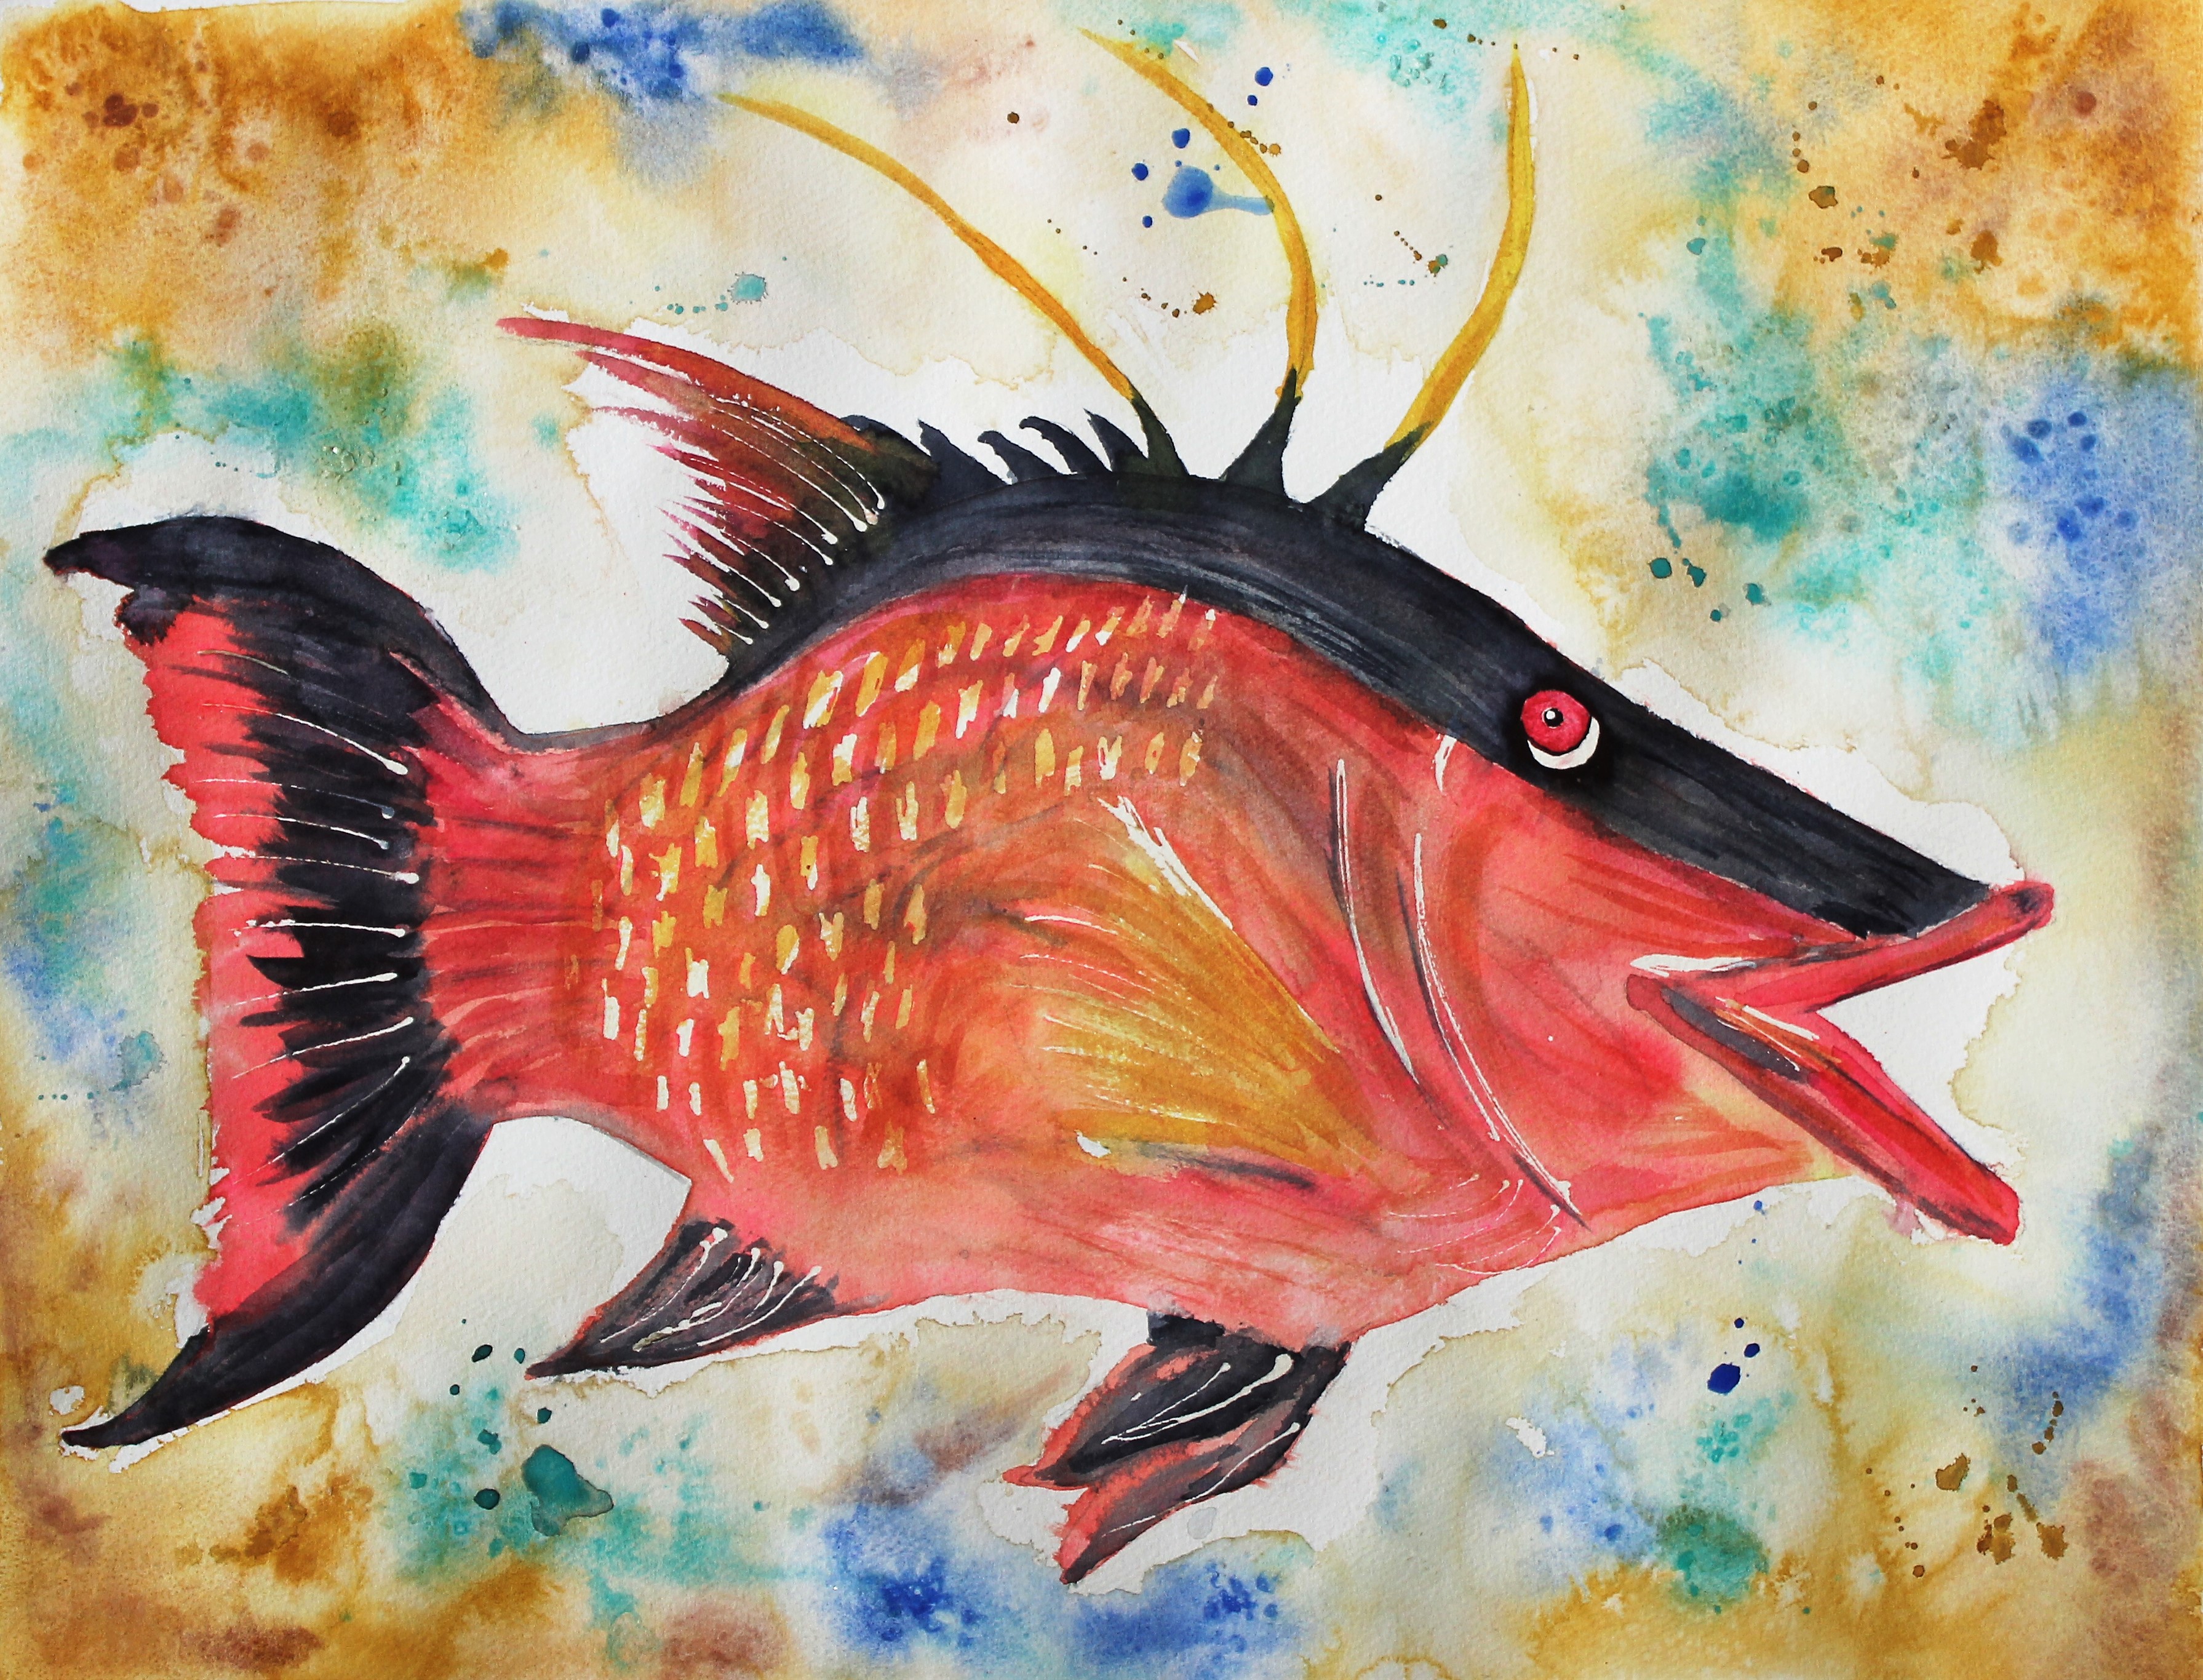
Kathy’s Bluebird in Watercolor – 11×14 140 lb cold press

Kathy’s Bluebird in Watercolor.

I finally remembered to post a bird painting on the right day for Draw a Bird Day which a gang of friendly, artistic bloggers celebrates of the 8th of every month (when we remember!).

Kathy, who blogs at Backyard Bird Nerd, always supplies us with plenty of great inspiration with her bird photography.  She recently captured a photo of an Eastern Bluebird that caught my eye and inspired this very loose interpretation.  I used her bird as a model, but had fun splashing it up in the loose style I love to do.  I took some artistic license in changing the piece of wood to a twig, adding the tail feathers that were hidden in her photo, making it a bit more of a summery, green scene instead of winter, and having some fun with color.  Awww – the beauty and freedom of art!

Cheers & Hugs,
Jodi

This bluebird painting is dedicated to the memory of my brother, Johnny, whose birthday would have been today.  RIP John P. Towle – February 8, 1964 – December 27, 2016.  You remain in my heart always.

This painting (original, prints, and cards) is available at McKinneyX2Designs as well as Berry Vine Gifts.

Daniel Smith watercolors used:  Cerulean Blue, Indigo, New Gamboge, Cadmium Orange, Olive Green, Perylene Green, Alizarin Crimson, Burnt Umber.

Finger-Lickin’ Baby Back Ribs

Finger-Lickin’ Baby Back Ribs.

Any rib lovers out there?

We decided on ribs for our Super Bowl Sunday meal this past Sunday.  They are great football feasting food!

Hubby learned a great way to make them.

The secret to making them tender and fall-off-the-bone wonderful is in boiling them first in Coca-Cola.

After boiling them for a couple hours, you drain them, put them in a container, drench with your favorite barbecue sauce, cover tightly, and marinade overnight.

When you are ready to eat them, you simply throw them on the grill, or in our case, Hubby likes to throw them in our Pit Barrel Cooker and smoke them a bit.  In a half hour, you have the most amazing tender, fall-off-the bone, juicy pork ribs you’ve ever eaten.

I like to add a little more sauce on when I eat mine.  (I’m a little saucier than Hubby!)

I know many folks have their own way of making ribs with varying techniques – dry rubs, wet sauces, marinades, etc., but I have not found a way I like better than this simple full-proof recipe.

Hope you’ll give it a try and let me know.

Finger-Lickin' Baby Back Ribs

Ingredients:

Directions:

Cut ribs into 4 pieces.  Put in large pot.  Pour Coca-Cola over ribs until they are completely covered.  Put lid on pot, and bring to boil.  Reduce heat, and simmer about an hour or so until they are fully cooked.

Remove ribs from pot, and discard Coca-Cola.  Place ribs in airtight container.  Cover with barbecue sauce and lid.  Marinade overnight or for at least 6-8 hours.

A half hour before ready to serve, place on grill or in Pit Barrel Cooker and grill/heat through.

Serve with additional barbecue sauce if desired. 

Enjoy!

Cheers & Hugs,
Jodi

A Tale of Two Fish

Hogfish Watercolor 16×20 #1

A Tale of Two Fish.

A friend recently asked me
to paint a fish for her fiance.

A Hogfish it was.
Lachnolaimus Maximus.

A fish caught
on a recent vacation.

She wanted it big…
Big by my painting standards.

The biggest I’ve painted to date is 11×14.
My friend wanted this hogfish painting to be about 16×20.

So I gave it
a whirl.

My first painting is above.
I never dreamed I would share it…

It was
a first attempt…

A lesson in what I wanted to do,
and what I didn’t want to do.

Here’s the actual Hogfish caught

So I tried
again.

I painted it less realistically.
More impressionistically.

A little more subtle.
A little more artistic license….

Impressionistic Hogfish 14×22 #2

I liked my second go
better….

but I still
wasn’t sure

about this large
Hogfish painting.

I showed Hubby my second painting
to get his thoughts.

He liked it.

Then I showed him my first go –
laughing a bit.

I explained
this was how I started.

His mouth dropped open.
He loved it….

What???

The point I was trying to make
was look how much better it got…

He insisted I share both with my friend,
and let her pick.

So I did.

My faithful friend
agreed with me.

She liked the second one better.
A bit more subdued.

But she decided to let
her fiance choose.

So she showed
him both.

And he chose…
the first.

Just like
Hubby.

So…
they are getting them both!

Cheers & Hugs,
Jodi

Raspberry-filled Vanilla Cupcakes

Raspberry-Filled Vanilla Cupcakes.

If you are looking for a super special, absolutely rock-your-world delicious treat to bake for your special Valentine(s), look no further thank these amazing Raspberry-Filled Vanilla Cupcakes!

I have always admired beautiful cupcakes and love those special gourmet ones that have surprise fillings and are extravagantly decorated, but I have never had much success making them.

I had the urge to give it another try yesterday after purchasing some fun sprinkles I was dying to use somehow.

Disclaimer – I have a weird “thing” for sprinkles and buy way more than I ever use!  I bought three different kinds of red/pink Valentiney ones and one big container of regular ones.  My granddaughter had fun shaking them in the cart while we were shopping!

I found a recipe at RockRecipes.com that I tweaked up a bit.  I was so excited with how beautiful and YUMMY they turned out.

When I handed one to Hubby to taste test, I said,  “Are you ready to have your world rocked by this?”

He loved it!

Here is how I made them.  Hope you give them a try.

Raspberry Filled Vanilla Cupcakes

Ingredients:

Cupcake Batter:

  • 1 1/2 cups flour
  • 1 1/2 tsp baking powder
  • 1/4 tsp salt
  • 1 stick (1/2 cup) butter, softened
  • 1 cup sugar
  • 2 eggs
  • 2 tsp. vanilla
  • 1/2 cup evaporated milk

Raspberry Filling:

  • 1 cup fresh raspberries
  • 1/4 cup sugar
  • 1 tsp corn starch
  • 1 oz. water

Vanilla Cream Cheese Frosting:

  • 1 stick (1/2 cup) butter, softened
  • 1/2 cup (4 oz.) cream cheese
  • 3 1/2 cups powdered sugar
  • 1 tsp vanilla
  • 2-3 Tbsp milk

Directions:

To make cupcakes, preheat oven to 325 degrees F.

Cream together butter and sugar until light and fluffy.  Add eggs, one at a time, beating until well incorporated.  Stir in vanilla.  Add baking powder and salt, then fold in flour.  Finally stir in milk to create batter.

Pour into paper-lined cupcake/muffin pan.  Bake for approximately 20 minutes, or until toothpick inserted into center comes out clean.

While cupcakes are baking, prepare raspberry filling by stirring 1 cup raspberries and 1/4 cup sugar in small saucepan.  Simmer over low heat for about 10 minutes.

Dissolve cornstarch in water, and slowly pour into boiling berries.  Stir constantly until thickened.  Allow to cool.

Prepare frosting by blending together butter, cream cheese, and vanilla.  Add powdered sugar and enough milk to make a smooth, creamy consistency.

When cupcakes are cooled, use an apple corer to remove a small section from center of cupcake.  Fill with raspberry filling.

Decorate with cream cheese frosting and sprinkles and fresh raspberries if desired.

Enjoy!

Cheers & Hugs,
Jodi

Dance with Your Heart

Dance with Your Heart Pink Ballerina 11×14 140lb Cold Press

Dance with your Heart.
Your feet will follow.

There is something so fun about painting ballerinas.

I came across this idea and painting demonstration by Julie Hyde that uses cling wrap to create an ethereal effect of movement to the ballerina’s skirt.

Using a wet on wet technique, you apply crinkled cling wrap to the wet paint.  After allowing it to dry thoroughly, when you lift the cling wrap, a beautiful texture is created.

I also bought a book by an artist I recently discovered  – Ann Blockley, called Experimental Landscapes in Watercolor.  She also uses cling wrap and salt and ink and other various techniques to create dramatic expressive and interpretive landscapes.  I’m looking forward to trying out some new ideas from that.

In the meantime, I hope you will dance….

with your heart, with paint, while baking, while working….

whatever it is you are doing.

And Cherish the Moments.

Cheers & Hugs,
Jodi


Friday and Saturday

Image result for friday and saturday

Hi Friends,

I have been blogging daily here at TheCreativeLifeinBetween.com since May 18, 2014.

A post every day for close to four years – sharing and “cherishing the moments.”

Posts with photography, poetry, stories, musings, recipes, watercolors, arts and crafts – all the “stuff” I love to do “in between.”

I feel so honored to have 4,000+ people following along here with me, and I greatly appreciate those who take the time to write notes and comments that encourage me so immensely.

It is becoming a bit of a challenge to blog every day, so I am going to allow myself a bit of a break and take Fridays and Saturdays off from posting.   I will continue on Sundays through Thursdays.

I hope this will keep my content fresh and my passion engaged.

So Happy Friday!
Cherish the Moments….
Know I’ll be cherishing mine immensely with my granddaughter, and I’ll be back Sunday!

Cheers & Hugs,
Jodi


A Snowy Blanket

A Snowy Blanket – Mars, PA – Winter 2018

A Snowy Blanket.

Winter’s blanket
of snow

is soft
and fluffy.

It’s cozy
and fuzzy.

But oh
snowy blanket…

you are not
warm.

What kind
of blanket is that?

Cheers & Hugs,
Jodi

Imagine it Real

Soft Spring Bunny Watercolor 8x10

Soft Spring Bunny Watercolor 8×10

Everything
that is real
was imagined
first.

The Velveteen Rabbit

I “real”ly enjoyed
painting this
soft Spring bunny
with a bright, hopeful eye.

I never would have
“imagined”
just a couple years ago
that I could possibly
consider myself an
artist.

Imagine
it
Real.

Cheers & Hugs,
Jodi

That Moment

That Moment.

That moment when a drip of water
crystallizes into ice with a single degree drop in temperature.

That moment when your eyes meet
and you truly see, and you immediately understand completely.

That moment when a song comes on
and memories and long-forgotten feelings flood your heart and soul.

That moment when the ringing phone
brings startling news that suddenly changes everything.

That moment when a single spark
ignites a rip-roaring, intensely scorching, blazing fire.

That moment of quiet wonder amidst the clamor
that reminds us that blissful peace is within reach.

That moment…

just one of the many…

that define our lives.

Cherish that moment.

Cheers & Hugs,
Jodi

Easy Sausage & Vegetable Quiche


Easy Sausage and Vegetable Quiche.

For those days when you want a hearty, substantial supper, but don’t feel like putting a lot of time and effort into it, this simple recipe is just the ticket.

It’s full of protein and veggies and could really be eaten for breakfast, lunch or dinner!

The secret to it being easy is in the fact that you don’t have to prepare a crust.  You simply use a little bit of baking mix (like Biquick) to create an almost crust-like texture.

And the options are limitless for what you can put in for your protein and veggies.  Exchange the sausage for bacon or chicken or turkey or ground beef.   You could even leave the meat out and just add more veggies.  Throw in any favorite vegetables you have in your fridge – mushrooms, asparagus, cauliflower, spinach, kale, tomatoes…..  And use any kind of cheese you love.  Exchange the cheddar for Swiss or muenster or provolone or mozzarella or even blue cheese or feta.

You get the idea…  right?  Toss in whatever you like, and you can have a wide variety of quick and easy meals.

I was recently reminded of this recipe when I came across a version of it at The Speckled Pumpkin.  It reminded me of years ago making all of those “impossible” pies….  Impossible Cheeseburger Pie, Impossible Taco Pie, Impossible Lasagna Pie, Impossible Tuna Pie….  Anybody else remember the Impossible Pie craze?  I may be back in the mood for these!

Serve it with a salad or side of roasted potatoes or even some chunky applesauce.

Here is how I made mine for our Sunday Supper last night.

Easy Sausage and Vegetable Quiche

Ingredients:

  • 1 lb pork sausage, cooked and crumbled
  • 1/2 medium sweet onion, chopped
  • 1 red pepper, chopped
  • 1 1/2 cups chopped fresh broccoli
  • 1 cup shredded cheddar cheese
  • 4 eggs
  • 2 cups milk
  • 1 cup Bisquick baking mix (or your favorite)

Directions:

Preheat oven to 400 degrees F.

Put sausage in bottom of stoneware deep dish baker or your favorite 2-quart round casserole dish or deep dish pie pan.  Top with chopped onions, pepper, broccoli, and cheese.

In a medium bowl, beat the eggs, milk and baking mix with a wire whisk until well blended.  Pour over sausage, veggies and cheese.

Bake for approximately 40 minutes until knife inserted in center comes out clean. 

Enjoy!

Cheers & Hugs,
Jodi