Perfect Prime Rib Roast

Perfect Prime Rib Roast.

On Christmas Eve this year, we decided on a Simple Surf and Turf Dinner menu to have with the family.  The Surf was Bacon Wrapped Scallops.  The Turf was Prime Rib.  Both were prepared simply, and turned out delish!  Baked potatoes, Roasted Brussels Sprouts and a Salad of romaine lettuce, apples, dried cranberries and walnuts accompanied the entrees.

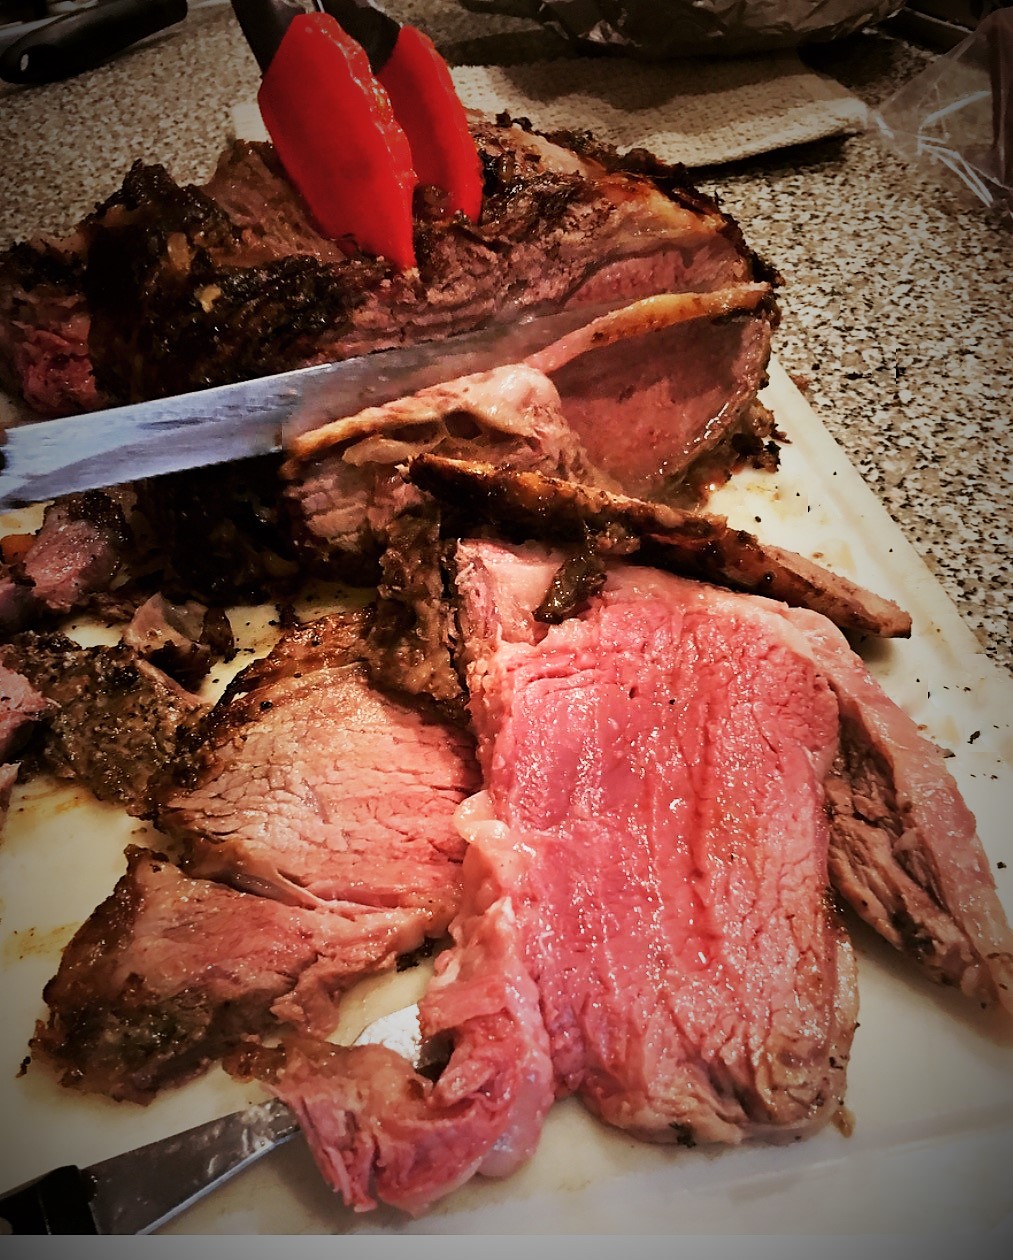
I managed to quickly snap this iPhone photo of Hubby cutting the prime rib.  Not the best photo, but this recipe I found and slightly modified is such a keeper, I had to share!  The roasted vegetables not only help to make the perfect base for the au jus, they also taste great too as an extra veggie.

Whenever you want a simple, but elegant entree, this is a winner you will want to try.

Perfect Prime Rib Roast

Ingredients:

  • 7-8 lb Prime Rib Roast (with bones)
  • 1-2 Tbsp Horseradish
  • 1-2 Tbsp Dijon Mustard
  • 2 tsp coarse salt
  • 2 tsp coarsely ground black pepper
  • 4 tsp fresh thyme
  • 2 tsp garlic powder
  • 4-6 stalks celery, cut into 1-2 inch pieces
  • 1 cup carrots, cut into 1-2 inch pieces
  • 1 large sweet onion, quartered
  • 2 beef bouillon cubes
  • 1 1/2 cups water
  • 1 tsp cornstarch
  • 1 tsp water

Directions:

Preheat oven to 450 degrees F.  Rub roast with horseradish and mustard.

Combine salt, pepper thyme and garlic powder, and sprinkle over roast.

Place celery, carrot, and onion chunks in the bottom of a large roasting pan.  Place roast on top of vegetables.

Roast for 30 mins.  Reduce oven temperature to 350 degrees F, and roast until meat is 135 degrees F.

Remove from oven, cover with foil, and allow to rest for 30 mins.

Make  au jus sauce by placing pan drippings in roasting pan (veggies removed and reserved to serve) over a burner set to medium.  Stir in beef bouillon and water.  Bring to a boil.  Combine cornstarch and water, and whisk into sauce.  Allow sauce to thicken slightly, and serve with roast.

Enjoy!

Cheers & Hugs,
Jodi

Turkey Cranberry Quesadilla

Turkey Cranberry Quesadilla.

Today is December 9th.
Hopefully your leftover turkey and cranberry sauce is long gone from Thanksgiving.

But Christmas is right around the corner.
And more turkeys will be on the menu.

This Turkey Cranberry Quesadilla is so so delicious, it is worth roasting a turkey for!

Remember the Cranberry Jalapeno Holiday Dip recipe I shared that I made for Thanksgiving?

Turns out – it is an AMAAAZZZING sandwich spread and Quesadilla Filling!

With the last of our turkey, a generous slathering of Cranberry Jalapeno Holiday Dip, and some shredded cheddar cheese, I made this Turkey Cranberry Quesadilla last week that I am still “jonesing” for right now.

It is pretty hard to beat any type of protein (turkey, chicken, beef, pork) topped with some veggies or fruit and cheese, pressed between a couple of tortillas and toasted up crisp on the outside, but warm and gooey on the inside.

Here is how I made my Turkey Cranberry Quesadilla.

Turkey Cranberry Quesadilla

Ingredients1/2 cup chopped or shredded cooked turkey

Directions

Heat a large cast iron skillet over medium-high heat.  Butter one side of each tortilla.  Place one tortilla on skillet.  Top with Cranberry Jalapeno Holiday Dip, turkey and cheese, followed by remaining tortilla.  Top with cast iron press and grill for 2-3 minutes.  Flip tortilla and grill for an additional minute.

Cut into wedges to serve.

Enjoy!

Cheers & Hugs,
Jodi

Herb and Garlic Roasted Spaghetti Squash

Herb and Garlic Roasted Spaghetti Squash.

Simple.
Healthy.
Amazingly Delicious!

I thought I was going to make something a bit more extravagant when I decided to roast some spaghetti squash by simply drizzling with olive oil, sprinkling with coarse ground pepper and salt, and topping with some garlic cloves and fresh herbs.

But when it came out of the oven looking like this….

And I took a teensy taste when scraping the flesh with a fork….

I ended up eating an entire half for my lunch!

I adore spaghetti squash, and have made it a number of ways that I’ve shared here:

Four Cheese Garlic Spaghetti Squash

Parmesan Garlic Roasted Spaghetti Squash

Italian Spaghetti Squash

But this super simple, quick and easy way is my new fave…..   at least for today!

Here is how I made it:

Herb & Garlic Roasted Spaghetti Squash

Ingredients:

  • 1 Spaghetti Squash
  • Extra Virgin Olive Oil
  • 4-6 cloves garlic
  • Salt & Pepper
  • Fresh Herbs

Directions:

Preheat oven to 400 degrees F.

Cut spaghetti squash in half, and scoop out seeds.  Place in cast iron skillet.  Drizzle liberally with extra virgin olive oil, toss garlic cloves and fresh herbs on top (I used fresh parsley and rosemary), and sprinkle liberally with fresh ground pepper and salt.

Roast for 45-55 minutes.

Remove from oven, and scrape flesh with fork to create spaghetti.  Serve immediately.

Enjoy!

Cheers & Hugs,
Jodi


Cranberry Jalapeno Holiday Dip

Cranberry Jalapeno Holiday Dip.

When I was asked to bring an appetizer to my new Daughter-in-Law, Liz’s family Thanksgiving, I knew I had to make this after being told by my BFF, Jill that everyone was “jonesing it” when she made it for a party.

First I had to laugh at our 50+ year old selves using urban slang, then I had to make it and see if it was so!

Well – Yep!  It was a hit! One sister asked if the recipe was on the blog, because she wanted it (here it is Laura!), and another said she normally doesn’t like salsas, but she really liked it.

It is sweet, and it is spicy. It is crunchy, and it is creamy. All of this in a bite!

Thumbs up from all, except for hubby, who said it was… meh… He preferred the other appetizer I made – Pumpkin Pecan Baked Brie – which was pretty amazing too!

But will you make this and let me know and prove him wrong? <wink>

So secret revealed here.  I did not take pictures of the batch I made for Thanksgiving, so I made it again this past week just to get pictures <whistles and rolls eyes… not owning up to the fact that I ate a quarter of it for lunch one day…..>

And guess what else I did with it this week?  I made a leftover cold turkey sandwich and slathered some of this on the Smart Bun first.  YUM!  Who knew it would make a great turkey sandwich spread too??!!

This will be a hit at any holiday gathering, and it is so easy and pretty!  Here is the recipe as I slightly tweaked from a recipe I found through Pinterest:

Cranberry Jalapeno Holiday Dip

Ingredients:1 12oz. bag fresh cranberries

  • 1/3 cup sliced green onions
  • 1/4 cup sliced jalapeno pepper slices in a jar (or 1-2 fresh if you like it HOT!)
  • 2 Tbsp. chopped cilantro
  • Juice of 1 fresh lemon
  • 1/4 tsp salt
  • 1 cup sugar
  • 16 oz. cream cheese, softened

Directions:

Chop cranberries (I used the Pampered Chef Food Chopper, and it worked wonderfully, but you can also chop by hand.  Do not put in a food processor as they will become too mushy), and place in a medium bowl.  Add chopped green onions, jalapenos, cilantro, lemon juice, salt, and sugar, and stir gently, but well.

Cover, and let refrigerate overnight.

When ready to serve, strain or squeeze liquid from cranberry relish.

Spread cream cheese in bottom of a pie plate or serving dish.  Top with cranberry relish mixture.

Serve with crackers, tortilla chips, pita chips, celery sticks, or your favorite “dipper.”

Enjoy, and let me know if you and your friends are jonesing it too!

Cheers & Hugs,
Jodi

Cheesy Bacon Ranch “Crack” Dip

Cheesy Bacon Ranch “Crack” Dip.

It’s party food time of year!

Time for dips and spreads, puffs and cups, hors d’oeuvres and crudites, balls and logs… Time for bits and bites in every color and shape and flavor.

When you are looking for an easy, crazy addictive, crowd-pleasing recipe, give this warm, cheesy, bacony, ranchy dip a go.

It’s sure to be a hit!

Cheesy Bacon Ranch Crack Dip

Ingredients:

  • 8 oz cream cheese, softened (I used 1/3 Less Fat)
  • 16 oz. sour cream (I used Light)
  • 2 cups cheddar cheese, shredded
  • 1 lb. bacon, cooked crisp and crumbled
  • 1/2 cup thinly sliced green onions (reserve a few for garnish)
  • 2 Tbsp. (or one 1oz. envelope) Ranch Dressing mix

Directions:

Preheat oven to 400 degrees F.

Combine all ingredients in bowl, reserving a bit of cheddar cheese and a few green onion slices for garnish.

Transfer dip to a pretty oven-proof serving bowl, fand back 20-25 minutes, uncovered until browned and bubbly.

Remove from oven, and immediately garnish with reserved shredded cheddar cheese and green onions.

Serve warm with tortilla chips, pretzel sticks, carrot or celery sticks, crackers, or your favorite dipper.

Enjoy!

Cheers & Hugs,
Jodi


S’More Cookie Bars

S’More Cookie Bars.

What S’more fun than S’mores?!

And what s’more perfect with hot cocoa or coffee than s’mores.

And what s’more delicious than campfire s’mores?

S’more cookie bars any time of year!

I love these adorable little cookie treats I learned from my daughter-in-law, Colleen, who first served them at a holiday cookie exchange she hosted a couple years ago.

They are simple.   They are fun. They are beautiful.  And best of all, they are SCRUMPTIOUS!

The teeny tiny miniature dehydrated marshmallows totally make them!  I purchased them locally at Make a Cake, a local, charming little cake and candy decorating shop, but they are also available online if you can’t find them near you.

Here is how to make them.

S'more Cookie Bars

Ingredients:

Directions:

After breaking all graham crackers and chocolate bars into rectangles, place one chocolate rectangle between two graham cracker rectangles forming a sandwich.

Melt Merckens milk chocolate one pound at a time in microwave.  Heat for 1 minute on high.  Stir well.  Heat 20-30 more seconds.  Stir well until smooth.

Dip each graham cracker and chocolate bar sandwich into chocolate – coating 1/2 – 2/3 of cookie.   Let excess drip, and place on sheet of wax paper to cool and harden.  Dip 4-6, place on wax paper, and sprinkle with marshmallows.  Working in groups allows the marshmallows to stick to the melted chocolate before it cools to harden.  Continue until all are coated and sprinkled with marshmallows.  Allow to cool and harden.

They are ready within 20-30 minutes to enjoy or store in an airtight container.

Enjoy!

Cheers & Hugs,
Jodi

P.S.  If you are local, I made these to share at the Berry Vine Gifts Christmas in the Woods Open House, which starts today, Friday, November 17th (10-6).  It also runs through the weekend, Saturday, November 18th (10-6) and Sunday, November 19th (12-4).  Come munch on one with a cup of cocoa while you browse the beautiful holiday handmade crafts, antique furniture, and gifts in this one-of-a-kind shoppe (including my art and Colleen’s rustic pallet signs!) 

Double Crumble Apple Crisp

Double Crumble Apple Crisp.

Nothing says Autumn like the taste of sweet, tender baked apples layered with cinnamony, nutty, crunchy oat crumble in a divine Apple Crisp.

Right?!

So of course I had to bake one with a bunch of apples I was gifted with from a local farm market.

Hubby likes his warm with creamy vanilla bean ice cream melting on it for dessert.

I like mine refrigerator cold for breakfast with steaming coffee flavored with Italian Sweet Cream.

However you like it, this is a classic worth making at least once each Autumn – just because!

Here is the recipe I like best, which is slightly tweaked from a recipe found at Creations by Kara.

Double Crumble Apple Crisp

Ingredients:

  • 1 cup oats
  • 1 cup brown sugar, packed
  • 1/2 cup flour
  • 1 Tbsp + 1/2 tsp cinnamon
  • 1/2 tsp salt
  • 1/2 cup butter, room temperature
  • 1/2 cup chopped walnuts or pecans
  • 7 large apples, peeled and sliced
  • 1/4 cup sugar

Directions:

Combine oats, brown sugar, flour 1 Tbsp cinnamon, salt, and butter to crumble consistently.  Add chopped nuts and combine.

Press 1/3 of the mixture into the bottom of a round or square baking dish (9-11″).  Spread peeled, sliced apples on top.  Sprinkle with 1/4 cup sugar and 1/2 tsp cinnamon.  Top with remaining crumble mixture.

Bake at 350 degrees F for 45-50 minutes until apples are tender and crumble is browned.

Serve warm with ice cream or cool whip or cold for breakfast (wink!) – however you prefer!

Enjoy

Cheers & Hugs,
Jodi

Turkey Kielbasa, Brussels Sprouts, and Potato Skillet

Turkey Kielbasa, Brussels Sprouts, and Potato Skillet.

We all find ourselves on those days when we just need to throw something together quick for dinner – right?

We want it to be easy, but healthy and delicious if possible.

The other day I threw this together and really enjoyed it.  We had it with a cucumber salad on the side for a healthy delicious meal in 30 minutes.

I’m sure there are many options for different proteins and veggies and spices, but here is how I made this one.  Do you ever throw together quick “skillet” meals like this?  What do you like to use?

Turkey Kielbasa, Brussels Sprouts, and Potato Skillet

Ingredients:

  • 1 lb Turkey Kielbasa, cut into 1/2 inch pieces
  • 1 lb fresh Brussels Sprouts, cut in half
  • 1 lb petite yellow fingerling potatoes, cut in half (or your favorite)
  • 1 sweet red bell pepper, cut into 1 inch pieces
  • 1/2 sweet onion, chopped
  • 4 cloves garlic, minced
  • 3 Tbsp olive oil
  • Salt and pepper to taste
  • 1 Tbsp fresh minced rosemary

Directions:

Heat 2 Tbsp olive oil in a large skillet.  Add Brussels sprouts, potatoes, red bell pepper,  onion, and salt and pepper to taste. Cook for approximately 20 minutes or so beginning with high heat to brown and then reducing to medium and covering with a lid until Brussels are becoming tender and potatoes are almost cooked through (you can test with a fork).  Stir occasionally.

Add additional Tbsp of olive oil, garlic, turkey kielbasa and fresh rosemary.  Cook approximately 10  more minutes on medium heat, stirring occasionally until all is cooked and flavors are blended well.

Serve immediately.

Stores well to reheat for leftovers.  

Enjoy!

(I ate leftovers for breakfast the next day and LOVED!)

Cheers & Hugs,
Jodi


Honey Garlic Chicken Stir Fry

Honey Garlic Chicken Stir Fry.

Do you love going to those fun hibachi restaurants where they cook delicious stir fry meals right before your eyes?

This honey garlic chicken stir fry recipe reminds me of the fresh deliciousness of those experiences.

This might very likely be my all-time favorite chicken recipe!

It is simple and easy, made from ingredients typically kept on hand, and so adaptable to your tastes.

Make it with mushrooms and snow peas and onions if they are your favorite vegetables or what you have on hand.

Make it with beef or pork or shrimp – whatever you like best.

Whatever you like, please do try this awesome recipe.

I wonder if it will become one of your favorites like it is for me?

Here is how I made it this past week.

Honey Garlic Chicken Stir Fry

Ingredients:

  • 2-3 Tbsp. olive oil
  • 2 lbs. boneless skinless chicken breasts, cut into 1 inch pieces
  • salt and pepper to taste
  • 2 cups fresh broccoli florets
  • 1 cup sliced carrots
  • 1 cup sweet red peppers, chopped
  • 1 cup zucchini, sliced
  • 5 cloves garlic, chopped
  • 1/2 cup chicken broth
  • 1/2 cup low sodium soy sauce
  • 6 Tbsp. honey
  • 3 tsp. cornstarch

Directions:

Heat 1-2 Tbsp oil in a large skillet over medium-high heat.  While oil is heating up, steam carrots in microwave for 3-4 minutes.

Season chicken cubes with salt and pepper to taste.  Allow to rest.

Add broccoli, carrots, red peppers, and zucchini to skillet.  Stir fry until vegetables are tender (approx. 3-4 mins.).

Remove veggies from skillet, and allow to rest.

Add remaining oil to skillet and stir fry seasoned chicken.  Cook 3-4 minutes on each side.

Add the chopped garlic, and cook for approx. 30 seconds.

Add the veggies back to the pan, and cook for a couple more minutes until the veggies are warmed through.

In a bowl, whisk together the chicken broth, honey, and soy sauce.  Pour over chicken and veggies.  Cook for one minute.

Whisk cornstarch with equal amount of cold water.  Add to skillet.  Bring to a boil, and cook for another minutes or so until sauce begins to thicken.

Serve over rice.

Enjoy!

Cheers & Hugs,
Jodi

*Recipe slightly adapted from DinnerAtTheZoo.

Old-Fashioned Homemade Chicken Soup for Beginners

When I have a head cold, nothing makes me feel better than the smell and taste of good old-fashioned chicken noodle soup.

So when my throat started aching, nose started running, cough began croaking, ears felt like they were stuffed with cotton, and head began pounding this week, I knew I had to get a pot of soup on.

Not only does the smell comfort me and remind me of Grandma’s house and love, but the steam clears up the stuffed nose and the warm broth soothes my sore throat.

When other foods lose their flavor when your head is congested, nothing tastes as good as homemade chicken soup.

If you are a beginner cook, I hope you will find this recipe easy to follow.  It is made from staple ingredients I almost always have in my kitchen, and though it takes a couple hours to simmer,  you can throw it together quickly and forget about it during that time – enjoying the aroma and anticipation of comfort.

Here is how I make it.

Old-Fashioned Homemade Chicken Soup for Beginners

  • Servings: approx. 12
  • Print

Ingredients

  • 2 lbs Boneless, Skinless Chicken Breasts (I like to use Trader Joe’s Frozen Organic Boneless & Skinless Chicken Breasts)
  • 12 cups water
  • 6 sticks celery cut into 4-5 inch pieces
  • 1 cup shortcut carrots
  • 5-6 tsp. chicken soup base (I like Bell-View)
  • 2 large cloves garlic
  • 2 large sweet onions, halved
  • 1/4  cup fresh chopped parsley (or 1 Tbsp dried parsley)
  • 1 Tbsp ground pepper
  • 12 oz. pkg Kluski egg noodles (I like Pennsylvania Dutch brand)

Directions:

Place frozen chicken breasts in large soup pot.  Cover with 12 cups cold water.  Add celery, carrots, chicken base, whole garlic cloves, onions, parsley, and pepper.  Cover and bring to a rolling boil.

Once boiling, reduce heat and simmer with lid tilted slightly so it is not tight fitting, but allows steam to escape.  Simmer for approximately 2 hours or until broth level reduces 1/2 – 1 inch.  You can tell this by looking at the side of the pot where a line will be formed where soup started.  This will allow the broth to build depth of flavor.

When soup is almost done, boil noodles in a separate pot, cooking 2-3 minutes less than directions.  Drain and rinse well with cold water.  Set aside.

When soup broth is done, pour through strainer into a larger pot.  The broth will go into the pot, and the chicken and vegetables will remain in the strainer.

When cool enough to handle, chop chicken and vegetables into bite-sized pieces.  Add back to broth, then add drained and rinsed noodles.   Stir to incorporate all.

Your soup is now ready to enjoy.  This soup keeps well for up to a week in the refrigerator and also freezes well.

Beginner’s sidenotes/tips:  You can certainly use a whole chicken or chicken parts, but it is a lot more work to clean the chicken from the bone, and remove the skin and fat after cooking to cut up for the soup.  Using chicken breasts also eliminated the need to allow the broth to cool and fat to rise to top to skim off as there is little to no fat in the chicken breasts.  Chicken breasts also allow for a heartier soup with big chunks of tender chicken.  Buying a better grade and organic chicken will give you better flavor and better food value.  I’ve found with cheaper brands of chicken, there is fat and gristle that needs removed as well as ligaments that need cut out.

You can certainly use whole raw carrots, but the convenient short-cut carrots save the need for peeling and cutting down carrots into manageable pieces.

While dried herbs are always good to have on hand in a pinch, nothing will make your recipes better than using fresh herbs.  Fresh parsley as opposed to dried will really add a whole new sophisticated level to your soup.

Always cook your noodles separately, and drain and rinse well in cold water.  This will remove the starch that cooks off the pasta from being in your soup and “muddying up” the broth’s texture and flavor.  Rinsing in cold water will stop the “cooking” that still continues in food like pasta while it is still hot.

Cook noodles 2-3 minutes less than directions say to avoid soggy, mushy noodles in your soup.  As they sit in the soup, they will soften and plump even more, so no need to over-cook.

Do not add oil or salt to the noodles when boiling.  There is plenty of salt in the soup base that will make the broth.  It is almost impossible to “unsalt” soup, but additional salt can always be added for individual taste or preference.  If you over-salt, add more water to broth or consider boiling a whole peeled potato in the broth.  The potato will absorb some of the salt.  You can then throw the potato out, hopefully salvaging your broth.

Enjoy!

Cheers & Hugs,
Jodi