Canning & Eating Sauerkraut – A New Year Tradition

canning-saurkraut-processed-jars

On New Year’s Day, Hubby and I canned the homemade sauerkraut we made this year at Krautfest about 12 weeks ago.

canning-saurkraut-marty

In past years, we froze it in Ziploc bags, but we decided to can it this year, and I’m so glad we did.  It tastes so much better this way, and no freezing and thawing.

canning-saurkraut-packed-jars

It was really quite simple to do.  We “cold-packed” it – meaning we did not heat or “cook” the sauerkraut first.  We simply packed the cold sauerkraut in warm, sterile jars and processed them in a hot water bath for 25 minutes.

canning-saurkraut-pot

Easy instructions can be found HERE.

Pork or kielbasa and sauerkraut is a New Year’s dinner tradition in our home and in our area.  Eating it on New Year’s Day is supposed to bring good luck and fortune in the new year.

So eat it we did!  Did you eat yours?

Cheers & Hugs,
Jodi

Easy Cinnamon Roll Apple Pie

cinnamon-roll-apple-pie-1

When my sister-in-law posted one of those amazing Tasty Videos on Facebook for a Cinnamon Roll Apple Pie, I just knew I HAD to try it!

cinnamon-roll-apple-pie-3

We love apple pie.  We love cinnamon rolls.  Who doesn’t??!!  Putting them together to make an EASY apple pie = Winner!

cinnamon-roll-apple-pie-2

If you struggle with making homemade crust or are looking for a new twist on traditional apple pie, this is an easy and super yummy semi-homemade version to try.

I made it for a birthday brunch yesterday when the family came over to celebrate hubby’s upcoming birthday.  After gorging ourselves on smoked sausages (that hubby smoked himself in his Pit Barrel Cooker we got him this past Father’s Day), Spinach, Feta, Bacon & Roasted Red Pepper Egg Casserole, Warm Biscuits and Sausage Gravy (homemade by our oldest son), and a fresh berry fruit salad, we waited a little while before eating this.  But when we did….. thumbs up all around!

I tweaked the recipe up a bit to assure the apples would be fully cooked without overbaking and drying out the cinnamon rolls.  It turned out wonderfully amazing!  And the smell……..  can you even imagine the wonderful smell?!?!

Hope you will give this delicious treat a try.  (Thanks for sharing Terri!)

Cinnamon Roll Apple Pie

Ingredients:cinnamon-roll-apple-pie-3

  • 6 cups peeled, cored, and thinly sliced tart apples
  • 1/2 cup sugar
  • 1 tsp cinnamon
  • 1 Tbsp butter
  • 3 Tbsp flour
  • 2 cans Pillsbury Cinnamon Rolls

Directions:

Preheat oven to 350°F/180°C.

Melt 1 Tbsp butter in large skillet, add apple slices, sugar, and cinnamon.  Cook on medium heat for approximately five minutes until tender.  Add flour and stir.  Cook one more minute until thickened.

Roll out each cinnamon roll in one tube until flat and thin using a small amount of flour to avoid sticking to rolling pin and counter.  Layer on the bottom and up sides of pie pan to form bottom crust.  Add the cooked apples.

Roll out each cinnamon roll in second tube until flat and thin, and layer on top of apples to form top crust.

Cover with foil and bake for 30 minutes.  Remove foil and bake for another 5 minutes.

Allow pie to cool and drizzle with icing from one tube of cinnamon rolls.

Enjoy!

Cheers & Hugs,
Jodi

Chunky Homemade Granola

Chunky Homemade Granola 0

I was itching to get back in the kitchen and make something after almost a week away.

Chunky Homemade Granola 1

And after a week of indulging, I thought I’d make something a bit healthy, but yummy to have on hand for the coming week.

chunky homemade granola 3

Homemade granola it was, and oh how yummy too!  Made with healthy ingredients like oats and nuts and dried fruits and held together with raw local honey and coconut oil, this recipe is delish just as is, but also delicious as a cereal with some extra fresh fruit like blueberries,

chunky homemade granola 4

or on top of Greek yogurt with some fresh fruit like blackberries!

chunky homemade granola 5

It also makes a lovely hostess or nice “thinking of you” gift in a clear bag with a pretty bow.

chunky homemade granola 2

It’s as simple as mixing everything together, packing it into a baking sheet, and baking.

Hope you’ll give it a try.  Enjoy!

Chunky Homemade Granola

  • Servings: a large batch!
  • Print

Ingredients:Chunky Homemade Granola 0

  • 1/3 cup raw local honey
  • 1/4 cup pure maple syrup
  • 2 Tbsp brown sugar
  • 4 tsp pure vanilla extract
  • 1/2 tsp salt
  • 1/2 cup coconut oil
  • 5 cups old-fashioned rolled oats
  • 1 cup walnuts, chopped
  • 1 cup raw cashews or almonds, chopped (I used cashews)
  • 1 1/2 cups dried fruit of your choice
    • I used:
      • 1/2 cup dried cranberries
      • 1/2 cup dried blueberries
      • 1/2 cup dried tart cherries
    • You could also use:  raisins, dates, apricots, goji berries, coconut, or any other dried fruit you like

Directions:

Preheat oven to 325 degrees F.

Whisk honey, maple syrup, brown sugar, vanilla, salt, and oil in a large bowl.

Add the oats and nuts, and stir until well coated and incorporated.  Add dried fruit and combine well.

Pour and spread mixture evenly onto a jelly roll sized  baking stone or parchment-lined baking sheet and pack down to compress.

Bake for 30 minutes until lightly browned.  Cool at least one hour in pan.

Break into pieces of your desired size, and store in airtight container.

Cheers & Hugs,
Jodi

*recipe adapted from Foolproofliving

Friday Night is Pizza Night

pizza 2

Friday night is often pizza night at our house, and although we often order in, sometimes we make our own homemade pizza.  It really is a fun way to get the whole gang engaged in the kitchen, and allows everyone to make their pizza just they way they like it.

pizza 1

This is a great, quick and easy fool-proof recipe for dough that you can top with any toppings you like.  It can be made ahead or right when you are ready to eat.

pizza3

One of my favorites is to spread roasted garlic on the dough, top with fresh mozzarella, fresh basil, and fresh tomatoes.  Sometimes simple is the best.

Other times, we spread with tomato sauce and top with pepperoni, crispy crumbled bacon, sauteed onions and peppers, mushrooms, banana pepper rings, and/or black olives.

The only rule is the cheese MUST be fresh sliced mozzarella – no pre-packaged, shredded cheese allowed.  There simply is no comparison.

What is your favorite pizza topping?

Homemade Quick & Easy Pizza Crust

Ingredients:pizza 1

  • 1 (.25 oz) pkg active dry yeast
  • 1 tsp white sugar
  • 1 cup warm water (approx. 110 degrees F)
  • 2 1/2 cups all purpose flour
  • 3 3/4 tsp. baking powder
  • 3/4 tsp. salt
  • 2 Tbsp olive oil
  • 1 Tbsp corn meal

Directions:

Dissolve yeast and sugar in warm water.  Let stand 10 min.

Stir in flour, baking powder, salt, and oil.  Combine well by kneading until smooth.  Let set for at least 5 min., or up to several hours.

If you have let the dough rise, punch down.  Stretch and toss or roll dough out onto baking stone or pizza dish sprinkled with corn meal.

Spread with desired toppings and bake in preheated 450 degree F oven over for 15 -20 minutes.

Enjoy!

Cheers & Hugs,
Jodi

Easy Homemade Chicken & Vegetable Lo Mein

chicken and vegetable lo mein 3

I love chicken and all the versatile ways you can prepare it.  I try a new chicken recipe almost every week.  I also love Asian-inspired dishes, so I really enjoyed trying a take on Chicken and Vegetable Lo-Mein.

chicken and vegetable lo mein 2

Like most recipes I make, almost everything can be substituted with any ingredients of your choice.  And though I provide measurements, I rarely measure anything exact myself.  In this recipe, you could use shrimp or pork or even beef if you prefer  instead of chicken.  You could also substitute any vegetables you prefer.  And if you don’t have lo mein noodles on hand, thin spaghetti will work too!

chicken and vegetable lo mein

I really believe the ingredient that seals the deal with this recipe is the addition of a lot of fresh spinach in the end that you cook only long enough to wilt.  It adds such great texture, color, taste, and nutritional value.  I also very highly recommend using low-sodium soy sauce.  I am a salt lover, and it has taken me a long time to realize this, but most soy sauce is way too salty.  The low-sodium version gives you just enough saltiness, but the full soy sauce flavor.  And the sesame oil is a must.  This cannot be substituted with corn or vegetable or canola or olive oil.  To get that great Asian lo mein flavor, the sesame oil is key.

Hope you will give this yet another winner winner of a chicken dinner a try.

Enjoy!

Easy Chicken & Vegetable Lo Mein

Ingredients:chicken and vegetable lo mein 3

  • 1 pound boneless, skinless chicken breasts, sliced thinly
  • 10 ounces lo mein egg noodles*
  • 1 tablespoon olive oil
  • 2 cloves garlic, minced
  • 1 cup red, yellow, orange bell pepper, julienned
  • 1 large carrot, julienned or 1/2 cup matchstick carrots
  • 1 cup sliced celery stalks
  • ½ cup green onions, sliced
  • 2 cups baby spinach

Sauce:

  • 2 tablespoons reduced sodium soy sauce, or more, to taste
  • 2 teaspoons sugar
  • 1 teaspoon sesame oil
  • 1/2 teaspoon ground ginger
  • 1/2 teaspoon Sriracha, or more, to taste

Directions:

In a small bowl, whisk together soy sauce, sugar, sesame oil, ginger and Sriracha; set aside.

In a large pot of boiling water, cook noodles according to package instructions; drain well.

Heat olive oil in a large skillet or wok over medium high heat. Add chicken, and cook thorough for several minutes.  Add garlic, bell pepper, celery, carrots, and onion. Cook, stirring frequently, until tender, about 3-4 minutes. Stir in spinach until wilted, about 2-3 minutes.

Stir in noodles and soy sauce mixture, and gently toss to combine.

Serve immediately.

*If lo mein egg noodles cannot be found, spaghetti can be substituted.


Cheers & Hugs,
Jodi

*Recipe slightly adapted from DamnDelicious

Old-Fashioned Dutch Apple Pie

dutch apple pie slice alamode

One of my favorite things to bake (besides cookies) is pie.  And what is more “all-American” for summer holidays and celebrations than apple pie?  Not sure why it is considered so “American” really – that is just what “they say.”  (Actually there are many theories…  which you can certainly feel free to Google, but let’s talk about baking and eating this amazingly yummy dessert!)

dutch apple pie cut

I made it this weekend to take to a party celebrating the Memorial Day holiday, family get-together, and birthday treat for my BFF, Jill.

When I make a pie to take somewhere, I almost always make a second one for home.  Hubby loves pie more than almost anything, and Grandma always taught me if you are going to go to the trouble and make the mess it takes to make one pie, you might as well make 2 or 3 or…. well – as many as you can!  🙂

So here is my recipe for old-fashioned, all-American Dutch Apple Pie.  I have tweaked it a bit from an old, worn-out cookbook I’ve had for about 30 years called , “Farm Journal’s Complete Home Baking Book.”  This is one of the very few cookbooks I’ve hung on to for it’s tried and true recipes.

I guarantee you will be a superstar if you bake and take or serve this all-star pie!

Dutch Apple Pie

Ingredients:dutch apple pie slice alamode

Directions:

Preheat oven to 400 degrees F.

Prepare pie crust and place in bottom of fluted 9 inch pie stone or pan.

Mix apples, sugar, flour, and cinnamon thoroughly until juices begin to form.  Pour into pie crust.

In a bowl, combine flour and sugar.  Cut butter in small pieces and work into flour/sugar with a pastry blender until a nice crumbly mixture forms.  Sprinkle and mound all over top of apple filling.

Cover edges of pie crust with foil to prevent from over-browning and bake for one hour.  Remove foil for last 10 minutes.

Cool completely and serve with ice cream, cool white or even a slice of sharp cheddar cheese if you please.

Enjoy!

Cheers & Hugs,
Jodi

Lemon Poppy Seed Biscotti

lemon poppy seed biscotti cover

Yesterday was the first day of Spring…

lemon poppy seed biscotti

and it snowed here in Mars!

lemon poppy seed biscotti 3

So I decided to make something bright and sunny and lemony…

lemon poppy seed biscotti 2

to dunk in my steaming cup of coffee by the warmth of a fire.

I’ve never made biscotti before, so decided it would be fun to try.  I love poppy seed, and it is so wonderful with lemon.

I found and slightly adapted a recipe from Lynn at FreshAprilFlowers, and I really enjoyed it.

This would make a wonderful Easter or hostess gift for coffee and tea lovers.

Lemon Poppy Seed Biscotti

Ingredients:lemon poppy seed biscotti cover
  • ½ cup granulated sugar
  • zest of one lemon
  • 1 Tablespoon butter, melted
  • 3 Tablespoons vegetable or canola oil
  • 1 large egg
  • 1 teaspoon vanilla extract
  • juice of one lemon, divided
  • 1 and ¾ cup all-purpose flour
  • 1 teaspoon baking powder
  • ¼ teaspoon salt
  • 2 Tablespoons poppy seeds
  • Egg Wash: 1 large egg, beaten with remaining lemon juice
Directions:

Preheat oven to 350ºF. Line a large baking sheet with parchment paper.

Place sugar in a medium bowl and add the lemon zest. Using your fingers, rub the zest into the sugar until all of the zest has been incorporated and most of the sugar is pale yellow. Whisk in the butter, oil, egg, vanilla extract, and 2 teaspoons of the lemon juice.

In a large bowl, toss together flour, baking powder, salt, and poppy seeds. Add the wet ingredients to the dry, and mix until combined.

Turn dough out onto baking sheet and pat dough into a rectangle about ½” thick ( approximately 6″ x 7 ½”.   The dough will be a bit dry and crumbly, but can be pressed together.

Brush egg wash on top and on sides of the dough.  Bake for 20 minutes or until the top and sides are lightly browned. Remove from the oven, but do not turn off the heat.

Place baking sheet on a wire rack and allow to cool for 10 minutes. Once the dough is cool enough to touch, cut into 1″ thick slices using a sharp knife. Cut these 1″ slices in half, making a horizontal slice down the center. Set slices cut sides up on the baking sheet. Return to the oven to bake for 6 minutes. Remove from oven, turn biscotti over, and bake the other side for 6 more minutes.

Remove from the oven and allow to cool for 3 minutes on the baking sheet (cookies will become crunchy as they cool). Transfer biscotti to a wire rack to cool completely.

Store biscotti in an airtight container for up to 2 weeks or in freezer for up to 3 months.

Enjoy dunking this delicious treat in a cup of your favorite coffee, tea, or hot cocoa!

Cheers & Hugs,
Jodi

Chocolate and Raspberry Custard Dessert in a Jar

chocolate and raspberry custard in a jar dessert

We celebrated my youngest son, Nick’s birthday yesterday.  I was excited to try to recreate a recipe he recently had and loved at Firebird’s Wood Fired Grill restaurant a month or so ago while traveling.

chocolate and raspberry custard in a jar dessert 2

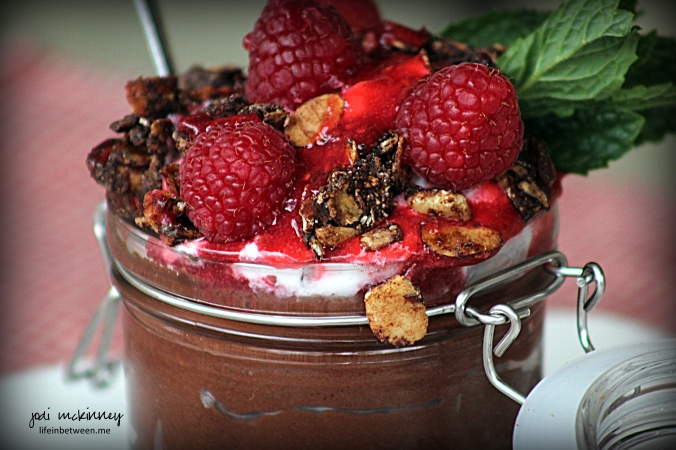
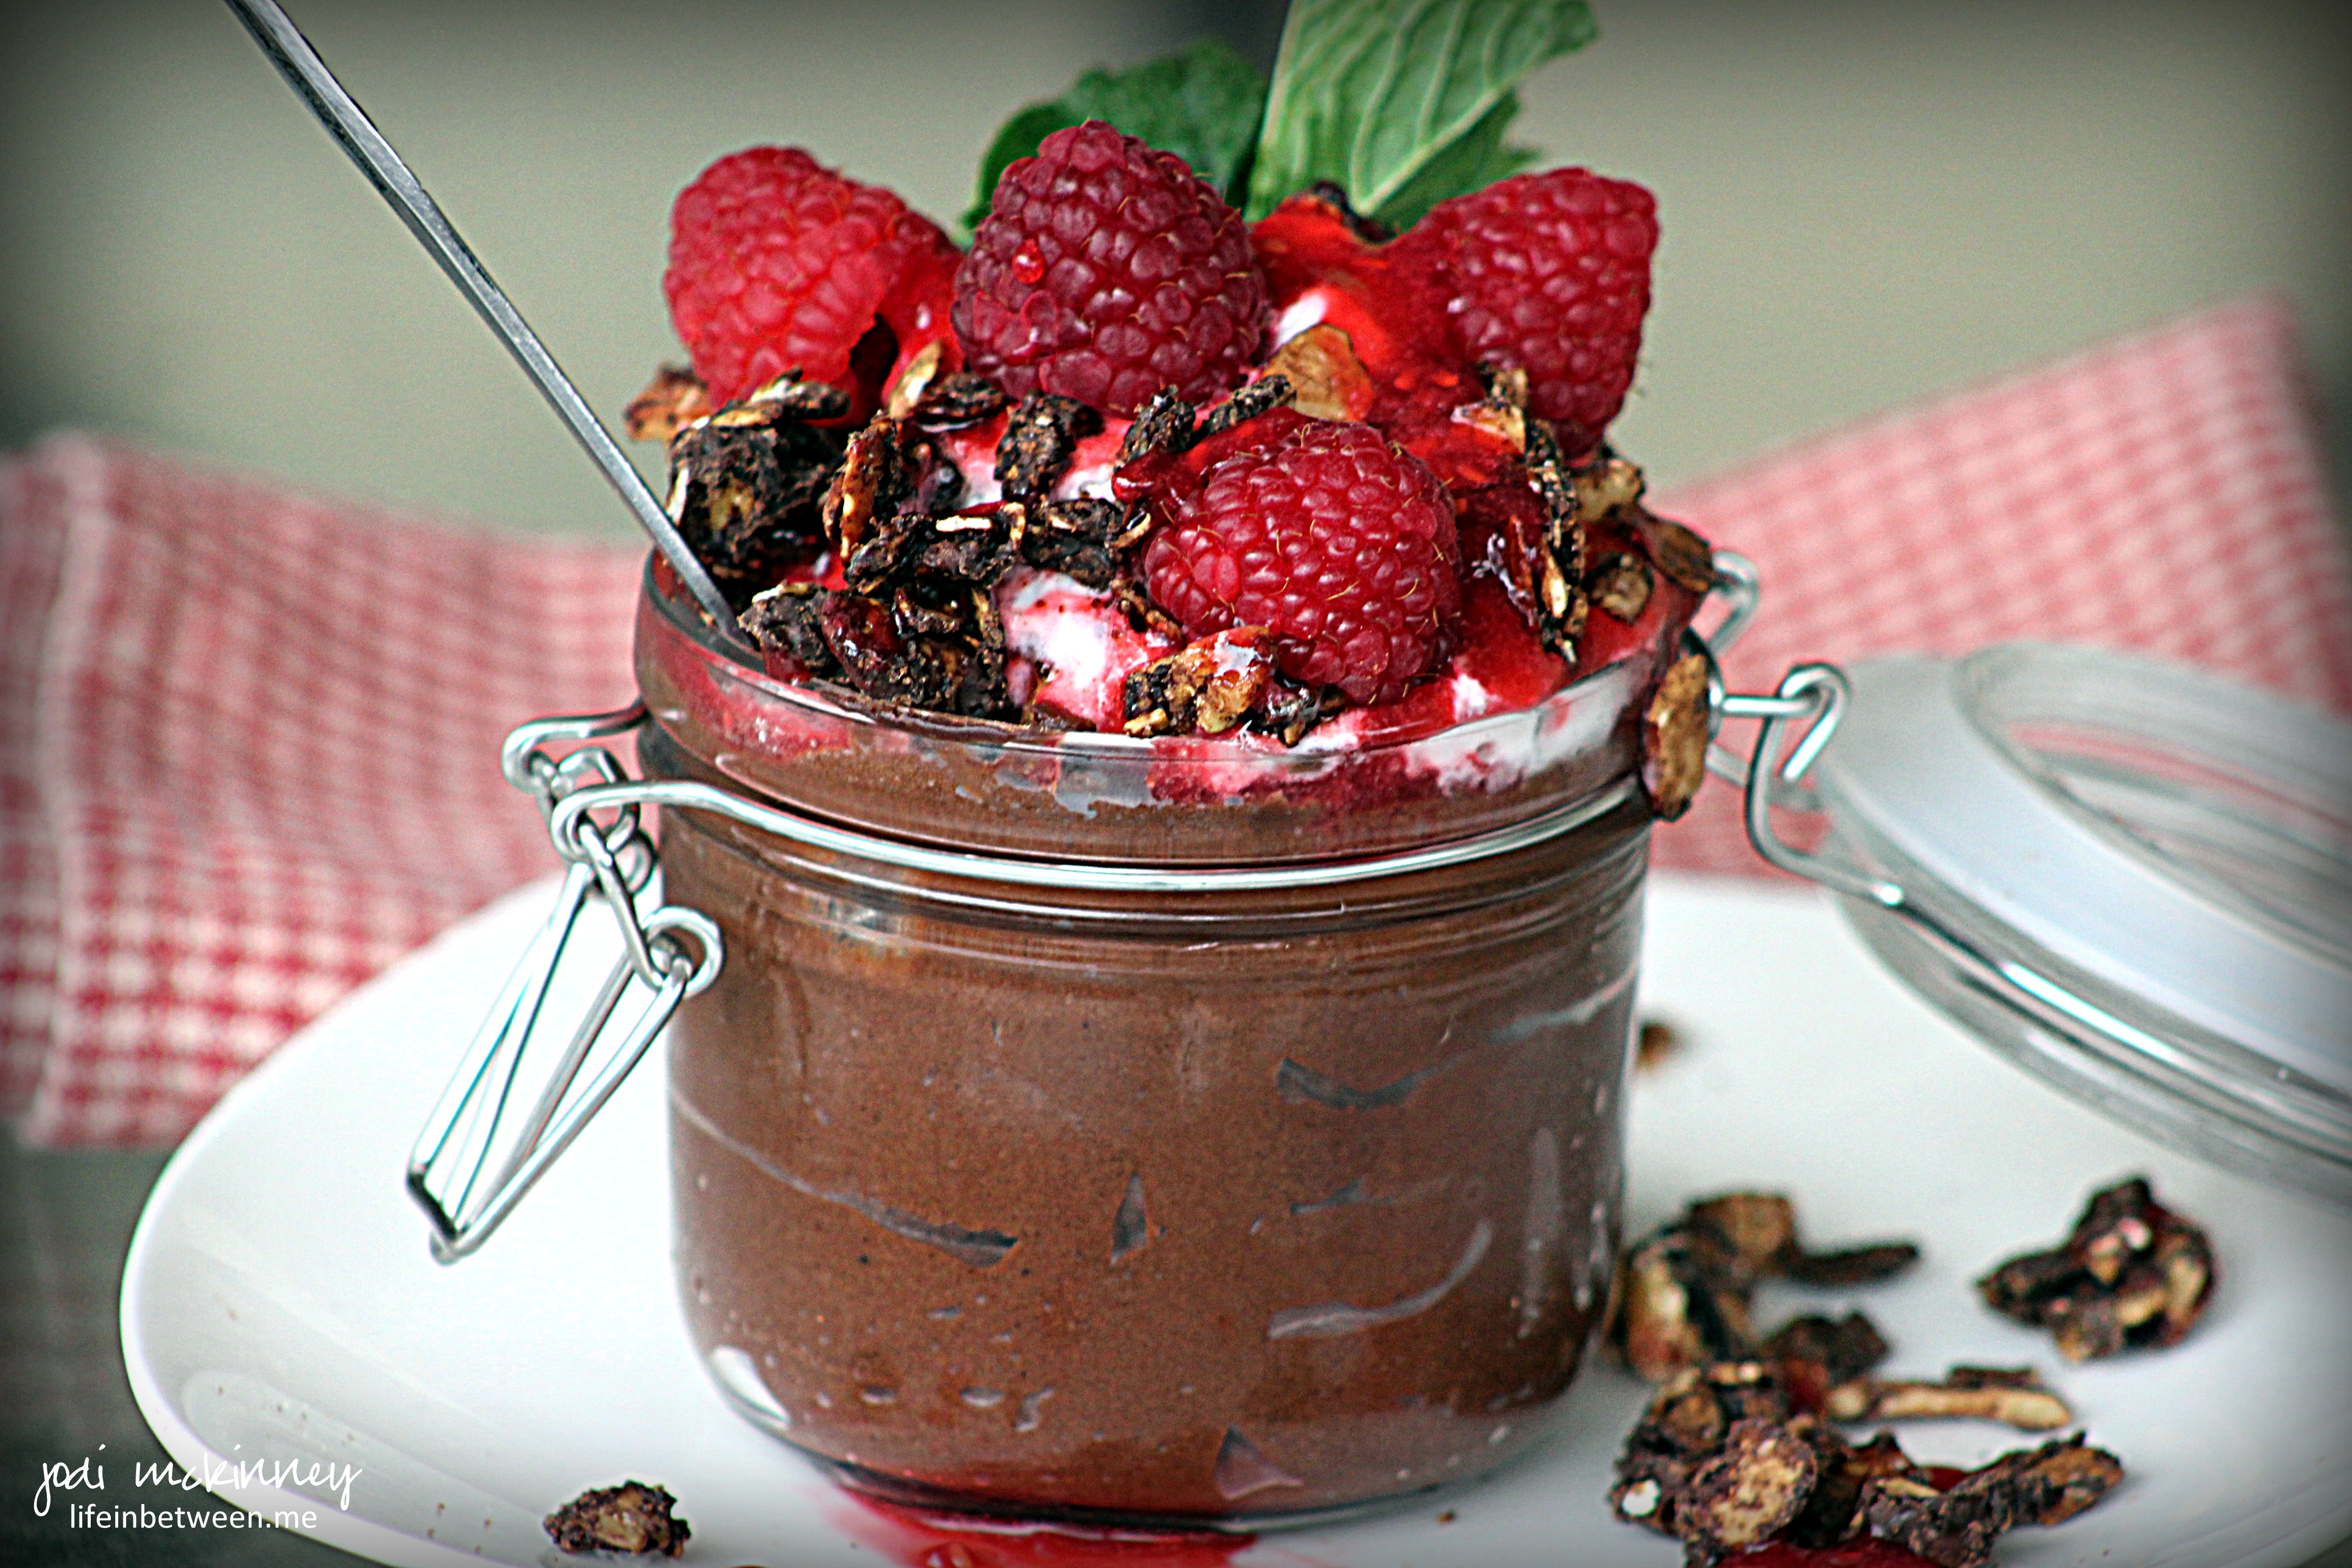
So instead of a birthday cake this year, I made these beautiful, decadent treats for his dessert.  He loved it and said I aced it.  Momma’s heart is happy.  This dessert is beautiful and delicious and will make any occasion special.

It is so worth the time to create a magical, delicious dessert.  And the beauty of it is that it can be made a day ahead of time and assembled right before you serve it for an amazing treat.

I know there is someone on your “list” who would do almost anything for one of these!

Chocolate and Raspberry Custard in a Jar

Ingredients:chocolate and raspberry custard in a jar dessert

1 cup heavy cream
2 cups semi-sweet chocolate chips
1 cup milk
1 cup Greek yogurt
1 – 2.35 oz pkg instant chocolate pudding mix
4 oz raspberry sauce (made by straining fresh 6 oz raspberries through a sieve with 1 Tbsp sugar)
16 fresh raspberries for garnish
chocolate granola for topping (recipe follows)
Whipped cream
4 – 6oz Mason jars

Directions:

Place heavy cream in pot on medium high heat, and bring to a boil. Turn off heat, and add chocolate chips.  Whisk until smooth and chocolate is completely melted. Set aside and cool to room temperature.  Reserve 1/2 cup of the chocolate ganache.  Mix milk, yogurt and remaining chocolate ganache (other than 1/2 cup) in a mixing bowl. Stir in the pudding mix until fully incorporated.  Pour 5 oz. of custard into each Mason jar or dessert dish.  Top with  1oz reserved ganache per jar.  Cover and refrigerate for at least 30 minutes or overnight.  Top with raspberry sauce, vanilla whipped cream, fresh raspberries and chocolate granola.  Garnish with a fresh sprig of mint.

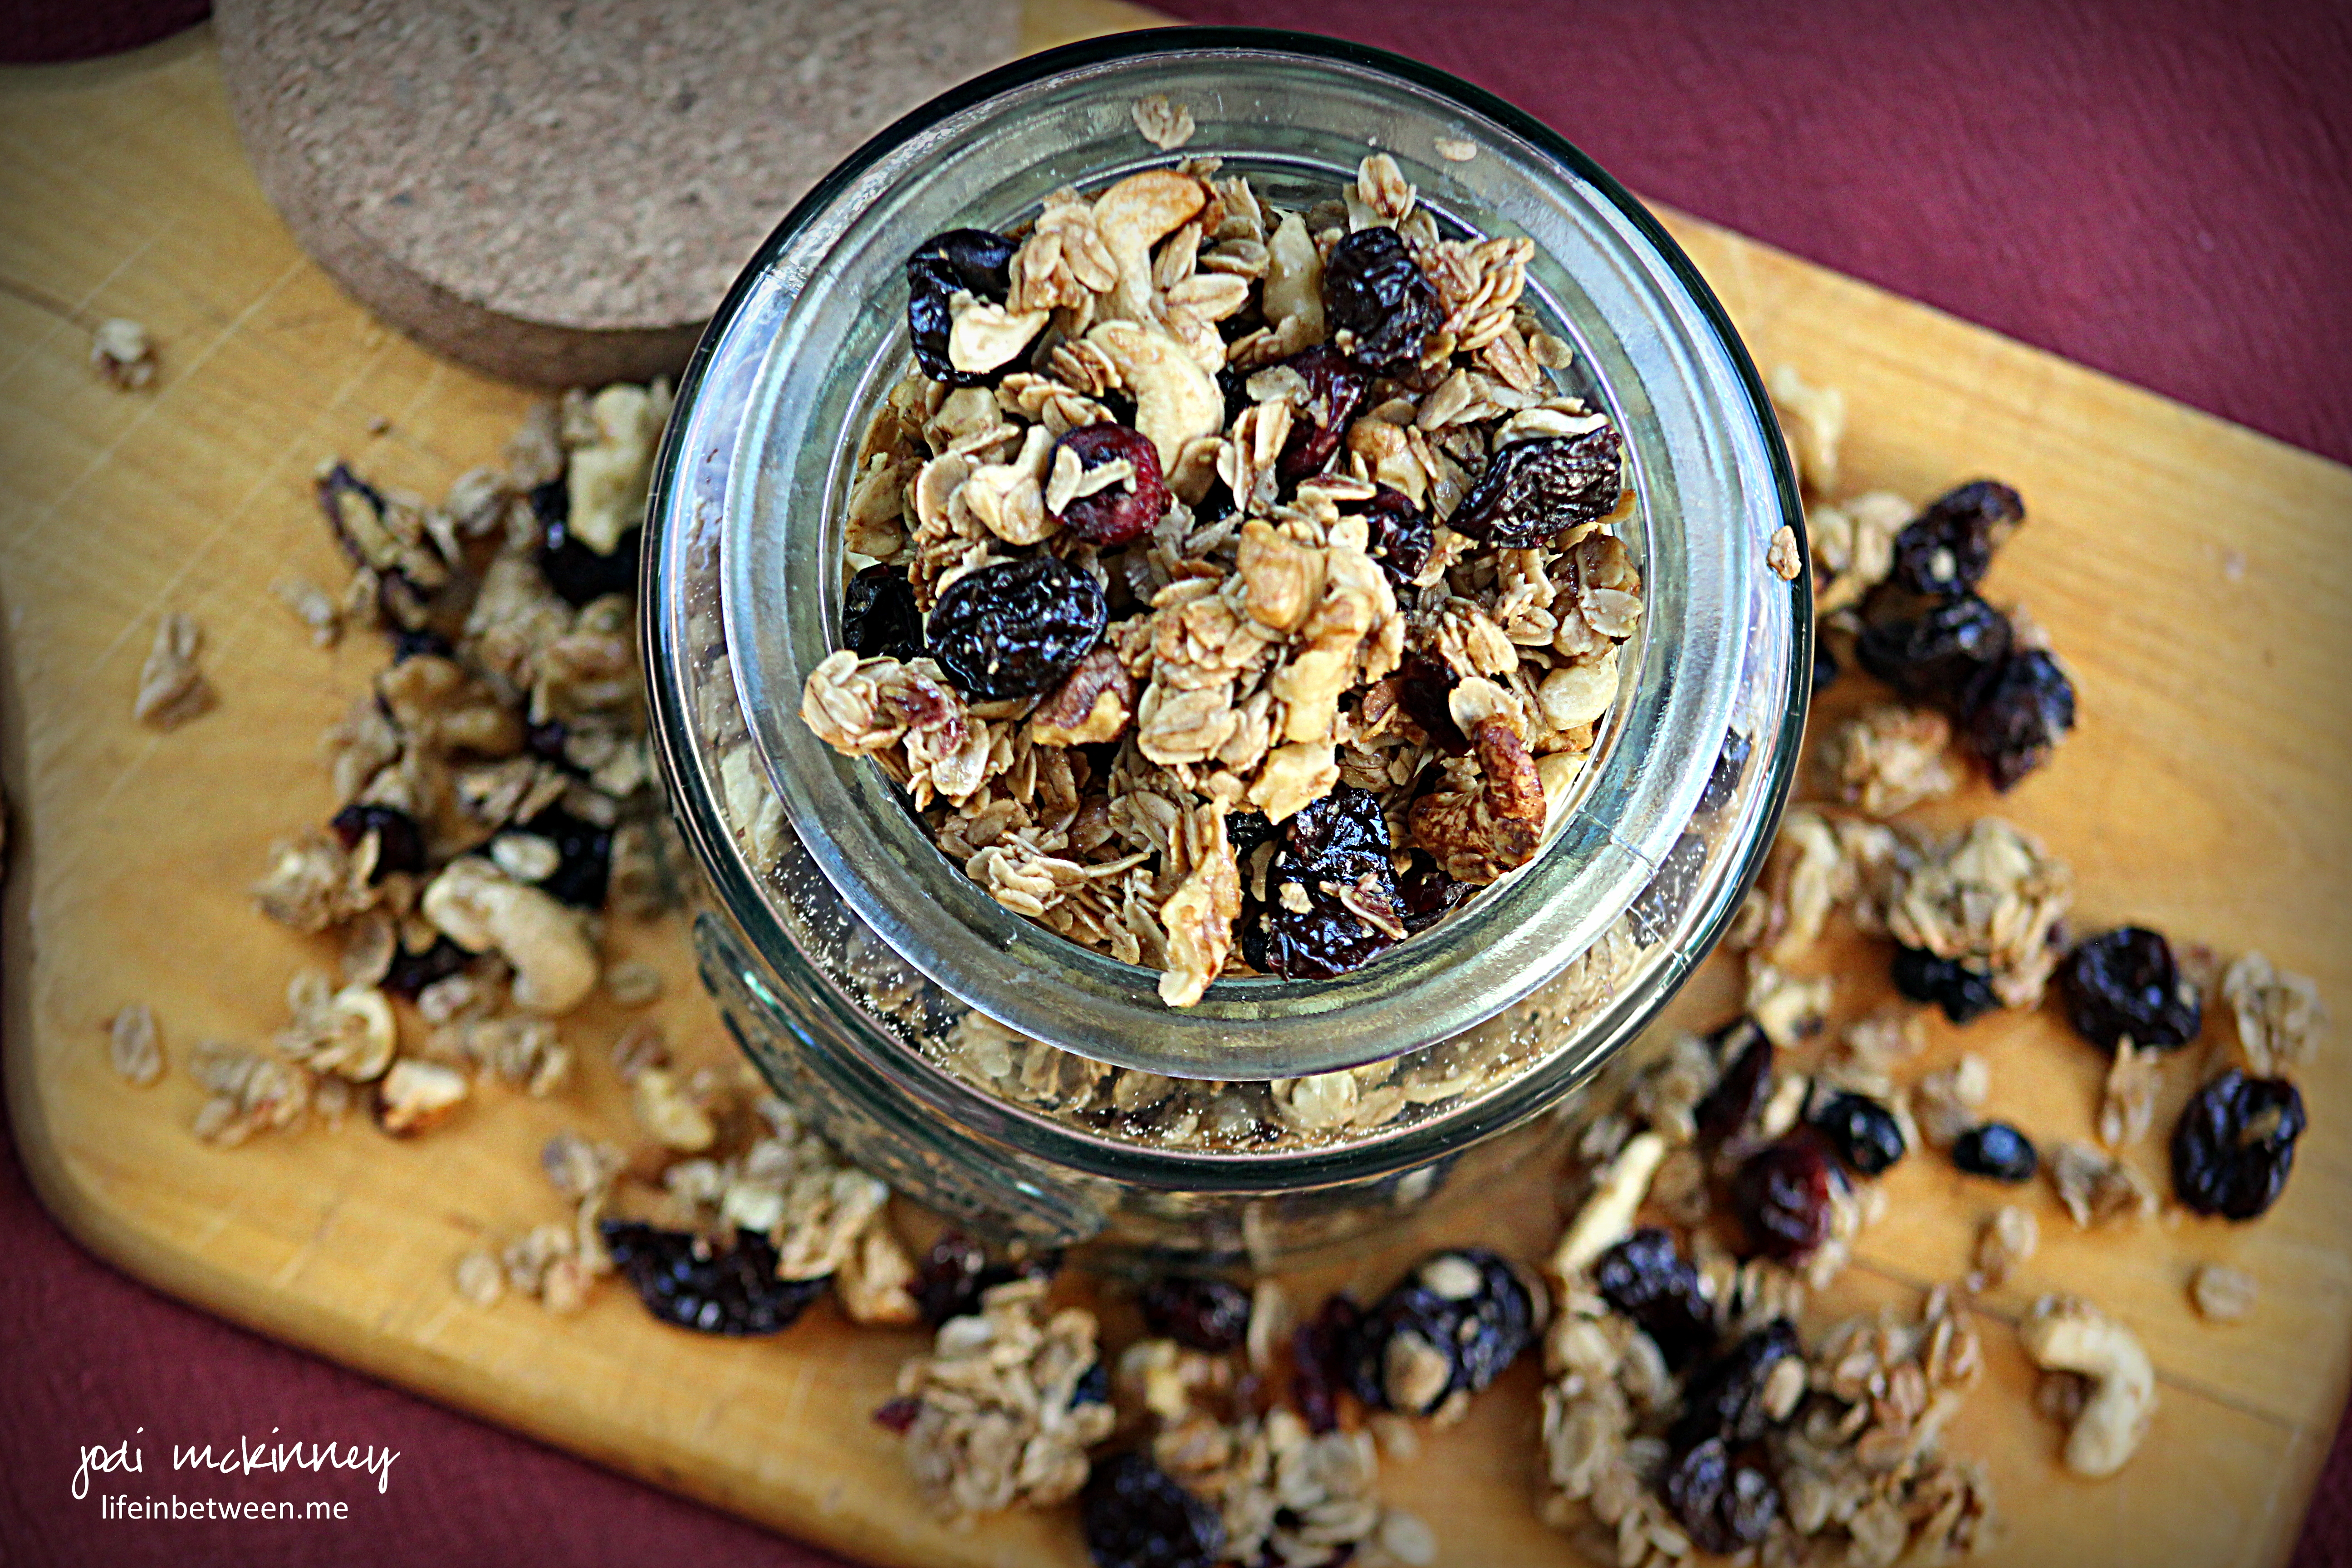
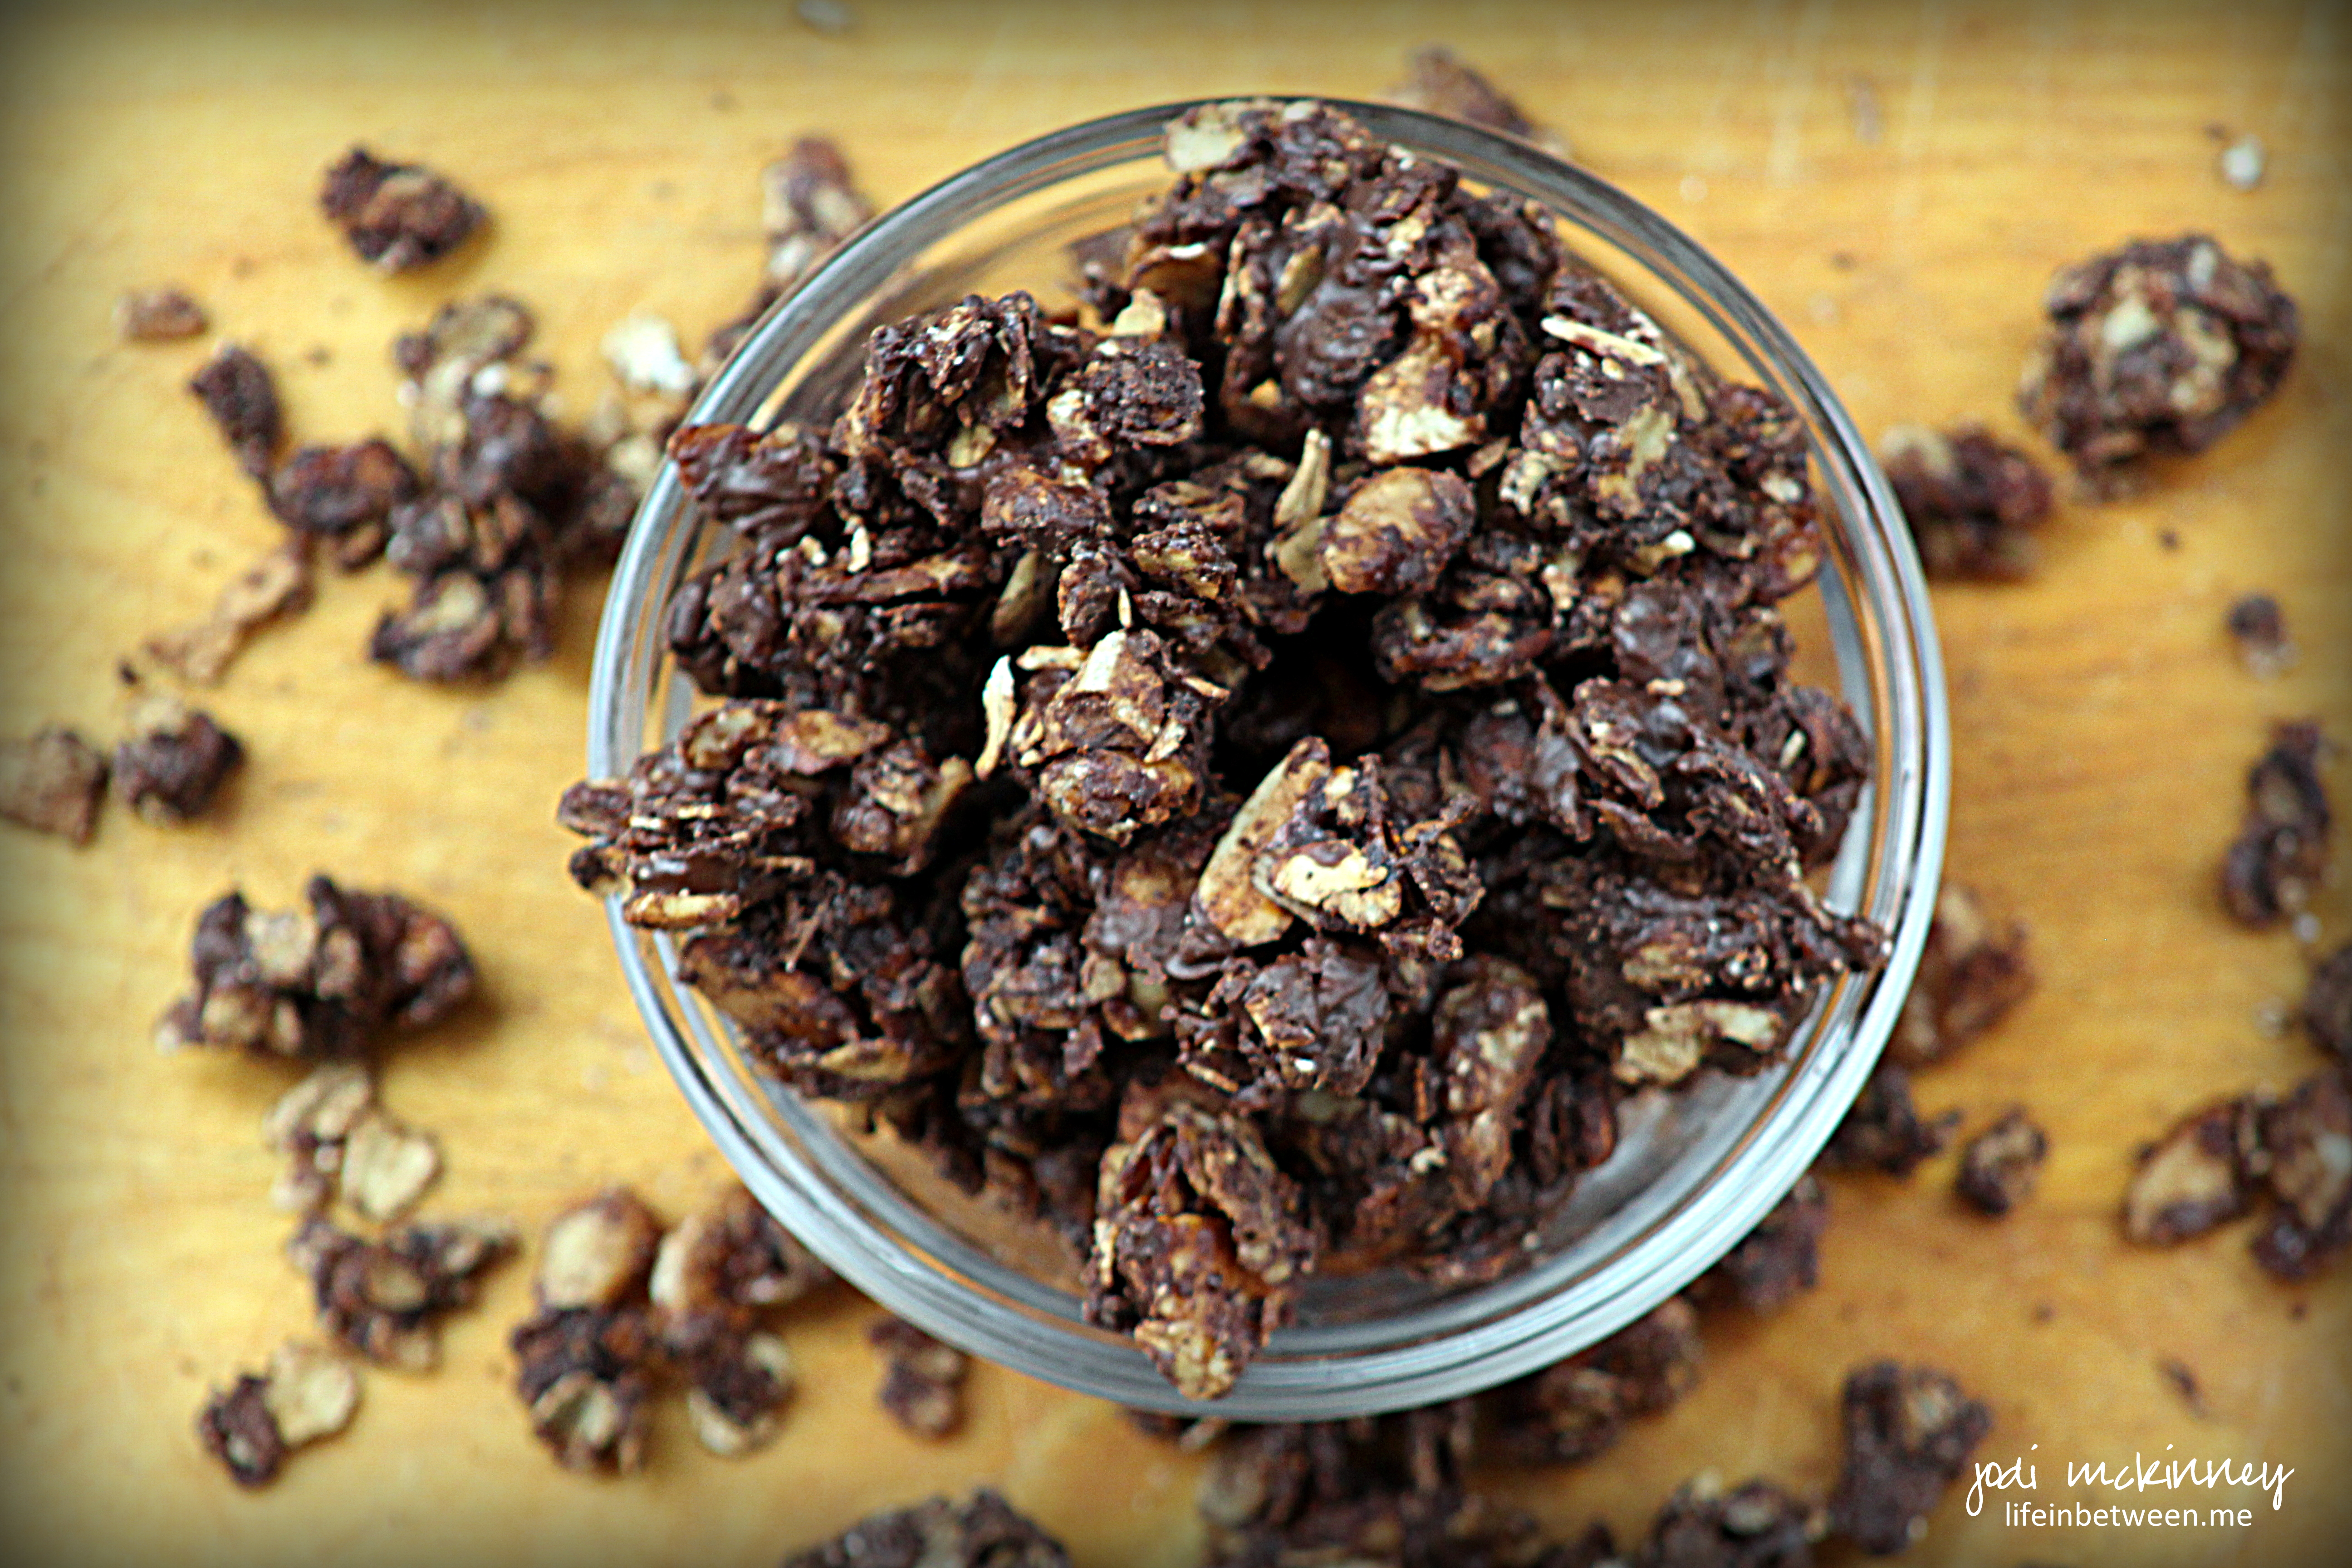
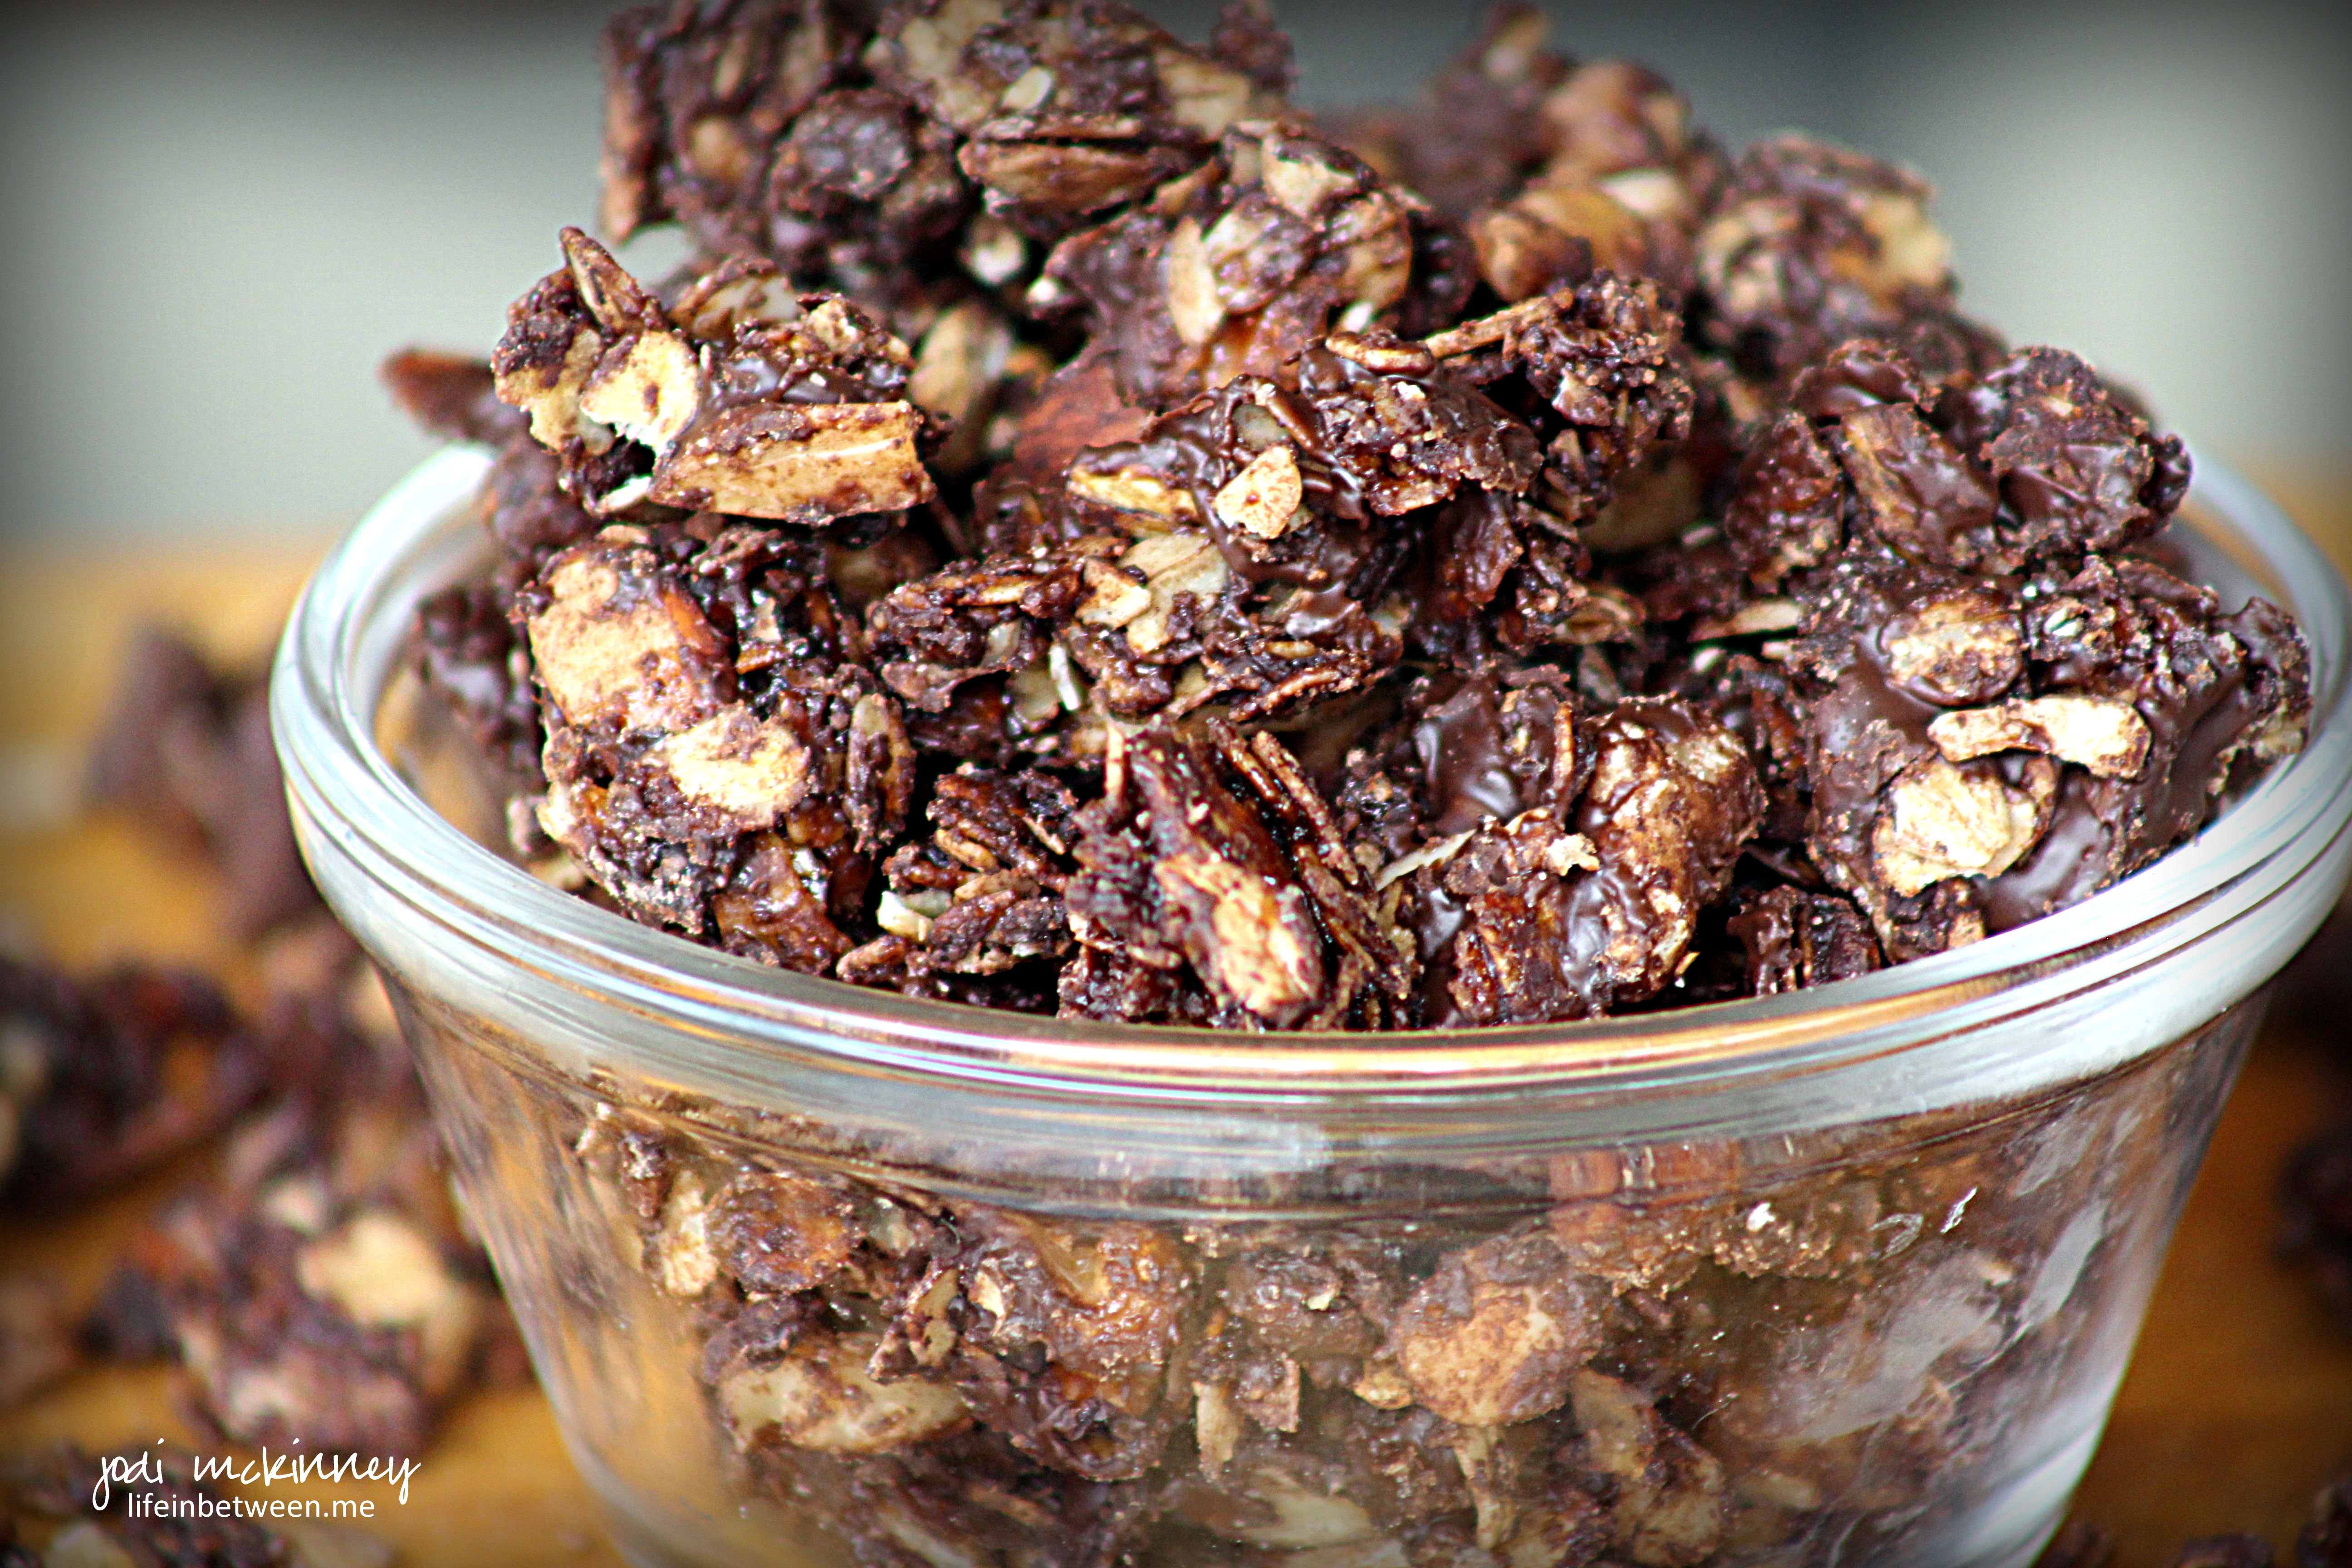
And the chocolate granola….

O M G!

This is a treat in and of itself!

I might be able to live on just this.

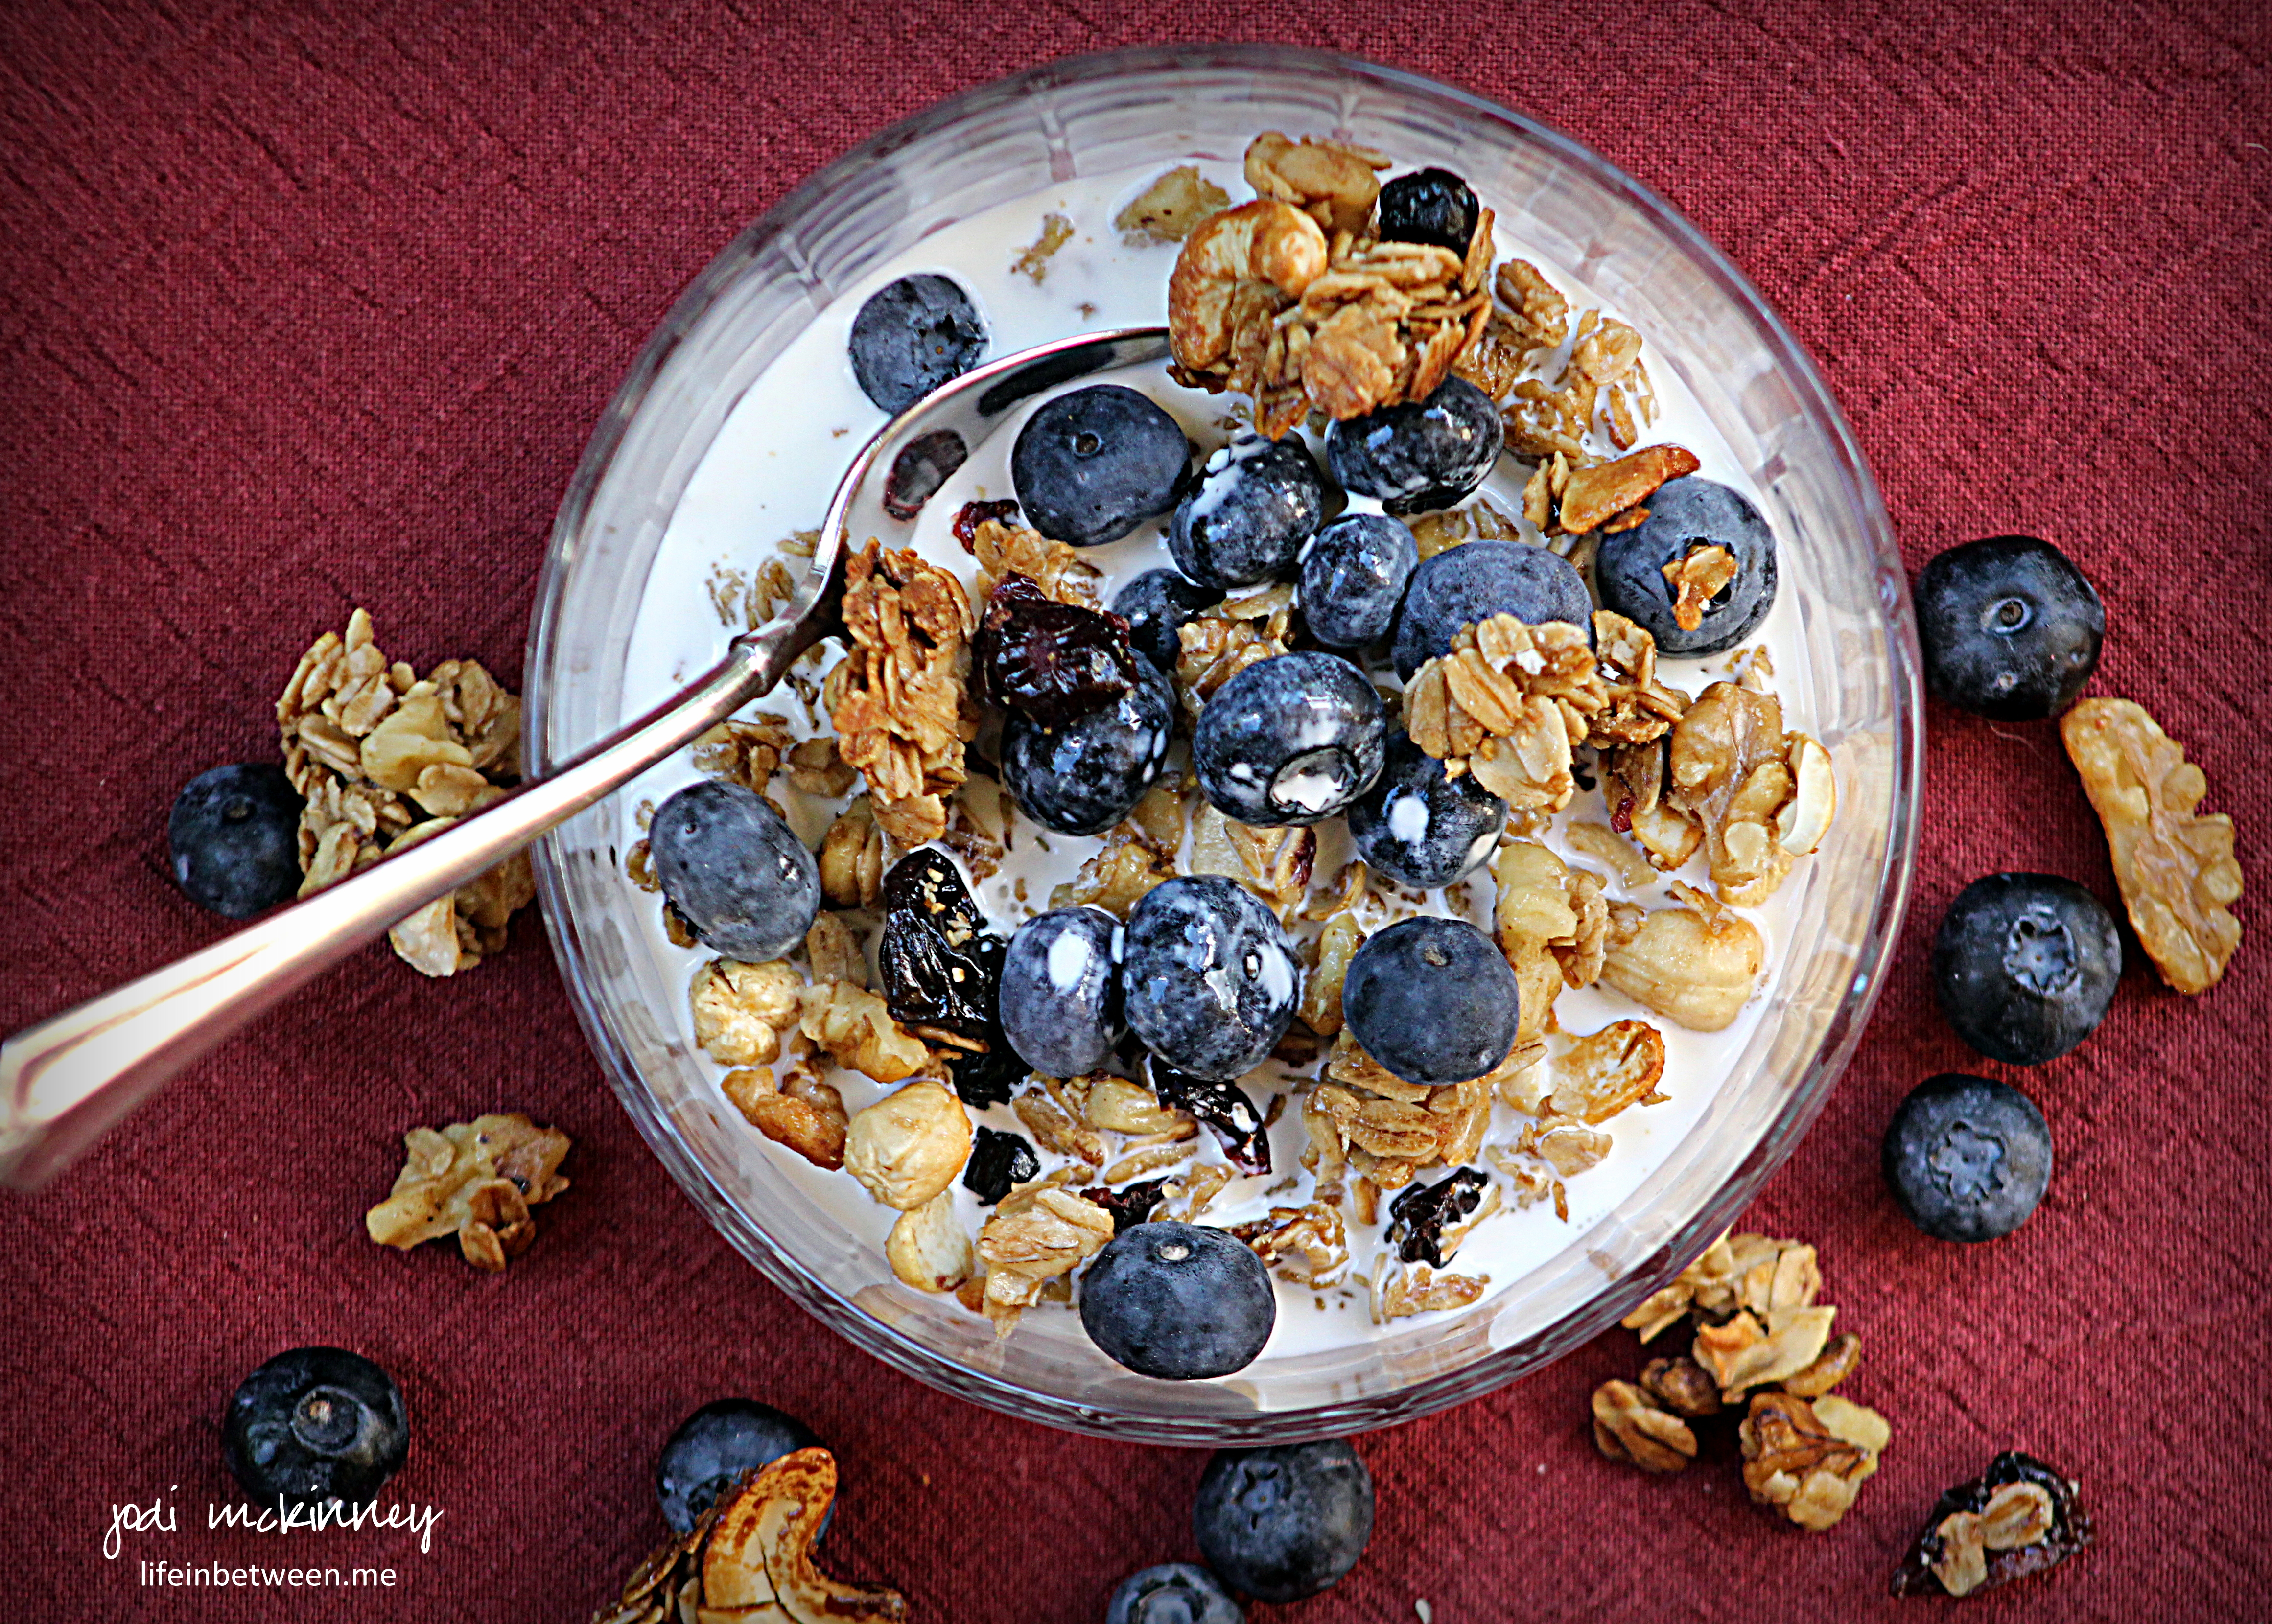
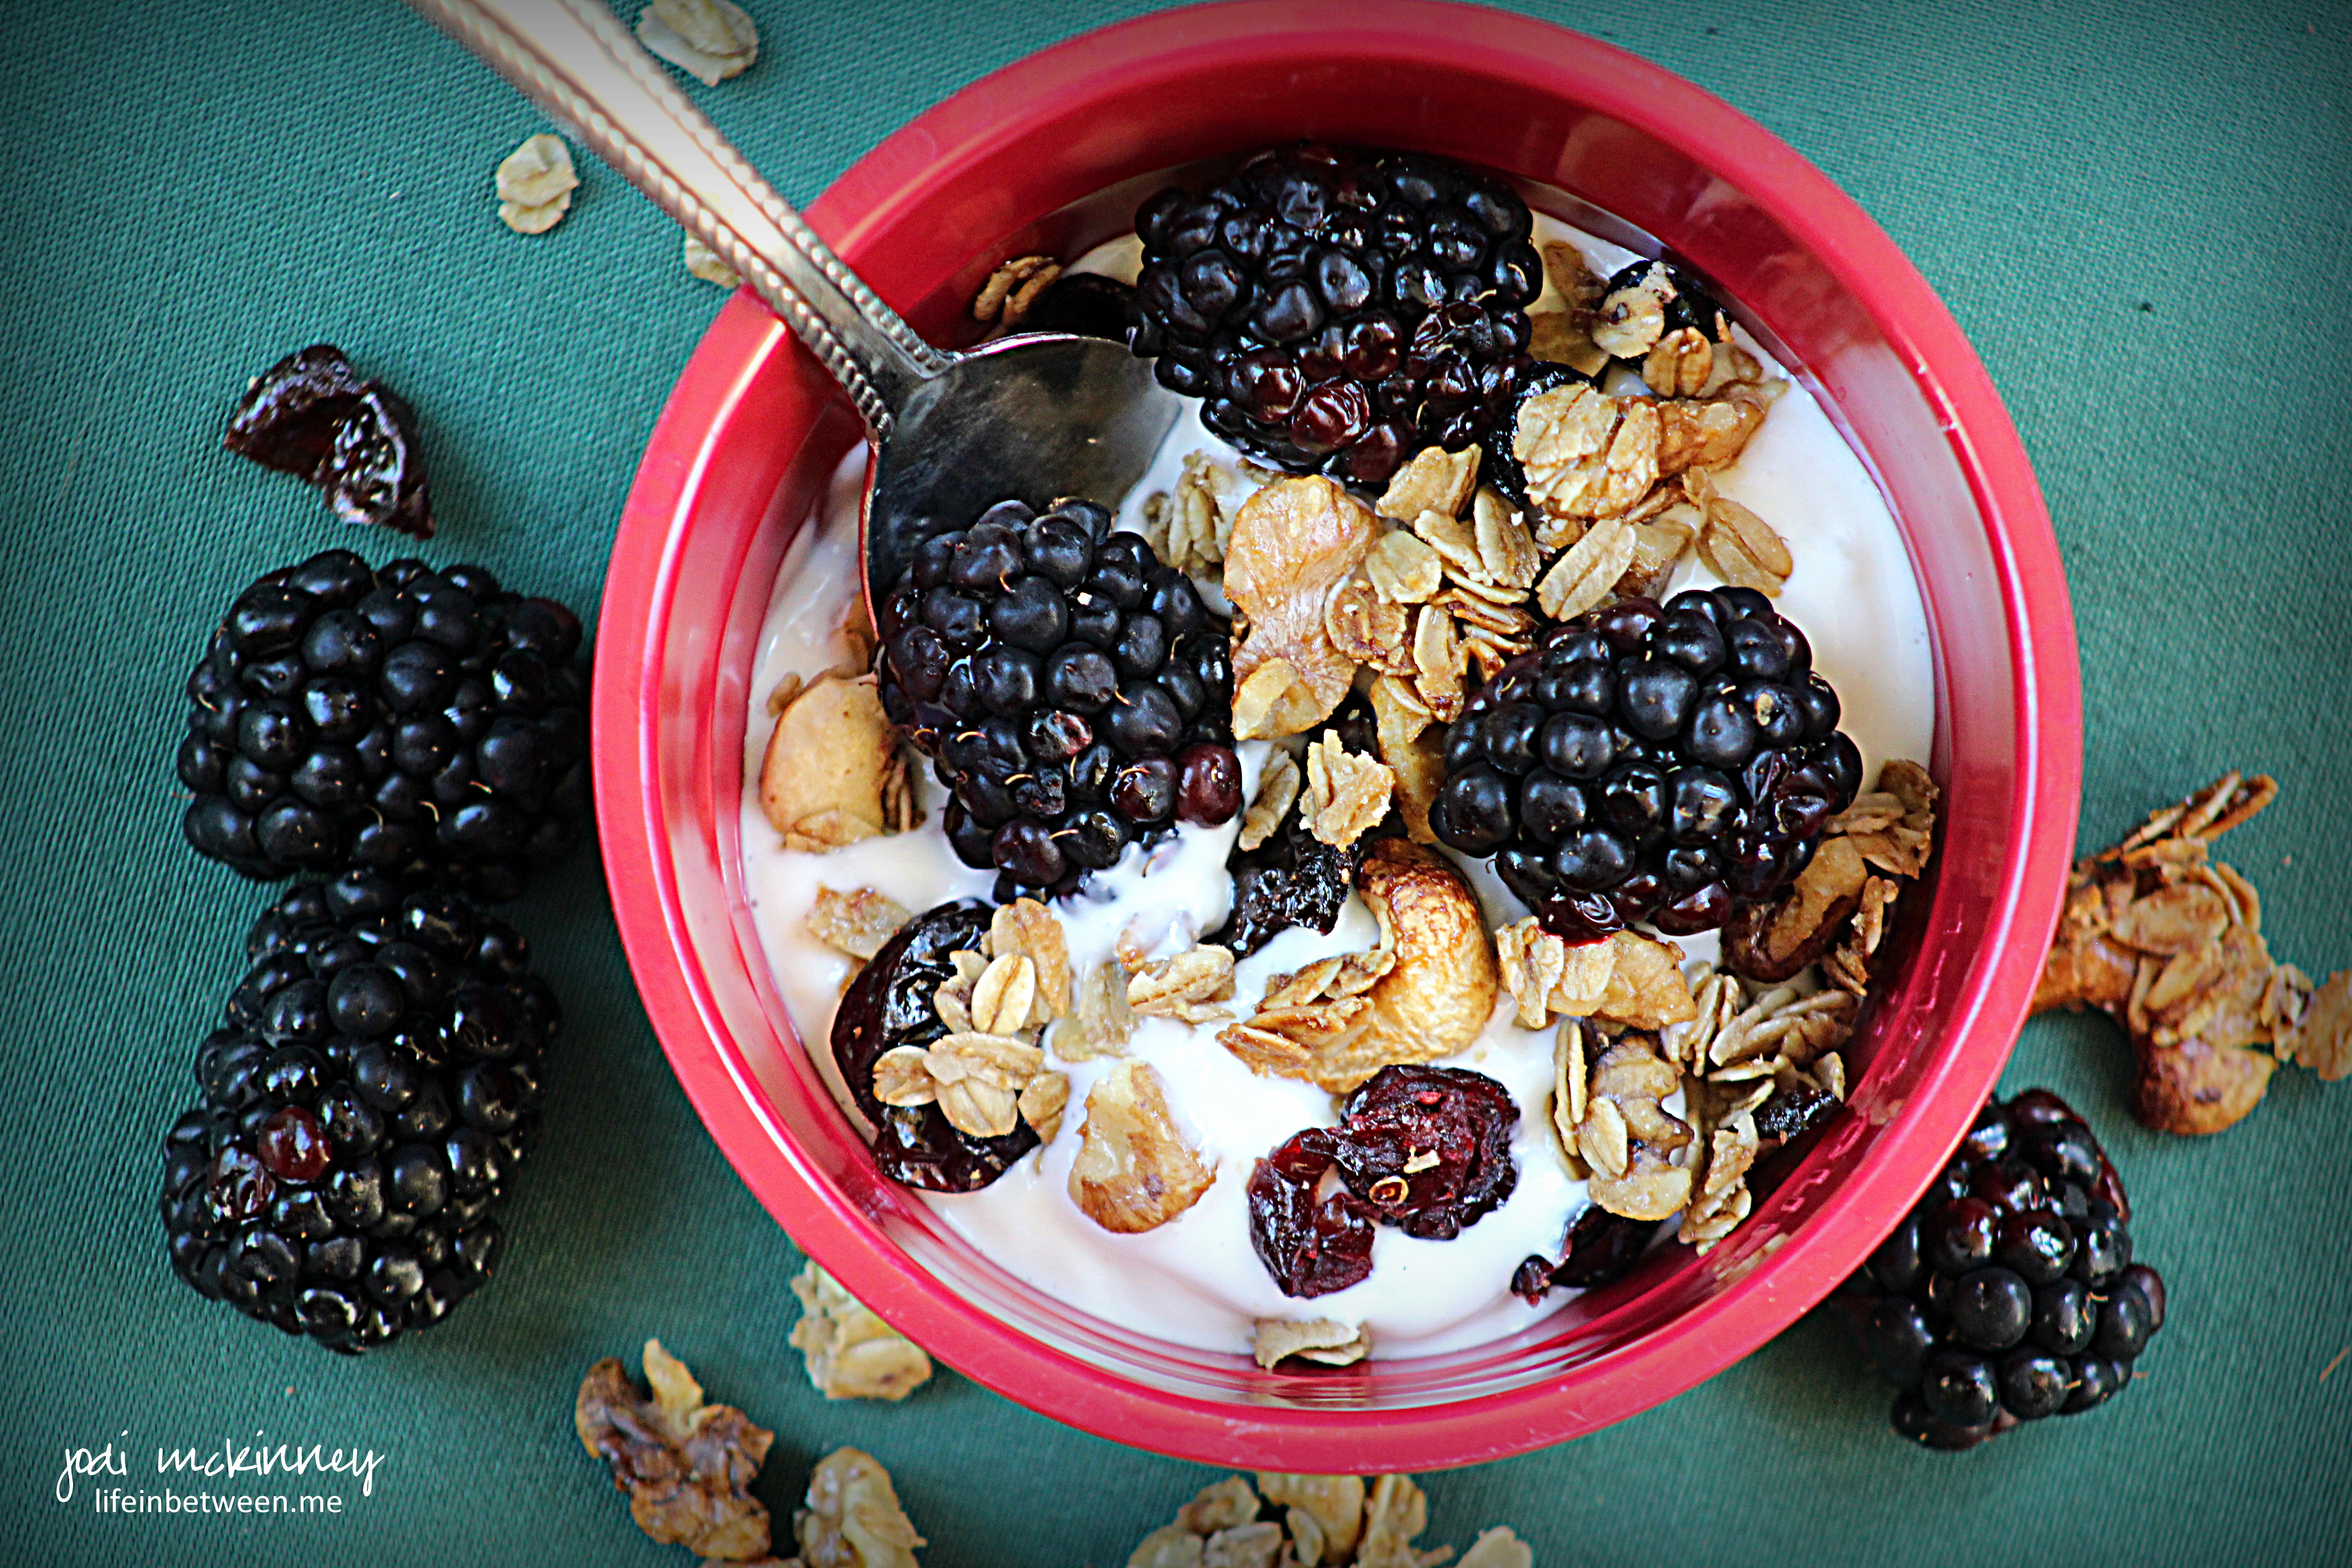
Make it to accompany the Chocolate and Raspberry Custard in a Jar Dessert or to top yogurt , ice cream, or to just toss in your mouth as a yummy snack.

chocolate granola

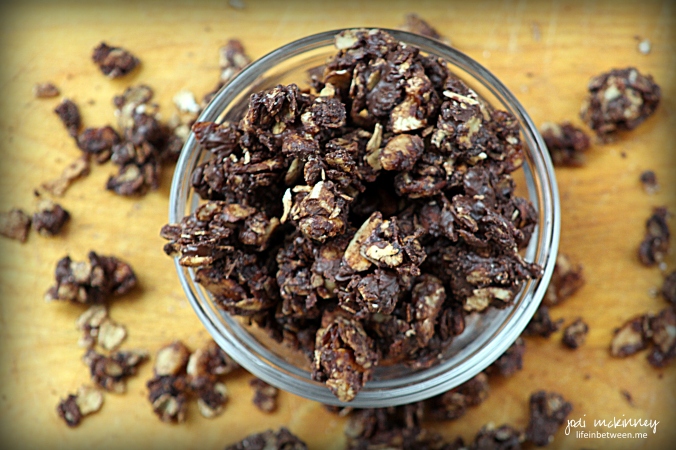
Oats and almonds and walnuts coated with cocoa and agave nectar and drizzled with semi-sweet chocolate….

Heaven in a bite!

chocolate granola 2

Chocolate Granola

Ingredients:chocolate granola
2 cups of Old Fashioned Oats
1 Cup of Sliced (or slivered) Almonds
1 Cup of Chopped Walnuts
1/4 cup of Unsweetened Cocoa Powder
1/3 cup Sugar
1/4 cup of Agave Nectar (you can also use Maple Syrup)
1/4 cup  Butter
1/2 cup Semisweet Chocolate Chips

Directions:

 Preheat the oven to 300 degrees.

In a small saucepan, melt agave nectar and butter on medium-low heat.

In a large bowl, combine oats, nuts, cocoa, sugar and melted butter mixture to coat well.

Spread the mixture in a single layer on a baking stone or sheet, and bake for 40 minutes, stirring every 10 minutes.

Remove from oven and sprinkle chocolate chips evenly over the top.

Allow mixture to cool completely.  Serve over Chocolate and Raspberry Custard Dessert, ice cream, yogurt, or enjoy as a snack.

Adapted from a recipe from Laura in the Kitchen

And here is the birthday “boy” with his birthday dessert.

Nick 26

Happy Birthday Nick!  You have made the past 26 years more joyful than you will ever know.  I wish you love and happiness and as much chocolate and raspberry custard as your heart desires.

Cheers & Hugs,
Jodi

Hand Painted Snowman Mugs

painted snowman mug 2

One of our Christmas celebrations last week was our annual McHendy Christmas get-together.

For this celebration, I painted some snowmen mugs and filled them with Rolo chocolate caramel candies, mini marshmallows, and the recipe for Rolo Hot Chocolate that I featured here a few weeks ago to give to everyone.

painted snowman mug

On white ceramic mugs purchased from the Dollar Store, I painted little snowman coal eyes and carrot noses with Sharpie Oil Based Paint Markers on one side, and wrote McHendy Mug and the year on the other.

painted snowman mug 3

After painting them all, I let them cure for 24 hours.  I then placed them in a cold oven, set the temperature for 350 degrees F and “baked” for 30 minutes.  I turned the oven off after 30 minutes and let them cool completely in the oven without opening it.  I hope this works as it is the first time I tried.  They are supposed to be able to go through the dishwasher.

Wondering what a McHendy Christmas Celebration is?

Well – when you take two besties and their families that have so much love they actually form one big family, you combine their last names to create a new one.

jill and jodi mchendy christmas 2015

And you celebrate every year watching the “kids” grow, marry and add to the family, and count your blessings dearly!

Mchendy family 2015

My BFF Jill not only had these shirts printed for all the McHendys this year, she even created the McHendy family crest, which is full of love and meaning to both of our families.

McHendy crest

We can be born into families, and we can be loved into families.  No matter which way it happens, celebrate it, and cherish the moments!

Cheers & Hugs,

Jodi


Wooden Log Snowmen

Wooden log snowmen christmas 2015

I love making and giving handmade DIY Christmas and holiday gifts, so when I saw a similar snowman project created from logs, I fell in love with the idea and convinced hubby we should make these.

He was a real trooper and really did the hard work.  He gathered, cut, and sanded the logs, drilled holes and assembled them with dowel rods and glue.

I broke out the sewing machine and created little fleece hats and scarves.

And Voila!

Stinking cute primitive wooden log snowmen!

Wooden log snowmen christmas 2015 2

We were thrilled with how they turned out, made about 15 of them, and had so much fun giving them away.

Handmade with love from both of us and sharing a little piece of our woods.

Cheers & Hugs,

Jodi